“ZabbixManual1.4/Installation/zh”的版本间的差异
来自Ubuntu中文
(→存储要求) |
(→硬件配置的范例) |
||
| (未显示1个用户的40个中间版本) | |||
| 第18行: | 第18行: | ||
---- | ---- | ||
| − | ==== CPU | + | ==== CPU 要求 ==== |
| − | ZABBIX | + | ZABBIX,特别是 ZABBIX 数据库可能要求大量的 CPU 资源,这有赖于监控参数的数量以及所选数据库的引擎。 |
| − | ==== | + | |
| − | + | ==== 其他硬件 ==== | |
| − | ==== | + | 为使用Zabbix 内建的 SMS 通知,要求使用一个串行通信口和一个串行 GSM 调制器。 |
| − | + | ||
| + | ==== 硬件配置的范例 ==== | ||
| + | 下表提供了一些硬件配置: | ||
{| | {| | ||
|- | |- | ||
| − | |Name|| | + | |Name||操作系统||CPU/内存||数据库||被监测主机数 |
|- | |- | ||
| − | | | + | |小型||Ubuntu Linux||P2 350MHz/256MB||MySQL MyISAM||20 |
|- | |- | ||
| − | | | + | |中型||Ubuntu Linux 64 bit||AMD Athlon 3200+/2GB||MySQL InnoDB||500 |
|- | |- | ||
| − | | | + | |大型||Ubuntu Linux 64 bit||Intel Dual Core 6400/4GB/RAID||MySQL InnoDB or PostgreSQL||>1000 |
|- | |- | ||
| − | |Very large||RedHat Enterprise||Intel Xeon 2 CPU/8GB/RAID||MySQL | + | |Very large||RedHat Enterprise||Intel Xeon 2 CPU/8GB/RAID||MySQL InnoDB or PostgreSQL||>10000 |
|} | |} | ||
---- | ---- | ||
| − | + | 注意: 实际配置特别有赖于激活监测项的数目以及刷新率。It is recommended to keep database engine on a separate box for large installations. | |
---- | ---- | ||
| − | |||
| − | |||
| − | ZABBIX | + | === 支持的操作系统 === |
| + | 出于监测服务器的安全需求和对关键任务的判断,Unix 是唯一能够持续提供必要的性能、容错能力以及恢复能力的操作系统。ZABBIX 支持目前市场上的主流版本。 | ||
| + | |||
| + | ZABBIX 在以下操作系统中测试过: | ||
* AIX | * AIX | ||
* FreeBSD | * FreeBSD | ||
| 第53行: | 第56行: | ||
---- | ---- | ||
| − | + | 注意: ZABBIX 也可能在其它的类 Unix 操作系统中良好运行。 | |
---- | ---- | ||
| − | |||
| − | |||
| − | + | === 软件需求 === | |
| + | ZABBIX 是基于最新的 Apache Web 服务器、主流的数据库引擎以及 PHP 脚本语言编译的。 | ||
| + | |||
| + | 运行 ZABBIX 需要下列软件: | ||
{| | {| | ||
|- | |- | ||
| − | | | + | |软件||版本||说明 |
|- | |- | ||
| − | |Apache||1.3.12 | + | |Apache||1.3.12 或以后版本|| |
|- | |- | ||
| − | |PHP||4.3 | + | |PHP||4.3 或以后版本|| |
|- | |- | ||
| − | |PHP | + | |PHP 模块: |
php-gd | php-gd | ||
php-bcmath | php-bcmath | ||
| − | |4.3 | + | |4.3 或以后版本 |
| − | |PHP GD | + | |PHP GD 模块必须支持 PNG 图片 |
|- | |- | ||
|MySQL | |MySQL | ||
php-mysql | php-mysql | ||
| − | |3.22 | + | |3.22 或以后版本||使用 MySQL 作为 ZABBIX 后台数据库时被要求 |
|- | |- | ||
|Oracle | |Oracle | ||
php-sqlora8 | php-sqlora8 | ||
| − | |9.2.0.4 | + | |9.2.0.4 或以后版本||使用 Oracle 作为 ZABBIX 后台数据库时被要求 |
|- | |- | ||
|PostgreSQL | |PostgreSQL | ||
php-pgsql | php-pgsql | ||
| − | |7.0.2 | + | |7.0.2 或以后版本 |
| − | | | + | |使用 PostgreSQL 作为 ZABBIX 后台数据库时被要求。使用 PostgreSQL 8.x 或以后版本以获取更好的性能。 |
|- | |- | ||
|SQLite | |SQLite | ||
php-sqlite3 | php-sqlite3 | ||
| − | |3.3.5 | + | |3.3.5 或以后版本||使用 SQLite 作为 ZABBIX 后台数据库时被要求 |
|} | |} | ||
---- | ---- | ||
| − | + | 注意: ZABBIX 在使用 Apache、MySQL、Oracle 或 PostgreSQL 的以前版本也可能正常运行。 | |
---- | ---- | ||
| − | WEB | + | === 客户端 WEB 浏览器 === |
| − | + | 要求支持 HTML 和 PNG 图片。MS Explorer(5.xx 和 6.xx)以及 Mozilla 1.x 上运行正常。必须支持 Cookies 和 JavaScript。其它浏览器也能支持 Zabbix | |
| − | === | + | === 数据库引擎的选择 === |
| − | ZABBIX | + | ZABBIX 支持四种数据库引擎: |
* MySQL | * MySQL | ||
* Oracle | * Oracle | ||
| 第105行: | 第109行: | ||
* SQLite | * SQLite | ||
| − | + | 每种数据库引擎都有它自己的优势,我们不好说哪一种最好。 | |
| − | + | 选择数据库引擎主要看以下几个方面: | |
| − | * | + | * 您硬件的性能 |
| − | * | + | * 自由或商业的数据库引擎 |
| − | * | + | * ZABBIX 服务器的繁忙程度 |
| − | + | 下表为选择数据库引擎提供一般性的建议 | |
{| | {| | ||
|- | |- | ||
| − | | | + | |ZABBIX 服务器的用途||选择的数据库引擎 |
|- | |- | ||
| − | | | + | |重负载节点/单机||MySQL MyISAM |
|- | |- | ||
| − | | | + | |轻负载节点/单机 |
|PostgreSQL | |PostgreSQL | ||
MySQL MyISAM | MySQL MyISAM | ||
|- | |- | ||
| − | | | + | |远程零管理节点 |
|PostgreSQL | |PostgreSQL | ||
SQLite | SQLite | ||
|- | |- | ||
| − | | | + | |单独轻负载||MySQL MyISAM |
|} | |} | ||
| − | === | + | === 时间同步 === |
| − | + | 对于运行 Zabbix 的服务器来说拥有精确的系统时间是十分重要的。Timed 是最通用的守护进程之一,以同步主机与其他机器的时间。 | |
| − | == | + | == 组件 == |
| − | === ZABBIX | + | === ZABBIX 组件 === |
| − | + | Zabbix 包含了几个重要的组件,其功能大致说明如下: | |
| − | === ZABBIX | + | === ZABBIX 服务器 === |
| − | + | 这是 Zabbix 软件的核心部分。服务器可以使用简单的服务检查来远程检查网络服务(如 Web 服务和 mail 服务),但它也是核心组件以便代理报告可用性以及完整的信息和状态。服务器是存放所有配置、状态和操作数据的中心库,同时它也是 Zabbix 软件中的实体,在被监测系统产生问题时主动向管理员报警。 | |
| − | + | Zabbix 可以执行无代理监测,同时也可以监测使用 SNMP 代理的网络设备。 | |
| − | === ZABBIX | + | === ZABBIX 代理 === |
| − | + | 为了主动监测网络系统上的本地资源和应用程序(如硬件、内存、处理器状态等),那些系统必须运行 Zabbix 代理。代理将从所运行的系统上收集可操作信息,并将这些数据报告给 Zabbix,以便做进一步处理。万一出现失败(如硬盘满或服务进程崩溃),Zabbix 服务器能主动向特定机器的管理员报告失败。 | |
| − | + | Zabbix 代理使用本地系统调用来收集统计信息,所以其效率是十分高的。 | |
| + | |||
| + | === Web 界面 === | ||
| + | 为了能够方便地访问监测数据,同时可以从任何地方和任何平台来配置 Zabbix,Zabbix 提供了基于 Web 的界面。该界面是 Zabbix 服务器的一部分,并且通常(但不必需)运行在与 Zabbix 服务器相同的物理机器上。 | ||
| − | |||
| − | |||
| − | |||
---- | ---- | ||
| − | + | 注意: 使用 SQLite 时,Zabbix 前端必须运行在相同的物理机器上。 | |
---- | ---- | ||
| − | == | + | == 从源安装 == |
| − | === | + | === 软件要求 === |
| − | + | 从源代码编译 Zabbix 服务器或代理需要其它软件。 | |
| − | + | 编译 ZABBIX 需要以下软件: | |
| − | ''' | + | '''下列数据库引擎之一:''' |
| − | '''MySQL | + | '''MySQL 头文件和库文件''' |
| − | + | 要求 3.22 或以后版本 | |
| − | '''Oracle | + | '''Oracle 头文件和库文件''' |
| − | Sqlora8 | + | 要求 Sqlora8 头文件或库文件 |
| − | '''PostgreSQL | + | '''PostgreSQL 头文件和库文件''' |
| − | + | 要求 7.0.2 或以后版本。 考虑使用 PostgreSQL 8.x 以获得更好的性能。 | |
| − | '''SQLite | + | '''SQLite 头文件和库文件''' |
| − | + | 要求 3.3.5 或以后版本 | |
---- | ---- | ||
| − | + | 注意: 通常做为 mysql-dev、postgresql-dev或sqlite3-dev 包的一部分。 | |
---- | ---- | ||
| − | '''NET-SNMP ( | + | '''NET-SNMP (或 UCD-SNMP) 头文件和库文件''' |
| − | + | 要求支持 SNMP,可选 | |
| − | '''Iksemel | + | '''Iksemel 头文件和库文件''' |
| − | + | 要求支持 Jabber 消息,可选 | |
| − | '''Libcurl | + | '''Libcurl 头文件和库文件''' |
| − | + | Web 监测模块需要,可选 | |
| − | '''C | + | '''C 编译器''' |
| − | C | + | 要求 C 编译器。 GNU C 编译器是开放平台的最好选择。其他(HP、IBM)的 C 编译器也许一样好用。 |
'''GNU Make''' | '''GNU Make''' | ||
| − | GNU make | + | 要求 GNU make 以便处理 Zabbix Make 文件 |
| − | === | + | === ZABBIX 发行版结构 === |
'''doc''' | '''doc''' | ||
| − | + | 包含本手册不同格式的目录 | |
'''src''' | '''src''' | ||
| − | + | 包含除前端外所有 Zabbix 处理程序源代码的目录 | |
'''src/zabbix_server''' | '''src/zabbix_server''' | ||
| − | + | 该目录包含 zabbix_server 的源代码和 make 文件。 | |
'''src/zabbix_agent''' | '''src/zabbix_agent''' | ||
| − | + | 该目录包含 zabbix_agent 和 zabbix_agentd 的源代码和 make 文件。 | |
'''src/zabbix_sender''' | '''src/zabbix_sender''' | ||
| − | + | 该目录包含 zabbix_sender 的源代码和 make 文件。 | |
'''include''' | '''include''' | ||
| − | + | 该目录包含 ZABBIX 的 include 文件。 | |
'''misc''' | '''misc''' | ||
| 第222行: | 第226行: | ||
'''misc/init.d''' | '''misc/init.d''' | ||
| − | + | 该目录包含不同平台的启动脚本。 | |
'''misc/pinger''' | '''misc/pinger''' | ||
| − | + | 该目录包含 ICMP pinging 的脚本,pinger.pl。 | |
'''frontends''' | '''frontends''' | ||
| 第232行: | 第236行: | ||
'''frontends/php''' | '''frontends/php''' | ||
| − | + | 该目录包含前端的 PHP 源代码。 | |
'''create''' | '''create''' | ||
| − | + | 该目录包含创建数据库的 SQL 初始化脚本。 | |
'''create/mysql''' | '''create/mysql''' | ||
| − | MySQL | + | MySQL 数据库模式。 |
'''create/postgresql''' | '''create/postgresql''' | ||
| − | PostgreSQL | + | PostgreSQL 数据库模式 |
'''create/data''' | '''create/data''' | ||
| − | + | 创建数据库的初始化数据 | |
'''upgrades''' | '''upgrades''' | ||
| − | + | 该目录包含 Zabbix 不同版本的升级步骤 | |
| − | === ZABBIX | + | === ZABBIX 服务器 === |
| − | ''' | + | '''服务器端''' |
| − | ''''' | + | '''''第1步 创建 Zabbix 的超级用户帐号'' ''' |
| − | + | 这是用来运行服务器的用户。在实际应用过程中你应该创建一个专用的普通帐号(通常使用 ‘zabbix’)。使用 'root'、'bin' 或其他特殊帐号会产生安全问题,切记不要这样做。 | |
---- | ---- | ||
| − | + | 注意: ZABBIX 服务器进程 (zabbix_server) 在 root 帐号下运行将被保护。 | |
---- | ---- | ||
| − | ''''' | + | '''''第 2 步 解开 ZABBIX 源代码''''' |
shell> gunzip zabbix.tar.gz && tar -xvf zabbix.tar | shell> gunzip zabbix.tar.gz && tar -xvf zabbix.tar | ||
| − | ''''' | + | '''''第 3 步 创建 ZABBIX 数据库''''' |
| − | ZABBIX | + | ZABBIX 使用 SQL 脚本来创建要求的数据库模式并插入缺省配置。这儿有 MySQL 和 PostgreSQL 两种不同的脚本。 |
| − | + | 对于 MySQL 来说: | |
shell> mysql -u<username> -p<password> | shell> mysql -u<username> -p<password> | ||
mysql> create database zabbix; | mysql> create database zabbix; | ||
| 第283行: | 第287行: | ||
shell> cat images_mysql.sql |mysql -u<username> -p<password> zabbix | shell> cat images_mysql.sql |mysql -u<username> -p<password> zabbix | ||
| − | + | 对于 PostgreSQL 来说: | |
shell> psql -U <username> | shell> psql -U <username> | ||
psql> create database zabbix; | psql> create database zabbix; | ||
| 第293行: | 第297行: | ||
shell> cat images_pgsql.sql |psql -U <username> zabbix | shell> cat images_pgsql.sql |psql -U <username> zabbix | ||
| − | + | 对于 SQLite 来说: | |
shell> cd create/sqlite | shell> cd create/sqlite | ||
shell> cat schema.sql | sqlite3 /var/lib/sqlite/zabbix.db | shell> cat schema.sql | sqlite3 /var/lib/sqlite/zabbix.db | ||
| 第301行: | 第305行: | ||
---- | ---- | ||
| − | + | 注意: 数据库如果不存在,将被自动创建。 | |
---- | ---- | ||
| − | ''''' | + | '''''第 4 步 为您的系统配置和编译源代码''''' |
| − | + | 源代码必须在服务器(监测机)和客户端(被监测机)上编译。为服务器配置源代码,您必须指定将使用哪种数据库。 | |
| − | shell> ./configure --enable-server --with-mysql --with-net-snmp –with-jabber –with-libcurl # | + | shell> ./configure --enable-server --with-mysql --with-net-snmp –with-jabber –with-libcurl |
| + | # 配置成 MySQL + Jabber + WEB 监测 | ||
| − | + | 或 | |
| − | shell> ./configure --enable-server --with-pgsql --with-net-snmp –with-jabber –with-libcurl # | + | shell> ./configure --enable-server --with-pgsql --with-net-snmp –with-jabber –with-libcurl |
| + | # 配置成 PostgreSQL + Jabber + WEB 监测 | ||
| − | + | 或 | |
| − | shell> ./configure --enable-server --with-oracle=/home/zabbix/sqlora8 --with-net-snmp –with-jabber –with-libcurl # | + | shell> ./configure --enable-server --with-oracle=/home/zabbix/sqlora8 --with-net-snmp –with-jabber –with-libcurl |
| + | # 配置成 Oracle + Jabber + WEB 监测 | ||
---- | ---- | ||
| − | + | 注意:使用标记 --with-oracle 是为了指出 sqlora8 库文件所在的位置。支持 Oracle 就需要该库文件。该库文件可以在 libsqlora8 主页上找到。 | |
---- | ---- | ||
---- | ---- | ||
| − | Note: | + | Note: 使用标记 --enable-static 用来统计链接库。如果您计划在不同的服务器间发布被编译的二进制文件,您必须使用该标记,从而让这些二进制文件可以在没有所要求库文件的情况下工作。 --enable-static 不能在 Solaris 上正常工作。 标记 --with-ucd-snmp 可以用来代替 --with-net-snmp。如果不要求支持 SNMP 的话,--with-net-snmp 和 --with-ucd-snmp 标记都可以省略。 |
---- | ---- | ||
| − | + | 然而,如果您想单独编译客户端二进制文件的话,请运行: | |
shell> ./configure --enable-server --enable-agent --with-mysql --with-net-snmp --with-jabber –with-libcurl | shell> ./configure --enable-server --enable-agent --with-mysql --with-net-snmp --with-jabber –with-libcurl | ||
| − | + | 参数 --enable-static 也可以强行用于静态链接上。 | |
| − | ''''' | + | '''''第 5 步 Make 和 安装''''' |
shell> make install | shell> make install | ||
| − | + | 缺省使用 | |
make install | make install | ||
| − | + | 将所有文件安装在 /usr/local/bin、/usr/local/lib 等目录中,您也可以使用 --prefix 来指定您要安装的目录前缀 | |
| − | ''''' | + | '''''第 6 步 配置 /etc/services''''' |
| + | |||
| + | 这一步并不真的必需,但它被推荐。在客户机(被监测)上在 /etc/services 文件中添加以下几行: | ||
| − | |||
zabbix_agent 10050/tcp | zabbix_agent 10050/tcp | ||
zabbix_trap 10051/tcp | zabbix_trap 10051/tcp | ||
| − | ''''' | + | '''''第 7 步 配置 /etc/inetd.conf''''' |
| − | + | 如果您计划使用 zabbix_agent 来代替推荐使用的 zabbix_agentd, 那么必须添加以下几行: | |
zabbix_agent stream tcp nowait.3600 zabbix /opt/zabbix/bin/zabbix_agent | zabbix_agent stream tcp nowait.3600 zabbix /opt/zabbix/bin/zabbix_agent | ||
| − | + | 然后重启 inetd | |
shell> killall -HUP inetd | shell> killall -HUP inetd | ||
| − | + | 在配置文件中修改缺省设置 | |
| − | ''''' | + | '''''第 8 步 配置 /etc/zabbix/zabbix_agent.conf''''' |
| − | + | 您需要为每个安装了 zabbix_agent 的主机配置该文件。该文件将包含 Zabbix 服务器的 IP 地址。来自其他主机的连接将被拒绝。您也可以参考 misc/conf/zabbix_agent.conf 文件。 | |
| − | ''''' | + | '''''第 9 步 配置 /etc/zabbix/zabbix_agentd.conf''''' |
| − | + | 您需要为每个安装了 zabbix_agentd 的主机配置该文件。该文件将包含 Zabbix 服务器的 IP 地址。来自其他主机的连接将被拒绝。您也可以参考 misc/conf/zabbix_agentd.conf 文件。 | |
| − | ''''' | + | '''''第 10 步 配置 /etc/zabbix/zabbix_server.conf''''' |
| − | + | 对于小安装来说 (最大不超过 10 个被监测主机),缺省的参数是完成胜任的。但当您要让 Zabbix 发挥最佳性能时就要更改缺省参数。更多详情请参见 [性能调整]章节。 | |
| − | + | 您或许可以参考 misc/conf/zabbix_server.conf 文件。 | |
| − | ''''' | + | '''''第 11 步 运行服务器进程''''' |
| − | + | 在服务器端运行 zabbix_server | |
shell> cd bin | shell> cd bin | ||
shell> ./zabbix_server | shell> ./zabbix_server | ||
| − | ''''' | + | '''''第 12 步 运行代理''''' |
| − | + | 在需要的地方运行 zabbix_agentd | |
shell> cd bin | shell> cd bin | ||
shell> ./zabbix_agentd | shell> ./zabbix_agentd | ||
| − | === ZABBIX | + | === ZABBIX 代理 === |
| − | + | 客户端 | |
| − | ''''' | + | '''''第 1 步 创建 Zabbix 帐号''''' |
| − | + | 这是用来运行服务器的用户。在实际应用过程中你应该创建一个专用的普通帐号(通常使用 ‘zabbix’)。ZABBIX 代理在 root 帐号下运行会被保护。 | |
| − | ''''' | + | '''''第 2 步 解压 ZABBIX 源代码''''' |
shell> gunzip zabbix.tar.gz && tar xvf zabbix.tar | shell> gunzip zabbix.tar.gz && tar xvf zabbix.tar | ||
| − | ''''' | + | '''''第 3 步 为您的系统配置和编译源代码''''' |
| + | |||
| + | 该源代码仅为客户端编译。为客户端配置源代码如下: | ||
| − | |||
shell> ./configure --enable-agent | shell> ./configure --enable-agent | ||
| − | + | 注意: 使用标记 --enable-static 可以统计链接库。如果您计划在不同服务器之间发布编译过的二进制文件,您必须使用该标志以使这些二进制文件在没有要求库文件的情况下也能运行。 | |
| − | ''''' | + | '''''第 4 步 生成代理''''' |
shell> make | shell> make | ||
| − | + | 从 bin/ 目录创建二进制文件复制到 /opt/zabbix/bin 或其它常用目录如 /usr/local/bin 或 /usr/local/zabbix/bin 中 | |
| − | ''''' | + | '''''第 5 步 配置 /etc/services''''' |
| − | + | 这一步并非必需,但推荐做这一步。On the client (monitored) machines, add the following lines to /etc/services: | |
| − | + | ||
zabbix_agent 10050/tcp | zabbix_agent 10050/tcp | ||
zabbix_trap 10051/tcp | zabbix_trap 10051/tcp | ||
| − | ''''' | + | '''''第6步 配置 /etc/inetd.conf''''' |
| − | + | 如果您计划使用 zabbix_agent 来代替 zabbix_agentd 的话,那么下行必须要添加: | |
zabbix_agent stream tcp nowait.3600 zabbix /opt/zabbix/bin/zabbix_agent | zabbix_agent stream tcp nowait.3600 zabbix /opt/zabbix/bin/zabbix_agent | ||
| − | + | 重启 inetd | |
shell> killall -HUP inetd | shell> killall -HUP inetd | ||
| − | + | '''''第7步 配置 /etc/zabbix/zabbix_agent.conf''''' | |
| − | |||
| − | + | 您需要在每个安装了 zabbix_agent 的主机上配置这个文件,该文件包含 Zabbix 服务器的 IP 地址。来自其他主机的连接将被拒绝。注意,该文件中将不会出现行结束字符。 | |
| − | ''''' | + | 您也可以参考 misc/conf/zabbix_agent.conf 文件 |
| + | |||
| + | '''''第8步 配置 /etc/zabbix/zabbix_agentd.conf''''' | ||
| − | + | 您需要在每个安装了 zabbix_agentd 的主机上配置这个文件,该文件包含了 Zabbix 服务器的 IP 地址。 来自其他主机的连接将被拒绝。您可以参考 misc/conf/zabbix_agentd.conf 文件。 | |
| − | ''''' | + | '''''第9步 在所有被监测机器上运行 zabbix_agentd''''' |
shell> /opt/zabbix/bin/zabbix_agentd | shell> /opt/zabbix/bin/zabbix_agentd | ||
---- | ---- | ||
| − | + | 注意: 如果您选择使用 zabbix_agent,那么您不应该再运行 zabbix_agentd ! | |
---- | ---- | ||
| − | === ZABBIX WEB | + | === ZABBIX WEB 界面 === |
| − | ''''' | + | '''''第1步 将您的浏览器指向 Zabbix 的 URL''''' |
| + | |||
[[Image:Zabbix-1.4-3.4.5-01.png]] | [[Image:Zabbix-1.4-3.4.5-01.png]] | ||
| − | ''''' | + | '''''第2步 阅读和接受 GRL v2''''' |
| + | |||
[[Image:Zabbix-1.4-3.4.5-02.png]] | [[Image:Zabbix-1.4-3.4.5-02.png]] | ||
| − | ''''' | + | '''''第3步 确保所有软件的先决条件均已满足''''' |
| + | |||
[[Image:Zabbix-1.4-3.4.5-03.png]] | [[Image:Zabbix-1.4-3.4.5-03.png]] | ||
| − | ''''' | + | '''''第4步 配置数据库设置。Zabbix 数据库必须已经被创建''''' |
| + | |||
[[Image:Zabbix-1.4-3.4.5-04.png]] | [[Image:Zabbix-1.4-3.4.5-04.png]] | ||
| − | ''''' | + | '''''第5步 查看设置''''' |
| + | |||
[[Image:Zabbix-1.4-3.4.5-05.png]] | [[Image:Zabbix-1.4-3.4.5-05.png]] | ||
| − | ''''' | + | '''''第6步 下载配置文件并将其放在 conf/ 目录下''''' |
| + | |||
[[Image:Zabbix-1.4-3.4.5-06.png]] | [[Image:Zabbix-1.4-3.4.5-06.png]] | ||
| − | ''''' | + | '''''第7步 检查是否准备就绪''''' |
| + | |||
[[Image:Zabbix-1.4-3.4.5-07.png]] | [[Image:Zabbix-1.4-3.4.5-07.png]] | ||
| − | ''''' | + | '''''第9步 仅用于分布式监测!''''' |
| − | + | 如果使用分布式环境,您必须运行: | |
shell> ./zabbix_server –n <nodeid> | shell> ./zabbix_server –n <nodeid> | ||
| − | + | 其中节点 ID 是一个唯一的节点标识符。例如: | |
shell> ./zabbix_server –n 1 | shell> ./zabbix_server –n 1 | ||
| − | + | 该语句将转换成使用节点 ID '1' 的数据库数据并添加一个本地节点。 | |
| + | '''''第10步 ZABBIX 前端已经就绪!缺省用户名是 ‘Admin’ ,没设密码''''' | ||
| − | |||
[[Image:Zabbix-1.4-3.4.5-10.png]] | [[Image:Zabbix-1.4-3.4.5-10.png]] | ||
| + | |||
| + | === 升级 === | ||
| + | |||
| + | 升级过程很简单。新二进制文件和前端根据最新安装操作进行安装。为了能更新数据库结构,以下步骤必须执行: | ||
| + | |||
| + | 整个升级过程可能花费从0秒(如果不要求补丁的话)到几小时不等。注意在打数据库补丁之前,应停用所有的 Zabbix 进程。 | ||
| + | |||
| + | 数据库升级通常要求从一个主稳定版本到另一个,如从 1.1.x 到 1.4.x | ||
| + | |||
| + | 在进行安装时一个数据库备份是必要的! | ||
| + | |||
| + | ==== 数据库升级 ==== | ||
| + | |||
| + | 进入 upgrades/dbpatches 目录中。在该目录中的子目录是按版本升级来命名的(如 1.0beta3_to_1.0beta4)。进入与您升级相一致的目录(如果您要从多个版本进行升级,那么您也必须一次只升级一个)。这有赖于您所使用的数据库: | ||
| + | |||
| + | shell> cd mysql; cat patch.sql |mysql zabbix -u<username> -p<password> | ||
| + | |||
| + | 或 | ||
| + | |||
| + | shell> cd postgresql; cat patch.sql|psql -U <username> zabbix | ||
| + | |||
| + | 别忘了升级 PHP 前端文件。最后阅读版本下面的特别说明以便进行一些额外的处理和得到一些有用的信息。 | ||
2013年5月30日 (四) 20:12的最新版本
| 点击翻译: |
English • 中文 |
目录
如何获取 ZABBIX
在 Zabbix 主页 http://www.zabbix.com 上找到当版版本及其下载说明。
要求
硬件要求
存储要求
ZABBIX 对物理内存和硬盘存储容量都有要求,128 MB 的物理内存和至少 256 MB 空闲的硬盘空间是将一个好的开始点。不过,其所需磁盘空间的大小显然有赖于主机及其所需监控参数的数量。如果您想保留监控参数一个较长的历史记录,那么您应该考虑至少 2 到 3 G 的空间用以保存数据库中的历史记录。
Each ZABBIX daemon process requires several connections to a database server. Amount of memory allocated for the connection depends on configuration of the database engine. 每个 Zabbix 守护程序进程都需要几条到数据库服务器的连接。分配给连接的内存总量也有赖于数据库引擎的配置。
注意: 您的物理内存越多,那么您数据库(因此 Zabbix)运行的也就越快!
CPU 要求
ZABBIX,特别是 ZABBIX 数据库可能要求大量的 CPU 资源,这有赖于监控参数的数量以及所选数据库的引擎。
其他硬件
为使用Zabbix 内建的 SMS 通知,要求使用一个串行通信口和一个串行 GSM 调制器。
硬件配置的范例
下表提供了一些硬件配置:
| Name | 操作系统 | CPU/内存 | 数据库 | 被监测主机数 |
| 小型 | Ubuntu Linux | P2 350MHz/256MB | MySQL MyISAM | 20 |
| 中型 | Ubuntu Linux 64 bit | AMD Athlon 3200+/2GB | MySQL InnoDB | 500 |
| 大型 | Ubuntu Linux 64 bit | Intel Dual Core 6400/4GB/RAID | MySQL InnoDB or PostgreSQL | >1000 |
| Very large | RedHat Enterprise | Intel Xeon 2 CPU/8GB/RAID | MySQL InnoDB or PostgreSQL | >10000 |
注意: 实际配置特别有赖于激活监测项的数目以及刷新率。It is recommended to keep database engine on a separate box for large installations.
支持的操作系统
出于监测服务器的安全需求和对关键任务的判断,Unix 是唯一能够持续提供必要的性能、容错能力以及恢复能力的操作系统。ZABBIX 支持目前市场上的主流版本。
ZABBIX 在以下操作系统中测试过:
- AIX
- FreeBSD
- HP-UX
- Linux
- Mac OS/X
- OpenBSD
- SCO Open Server
- Solaris
注意: ZABBIX 也可能在其它的类 Unix 操作系统中良好运行。
软件需求
ZABBIX 是基于最新的 Apache Web 服务器、主流的数据库引擎以及 PHP 脚本语言编译的。
运行 ZABBIX 需要下列软件:
| 软件 | 版本 | 说明 |
| Apache | 1.3.12 或以后版本 | |
| PHP | 4.3 或以后版本 | |
| PHP 模块:
php-gd php-bcmath |
4.3 或以后版本 | PHP GD 模块必须支持 PNG 图片 |
| MySQL
php-mysql |
3.22 或以后版本 | 使用 MySQL 作为 ZABBIX 后台数据库时被要求 |
| Oracle
php-sqlora8 |
9.2.0.4 或以后版本 | 使用 Oracle 作为 ZABBIX 后台数据库时被要求 |
| PostgreSQL
php-pgsql |
7.0.2 或以后版本 | 使用 PostgreSQL 作为 ZABBIX 后台数据库时被要求。使用 PostgreSQL 8.x 或以后版本以获取更好的性能。 |
| SQLite
php-sqlite3 |
3.3.5 或以后版本 | 使用 SQLite 作为 ZABBIX 后台数据库时被要求 |
注意: ZABBIX 在使用 Apache、MySQL、Oracle 或 PostgreSQL 的以前版本也可能正常运行。
客户端 WEB 浏览器
要求支持 HTML 和 PNG 图片。MS Explorer(5.xx 和 6.xx)以及 Mozilla 1.x 上运行正常。必须支持 Cookies 和 JavaScript。其它浏览器也能支持 Zabbix
数据库引擎的选择
ZABBIX 支持四种数据库引擎:
- MySQL
- Oracle
- PostgreSQL
- SQLite
每种数据库引擎都有它自己的优势,我们不好说哪一种最好。
选择数据库引擎主要看以下几个方面:
- 您硬件的性能
- 自由或商业的数据库引擎
- ZABBIX 服务器的繁忙程度
下表为选择数据库引擎提供一般性的建议
| ZABBIX 服务器的用途 | 选择的数据库引擎 |
| 重负载节点/单机 | MySQL MyISAM |
| 轻负载节点/单机 | PostgreSQL
MySQL MyISAM |
| 远程零管理节点 | PostgreSQL
SQLite |
| 单独轻负载 | MySQL MyISAM |
时间同步
对于运行 Zabbix 的服务器来说拥有精确的系统时间是十分重要的。Timed 是最通用的守护进程之一,以同步主机与其他机器的时间。
组件
ZABBIX 组件
Zabbix 包含了几个重要的组件,其功能大致说明如下:
ZABBIX 服务器
这是 Zabbix 软件的核心部分。服务器可以使用简单的服务检查来远程检查网络服务(如 Web 服务和 mail 服务),但它也是核心组件以便代理报告可用性以及完整的信息和状态。服务器是存放所有配置、状态和操作数据的中心库,同时它也是 Zabbix 软件中的实体,在被监测系统产生问题时主动向管理员报警。
Zabbix 可以执行无代理监测,同时也可以监测使用 SNMP 代理的网络设备。
ZABBIX 代理
为了主动监测网络系统上的本地资源和应用程序(如硬件、内存、处理器状态等),那些系统必须运行 Zabbix 代理。代理将从所运行的系统上收集可操作信息,并将这些数据报告给 Zabbix,以便做进一步处理。万一出现失败(如硬盘满或服务进程崩溃),Zabbix 服务器能主动向特定机器的管理员报告失败。
Zabbix 代理使用本地系统调用来收集统计信息,所以其效率是十分高的。
Web 界面
为了能够方便地访问监测数据,同时可以从任何地方和任何平台来配置 Zabbix,Zabbix 提供了基于 Web 的界面。该界面是 Zabbix 服务器的一部分,并且通常(但不必需)运行在与 Zabbix 服务器相同的物理机器上。
注意: 使用 SQLite 时,Zabbix 前端必须运行在相同的物理机器上。
从源安装
软件要求
从源代码编译 Zabbix 服务器或代理需要其它软件。
编译 ZABBIX 需要以下软件: 下列数据库引擎之一:
  MySQL 头文件和库文件
  要求 3.22 或以后版本
  Oracle 头文件和库文件
  要求 Sqlora8 头文件或库文件
  PostgreSQL 头文件和库文件
  要求 7.0.2 或以后版本。 考虑使用 PostgreSQL 8.x 以获得更好的性能。
  SQLite 头文件和库文件
  要求 3.3.5 或以后版本
注意: 通常做为 mysql-dev、postgresql-dev或sqlite3-dev 包的一部分。
NET-SNMP (或 UCD-SNMP) 头文件和库文件
要求支持 SNMP,可选
Iksemel 头文件和库文件
要求支持 Jabber 消息,可选
Libcurl 头文件和库文件
Web 监测模块需要,可选
C 编译器
要求 C 编译器。 GNU C 编译器是开放平台的最好选择。其他(HP、IBM)的 C 编译器也许一样好用。
GNU Make
要求 GNU make 以便处理 Zabbix Make 文件
ZABBIX 发行版结构
doc
包含本手册不同格式的目录
src
包含除前端外所有 Zabbix 处理程序源代码的目录
src/zabbix_server
该目录包含 zabbix_server 的源代码和 make 文件。
src/zabbix_agent
该目录包含 zabbix_agent 和 zabbix_agentd 的源代码和 make 文件。
src/zabbix_sender
该目录包含 zabbix_sender 的源代码和 make 文件。
include
该目录包含 ZABBIX 的 include 文件。
misc
misc/init.d
该目录包含不同平台的启动脚本。
misc/pinger
该目录包含 ICMP pinging 的脚本,pinger.pl。
frontends
frontends/php
该目录包含前端的 PHP 源代码。
create
该目录包含创建数据库的 SQL 初始化脚本。
create/mysql
MySQL 数据库模式。
create/postgresql
PostgreSQL 数据库模式
create/data
创建数据库的初始化数据
upgrades
该目录包含 Zabbix 不同版本的升级步骤
ZABBIX 服务器
服务器端
第1步 创建 Zabbix 的超级用户帐号
这是用来运行服务器的用户。在实际应用过程中你应该创建一个专用的普通帐号(通常使用 ‘zabbix’)。使用 'root'、'bin' 或其他特殊帐号会产生安全问题,切记不要这样做。
注意: ZABBIX 服务器进程 (zabbix_server) 在 root 帐号下运行将被保护。
第 2 步 解开 ZABBIX 源代码
shell> gunzip zabbix.tar.gz && tar -xvf zabbix.tar
第 3 步 创建 ZABBIX 数据库
ZABBIX 使用 SQL 脚本来创建要求的数据库模式并插入缺省配置。这儿有 MySQL 和 PostgreSQL 两种不同的脚本。
对于 MySQL 来说:
shell> mysql -u<username> -p<password>
mysql> create database zabbix;
mysql> quit;
shell> cd create/mysql
shell> cat schema.sql |mysql -u<username> -p<password> zabbix
shell> cd ../data
shell> cat data.sql |mysql -u<username> -p<password> zabbix
shell> cat images_mysql.sql |mysql -u<username> -p<password> zabbix
对于 PostgreSQL 来说:
shell> psql -U <username>
psql> create database zabbix;
psql> \q
shell> cd create/postgresql
shell> cat schema.sql|psql -U <username> zabbix
shell> cd ../data
shell> cat data.sql|psql -U <username> zabbix
shell> cat images_pgsql.sql |psql -U <username> zabbix
对于 SQLite 来说:
shell> cd create/sqlite
shell> cat schema.sql | sqlite3 /var/lib/sqlite/zabbix.db
shell> cd ../data
shell> cat data.sql | sqlite3 /var/lib/sqlite/zabbix.db
shell> cat images.sql | sqlite3 /var/lib/sqlite/zabbix.db
注意: 数据库如果不存在,将被自动创建。
第 4 步 为您的系统配置和编译源代码
源代码必须在服务器(监测机)和客户端(被监测机)上编译。为服务器配置源代码,您必须指定将使用哪种数据库。
shell> ./configure --enable-server --with-mysql --with-net-snmp –with-jabber –with-libcurl
# 配置成 MySQL + Jabber + WEB 监测
或
shell> ./configure --enable-server --with-pgsql --with-net-snmp –with-jabber –with-libcurl
# 配置成 PostgreSQL + Jabber + WEB 监测
或
shell> ./configure --enable-server --with-oracle=/home/zabbix/sqlora8 --with-net-snmp –with-jabber –with-libcurl
# 配置成 Oracle + Jabber + WEB 监测
注意:使用标记 --with-oracle 是为了指出 sqlora8 库文件所在的位置。支持 Oracle 就需要该库文件。该库文件可以在 libsqlora8 主页上找到。
Note: 使用标记 --enable-static 用来统计链接库。如果您计划在不同的服务器间发布被编译的二进制文件,您必须使用该标记,从而让这些二进制文件可以在没有所要求库文件的情况下工作。 --enable-static 不能在 Solaris 上正常工作。 标记 --with-ucd-snmp 可以用来代替 --with-net-snmp。如果不要求支持 SNMP 的话,--with-net-snmp 和 --with-ucd-snmp 标记都可以省略。
然而,如果您想单独编译客户端二进制文件的话,请运行:
shell> ./configure --enable-server --enable-agent --with-mysql --with-net-snmp --with-jabber –with-libcurl
参数 --enable-static 也可以强行用于静态链接上。
第 5 步 Make 和 安装
shell> make install
缺省使用
make install
将所有文件安装在 /usr/local/bin、/usr/local/lib 等目录中,您也可以使用 --prefix 来指定您要安装的目录前缀
第 6 步 配置 /etc/services
这一步并不真的必需,但它被推荐。在客户机(被监测)上在 /etc/services 文件中添加以下几行:
zabbix_agent 10050/tcp
zabbix_trap 10051/tcp
第 7 步 配置 /etc/inetd.conf
如果您计划使用 zabbix_agent 来代替推荐使用的 zabbix_agentd, 那么必须添加以下几行:
zabbix_agent stream tcp nowait.3600 zabbix /opt/zabbix/bin/zabbix_agent
然后重启 inetd
shell> killall -HUP inetd
在配置文件中修改缺省设置
第 8 步 配置 /etc/zabbix/zabbix_agent.conf
您需要为每个安装了 zabbix_agent 的主机配置该文件。该文件将包含 Zabbix 服务器的 IP 地址。来自其他主机的连接将被拒绝。您也可以参考 misc/conf/zabbix_agent.conf 文件。
第 9 步 配置 /etc/zabbix/zabbix_agentd.conf
您需要为每个安装了 zabbix_agentd 的主机配置该文件。该文件将包含 Zabbix 服务器的 IP 地址。来自其他主机的连接将被拒绝。您也可以参考 misc/conf/zabbix_agentd.conf 文件。
第 10 步 配置 /etc/zabbix/zabbix_server.conf
对于小安装来说 (最大不超过 10 个被监测主机),缺省的参数是完成胜任的。但当您要让 Zabbix 发挥最佳性能时就要更改缺省参数。更多详情请参见 [性能调整]章节。
您或许可以参考 misc/conf/zabbix_server.conf 文件。
第 11 步 运行服务器进程
在服务器端运行 zabbix_server
shell> cd bin
shell> ./zabbix_server
第 12 步 运行代理
在需要的地方运行 zabbix_agentd
shell> cd bin
shell> ./zabbix_agentd
ZABBIX 代理
客户端
第 1 步 创建 Zabbix 帐号
这是用来运行服务器的用户。在实际应用过程中你应该创建一个专用的普通帐号(通常使用 ‘zabbix’)。ZABBIX 代理在 root 帐号下运行会被保护。
第 2 步 解压 ZABBIX 源代码
shell> gunzip zabbix.tar.gz && tar xvf zabbix.tar
第 3 步 为您的系统配置和编译源代码
该源代码仅为客户端编译。为客户端配置源代码如下:
shell> ./configure --enable-agent
注意: 使用标记 --enable-static 可以统计链接库。如果您计划在不同服务器之间发布编译过的二进制文件,您必须使用该标志以使这些二进制文件在没有要求库文件的情况下也能运行。
第 4 步 生成代理
shell> make
从 bin/ 目录创建二进制文件复制到 /opt/zabbix/bin 或其它常用目录如 /usr/local/bin 或 /usr/local/zabbix/bin 中
第 5 步 配置 /etc/services
这一步并非必需,但推荐做这一步。On the client (monitored) machines, add the following lines to /etc/services:
zabbix_agent 10050/tcp
zabbix_trap 10051/tcp
第6步 配置 /etc/inetd.conf
如果您计划使用 zabbix_agent 来代替 zabbix_agentd 的话,那么下行必须要添加:
zabbix_agent stream tcp nowait.3600 zabbix /opt/zabbix/bin/zabbix_agent
重启 inetd
shell> killall -HUP inetd
第7步 配置 /etc/zabbix/zabbix_agent.conf
您需要在每个安装了 zabbix_agent 的主机上配置这个文件,该文件包含 Zabbix 服务器的 IP 地址。来自其他主机的连接将被拒绝。注意,该文件中将不会出现行结束字符。
您也可以参考 misc/conf/zabbix_agent.conf 文件
第8步 配置 /etc/zabbix/zabbix_agentd.conf
您需要在每个安装了 zabbix_agentd 的主机上配置这个文件,该文件包含了 Zabbix 服务器的 IP 地址。 来自其他主机的连接将被拒绝。您可以参考 misc/conf/zabbix_agentd.conf 文件。
第9步 在所有被监测机器上运行 zabbix_agentd
shell> /opt/zabbix/bin/zabbix_agentd
注意: 如果您选择使用 zabbix_agent,那么您不应该再运行 zabbix_agentd !
ZABBIX WEB 界面
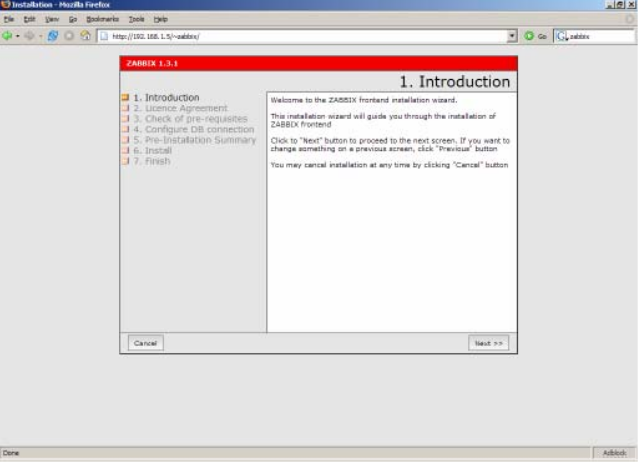
第1步 将您的浏览器指向 Zabbix 的 URL
第2步 阅读和接受 GRL v2
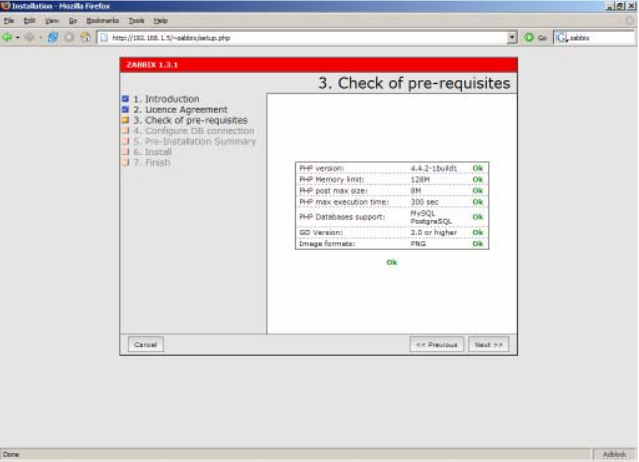
第3步 确保所有软件的先决条件均已满足
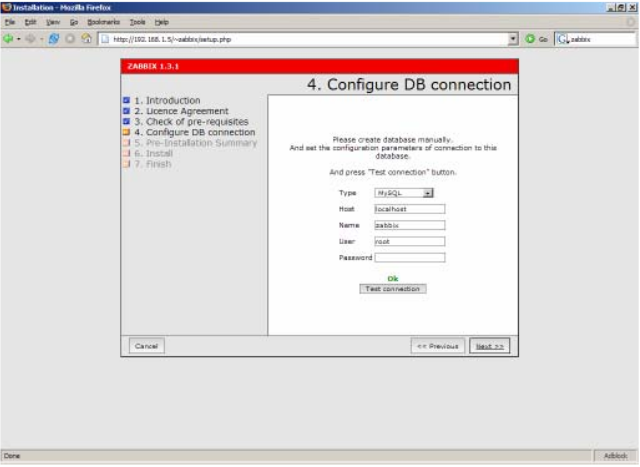
第4步 配置数据库设置。Zabbix 数据库必须已经被创建
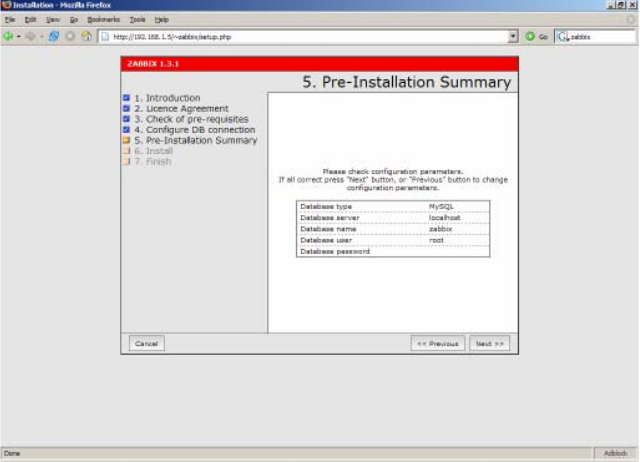
第5步 查看设置
第6步 下载配置文件并将其放在 conf/ 目录下
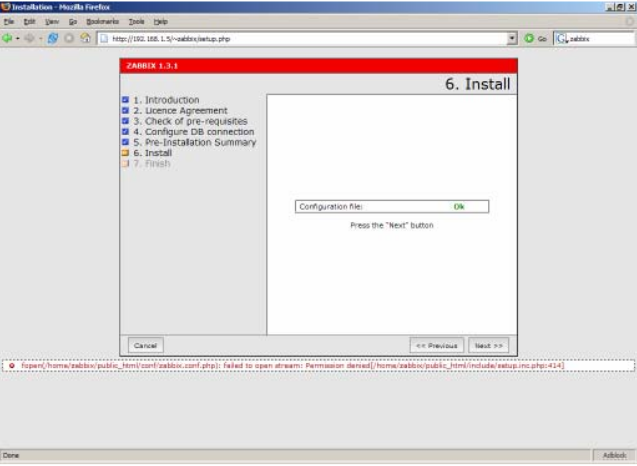
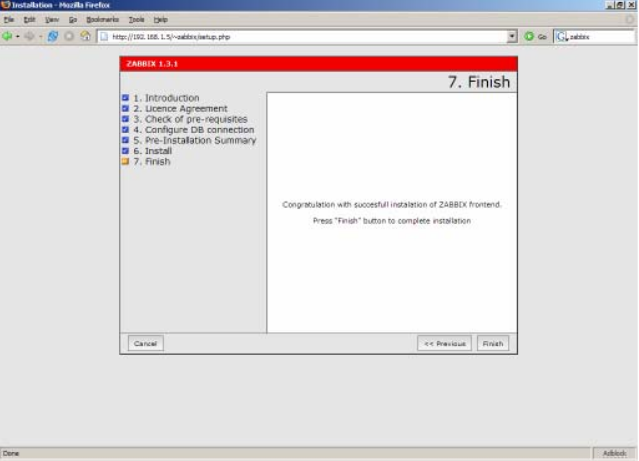
第7步 检查是否准备就绪
第9步 仅用于分布式监测!
如果使用分布式环境,您必须运行:
shell> ./zabbix_server –n <nodeid>
其中节点 ID 是一个唯一的节点标识符。例如:
shell> ./zabbix_server –n 1
该语句将转换成使用节点 ID '1' 的数据库数据并添加一个本地节点。
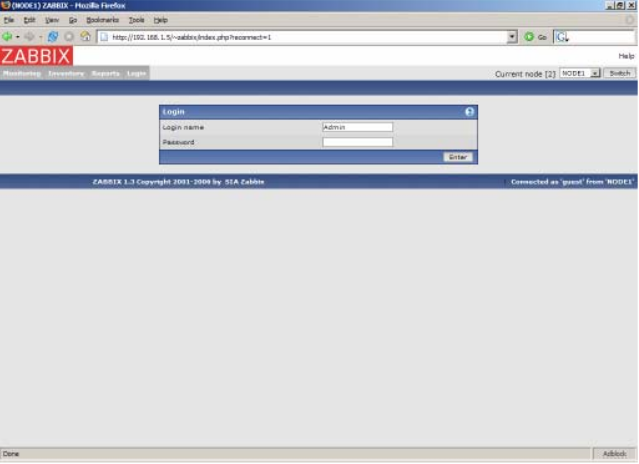
第10步 ZABBIX 前端已经就绪!缺省用户名是 ‘Admin’ ,没设密码
升级
升级过程很简单。新二进制文件和前端根据最新安装操作进行安装。为了能更新数据库结构,以下步骤必须执行:
整个升级过程可能花费从0秒(如果不要求补丁的话)到几小时不等。注意在打数据库补丁之前,应停用所有的 Zabbix 进程。
数据库升级通常要求从一个主稳定版本到另一个,如从 1.1.x 到 1.4.x
在进行安装时一个数据库备份是必要的!
数据库升级
进入 upgrades/dbpatches 目录中。在该目录中的子目录是按版本升级来命名的(如 1.0beta3_to_1.0beta4)。进入与您升级相一致的目录(如果您要从多个版本进行升级,那么您也必须一次只升级一个)。这有赖于您所使用的数据库:
shell> cd mysql; cat patch.sql |mysql zabbix -u<username> -p<password>
或
shell> cd postgresql; cat patch.sql|psql -U <username> zabbix
别忘了升级 PHP 前端文件。最后阅读版本下面的特别说明以便进行一些额外的处理和得到一些有用的信息。
