“UbuntuHelp:HowtoPartition”的版本间的差异
来自Ubuntu中文
小 |
小 |
||
| 第1行: | 第1行: | ||
{{From|https://help.ubuntu.com/community/HowtoPartition}} | {{From|https://help.ubuntu.com/community/HowtoPartition}} | ||
{{Languages|UbuntuHelp:HowtoPartition}} | {{Languages|UbuntuHelp:HowtoPartition}} | ||
| + | #title How to Partition | ||
| + | |||
| + | |||
If you are running Windows and would like to install Linux on your system, you must to free up some space on your hard drive to contain Linux. Changing the layout of your hard drive is called partitioning. | If you are running Windows and would like to install Linux on your system, you must to free up some space on your hard drive to contain Linux. Changing the layout of your hard drive is called partitioning. | ||
| − | The Ubuntu installer's partitioner is one of the safest ways to partition a hard disk. However, do not use this as an excuse to not back up your important files. Always perform a backup before any partitioning operation. | + | The Ubuntu installer's partitioner is one of the safest ways to partition a hard disk. However, do not use this as an excuse to not back up your important files. '''Always perform a backup before any partitioning operation.''' |
| + | |||
| + | === How to create space for Ubuntu === | ||
| + | There are several ways to partition a hard drive for Ubuntu. If you have data on the hard drive in partitions with free space left on them you can resize those partitions to create space for a new partition. This enables you to keep your existing data and operating system so you can install Ubuntu alongside it. If you want to dual boot Ubuntu and Windows or another Linux distribution this is what you want. | ||
| + | |||
| + | You can also delete existing partitions and create new partitions in the free space for Ubuntu. This will cause you to lose any existing data but you will have more room for Ubuntu as it is the only partition on the drive. | ||
| + | |||
| + | === Resizing an old partition === | ||
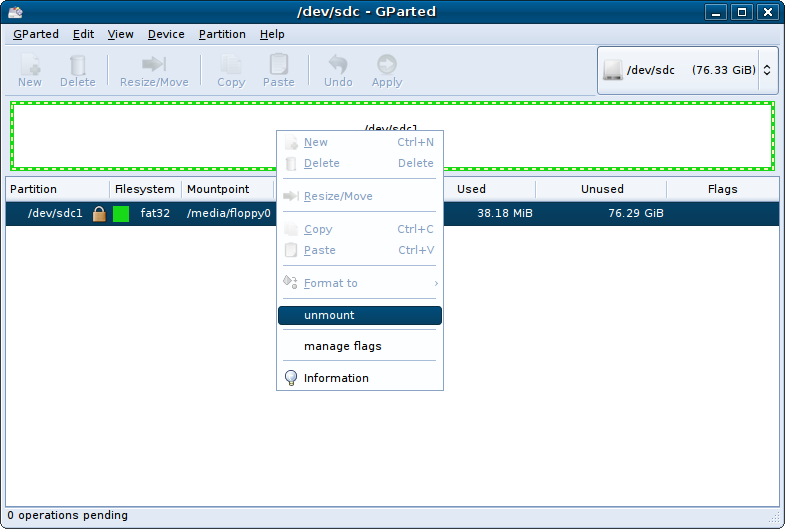
| + | Open the Gnome Partition Editor from the System Administration menu. As changing partitions can cause data loss you need to put your password in when prompted as a security measure. Select the disk you want to work on from the drop down menu on the right of the tool bar and unmount it (if it is mounted) by right clicking on the bar showing the drive with its partitions and selecting unmount from the drop down menu that appears. | ||
| + | |||
| + | http://i235.photobucket.com/albums/ee221/HJMills1388/unmountDrive.png | ||
| + | |||
| + | You can now alter the drive. In the following screenshots I am working on an empty partition. You will probably have some data on your drive which will be shown by a pale yellow area inside the green border. You cannot resize a partition to be smaller than the yellow area. | ||
| + | |||
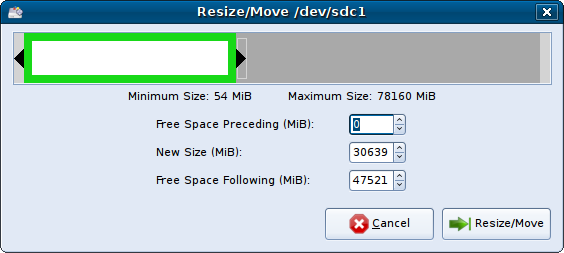
| + | To resize your existing partition simply right click and select "Resize/Move" from the drop down list. You will be presented with a window that allows you to drag the partition to change its size or to type in a new size. From here you can also move the partition to a different area of the drive if there is free space on either side of the partition. In the image below I have resized the Fat32 partition to about 30GB of the 80GB drive I am using. | ||
| + | |||
| + | http://i235.photobucket.com/albums/ee221/HJMills1388/resizePartition.png | ||
| + | |||
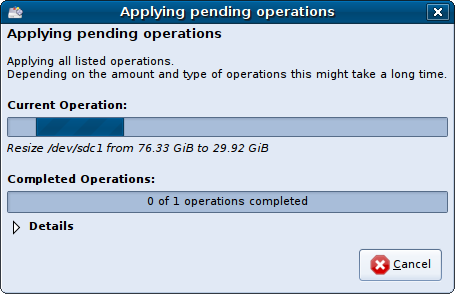
| + | When you have set the size click "Resize" and then click the "Apply" button on the toolbar to make the change. It will give you a warning message about backing up any data on the drive (not just the partition you are using) which you should take heed of if you have not taken a backup already. If you have then click "Apply" and it will start resizing the drive. If it comes up with an error it may have mounted the disk automatically when it finished resizing it which prevented the disk from being checked after the resize so you may need to unmount the disk before you continue. If this occurs you will need to go into Removable Drives and Media in the System Preferences menu and stop drives being mounted automatically. You can re-enable this when you have finished partitioning. | ||
| + | |||
| + | http://i235.photobucket.com/albums/ee221/HJMills1388/resizeProgress.png | ||
| + | |||
| + | Your partition is now resized so you are ready to add new partitions. | ||
| − | + | === Deleting an existing partition === | |
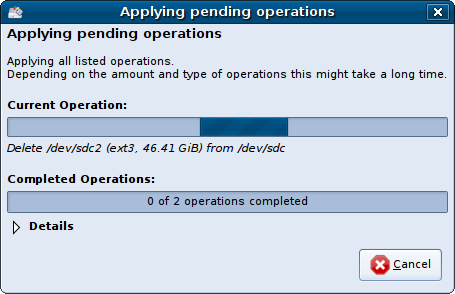
| + | If you want to start with a blank drive then you can delete the partitions that are currently on the drive. '''Make sure you backup important data first.''' In the image below I have two partitions which I want to delete. Right click on the partition you wish to remove and click on delete in the drop down box. Repeat this for all the partitions you wish to remove and you will see your changes reflected in the graphical representation of the drive. When you are ready click the "Apply" button on the toolbar to make the changes. | ||
| − | + | http://i235.photobucket.com/albums/ee221/HJMills1388/deletePending.png | |
| − | + | You now have an empty drive which you are ready to partition. | |
| − | + | === Creating new partitions for Ubuntu === | |
| + | By default Ubuntu uses ext3 partitions. These are readable under Windows (except Vista last time I checked) using the [http://www.fs-driver.org/ FS-Driver project]. If you want a partition which can be readable by both Windows and Ubuntu without installing anything extra you will need to use Fat32. | ||
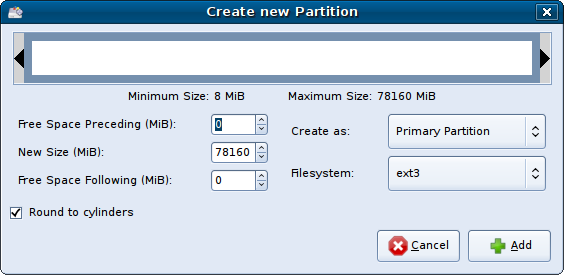
| − | + | To create a partition you need to right click on any unallocated space and add a new partition with the "New" option in the drop down list. From the window that appears you can select what filsystem type you want, whether it is a primary or logical partition and how large to make the partition. Here I am creating a single ext3 partition covering the whole drive. | |
| − | + | http://i235.photobucket.com/albums/ee221/HJMills1388/addNewPartition.png | |
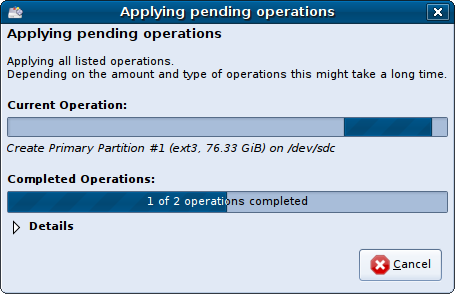
| − | + | Click "Add" and then click the "Apply" button on the toolbar to add the new partition to the drive. You can create multiple partitions at once if you want and they will be checked automatically once they are created. If you have any problems then make sure that drives are not automatically mounted by unticking the relevant options in Removable Drives and Media in the System Preferences menu. | |
| − | + | http://i235.photobucket.com/albums/ee221/HJMills1388/creatPartitionProgress.png | |
| + | === The GParted Live CD === | ||
| + | You can download GParted, the partitioning program used in this guide, on a Live CD designed for partition editing. You can also use it to boot other partitions if you have a problem with GRUB. It is available from the [http://gparted.sourceforge.net/ GParted website]. | ||
| − | + | === Parted Magic RAM-boot Version === | |
| + | [http://partedmagic.com/ Parted Magic] also comes with GParted, but a standalone, installable version that boots and runs off RAM is also available in [http://sourceforge.net/project/showfiles.php?group_id=198821&package_id=240127 deb, exe, rpm, and sh formats] so that no CD is required to use or run it. [http://www.howtoforge.com/unetbootin_windows_ubuntu_fedora_p4 HowtoForge] has screenshots and instructions on using the Parted Magic RAM-boot approach. | ||
---- | ---- | ||
2007年11月22日 (四) 13:04的版本
- title How to Partition
If you are running Windows and would like to install Linux on your system, you must to free up some space on your hard drive to contain Linux. Changing the layout of your hard drive is called partitioning.
The Ubuntu installer's partitioner is one of the safest ways to partition a hard disk. However, do not use this as an excuse to not back up your important files. Always perform a backup before any partitioning operation.
目录
How to create space for Ubuntu
There are several ways to partition a hard drive for Ubuntu. If you have data on the hard drive in partitions with free space left on them you can resize those partitions to create space for a new partition. This enables you to keep your existing data and operating system so you can install Ubuntu alongside it. If you want to dual boot Ubuntu and Windows or another Linux distribution this is what you want.
You can also delete existing partitions and create new partitions in the free space for Ubuntu. This will cause you to lose any existing data but you will have more room for Ubuntu as it is the only partition on the drive.
Resizing an old partition
Open the Gnome Partition Editor from the System Administration menu. As changing partitions can cause data loss you need to put your password in when prompted as a security measure. Select the disk you want to work on from the drop down menu on the right of the tool bar and unmount it (if it is mounted) by right clicking on the bar showing the drive with its partitions and selecting unmount from the drop down menu that appears.
You can now alter the drive. In the following screenshots I am working on an empty partition. You will probably have some data on your drive which will be shown by a pale yellow area inside the green border. You cannot resize a partition to be smaller than the yellow area.
To resize your existing partition simply right click and select "Resize/Move" from the drop down list. You will be presented with a window that allows you to drag the partition to change its size or to type in a new size. From here you can also move the partition to a different area of the drive if there is free space on either side of the partition. In the image below I have resized the Fat32 partition to about 30GB of the 80GB drive I am using.
When you have set the size click "Resize" and then click the "Apply" button on the toolbar to make the change. It will give you a warning message about backing up any data on the drive (not just the partition you are using) which you should take heed of if you have not taken a backup already. If you have then click "Apply" and it will start resizing the drive. If it comes up with an error it may have mounted the disk automatically when it finished resizing it which prevented the disk from being checked after the resize so you may need to unmount the disk before you continue. If this occurs you will need to go into Removable Drives and Media in the System Preferences menu and stop drives being mounted automatically. You can re-enable this when you have finished partitioning.
Your partition is now resized so you are ready to add new partitions.
Deleting an existing partition
If you want to start with a blank drive then you can delete the partitions that are currently on the drive. Make sure you backup important data first. In the image below I have two partitions which I want to delete. Right click on the partition you wish to remove and click on delete in the drop down box. Repeat this for all the partitions you wish to remove and you will see your changes reflected in the graphical representation of the drive. When you are ready click the "Apply" button on the toolbar to make the changes.
You now have an empty drive which you are ready to partition.
Creating new partitions for Ubuntu
By default Ubuntu uses ext3 partitions. These are readable under Windows (except Vista last time I checked) using the FS-Driver project. If you want a partition which can be readable by both Windows and Ubuntu without installing anything extra you will need to use Fat32.
To create a partition you need to right click on any unallocated space and add a new partition with the "New" option in the drop down list. From the window that appears you can select what filsystem type you want, whether it is a primary or logical partition and how large to make the partition. Here I am creating a single ext3 partition covering the whole drive.
Click "Add" and then click the "Apply" button on the toolbar to add the new partition to the drive. You can create multiple partitions at once if you want and they will be checked automatically once they are created. If you have any problems then make sure that drives are not automatically mounted by unticking the relevant options in Removable Drives and Media in the System Preferences menu.
The GParted Live CD
You can download GParted, the partitioning program used in this guide, on a Live CD designed for partition editing. You can also use it to boot other partitions if you have a problem with GRUB. It is available from the GParted website.
Parted Magic RAM-boot Version
Parted Magic also comes with GParted, but a standalone, installable version that boots and runs off RAM is also available in deb, exe, rpm, and sh formats so that no CD is required to use or run it. HowtoForge has screenshots and instructions on using the Parted Magic RAM-boot approach.