特殊:Badtitle/NS100:Freescale5329AndUclinux
| 文章出处: |
{{#if: | {{{2}}} | https://help.ubuntu.com/community/Freescale5329AndUclinux }} |
| 点击翻译: |
English {{#ifexist: {{#if: UbuntuHelp:Freescale5329AndUclinux | UbuntuHelp:Freescale5329AndUclinux | {{#if: | :}}Freescale5329AndUclinux}}/af | • {{#if: UbuntuHelp:Freescale5329AndUclinux|Afrikaans| [[::Freescale5329AndUclinux/af|Afrikaans]]}}|}} {{#ifexist: {{#if: UbuntuHelp:Freescale5329AndUclinux | UbuntuHelp:Freescale5329AndUclinux | {{#if: | :}}Freescale5329AndUclinux}}/ar | • {{#if: UbuntuHelp:Freescale5329AndUclinux|العربية| [[::Freescale5329AndUclinux/ar|العربية]]}}|}} {{#ifexist: {{#if: UbuntuHelp:Freescale5329AndUclinux | UbuntuHelp:Freescale5329AndUclinux | {{#if: | :}}Freescale5329AndUclinux}}/az | • {{#if: UbuntuHelp:Freescale5329AndUclinux|azərbaycanca| [[::Freescale5329AndUclinux/az|azərbaycanca]]}}|}} {{#ifexist: {{#if: UbuntuHelp:Freescale5329AndUclinux | UbuntuHelp:Freescale5329AndUclinux | {{#if: | :}}Freescale5329AndUclinux}}/bcc | • {{#if: UbuntuHelp:Freescale5329AndUclinux|جهلسری بلوچی| [[::Freescale5329AndUclinux/bcc|جهلسری بلوچی]]}}|}} {{#ifexist: {{#if: UbuntuHelp:Freescale5329AndUclinux | UbuntuHelp:Freescale5329AndUclinux | {{#if: | :}}Freescale5329AndUclinux}}/bg | • {{#if: UbuntuHelp:Freescale5329AndUclinux|български| [[::Freescale5329AndUclinux/bg|български]]}}|}} {{#ifexist: {{#if: UbuntuHelp:Freescale5329AndUclinux | UbuntuHelp:Freescale5329AndUclinux | {{#if: | :}}Freescale5329AndUclinux}}/br | • {{#if: UbuntuHelp:Freescale5329AndUclinux|brezhoneg| [[::Freescale5329AndUclinux/br|brezhoneg]]}}|}} {{#ifexist: {{#if: UbuntuHelp:Freescale5329AndUclinux | UbuntuHelp:Freescale5329AndUclinux | {{#if: | :}}Freescale5329AndUclinux}}/ca | • {{#if: UbuntuHelp:Freescale5329AndUclinux|català| [[::Freescale5329AndUclinux/ca|català]]}}|}} {{#ifexist: {{#if: UbuntuHelp:Freescale5329AndUclinux | UbuntuHelp:Freescale5329AndUclinux | {{#if: | :}}Freescale5329AndUclinux}}/cs | • {{#if: UbuntuHelp:Freescale5329AndUclinux|čeština| [[::Freescale5329AndUclinux/cs|čeština]]}}|}} {{#ifexist: {{#if: UbuntuHelp:Freescale5329AndUclinux | UbuntuHelp:Freescale5329AndUclinux | {{#if: | :}}Freescale5329AndUclinux}}/de | • {{#if: UbuntuHelp:Freescale5329AndUclinux|Deutsch| [[::Freescale5329AndUclinux/de|Deutsch]]}}|}} {{#ifexist: {{#if: UbuntuHelp:Freescale5329AndUclinux | UbuntuHelp:Freescale5329AndUclinux | {{#if: | :}}Freescale5329AndUclinux}}/el | • {{#if: UbuntuHelp:Freescale5329AndUclinux|Ελληνικά| [[::Freescale5329AndUclinux/el|Ελληνικά]]}}|}} {{#ifexist: {{#if: UbuntuHelp:Freescale5329AndUclinux | UbuntuHelp:Freescale5329AndUclinux | {{#if: | :}}Freescale5329AndUclinux}}/es | • {{#if: UbuntuHelp:Freescale5329AndUclinux|español| [[::Freescale5329AndUclinux/es|español]]}}|}} {{#ifexist: {{#if: UbuntuHelp:Freescale5329AndUclinux | UbuntuHelp:Freescale5329AndUclinux | {{#if: | :}}Freescale5329AndUclinux}}/fa | • {{#if: UbuntuHelp:Freescale5329AndUclinux|فارسی| [[::Freescale5329AndUclinux/fa|فارسی]]}}|}} {{#ifexist: {{#if: UbuntuHelp:Freescale5329AndUclinux | UbuntuHelp:Freescale5329AndUclinux | {{#if: | :}}Freescale5329AndUclinux}}/fi | • {{#if: UbuntuHelp:Freescale5329AndUclinux|suomi| [[::Freescale5329AndUclinux/fi|suomi]]}}|}} {{#ifexist: {{#if: UbuntuHelp:Freescale5329AndUclinux | UbuntuHelp:Freescale5329AndUclinux | {{#if: | :}}Freescale5329AndUclinux}}/fr | • {{#if: UbuntuHelp:Freescale5329AndUclinux|français| [[::Freescale5329AndUclinux/fr|français]]}}|}} {{#ifexist: {{#if: UbuntuHelp:Freescale5329AndUclinux | UbuntuHelp:Freescale5329AndUclinux | {{#if: | :}}Freescale5329AndUclinux}}/gu | • {{#if: UbuntuHelp:Freescale5329AndUclinux|ગુજરાતી| [[::Freescale5329AndUclinux/gu|ગુજરાતી]]}}|}} {{#ifexist: {{#if: UbuntuHelp:Freescale5329AndUclinux | UbuntuHelp:Freescale5329AndUclinux | {{#if: | :}}Freescale5329AndUclinux}}/he | • {{#if: UbuntuHelp:Freescale5329AndUclinux|עברית| [[::Freescale5329AndUclinux/he|עברית]]}}|}} {{#ifexist: {{#if: UbuntuHelp:Freescale5329AndUclinux | UbuntuHelp:Freescale5329AndUclinux | {{#if: | :}}Freescale5329AndUclinux}}/hu | • {{#if: UbuntuHelp:Freescale5329AndUclinux|magyar| [[::Freescale5329AndUclinux/hu|magyar]]}}|}} {{#ifexist: {{#if: UbuntuHelp:Freescale5329AndUclinux | UbuntuHelp:Freescale5329AndUclinux | {{#if: | :}}Freescale5329AndUclinux}}/id | • {{#if: UbuntuHelp:Freescale5329AndUclinux|Bahasa Indonesia| [[::Freescale5329AndUclinux/id|Bahasa Indonesia]]}}|}} {{#ifexist: {{#if: UbuntuHelp:Freescale5329AndUclinux | UbuntuHelp:Freescale5329AndUclinux | {{#if: | :}}Freescale5329AndUclinux}}/it | • {{#if: UbuntuHelp:Freescale5329AndUclinux|italiano| [[::Freescale5329AndUclinux/it|italiano]]}}|}} {{#ifexist: {{#if: UbuntuHelp:Freescale5329AndUclinux | UbuntuHelp:Freescale5329AndUclinux | {{#if: | :}}Freescale5329AndUclinux}}/ja | • {{#if: UbuntuHelp:Freescale5329AndUclinux|日本語| [[::Freescale5329AndUclinux/ja|日本語]]}}|}} {{#ifexist: {{#if: UbuntuHelp:Freescale5329AndUclinux | UbuntuHelp:Freescale5329AndUclinux | {{#if: | :}}Freescale5329AndUclinux}}/ko | • {{#if: UbuntuHelp:Freescale5329AndUclinux|한국어| [[::Freescale5329AndUclinux/ko|한국어]]}}|}} {{#ifexist: {{#if: UbuntuHelp:Freescale5329AndUclinux | UbuntuHelp:Freescale5329AndUclinux | {{#if: | :}}Freescale5329AndUclinux}}/ksh | • {{#if: UbuntuHelp:Freescale5329AndUclinux|Ripoarisch| [[::Freescale5329AndUclinux/ksh|Ripoarisch]]}}|}} {{#ifexist: {{#if: UbuntuHelp:Freescale5329AndUclinux | UbuntuHelp:Freescale5329AndUclinux | {{#if: | :}}Freescale5329AndUclinux}}/mr | • {{#if: UbuntuHelp:Freescale5329AndUclinux|मराठी| [[::Freescale5329AndUclinux/mr|मराठी]]}}|}} {{#ifexist: {{#if: UbuntuHelp:Freescale5329AndUclinux | UbuntuHelp:Freescale5329AndUclinux | {{#if: | :}}Freescale5329AndUclinux}}/ms | • {{#if: UbuntuHelp:Freescale5329AndUclinux|Bahasa Melayu| [[::Freescale5329AndUclinux/ms|Bahasa Melayu]]}}|}} {{#ifexist: {{#if: UbuntuHelp:Freescale5329AndUclinux | UbuntuHelp:Freescale5329AndUclinux | {{#if: | :}}Freescale5329AndUclinux}}/nl | • {{#if: UbuntuHelp:Freescale5329AndUclinux|Nederlands| [[::Freescale5329AndUclinux/nl|Nederlands]]}}|}} {{#ifexist: {{#if: UbuntuHelp:Freescale5329AndUclinux | UbuntuHelp:Freescale5329AndUclinux | {{#if: | :}}Freescale5329AndUclinux}}/no | • {{#if: UbuntuHelp:Freescale5329AndUclinux|norsk| [[::Freescale5329AndUclinux/no|norsk]]}}|}} {{#ifexist: {{#if: UbuntuHelp:Freescale5329AndUclinux | UbuntuHelp:Freescale5329AndUclinux | {{#if: | :}}Freescale5329AndUclinux}}/oc | • {{#if: UbuntuHelp:Freescale5329AndUclinux|occitan| [[::Freescale5329AndUclinux/oc|occitan]]}}|}} {{#ifexist: {{#if: UbuntuHelp:Freescale5329AndUclinux | UbuntuHelp:Freescale5329AndUclinux | {{#if: | :}}Freescale5329AndUclinux}}/pl | • {{#if: UbuntuHelp:Freescale5329AndUclinux|polski| [[::Freescale5329AndUclinux/pl|polski]]}}|}} {{#ifexist: {{#if: UbuntuHelp:Freescale5329AndUclinux | UbuntuHelp:Freescale5329AndUclinux | {{#if: | :}}Freescale5329AndUclinux}}/pt | • {{#if: UbuntuHelp:Freescale5329AndUclinux|português| [[::Freescale5329AndUclinux/pt|português]]}}|}} {{#ifexist: {{#if: UbuntuHelp:Freescale5329AndUclinux | UbuntuHelp:Freescale5329AndUclinux | {{#if: | :}}Freescale5329AndUclinux}}/ro | • {{#if: UbuntuHelp:Freescale5329AndUclinux|română| [[::Freescale5329AndUclinux/ro|română]]}}|}} {{#ifexist: {{#if: UbuntuHelp:Freescale5329AndUclinux | UbuntuHelp:Freescale5329AndUclinux | {{#if: | :}}Freescale5329AndUclinux}}/ru | • {{#if: UbuntuHelp:Freescale5329AndUclinux|русский| [[::Freescale5329AndUclinux/ru|русский]]}}|}} {{#ifexist: {{#if: UbuntuHelp:Freescale5329AndUclinux | UbuntuHelp:Freescale5329AndUclinux | {{#if: | :}}Freescale5329AndUclinux}}/si | • {{#if: UbuntuHelp:Freescale5329AndUclinux|සිංහල| [[::Freescale5329AndUclinux/si|සිංහල]]}}|}} {{#ifexist: {{#if: UbuntuHelp:Freescale5329AndUclinux | UbuntuHelp:Freescale5329AndUclinux | {{#if: | :}}Freescale5329AndUclinux}}/sq | • {{#if: UbuntuHelp:Freescale5329AndUclinux|shqip| [[::Freescale5329AndUclinux/sq|shqip]]}}|}} {{#ifexist: {{#if: UbuntuHelp:Freescale5329AndUclinux | UbuntuHelp:Freescale5329AndUclinux | {{#if: | :}}Freescale5329AndUclinux}}/sr | • {{#if: UbuntuHelp:Freescale5329AndUclinux|српски / srpski| [[::Freescale5329AndUclinux/sr|српски / srpski]]}}|}} {{#ifexist: {{#if: UbuntuHelp:Freescale5329AndUclinux | UbuntuHelp:Freescale5329AndUclinux | {{#if: | :}}Freescale5329AndUclinux}}/sv | • {{#if: UbuntuHelp:Freescale5329AndUclinux|svenska| [[::Freescale5329AndUclinux/sv|svenska]]}}|}} {{#ifexist: {{#if: UbuntuHelp:Freescale5329AndUclinux | UbuntuHelp:Freescale5329AndUclinux | {{#if: | :}}Freescale5329AndUclinux}}/th | • {{#if: UbuntuHelp:Freescale5329AndUclinux|ไทย| [[::Freescale5329AndUclinux/th|ไทย]]}}|}} {{#ifexist: {{#if: UbuntuHelp:Freescale5329AndUclinux | UbuntuHelp:Freescale5329AndUclinux | {{#if: | :}}Freescale5329AndUclinux}}/tr | • {{#if: UbuntuHelp:Freescale5329AndUclinux|Türkçe| [[::Freescale5329AndUclinux/tr|Türkçe]]}}|}} {{#ifexist: {{#if: UbuntuHelp:Freescale5329AndUclinux | UbuntuHelp:Freescale5329AndUclinux | {{#if: | :}}Freescale5329AndUclinux}}/vi | • {{#if: UbuntuHelp:Freescale5329AndUclinux|Tiếng Việt| [[::Freescale5329AndUclinux/vi|Tiếng Việt]]}}|}} {{#ifexist: {{#if: UbuntuHelp:Freescale5329AndUclinux | UbuntuHelp:Freescale5329AndUclinux | {{#if: | :}}Freescale5329AndUclinux}}/yue | • {{#if: UbuntuHelp:Freescale5329AndUclinux|粵語| [[::Freescale5329AndUclinux/yue|粵語]]}}|}} {{#ifexist: {{#if: UbuntuHelp:Freescale5329AndUclinux | UbuntuHelp:Freescale5329AndUclinux | {{#if: | :}}Freescale5329AndUclinux}}/zh | • {{#if: UbuntuHelp:Freescale5329AndUclinux|中文| [[::Freescale5329AndUclinux/zh|中文]]}}|}} {{#ifexist: {{#if: UbuntuHelp:Freescale5329AndUclinux | UbuntuHelp:Freescale5329AndUclinux | {{#if: | :}}Freescale5329AndUclinux}}/zh-hans | • {{#if: UbuntuHelp:Freescale5329AndUclinux|中文(简体)| [[::Freescale5329AndUclinux/zh-hans|中文(简体)]]}}|}} {{#ifexist: {{#if: UbuntuHelp:Freescale5329AndUclinux | UbuntuHelp:Freescale5329AndUclinux | {{#if: | :}}Freescale5329AndUclinux}}/zh-hant | • {{#if: UbuntuHelp:Freescale5329AndUclinux|中文(繁體)| [[::Freescale5329AndUclinux/zh-hant|中文(繁體)]]}}|}} |
{{#ifeq:UbuntuHelp:Freescale5329AndUclinux|:Freescale5329AndUclinux|请不要直接编辑翻译本页,本页将定期与来源同步。}} |
{{#ifexist: :Freescale5329AndUclinux/zh | | {{#ifexist: Freescale5329AndUclinux/zh | | {{#ifeq: {{#titleparts:Freescale5329AndUclinux|1|-1|}} | zh | | }} }} }} {{#ifeq: {{#titleparts:Freescale5329AndUclinux|1|-1|}} | zh | | }}
Freescale 5329 And uClinux (with LTIB)
Version française ici
Introduction
The purpose of this document is the implementation, under Ubuntu, of the System-On-Module MCF5329 Fire Engine (from Freescale/Logicpd). On this system (available from Farnell), we are going to install uClinux via the image generator provided by Freescale : LTIB. Commands and concepts present in this tutorial are often "simple", but it possible to waste a lot of time to find them and to use them correctly (especially with small embedded Linux). Therefore, in this tutorial, we retranscribe all of these (including these for TFTP, NFS,...). Many commands present in this tutorial are, probably, exportable to other development boards. Note of the author (Val) : This document is a synthesis of a lot of information, forums, tutorial, etc. found on the Web. I'm not a Linux/Ubuntu expert, that's why, some of these commands are not optimal and/or "clean".
Requirement
- Host computer IP : 192.168.0.2
- Host computer OS : Ubuntu Desktop 9.04 (32 bits - Update 100% OK - 22 may 2009)
- User account : as
- System-On-Module IP (Freescale Coldfire) : 192.168.0.254
- Gateway address : 192.168.0.1
- Mask : 255.255.255.0
- System-On-Module bootloader : U-Boot 2008.10 (Dec 15 2008 - 11:03:39)
- This document and all the downloaded files are in /home/as/tuto directory
Reference documents
- « BSP Targeting the Freescale Coldfire M5239EVB User's Guide » (User_Manual_MCF5329.pdf)
- « Using MCF5329EVB NAND Flash to Host μClinux Root File System » (AN3757.pdf)
- « Building a Sample CGI Application » (AN3408.pdf)
LTIB installation
LTIB is the uClinux image generator for the System-On-Module. Extract the m53xxevb-20081215-ltib.iso file (source : Linux BSP for Freescale M5329EVB )
- Right-click on the file -> Extract here
- Now, we have, in this directory, a very good documentation
/home/as/tuto/m53xxevb-20081215-ltib/START_HERE.htm
- (In this documentation, there is a U-Boot installation tutorial !)
LTIB installation
- In a terminal, go to the iso directory :
cd /home/as/tuto/m53xxevb-20081215-ltib
- Execute the install scipt :
sh ./install
- Answer the default choice for all options
- Install it in :
/home/as/ltib
Required packages installation (for LTIB)
- In a terminal, execute this command :
sudo apt-get install bison libncurses5-dev build-essential rpm tcl8.5 libghc6-zlib-dev
LTIB authorizations
- In a terminal, modify the visudo file with this command :
sudo /usr/sbin/visudo
- In this file, add the following line :
as ALL = NOPASSWD: /usr/bin/rpm, /opt/freescale/ltib/usr/bin/rpm
- Save this file ([ctrl+o] shortcut)
- Quit the editor ([ctrl+x] shortcut)
LTIB first launch
- In a terminal, go to the LTIB directory :
cd /home/as/ltib/ltib-cf_nommu-20081215
- Execute LTIB :
./ltib
- We have a bug (Exiting on error or interrupt)
- To solve it, modify the lines 46, 47 and 48 of this file :
/opt/freescale/pkgs/mtd-utils-20060302-cf-byteswap_h-1.patch
- before
+#if !defined _BYTESWAP_H && !defined _NETINET_IN_H
+# error "Never use <bits/byteswap.h> directly; include <byteswap.h> instead."
+#endif
- after
+//#if !defined _BYTESWAP_H && !defined _NETINET_IN_H
+//# error "Never use <bits/byteswap.h> directly; include <byteswap.h> instead."
+//#endif
- and delete the directory :
/opt/freescale/ltib/usr/src/rpm/BUILD/mtd
Re-execute LTIB :
./ltib
and it works !
Minicom installation
In a terminal, install Minicom :
sudo apt-get install minicom
To configure it, execute :
minicom -s
In Serial port configuration, verify these options and save them :
Serial device : your serial device, for me, it is ttyUSB0
Bps/Par/Bits : 115200 8N1
Hardware Flow Control : No
Software Flow Control : No
To launch Minicom, execute this command in a terminal :
minicom
TFTP server installation
In a terminal, create a tftpboot directory :
sudo mkdir /tftpboot
sudo chmod -R 777 /tftpboot
sudo chown -R nobody /tftpboot
and install these packages :
sudo apt-get install xinetd tftpd tftp
Open a text editor (root user) :
sudo gedit
Write these lines :
service tftp
{
protocol = udp
port = 69
socket_type = dgram
wait = yes
user = nobody
server = /usr/sbin/in.tftpd
server_args = /tftpboot
disable = no
}
(! there is a [enter] after the last brace !) And save in /etc/xinet.d/tftp file (create it if necessary). Then, with this text editor (root user), add these lines in the /etc/hosts.allow file :
portmap:192.168.0.254
nfsd:192.168.0.254
mountd:192.168.0.254
And these lines in the /etc/hosts.deny file :
portmap:ALL
nfsd:ALL
mountd:ALL
After, reload the configuration file :
sudo /etc/init.d/xinetd reload
And restart the TFTP server :
sudo /etc/init.d/xinetd restart
We check the TFTP server configuration :
cat /etc/xinetd.d/tftp
This command should return :
as@as-desktop:~$ cat /etc/xinetd.d/tftp
service tftp
{
protocol = udp
port = 69
socket_type = dgram
wait = yes
user = nobody
server = /usr/sbin/in.tftpd
server_args = /tftpboot
disable = no
}
NFS server installation
In a terminal, create a link to the rootfs directory (directory in the LTIB directory) :
ln -s /home/as/ltib/ltib-cf_nommu-20081215/rootfs /tftpboot/ltib
Install the NFS package :
sudo apt-get install nfs-kernel-server
Add this line in the /etc/exports file (with a text editor in root mode) :
/tftpboot/ltib 192.168.0.254/255.255.255.0(rw,no_root_squash,async)
Reload the configuration :
sudo /etc/init.d/nfs-kernel-server reload
And restart the NFS server :
sudo /etc/init.d/nfs-kernel-server restart
C/C++ compiler installation
Download Sourcery G++ Lite Edition for ColdFire (uClinux) (here). In a terminal, go to the download directory and launch the installation script :
sh ./freescale-coldfire-4.3-45-m68k-uclinux.bin -i console
Let the default choice for all options. Add these lines into the .bashrc (/home/as/.bashrc) file :
PATH=$HOME/CodeSourcery/Sourcery_G++_Lite/bin:$PATH
export PATH
Test the compiler :
m68k-uclinux-g++
This command should return :
m68k-uclinux-g++: no input files
To compile, execute this command :
m68k-uclinux-g++ -o hello helloworld.c
C++ source file - input : helloworld.c - output : hello and,
m68k-uclinux-gcc -o hello helloworld.c
C source file - input : helloworld.c - output : hello
Kernel image generation
In a terminal, launche LTIB :
cd /home/as/ltib/ltib-cf_nommu-20081215
./ltib -c
- Tick "Configure the kernel".
- In "Target System Configuration → Options → Network setup", unmark "get network parameters using dhcp" and change "IP address" to "192.168.0.2".
- In " Target Image Generation → Options → Choose your root filesystem image type", choose "Target image: (NFS)" and unmark "read-only root filesystem".
- Quit these menus "Do you wish to save your new configuration? → yes".
We arrive in the kernel options.
- In "General setup" menu, tick "System V IPC".
- In "File systems → Miscellaneous filesystems", unmark "ROM file system support".
- Quit these menus "Do you wish to save your new configuration? → yes".
The kernel image is generated. Now, prepare it to be injected in the System-On-Module (we are in LTIB directory) :
sudo gzip -f -9 rootfs/boot/vmlinux.bin
/opt/freescale/ltib/usr/bin/mkimage -A m68k -O linux -T kernel -C gzip -a 0x40020000 -e 0x40020000 -n "Linux Kernel Image" -d rootfs/boot/vmlinux.bin.gz uImage
cp uImage /tftpboot/
uImage kernel image, in /tftpboot, is ready to be injected in the System-On-Module.
Root directory (in JFFS2) generation
In a terminal, launche LTIB :
cd /home/as/ltib/ltib-cf_nommu-20081215
./ltib -c
- In "Image Generation → Options → Choose your root filesystem image type" :
choose "Target image: (jffs2)"
- unmark "read-only root filesystem"
- "jffs2 erase block size in KB (NEW) = 16"
- "(/tmp /var) Place these dirs in writable RAM"
Quit these menus "Do you wish to save your new configuration? → yes". Now, the root directory image is available (rootfs.jffs2). Copy it in the boot directory (terminal in the LTIB directory) :
sudo cp rootfs.jffs2 /home/as/ltib/ltib-cf_nommu-20081215/rootfs/boot
The root directory is ready to be implemented in the System-On-Module.
Kernel image installation (in RAM, with root directory in NFS)
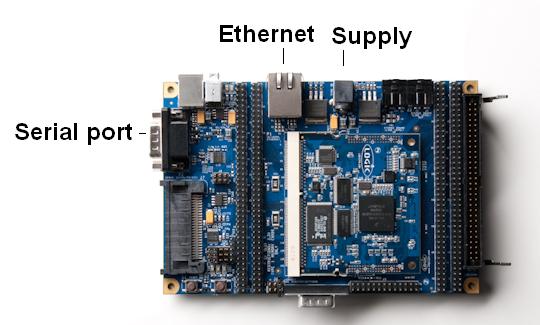
Connect the serial and Ethernet ports, form the System-On-Module to the computer.
 In a terminal, launch Minicom (following commands are launched in Minicom).
Connect the supply to the System-On-Module and observe the boot sequence with Minicom. If a counter is present, interrupt it (Now, we are in bootloader menu).
To print (on the screen) the bootloader settings, execute this command :
In a terminal, launch Minicom (following commands are launched in Minicom).
Connect the supply to the System-On-Module and observe the boot sequence with Minicom. If a counter is present, interrupt it (Now, we are in bootloader menu).
To print (on the screen) the bootloader settings, execute this command :
printenv
To modify a setting, it is :
set setting 'value'
save
Example :
set serverip '192.168.0.2'
save
Check (through printenv) the configuration (and modify if necessary) :
gatewayip=192.168.0.1
netmask=255.255.255.0
ipaddr=192.168.0.254
serverip=192.168.0.2
Indicate to the OS where is the root directory (through a setting in the bootloader) :
set bootargs 'root=/dev/nfs rw nfsroot=192.168.0.2:/tftpboot/ltib ip=192.168.0.254:192.168.0.2:192.168.0.1:255.255.255.0::eth0:off'
save
(the root directory is in NFS on the development computer) Load in RAM the kernel image :
tftp 0x41000000 uImage
And boot uClinux :
bootm 0x41000000
Root directory installation (in NAND Flash - JFFS2)
Here, we are in uClinux ! Execute these commands :
/usr/bin/flash_eraseall /dev/mtd1
cd /boot
cp rootfs.jffs2 /dev/mtdblock1
Reboot the System-On-Module and change this bootloader setting
set bootargs 'root=/dev/mtdblock1 rw rootfstype=jffs2'
save
Now, the root directory is operational from the System-On-Module
Kernel image installation (in NOR Flash)
Launch the System-On-Module and in the bootloader (U-Boot), Execute these commands Remove a part of the NOR Flash memory protection, and erase it :
prot off 0x30000 0x1FFFFF
erase 0x30000 0x1FFFFF
Load the kernel in the RAM, and copy it to the NOR Flash
tftp 0x40020000 uImage
cp.b 0x40020000 0x30000 ${filesize}
Change the boot settings (bootloader option)
set bootcmd bootm 0x30000
set bootdelay 3
save
Now, the kernel boot from the NOR Flash, and the root directory is in NAND Flash. We have finished, the uClinux is fully functional from the System-On-Module !
Bug
Under uClinux AND with the kernel image in the NOR Flash, we have a bug : Ethernet is down. To re-activate Ethernet, execute these commands (under uClinux) :
ifconfig eth0 hw ether 0008ee013f7c
ifconfig eth0 up
(0008ee013f7c is MY System-On-Module MAC address. Modify this value for your System-On-Module (Sticker on the card)) Check Ethernet with a simple ping :
ping 192.168.0.2