“Ardour4 初学者教程 04 混音会话”的版本间的差异
来自Ubuntu中文
(→Mute) |
小 (→使用均衡器的一个实例) |
||
| (未显示同一用户的123个中间版本) | |||
| 第6行: | 第6行: | ||
==混音工具== | ==混音工具== | ||
| − | 用来实现一个好的混音的主要工具有'''Levels电平''',''' | + | 用来实现一个好的混音的主要工具有'''Levels电平''','''Panning声相偏移''','''Equalization均衡'''('''EQ''')和'''Compression压缩'''。除了这些核心工具,众多的插件效果也可以用来优化声音,例如'''Reverb混响'''和'''Delay延迟'''。 |
==混音器工具栏简介== | ==混音器工具栏简介== | ||
| 第40行: | 第40行: | ||
这部分底部的大片黑色区域是'''Processor Box处理器框'''(注:上面的那张图)。在这里您可以添加插件等,诸如此类的操作。处理器框将总是包含着一个蓝色的Fader淡化器处理器。这表明在处理器链条里已经安置了主要的声道淡化器——这就是淡化器在工具栏的下半部分所显示的。请参阅'''使用插件'''和'''使用发送'''章节里对这部分区域的详细讨论。 | 这部分底部的大片黑色区域是'''Processor Box处理器框'''(注:上面的那张图)。在这里您可以添加插件等,诸如此类的操作。处理器框将总是包含着一个蓝色的Fader淡化器处理器。这表明在处理器链条里已经安置了主要的声道淡化器——这就是淡化器在工具栏的下半部分所显示的。请参阅'''使用插件'''和'''使用发送'''章节里对这部分区域的详细讨论。 | ||
| − | + | 混音器工具栏的下一部分包括有Panning声相偏移,Record录制,Mute静音,以及Solo独奏,还有其它等等控制元件(注:下面的这张图)。 | |
http://brunoruviaro.github.io/ardour4-tutorial/images/Ardour4_Mixer_Strip_3.png | http://brunoruviaro.github.io/ardour4-tutorial/images/Ardour4_Mixer_Strip_3.png | ||
| − | === | + | ===声相偏移=== |
| − | + | Panning声相偏移与左右扬声器之间声音的位置协同工作。有关更多信息请参阅'''声相'''一章。 | |
===独奏=== | ===独奏=== | ||
| 第60行: | 第60行: | ||
任何音轨或总线处在'''Mute静音'''状态时,将无法通过主控总线或试听来听见。音轨混音器也包含有一个小型化的静音按钮,就位于录制预备按钮和独奏按钮之间。右键点击静音按钮将会为你弹出关于静音按钮行为的高级选项。 | 任何音轨或总线处在'''Mute静音'''状态时,将无法通过主控总线或试听来听见。音轨混音器也包含有一个小型化的静音按钮,就位于录制预备按钮和独奏按钮之间。右键点击静音按钮将会为你弹出关于静音按钮行为的高级选项。 | ||
| − | === | + | ===预备录制=== |
| − | + | 录制按钮用于为录制预备音轨,请参阅'''录制音频'''章节。 | |
| − | === | + | ===淡化器,淡化 / 峰值计量仪=== |
| − | + | 出现在混音器工具栏上的最突出的控制元件就是'''Fader淡化器''',用于调整相应音轨或总线的整体增益。'''Peak Meter峰值计量仪'''显示的是已选中的音轨的峰值数值,就位于淡化器的右侧。每个由一个'''Bar Graph柱状图'''组成的峰值计量就仪是对应于一个单声道音轨,而两个柱状图就是对应于立体声音轨。计量仪上方的小的矩形里的数字显示的是到目前为止那个音轨所播放过的最高峰值数值。 | |
http://brunoruviaro.github.io/ardour4-tutorial/images/Ardour4_Mixer_Strip_5.png | http://brunoruviaro.github.io/ardour4-tutorial/images/Ardour4_Mixer_Strip_5.png | ||
| − | + | 通过点击混音器工具栏底部右手边的按钮(即上图中标有“Post”的那个按钮),您将能够选择'''Metering Point计量点''',例如从声卡直接“''in 入''”,“''pre前置''”淡化信号,或者“''post后置''”淡化信号。 | |
| − | + | 正如您在下图中可以看到的那样,在每个音轨里都有一个较小版本的混音器工具栏,叫做'''Track Mixer音轨混音器'''。它包含有一个水平'''Fader淡化器''',一个垂直'''Peak Meter峰值计量仪''',也同样有微型的'''Arm Record预备录制'''按钮,'''Mute静音'''按钮,和'''Solo独奏'''按钮。它们都与音轨上的混音器工具栏里的按钮是相互镜像工作的。 | |
http://brunoruviaro.github.io/ardour4-tutorial/images/Ardour4_Mixer_Strip_6.png | http://brunoruviaro.github.io/ardour4-tutorial/images/Ardour4_Mixer_Strip_6.png | ||
| − | + | 关于使用淡化器和峰值计量仪更详细的说明请参考'''混音电平'''章节。 | |
| − | === | + | ===路由=== |
| − | + | 最后,我们到达混音器工具栏的底部。这里我们能看到'''Output Routing Button输出路由按钮''',即在前面的屏幕截图里标记为“master主控”的那个按钮,在'''理解路由'''章节中讲解过。 | |
| − | = | + | =混音电平= |
[http://brunoruviaro.github.io/ardour4-tutorial/mixing-levels/ (原文)] | [http://brunoruviaro.github.io/ardour4-tutorial/mixing-levels/ (原文)] | ||
| − | + | '''Levels电平'''是每个音轨相对于其它音轨的音量。 | |
| − | + | 如果您无法听到一个高于其他乐器的低音片段,显而易见的选择就是提高这个低音片段的音量。电平可以通过使用位于混音器工具栏或者每个音轨里的淡化器来调节,就在音轨的名称下方。混音的第一步是试听所有已经录制好的每一个声音,然后调节所有音轨的电平以便您能听清楚一切,除了为适合歌唱的表现手法以外。例如,声乐音轨通常比韵律吉他大声一些,因为人声正是歌唱作品的焦点。 | |
| − | == | + | ==使用淡化器== |
| − | + | 淡化器是每一个音轨的音量的主要控制元件。音轨电平的精确数值水平显示在淡化器上方的小的矩形数字区域。您可以通过拖动滑块或者在带有数字的矩形里直接键入一个新的数字来改变电平。淡化器默认被设置为 −0.0 dB,这意味着音轨的电平并没有改变。在下面的截图中,名为“''synth''”的音轨的淡化器设置为 -0.0,并且峰值计量仪显示到目前为止的最高峰值为 -5.1。 | |
http://brunoruviaro.github.io/ardour4-tutorial/images/Ardour4_Mixing_Levels_1.png | http://brunoruviaro.github.io/ardour4-tutorial/images/Ardour4_Mixing_Levels_1.png | ||
| − | == | + | ==避免截波== |
| − | + | 混音的另一个重要的工作是避免'''Clipping截波'''。当信号已经达到峰值高于 0.0 dB 时,混音器工具栏上的峰值变成红色。您可以在混音时使用这个工具来监控您的音轨的最高电平。 | |
| − | + | 在下面的截图中,名为“synth”的音轨刚刚被截去了 + 5.9。您还可以看到在它自身波形上的小小红色边缘,表明了以录制的声音被截去数据的确切位置。 | |
http://brunoruviaro.github.io/ardour4-tutorial/images/Ardour4_Mixing_Levels_2.png | http://brunoruviaro.github.io/ardour4-tutorial/images/Ardour4_Mixing_Levels_2.png | ||
| − | + | 在峰值计量仪里的红色数字上点击,可以重置它。 | |
| − | + | *提示:为了练习的方便,可以试着录制您的声音片段,然后让它出现截波。听一听回放是如何被扭曲的。 | |
| − | + | 您应该确保任何您发送到您的声卡或者您将最终导出成为的一个声音文件(诸如 CD 母碟)永远不要超过0.0 dB 来避免出现实际的截波。 | |
| − | + | 如果截波发生于一个沉重的打击乐的声音里,它几乎无法察觉到。您可以通过减少增益来隐藏它(例如,规范化区域到 0.0,或者一个更低的数字,例如 -1.0 )。然而,通常截波会导致已录制的声音能听到失真。在这种情况下,最好的解决方案是以较低的电平重新再录制一次。 | |
| − | = | + | =声相偏移= |
[http://brunoruviaro.github.io/ardour4-tutorial/panning/ (原文)] | [http://brunoruviaro.github.io/ardour4-tutorial/panning/ (原文)] | ||
| − | + | Panning声相偏移有助于构建一个'''Stereo Field立体声音场''',在扬声器之间的相对空间里面,放置您的声音和乐器。 | |
| − | + | 一旦您在所有音轨上构建了一个良好的平衡的电平,您就可以开始考虑声相偏移。 | |
| − | == | + | ==声相偏移的界面== |
| − | + | 在Ardour里,'''Panning声相偏移'''的控制是位于混音器工具栏的中部。 | |
| − | + | 一个单声道音轨将拥有一个Mono Panner单声道声相器。它看起来像是这样: | |
http://brunoruviaro.github.io/ardour4-tutorial/images/Ardour4_Panning_MONO.png | http://brunoruviaro.github.io/ardour4-tutorial/images/Ardour4_Panning_MONO.png | ||
| − | + | 一个立体声音轨将拥有一个Stereo Panner立体声声相器,像这样: | |
http://brunoruviaro.github.io/ardour4-tutorial/images/Ardour4_Panning_STEREO.png | http://brunoruviaro.github.io/ardour4-tutorial/images/Ardour4_Panning_STEREO.png | ||
| − | === | + | ===单声道声相器=== |
| − | + | 默认的单声道声相器分布着一个输入到二个输出。其行为是由一个单独的参数控制,即位置。默认情况下,声相器位于中央。您可以通过直接在单声道声相器上点击和拖动来改变这个位置。在声道器上右键单击可访问到它他选项。 | |
| − | === | + | ===立体声声相器=== |
| − | + | 默认的立体声声相器分布着 2 输入到 2 输出。其行为是由两个参数控制,即宽度和位置。默认情况下,声相器位于整体宽度的中央。 | |
| − | + | 不论单击并拖动Left左边或者Right右边的按钮,都可以改变宽度。例如,如果您拉近它们之间的距离,它看起来将会像是这样: | |
http://brunoruviaro.github.io/ardour4-tutorial/images/Ardour4_Panning_STEREO_WIDTH.png | http://brunoruviaro.github.io/ardour4-tutorial/images/Ardour4_Panning_STEREO_WIDTH.png | ||
| − | + | 在一个狭窄的宽度下,您还可以拖动顶部把柄,用来改变相对的中心位置,像这样: | |
http://brunoruviaro.github.io/ardour4-tutorial/images/Ardour4_Panning_Stereo_example.png | http://brunoruviaro.github.io/ardour4-tutorial/images/Ardour4_Panning_Stereo_example.png | ||
| − | + | 如果我们让Left左边和Right右边的按钮完全重叠(也就是说,宽度减少到零),把手会转变成一个单独的信号指示器,标记为“M”(即 mono 单声道): | |
http://brunoruviaro.github.io/ardour4-tutorial/images/Ardour4_Panning_Stereo_Mono.png | http://brunoruviaro.github.io/ardour4-tutorial/images/Ardour4_Panning_Stereo_Mono.png | ||
| − | == | + | ==声相偏移技巧== |
| − | + | 关于声相偏移的理念和技术更广泛的讨论超出了本教程的范围,但这里有一些通用的经验法则: | |
| − | + | *吉他更倾向于被声相偏移到左边和右边。 | |
| − | + | *声乐和低音更倾向于被放置在中央。您打算创建一个平衡,这样一边不会比另一边更大声。 | |
| − | + | *耳机可能有助于决定乐器应该被如何声相偏移,以及混音感觉是否不均衡,因为其中一边太大声了。 | |
| − | + | 在创建一个“spatial有空间感”或者立体声音场时,另外两个很有用的工具是'''Reverb回声'''和'''Delay延迟'''。这些效果可以一起用于发送到创建一个鼓声发送,将带有混合着更多的回音的向后趋势。也可以用于一个可能会稍微有一点延迟的声乐发送,但声音比较接近鼓声。要了解更多的信息请参阅'''使用插件'''和'''使用发送'''章节。 | |
| − | + | 提示:在对音轨进行声相偏移时,应当总是注意您的电平!声相偏移一条音轨到一个声道会增加那个声道的电平。这可能会改变您在之前章节里设置的电平的平衡,并且在极端情况下可能导致截波。当这种情况发生时,降低那条音轨的整体电平,并再次检查它在混音里所处的位置。 | |
=使用插件= | =使用插件= | ||
[http://brunoruviaro.github.io/ardour4-tutorial/using-plugins/ (原文)] | [http://brunoruviaro.github.io/ardour4-tutorial/using-plugins/ (原文)] | ||
| − | + | '''Plugins插件'''可以用来改善或改造各个音轨的声音。 | |
| − | + | 它们可以直接应用于一个单独的音轨,或者使用一个'''Send发送端'''的一组音轨。稍后在本教程中,我们将讨论一些插件,尤其是针对的混音过程的,诸如'''Compressors压缩器'''、'''Limiters限制器'''、'''Parametric Equalizers参数均衡器'''、'''Reverbs混响器'''等。 | |
| − | == | + | ==处理器框== |
| − | + | 在Ardour的术语里,一个'''Processor处理器'''就是被插入一个混音器工具栏里的任何东西,并且会将信号以某种方式进行处理。Ardour提供了一些内置的处理器,诸如Fader淡化器或者Panners声相器。处理器也可以是插件,用于产生特效影响或者作为乐器,也可以是发送端或者能影响信号路由的插入件。处理器的排序是可以任意的,且不限制可以有多少个。 | |
http://brunoruviaro.github.io/ardour4-tutorial/images/Ardour4_Mixer_Strip_2.png | http://brunoruviaro.github.io/ardour4-tutorial/images/Ardour4_Mixer_Strip_2.png | ||
| − | + | 上面截图所示的主要空间就是处理器框。蓝色的框Fader淡化器实际上就是默认在处理框里的一个处理器。它代表了您用来控制音轨的音量的Fader淡化器。所有的处理器都显示为彩色矩形,在它们的旁边有一个小小的“LED灯”,在处理器被启用时即点亮。处理器的颜色取决于它在序列里的位置;pre-fader前置于淡化器呈现红色,post-fader后置于淡化器呈现绿色。 | |
| − | == | + | ==添加一个插件到一条音轨或一条总线== |
| − | + | 可以通过在音轨或总线的处理器框里右键点击来添加插件。会弹出一个菜单选项。从菜单中选择,新的处理器即可被插入。 | |
http://brunoruviaro.github.io/ardour4-tutorial/images/Ardour4_Plugins_1.png | http://brunoruviaro.github.io/ardour4-tutorial/images/Ardour4_Plugins_1.png | ||
| − | + | 插件管理器是浏览和选择插件的一个方便途径: | |
http://brunoruviaro.github.io/ardour4-tutorial/images/Ardour4_Plugins_2.png | http://brunoruviaro.github.io/ardour4-tutorial/images/Ardour4_Plugins_2.png | ||
| − | + | 您可以从插件管理器中搜索插件,通过它们的名字,类型,或者通过从下拉菜单中可用的其它搜索参数来搜索。例如,我们将添加的reverb混响插件被称为“Freeverb”: | |
http://brunoruviaro.github.io/ardour4-tutorial/images/Ardour4_Plugins_3.png | http://brunoruviaro.github.io/ardour4-tutorial/images/Ardour4_Plugins_3.png | ||
| − | + | 一旦插件被选中,点击“''Add 添加''”则插件将出现在底部的“Plugins to be connected 被连接的插件”列表里。然后单击“''Insert Plugin(s) 插入插件''”,则它们将会出现在处理器框里。 | |
http://brunoruviaro.github.io/ardour4-tutorial/images/Ardour4_Plugins_Freeverb.png | http://brunoruviaro.github.io/ardour4-tutorial/images/Ardour4_Plugins_Freeverb.png | ||
| − | == | + | ==编辑插件参数== |
| − | + | 双击一个插件即可编辑它的参数。在这个例子中,我们双击“Freeverb“绿色框,然后弹出这个窗口: | |
http://brunoruviaro.github.io/ardour4-tutorial/images/Ardour4_Plugin_Freeverb_Settings.png | http://brunoruviaro.github.io/ardour4-tutorial/images/Ardour4_Plugin_Freeverb_Settings.png | ||
| − | + | 这里您可以控制reverb混响参数,诸如oom Size,房间大小、Damping衰减、Wet湿润和Dry干燥信号的程度,以及Width宽度。这效果将会应用到音轨里所包含的所有声音。 | |
| − | == | + | ==略过插件== |
| − | + | 要略过一个插件,在插件设置窗口里按下“''Bypass 略过''”按钮即可,或者在处理器框里简单点击插件的“LED灯”也行。这样就把插件关闭了,允许信号通过它而不受影响。这是非常有用的,尤其是当您想要比较一条音轨有或没有插件听起来会是什么样子时。 | |
http://brunoruviaro.github.io/ardour4-tutorial/images/Ardour4_Plugins_Bypass.png | http://brunoruviaro.github.io/ardour4-tutorial/images/Ardour4_Plugins_Bypass.png | ||
| − | + | 被略过的插件带着已关闭的“LED灯”显示呈灰色。 | |
| − | + | 鼠标右键单击插件将会弹出带有几个选项的菜单,包括有Delete删除。 | |
| − | == | + | ==前置于淡化器和后置于淡化器== |
| − | + | 您可以选择您是否想在'''Processor Box处理器框'''里位于淡化器矩形框的之前或之后添加您的插件。Pre-Fader Plugins前置于淡化器插件被插入在淡化器之前的信号路径里,这样淡化器控制从插件出来的信号的电平。Post-Fader Plugins后置于淡化器插件被插入在淡化器的后面:淡化器控制进入插件的信号的电平。对于一些插件,Pre-前置或Post-后置于淡化器的放置并不重要。对另一些插件来说,这两者的区别是微妙的。而对于其它一些插件而言,插入它们到正确的位置是绝对必要的。 | |
| − | == | + | ==插件格式== |
| − | + | 对那些有兴趣学习更多关于插件格式的朋友,下面是一个快速概览: | |
| − | LADSPA | + | '''LADSPA 插件'''是Ardour的“native原生”插件格式。他们最初是为Linux开发的,但此后也一样已经被移植到OS X。 |
| − | LV2 | + | '''LV2''' 是一个简单的但可扩展的 LADSPA 后继版本,可以用图形化的方式来显示声音特征。LV2 插件可以在OS X和Linux上使用。 |
| − | AU | + | '''AU 插件'''是OS X的“native原生”插件格式,在Ardour中,它们只会在您在下载程序时捐了款时工作。更多的详细信息,请参阅'''安装于OS X'''章节。AU 插件根本不会在Linux上工作。 |
| − | VST | + | '''VST 插件'''是一个与微软Windows共有的插件格式。一些 VST 插件可以在Linux上使用,然而它们可能不会正常工作,甚至会导致Ardour崩溃。使用这些插件需要手动编译Ardour应用程序,这个工作超出了本手册的范围。 |
| − | + | 关于使用Ardour插件的更多信息可以在这里找到: http://manual.ardour.org/working-with-plugins/ | |
=使用发送端= | =使用发送端= | ||
[http://brunoruviaro.github.io/ardour4-tutorial/using-sends/ (原文)] | [http://brunoruviaro.github.io/ardour4-tutorial/using-sends/ (原文)] | ||
| − | + | 一个发送端就是带有它们自己独立淡化器的一条音轨或总线的一个额外的输出,可以用来把信号路由到Ardour里的其它应用点上。 | |
| − | + | 这也称为'''Auxiliary Sends辅助发送端''',它们信号流的特定点上采用信号(pre-fader前置于淡化器,post-fader后置于淡化器,在EQ均衡器之前或之后,以及其它插件,诸如此类等)并发送信号的一个副本到别的地方,,而不影响正常的信号向下流动到声道淡化器。 | |
| − | + | 在Ardour中,您可以很容易地通过混音器工具栏添加'''Sends发送端'''到音轨和总线上。发送端是处理器,就像插件一样。 | |
| − | == | + | ==何时该用发送端?== |
| − | + | 在前面章节中,我们构建了一个鼓声组件架构,带有四个独立的音轨:kick底鼓,snare军鼓,hihat踩镲,以及clap拍击。让我们假设现在您打算添加一个鼓声的reverb回音。当然您可以为每个单独的音轨分别添加一个单独的插件,并且分别单独调整它们的设置,但这种方法增加了许多不必要的工作量。每次您打算全盘地为所有的鼓声改变一个reverb回音设置,您都必须打开所有四个reverb回声插件,然后以同样的方式修改它们。 | |
| − | + | *这就是发送派上用场的时候:您可以使用它们来为一组音轨添加一个特殊效果,而不需要创建多个带有相同插件的实例。 | |
| − | + | 以下是我们将如何实现这方法的概述: | |
| − | + | *创建一个带有所需插件的单独的总线。 | |
| − | + | *为您打算实现那个效果的每一个鼓声音轨都添加一个发送端。 | |
| − | + | *路由这些发送端到总线上。 | |
| − | == | + | ==创建总线并添加一个插件== |
| − | + | 创建一条总线(菜单 '''Track 音轨''' > '''Add Track or Bus 添加音轨或总线'''),为它取一个适当的名称,然后在前置于淡化器区域里添加一个插件(在处理器框里的淡化器蓝色矩形的上面右键点击),正如'''使用插件'''章节里所阐述的那样, | |
| − | + | 在本例中,我们创建了一个名为“''DRUMS'' 鼓”的单声道总线,并且添加了“''Freeverb''“ 这个 Reverb 回声 LADSPA 插件到总线。 | |
http://brunoruviaro.github.io/ardour4-tutorial/images/Ardour4_Sends_1.png | http://brunoruviaro.github.io/ardour4-tutorial/images/Ardour4_Sends_1.png | ||
| − | === | + | ===总线输入端=== |
| − | + | 显示在总线输入按钮上的”-“号表明,目前还没有任何东西被路由到这条总线。稍后我们将会留意这里。 | |
| − | === | + | ===总线输出端=== |
| − | + | 在路由一个发送端到这条总线之前,首先确保总线输出端已经被路由到主控总线。如下图所示(底部的按钮标有“master 主控”)。 | |
http://brunoruviaro.github.io/ardour4-tutorial/images/Ardour4_Sends_2.png | http://brunoruviaro.github.io/ardour4-tutorial/images/Ardour4_Sends_2.png | ||
| − | + | 另外,打开插件窗口(双击 Freeverb 矩形)然后设置插件的信号以 1.0 Wet Level 湿润度和 0.0 干燥度混合。 | |
http://brunoruviaro.github.io/ardour4-tutorial/images/Ardour4_Sends_3.png | http://brunoruviaro.github.io/ardour4-tutorial/images/Ardour4_Sends_3.png | ||
| − | + | 这确保总线携带了所有来自那个插件的已经处理过的信号(即“Wet 湿润”信号),并且没有未处理过的信号(即“Dry 干燥”信号)到主总线。记住,未处理过的”clean 干净“信号仍然可以来自于它们原来的音轨,因此在这条总线里没有必要复制它们。 | |
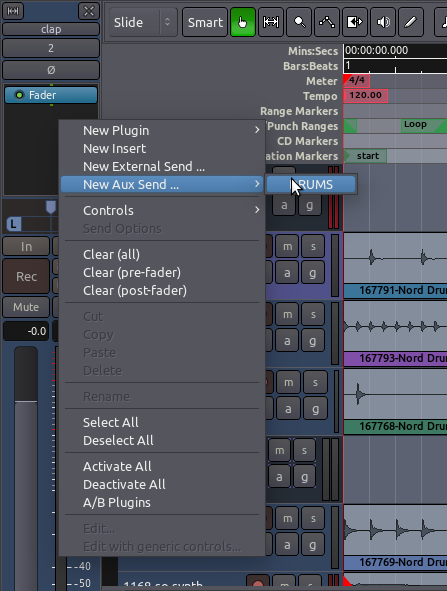
| − | == | + | ==创建并路由发送端== |
| − | + | 现在我们可以在其它音轨上创建发送端,并且将其路由到总线的输入端。 | |
| − | + | 像插件一样,也可以在处理器框中创建发送端。在您的每个鼓声音轨上,在处理器框里右键单击空白处,然后创建一个 ''New Aux Send 新建辅助发送端'',定向到恰当的总线(在我们的示例中,名称为 DRUMS 鼓)。 | |
http://brunoruviaro.github.io/ardour4-tutorial/images/Ardour4_Sends_4.png | http://brunoruviaro.github.io/ardour4-tutorial/images/Ardour4_Sends_4.png | ||
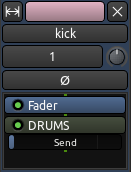
| − | + | 您现在应该可以看到,发送端出现在处理器框中: | |
http://brunoruviaro.github.io/ardour4-tutorial/images/Ardour4_Post-Fader_Send.png | http://brunoruviaro.github.io/ardour4-tutorial/images/Ardour4_Post-Fader_Send.png | ||
| − | + | 你可以看到,刚好在绿色的矩形下面,有个小小的“''Send 发送端''”滑块,这是发送端淡化器,用于控制把多大的声音从这个音轨发送到总线。 | |
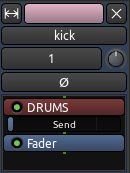
| − | === | + | ===后置于淡化和前置于淡化发送端=== |
| − | + | 注意上图显示的是 Post-Fader Send 后置于淡化器发送端(它位于淡化器矩形的“after 后面”)。在后置于淡化发送端里,Send Level 发送级别是,第一级由音轨/总线淡化器一起控制,然后第二级由发送端淡化器控制。 | |
| − | + | 在 Pre-Fader Send 前置于淡化器发送端中,另一方面。发送级别仅仅由发送端淡化器来控制,独立于音轨/总线淡化器。一个前置于淡化发送端看起来将会像是这个样子: | |
http://brunoruviaro.github.io/ardour4-tutorial/images/Ardour4_Pre-Fader_Send.png | http://brunoruviaro.github.io/ardour4-tutorial/images/Ardour4_Pre-Fader_Send.png | ||
| − | + | 您可以在处理器框里上下拖拽发送端的矩形,根据需要让它前置于或者后置于淡化器。 | |
| − | + | *提示:根据所使用的效果插件的类型,以及所期望的结果,来选择前置于或者后置于淡化器。对于本次练习,哪种都可以正常工作。 | |
| − | + | 在处理器框里,一个发送端的行为就像任何其它的插件。您可以通过单击那个小小“LED灯”来暂时禁用它,并且您可以在矩形上右键单击来访问其它选项,包括“''Delete 删除''”。 | |
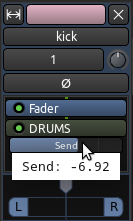
| − | === | + | ===发送端淡化器=== |
| − | + | 要控制各个发送端的电平,只需单击并且拖动发送端淡化器,即可加大或者减小它的音量。 | |
http://brunoruviaro.github.io/ardour4-tutorial/images/Ardour4_Send_Fader.png | http://brunoruviaro.github.io/ardour4-tutorial/images/Ardour4_Send_Fader.png | ||
| − | + | “DRUMS 鼓声”总线现在正在接收所有音轨的和,并且对它应用插件效果。一个应用于总线的单独的插件,控制着路由到那里的所有的鼓声的效果。以这种方式,您拥有对原始音轨“dry 干燥”(注:未处理过的)声音的独立控制,并且把“wet 湿润”(注:已处理过的)的声音流出总线。 | |
| − | + | 因为这种带特效插件工作的类型,发送端是非常有用的,所以它们也通常被称为“Effect Sends 特效发送端”。 | |
=动态= | =动态= | ||
[http://brunoruviaro.github.io/ardour4-tutorial/dynamics/ (原文)] | [http://brunoruviaro.github.io/ardour4-tutorial/dynamics/ (原文)] | ||
| − | + | 在混音时您可能遇到的问题之一就是太大声,并且/或者安静的部分太安静。 | |
| − | + | 如果使用的淡化器来单独调节电平,则这类问题不容易得到解决。您也许会设置过高的电平导致它们出现截波,或者您可能会通过简单地提高电平来增加不必要的背景噪音。所有这些问题都被称为 '''Dynamic Range 动态范围''',即,您的会话中最大声部分和最安静部分之间的区别。在Ardour里有几种类型的工具可作为'''Plugins插件'''使用,可以用来调整动态范围,包括'''Limiting限制''','''Compression压缩'''和'''Gating闸门'''。 | |
| − | == | + | ==限制== |
| − | + | 一个 '''Limiter 限制器'''就是防止一条音轨的音量超过一定电平的一种工具,通常Peak Level峰值水平(0 dB 分贝)或接近它。许多限值器带有在实施限制之前就先提高导入信号电平的选项,通过这种方式您可以在您的混音最大声部分和最安静部分之间“ close the gap 缩小差距”。限制器可以用在主控总线上以避免整体混音出现Clipping截波。限制器几乎总是使用Post-Fader后置于淡化器。 | |
| − | + | 可以在插件当中在找到 “''Fast Lookahead Limiter 快速前瞻限制器''”。要设置前瞻限制器多大的限制量,只需简单调整 “''Limit (dB) 限制( 分贝)''”滑块。快速超前限制器会如同字面上的含义那样“looks ahead 超前预览”在几毫秒的信号,当它看到的信号将要超过您设置的限制,它会自动将电平降低下来。 | |
http://brunoruviaro.github.io/ardour4-tutorial/images/Ardour4_Limiter_Fast_Lookahead.png | http://brunoruviaro.github.io/ardour4-tutorial/images/Ardour4_Limiter_Fast_Lookahead.png | ||
| − | + | “''Input Gain (dB) 输入增益(分贝)''”滑块决定了到达限制器之前电平被加大多少量,位于右手边的“Attenuation (dB) 衰减(分贝)”计量仪显示在任何给定的时刻有多大的电平正被减少(注:“给定的时刻”即指针所在的时刻)。与此同时音量的降低是接近于即时发生的,“''Release time (s) 发布时间(秒)''”滑块决定了需要多长时间它才让限制器的衰减返回到 0 分贝。 | |
| − | + | 注意, “harder 越是努力”驾驭限制器(通过增加输入增益并且/或者减少允许的最大峰值限制),限制器被迫作出的缩减就越多,就越有可能令这个处理呈现人工化的痕迹(诸如Distortions扭曲失真或音量的改变不稳定)。在主控总线上,一般来说最好避免过多的限制。 | |
| − | == | + | ==压缩== |
| − | + | 一个'''Compressor压缩器'''能提高声音的整体音总量,但之后“squeezes 压榨”的分量取决于它有多大声。这可以使声乐的人声听起来更均衡,或者使鼓声更饱满和响亮。最终的效果是类似于一个限制器能减少最安静和最响亮的声音之间的范围那样,然而在使用压缩器时,这效果有更多的可选择项目。 | |
| − | + | 最简单的压缩器只有相对较少的几个控制元件,诸如下面所示的“''Simple Compressor 简单的压缩器''”插件。在这里,“''Threshold 临界值''”设置的是触发压缩器开始行动的电平,“''Compression Ratio 压缩比''”控制着该压缩器将“squeeze 压榨”多少声音。“''Attack 上冲''”和“''Decay 衰减''”参数控制着压缩器以多快的速度来影响这声音。 | |
http://brunoruviaro.github.io/ardour4-tutorial/images/Ardour4_Compressor_Simple.png | http://brunoruviaro.github.io/ardour4-tutorial/images/Ardour4_Compressor_Simple.png | ||
| − | + | 一个更复杂的压缩器,“SC1 Compressor 压缩器”插,如下图所示。 | |
http://brunoruviaro.github.io/ardour4-tutorial/images/Ardour4_Compressor_SC1.png | http://brunoruviaro.github.io/ardour4-tutorial/images/Ardour4_Compressor_SC1.png | ||
| − | + | 它有三个主要的按钮: | |
| − | + | *“''Threshold level (dB) 临界水平(分贝)''”设置压缩器将压缩或者压榨这声音的电平。 | |
| + | *“''Ratio (1:n) 比率(一比N)''”控制它在的大道临界值时,将压榨多大程度。 | ||
| + | *“''Makeup gain (dB) 增益补偿(分贝)''”用于在压缩的过程中提高整个信号的音量。 | ||
| − | + | 要舒柔化一个声乐,例如,您可以设定一个“''Threshold level 临界值电平''”大约为 10 dB,并且“''Ratio 比率''”为 2.5,然后使用“''Makeup gain 增益补偿''”来补充音量。 | |
| − | + | 其它三个控制——“Attack time (ms) 上冲时间(毫秒)”,“Release time (ms) 释放时间(毫秒)”以及“Knee radius (dB) 拐点半径(分贝)”——允许您控制这个压缩的数学曲线的形状。 | |
| − | + | 对于舒柔化声乐压缩,您会想要一个 semi-fast 稍快的“Attack time 上冲时间”,以便压缩器捕获每个歌词的开头,还有一个 slower 较慢的“Release time 释放时间”来让人声响起,以及一个 soft 舒缓的软“Knee radius 拐点半径”来为压缩创建一个不太明显的温和形态。 | |
| − | + | 如果您想让鼓声听起来宏大,您可以尝试使用一个缓慢的“Attack time 上冲时间”这样您就不会压缩鼓的敲击声,用一个快速的“Release time 释放时间”以便压缩器可以捕获鼓的下一个敲击声,还有用一个很大的“Ratio 比率”来让鼓声敲击在开始和结束之间的 Dynamics 动态较为相似。 | |
| − | + | 下面是来自于“Calf Plugins Package 牛犊插件套装”的一个近似压缩器的截图: | |
| − | + | ||
| − | + | ||
| − | + | ||
| − | + | ||
http://brunoruviaro.github.io/ardour4-tutorial/images/Ardour4_Compressor_Calf.png | http://brunoruviaro.github.io/ardour4-tutorial/images/Ardour4_Compressor_Calf.png | ||
| − | == | + | ==阀门== |
| − | + | 最简单的一种'''Gate阀门'''是,当信号超过一个限定的水平是就允许信号通过,并且阻挡低于这一水平的信号。 | |
| − | + | 阀门常常被用来作为降噪的方法之一。例如,在一个麦克风声道上的阀门,可能仅仅当歌手正在唱歌时打开,当她不唱歌时防止其它背景噪音通过。Gated drums 鼓声阀门也是一个非常有名的制作技巧,可以使声音听起来“sharper 更清晰”。 | |
| − | + | 在这里,“Hard Gate 硬性阀门”插件显示一个单独的控制参数,“Threshold 临界值”限定了打开大门并让信号通过的门槛。 | |
http://brunoruviaro.github.io/ardour4-tutorial/images/Ardour4_Hard_Gate_Plugin.png | http://brunoruviaro.github.io/ardour4-tutorial/images/Ardour4_Hard_Gate_Plugin.png | ||
| − | + | 其他种类的阀门,诸如“Calf Gate 牛犊阀门”插件,则更为复杂。它们有独立的控制元件,用于控制阀门打开(“Attack 上冲”)和关闭(“Release 释放”)的速度,以及其它参数相当类似于上面章节描述的SC压缩机。 | |
http://brunoruviaro.github.io/ardour4-tutorial/images/Ardour4_Gate_Calf.png | http://brunoruviaro.github.io/ardour4-tutorial/images/Ardour4_Gate_Calf.png | ||
| 第382行: | 第380行: | ||
[http://brunoruviaro.github.io/ardour4-tutorial/equalizing/ (原文)] | [http://brunoruviaro.github.io/ardour4-tutorial/equalizing/ (原文)] | ||
| − | + | 一个 '''Equalizer 均衡器'''(即 '''EQ''')允许您分别控制一个声音中不同频率范围的增益。 | |
| − | + | 这不仅可以用于雕琢一个独立声音的音色(例如,使它听起来sharper更尖锐或者smoother更平滑)也可以用于令音色变化的声音能更好的地整合入混音中。 | |
| − | + | 通常,即使经过调整Levels电平和Panning声相偏移之后,带有类似频率内容的不同音轨(例如,一个低音吉他和一个踢鼓)在混音中有可能很难分辨出来。这时,一个均衡器就是解决这个问题的一个很好的工具。 | |
| − | == | + | ==三波段均衡器== |
| − | + | 最简单的一种均衡器是一个在模拟混音器中我们所熟悉的那个。它有三个参数,调整三个'''Bands波段'''的电平,或者称为频率范围:一个'''Bass低音'''(低频),一个中段范围的频率,以及一个'''Treble高音'''(高频)。“''DJ EQ''”插件就是这样的一个EQ均衡器。 | |
http://brunoruviaro.github.io/ardour4-tutorial/images/Ardour4_EQ_DJ.png | http://brunoruviaro.github.io/ardour4-tutorial/images/Ardour4_EQ_DJ.png | ||
| − | == | + | ==多波段(或图形)均衡器== |
| − | + | 一个更复杂的 '''Multi-Band (or Graphical) Equalizer 多波段(或图形)均衡器'''通常带有更多的波段。每个波段都是集中于一个频率,并且每个波段的电平都可以单独调节。在一些多波段均衡器里,例如下图所示的“''TAP Equalizer 水龙头均衡器''”插件,每个波段的中心频率可以由用户定义。这允许您或者衰减(或移除)一个不需要的频率,或加强(提高)所需要的那个波段。 | |
http://brunoruviaro.github.io/ardour4-tutorial/images/Ardour4_EQ_TAP_Equalizer.png | http://brunoruviaro.github.io/ardour4-tutorial/images/Ardour4_EQ_TAP_Equalizer.png | ||
| − | + | 波段的整体“curve 曲线”也可以用来确定您的音轨或混音的general tone总体音调。在上面的示例中,中部频率的下部分已经被“scooped out 削除”了一点(注意波段 1 和 8 原封不动地停在 0 dB,而它们之间的 2 到 7 则画出了一个衰减曲线,波段 4 位于最低点 -15 dB)。 | |
| − | == | + | ==参量均衡器== |
| − | + | '''Parametric Equalizer 参量均衡器'''是用于混音器的EQ中最万能的类型,因为它广泛控制着EQ参数的所有类型。在Ardour中,有一个参量均衡器称为“''Triple Band Parametric with Shelves 带滤波架的三重波段参量''”。还有一个来自于 Calf 牛犊插件包的类似均衡器,如下图所示: | |
http://brunoruviaro.github.io/ardour4-tutorial/images/Ardour4_EQ_Calf.png | http://brunoruviaro.github.io/ardour4-tutorial/images/Ardour4_EQ_Calf.png | ||
| − | + | 每个频率波段都有有三个选项(即方框 “''Parametric 1 参数 1'' ”、“''2''” 和 “''3''”)。这三个波段每个都有“''Level (dB) 电平(分贝)''”用于调整cut削减或boost增大频率,还有“''Frequency (Hz) 频率(赫兹)''”用于调整选择中心频率,以及一个 “''Q''” 用于调整决定使用多宽的频率范围来影响它。 | |
| − | === | + | ===高架,低架=== |
| − | + | 这个插件还包含有一个'''High Shelf 高架'''和一个'''Low Shelf 低架'''。滤波架削减或增加所有高于(高架)或低于(低架)一个特定频率的全部东西。例如,一个低架可以用来移除不需要的rumbling隆隆声,一个高架可以用来减少hiss嘶嘶声。滤波架的“''Frequency 频率''”控制元件决定了截止频率。例如,一个带有截止频率是 200 Hz的低架意味着均衡器将会衰减所有低于这个频率的一切东西。使用Level电平旋钮控制衰减量。 | |
| − | == | + | ==使用均衡器的一个实例== |
| − | + | 为了通过使用EQ来实现在混音中更好地分离出两种乐器的声音,您首先需要找出两种乐器的重叠部分。 | |
| − | + | 这里有一种途径。在上述所示的 ''Calf Equalizer 5 Band Plugin 牛犊均衡器5波段插件''(或者 ''Triple Band Parametric with Shelves 带滤波架的三重波段参量'')里,为每个乐器选择适当的波段。在低音吉他的情况下,这将是一个低频段(假设,起始于 100 Hz)。提高“'''gain 增益'''”到 10 dB,改变“''Q''”(也称为“''bandwidth 带宽''”)以形成一个狭窄的范围,然后慢慢地向上下滚动“''frequency 频率''”。您将会听到一个pitch音高上下移动。然后慢慢滚动下来,直到您听到两种乐器重叠的频率范围。现在简单地减少“''gain 增益''”到 -5 dB,然后您将很有希望能听到更清晰一点的乐器声。接下来,对其他乐器应用相同的处理。 | |
| − | + | EQ的处理方法有很多。希望提供的这个例子能为您在混音里开始“均衡”音轨有所帮助。但最重要的是,当需要用到EQ时,最好是尽量少用而不是尽量多用,除非您是有意识地使用极端的EQ作为创作参量。 | |
=使用自动化= | =使用自动化= | ||
[http://brunoruviaro.github.io/ardour4-tutorial/using-automation/ (原文)] | [http://brunoruviaro.github.io/ardour4-tutorial/using-automation/ (原文)] | ||
| − | Automation | + | '''Automation 自动化'''是一种随着时间而动态改变音频处理参数的工作方式。 |
| − | + | 到目前为止,我们在我们的音轨里使用的各种参数,都是固定的数值(例如,一个音轨淡化器设置为 -3.0 dB;或者一个单声道声相器设置为 100%;等等)。这些固定的数值将应用于整条音轨贯穿整个会话。 | |
| − | + | 但您是否打算让这些数值随着时间以预先确定的方式而改变?例如,您可能打算让一个音轨的增益在20秒内逐渐减少。或者您可能希望所发出的声音在两秒内从左向右移动。 | |
| − | + | 这可以用 '''Automation 自动化'''来完成。淡化器、声相偏移,以及在音轨中使用的任何插件都可以自动化。一个自动化的参数显示在其父系一级音轨下面的属于它自己的 '''Automation Track 自动化音轨'''中。'''Automation data 自动化数据'''直观地表示为一个 '''Automation Line 自动化线条''',由许多 '''Automation Points 自动化点'''组成。下图就是一个自动化音轨看起来的样子: | |
http://brunoruviaro.github.io/ardour4-tutorial/images/Ardour4_Automation_Fader_1.png | http://brunoruviaro.github.io/ardour4-tutorial/images/Ardour4_Automation_Fader_1.png | ||
| − | + | 在上图中,名称是“''Fader 淡化器''”的自动化音轨,是被关联到名称是“''Audio 1 音频 1''”的父系一级音轨。自动化线条随着时间控制着Fader淡化器(volume 音量)的改变。 | |
| − | == | + | ==创建一个淡化器自动化线条== |
| − | + | 让我们来创建一个简单的淡化器自动化。在一条选中的音轨上点击“''A''”按钮,将会弹出一个菜单,您可以选择您打算要自动化的参数。现在选择“''Fader 淡化器''”。 | |
http://brunoruviaro.github.io/ardour4-tutorial/images/Ardour4_Automation_Button.png | http://brunoruviaro.github.io/ardour4-tutorial/images/Ardour4_Automation_Button.png | ||
| − | + | 一个自动化音轨将会显示出来。选择 Draw Mode 描绘模式(快捷键“''D''”): | |
http://brunoruviaro.github.io/ardour4-tutorial/images/Ardour4_EditModes_D.png | http://brunoruviaro.github.io/ardour4-tutorial/images/Ardour4_EditModes_D.png | ||
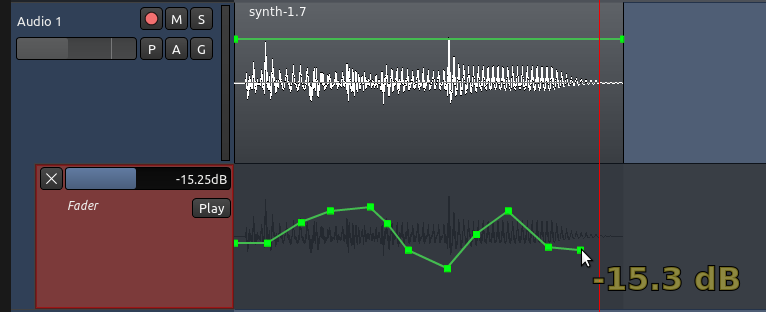
| − | + | 现在您可以通过在自动化音轨里点击任意地方来创建自动化点。自动化线条会连接您所添加的自动化点。黄色的数字(下图所示 -15.3 分贝)表示所选中的自动化点的增益电平。 | |
http://brunoruviaro.github.io/ardour4-tutorial/images/Ardour4_Automation_Fader_2.png | http://brunoruviaro.github.io/ardour4-tutorial/images/Ardour4_Automation_Fader_2.png | ||
| − | === | + | ===自动化状态=== |
| − | + | 然而,Automation Curve 自动化曲线不会播放,直到您设置自动化状态为“Play 播放”。 | |
http://brunoruviaro.github.io/ardour4-tutorial/images/Ardour4_Automation_Fader_3.png | http://brunoruviaro.github.io/ardour4-tutorial/images/Ardour4_Automation_Fader_3.png | ||
| − | Manual | + | '''Manual 手动''':设置为“''Manual 手动''”时,音轨将忽略任何自动化数据。它将仅仅播放淡化器所设置的任何音量。在这种模式下,您可以手动移动音轨淡化器来设置一个新的固定的电平。这是音轨在它被第一次创建的时候的默认方式。 |
| − | Play | + | '''Play 播放''':当设置为“''Play 播放''”时,音轨将自动化地跟随自动化音轨里所描绘的自动化曲线绘制来改变增益电平。您将不再能够手工移动音轨淡化器。在回放期间,您将看到音轨淡化器根据曲线上下移动。 |
| − | Write | + | '''Write 编写'''模式将在播送播放时持续不断地记录用户更改自动化参数,创建一个自动化线条。例如,您可能会开始播放,然后使用您的音轨的淡化器在增益里进行实时的修改。您做出的所有更改都将被作为一个自动化线条而编写(recorded 记录),然后,您可以在稍后通过切换自动化模式,回到Play播放模式来回放。 |
| − | Touch | + | '''Touch 改动'''模式类似于Write编写模式。然而与编写模式不同的是,改动模式不会记录超过现有的自动化数据,除非参数被改变。 |
| − | + | 如果这些概念对您来说都是崭新的,那么现在只需关注的前两个模式即可(Manual手动和Play播放),并且通过手工实践练习描绘自动化曲线来创建自动化。 | |
| − | == | + | ==创建一个插件自动化== |
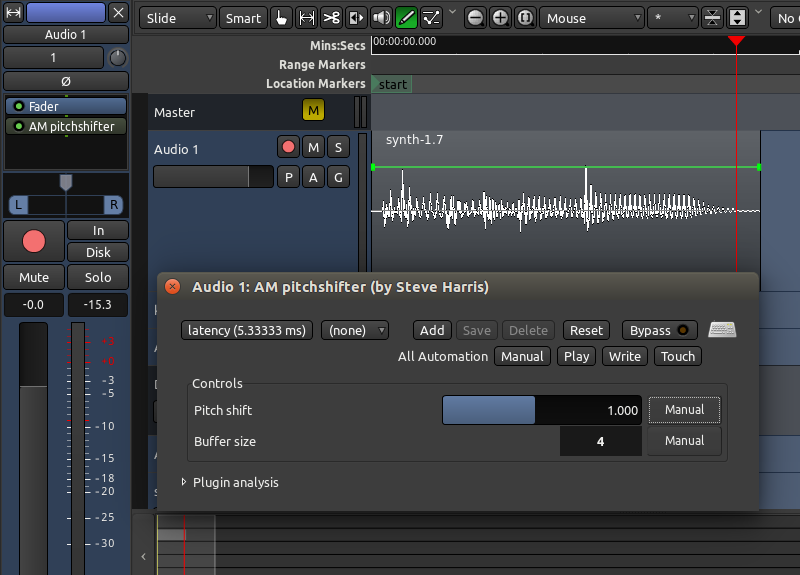
| − | + | 您可以添加自动化到已经添加到音轨的任意插件。在下面的例子里,我们有一个音轨已经添加了一个“'''AM pitchshifter 中波音高替换器'''”插件。 | |
http://brunoruviaro.github.io/ardour4-tutorial/images/Ardour4_Automation_Plugin1.png | http://brunoruviaro.github.io/ardour4-tutorial/images/Ardour4_Automation_Plugin1.png | ||
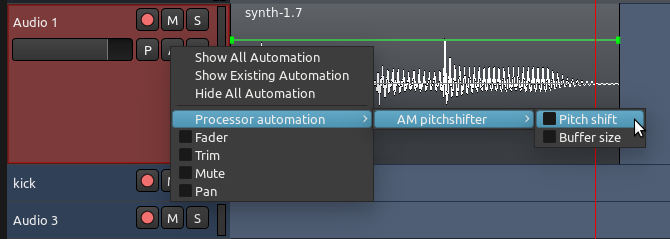
| − | + | 要为自动化选择一个插件参数,点击音轨上标记为“''a''”的按钮,菜单就会弹出。在“''Processor Automation 处理器自动化''”(注:子菜单)下,您会发现您已经为那条音轨所添加了的插件的列表。 | |
http://brunoruviaro.github.io/ardour4-tutorial/images/Ardour4_Automation_Plugin2.png | http://brunoruviaro.github.io/ardour4-tutorial/images/Ardour4_Automation_Plugin2.png | ||
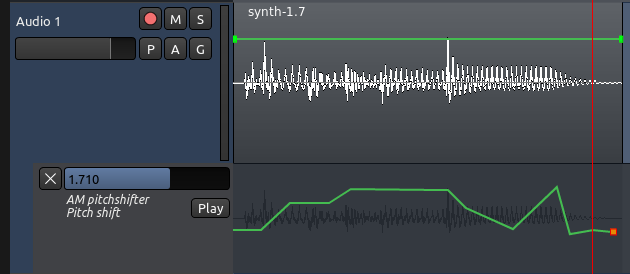
| − | + | 在所列出的每个插件中,您可以从列表中选择您打算要自动化哪个参数。在这个例子中,我们选择的是“'''AM pitchshifter 中波音高替换器'''”插件的参数“''Pitch shift 音高替换''”,这个参数的一个自动化音轨即可出现。注意,当您打开多个自动化音轨时,它们会在主父系一级音轨下方一个接一个地出现。 | |
| − | + | 为那个参数描绘一个自动化曲线。别忘了设置自动化状态为“''Play 播放''”。 | |
http://brunoruviaro.github.io/ardour4-tutorial/images/Ardour4_Automation_Plugin3.png | http://brunoruviaro.github.io/ardour4-tutorial/images/Ardour4_Automation_Plugin3.png | ||
| − | + | 在上面的图片中,声音的音高替换正在随着时间的推移而改变,由曲线控制这一过程。 | |
| − | + | *提示:您可以隐藏一个自动化音轨,只需点击位于自动化音轨左上角的“''X''”即可。注意,一个隐藏的自动化音轨仍继续发挥着作用,即使它是不可见的。 | |
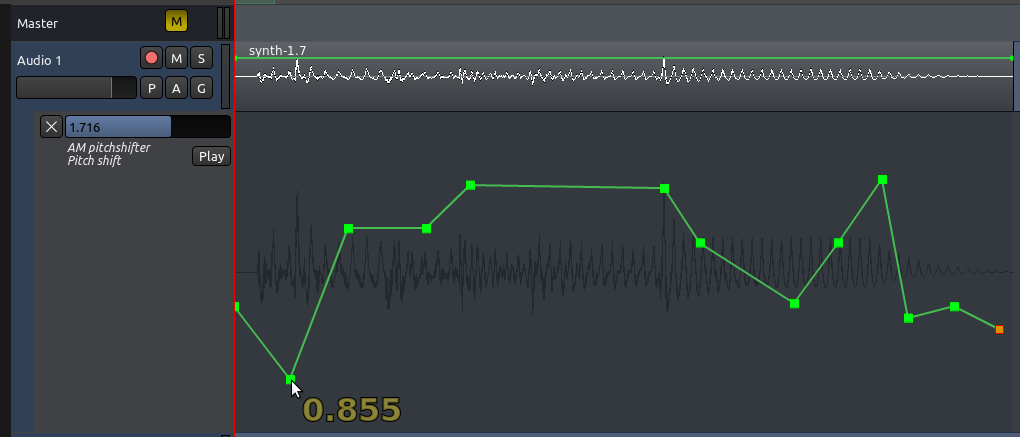
| − | == | + | ==为自动化提高可视分辨率== |
| − | + | 您可以通过增加自动化音轨的高度来获得一个更大的垂直精度。移动你的鼠标靠近自动化音轨下方的边缘。鼠标指针变成一个垂直双箭头。按着它拖下来即可增加自动化音轨的高度。注意,到父系一级音轨和自动化音轨的高度是各自独立的,因此,当您在您的自动化曲线里工作时,你可以像这样来设置它们: | |
http://brunoruviaro.github.io/ardour4-tutorial/images/Ardour4_Automation_Plugin4.png | http://brunoruviaro.github.io/ardour4-tutorial/images/Ardour4_Automation_Plugin4.png | ||
| − | + | *提示:记住您也可以在水平轴向上通过放大和缩小来增加分辨率。(注:快捷键是大键盘的“''+''”和“''-''”) | |
| − | == | + | ==自动化点的常用操作== |
| − | + | 这里有几种方法可以调整自动化点,取决于您所在编辑模式: | |
| − | + | *一个自动化点可以用鼠标往任何方向拖拽(工作于抓取、描绘、以及编辑模式)。(注:把鼠标放在自动化点上,鼠标变成“小十字”,点击那个点,即可拖拽。如果鼠标没变成“小十字”点击则是添加点。) | |
| + | *要删除一个自动化点,只需按住“''Shift''”键不放,在那个点上面右键点击它(工作于抓取、描绘、以及编辑模式)。(注:把鼠标放在自动化点上,鼠标变成“小十字”,右键点击那个点,同时弹出的菜单里也有删除选项。) | ||
| + | *“''Ctrl''”+''点击''+''拖拽'',可以向任何方向移动当前点,并且在所有水平方向上,当前点及其随后的点也一起移动(工作于抓取、描绘、以及编辑模式)。 | ||
| + | *仅在编辑模式下:自动化线条上任何两个自动化点之间的线段都可以垂直拖拽,即同时影响两个端点,而不影响它们的水平位置。只需简单地在两点之间直线上(注:鼠标变成“大十字”)的某个地方点击,然后即可上下拖动。 | ||
| + | *如何一次删除多个自动化点(仅在抓取模式和编辑模式下):通过音轨的背景上使用鼠标在几个点周围拖拽画出一个方框,选中多个自动化点。然后被选中的这些点可以被删除,只需按下“''Delete 删除''”键(不是“''Backspace 退格''”键)。如果您是在Mac(苹果)系统上,没有一个真正的“''Delete 删除''”键,可以尝试使用“''Function 功能''”+“''Backspace 退格''”键。 | ||
| − | + | 在自动化曲线末端之后,它们的数值将为所有后续区域保持在这一电平,不论您是否延续描绘曲线。 | |
| − | + | http://brunoruviaro.github.io/ardour4-tutorial/images/Ardour4_Automation_Fader_End.png | |
| − | + | 在上面的示例中,曲线的最后一点位于 -8.95 分贝。剩余的音轨将保持同样的电平,尽管那线条不是一直描绘到最后。 | |
| − | + | ==移动自动化== | |
| − | + | 移动一个区域到一个新的位置将会自动地也把对齐着的自动化数据一起移动,正如下面的屏幕截图我们可以看到的: | |
| − | + | 移动前: | |
| − | + | http://brunoruviaro.github.io/ardour4-tutorial/images/Ardour4_Automation_Moving_2.png | |
| − | + | 移动后: | |
| − | + | ||
| − | + | ||
| − | + | ||
| − | + | ||
| − | + | ||
| − | |||
http://brunoruviaro.github.io/ardour4-tutorial/images/Ardour4_Automation_Moving_2.png | http://brunoruviaro.github.io/ardour4-tutorial/images/Ardour4_Automation_Moving_2.png | ||
| − | + | 如果你愿意,你可以改变这种行为方式。换句话说,如果您打算让自动化曲线保持在原地,即使您移动区域也不改变,那么可以去菜单里设置:''Edit 编辑'' > ''Preferences 首选项'' > ''Editor 编辑器'',取消勾选 “''Move relevant automation when audio regions are moved 当音频区域移动时,也移动相关的自动化''”。 | |
| − | == | + | ==区域特异性增益自动化== |
| − | + | 有一种方法可以创建一个直接绑定到一个区域的增益自动化。当您选择描绘模式时,在每个区域矩形的上半部分,您应该可以看到一个平直的线条:(注:这线条位于音频的原始区域音轨上,并不是在自动化音轨上。) | |
http://brunoruviaro.github.io/ardour4-tutorial/images/Ardour4_Automation_Region_Specific_1.png | http://brunoruviaro.github.io/ardour4-tutorial/images/Ardour4_Automation_Region_Specific_1.png | ||
| − | + | 在那线条上直接点击即可创建自动化点。这将直接在区域本身上描绘,这与在自动化音轨里描绘或记录的淡化器自动化有所不同。区域增益自动化与与淡化器自动化是分开不同的。 | |
http://brunoruviaro.github.io/ardour4-tutorial/images/Ardour4_Automation_Region_Specific_2.png | http://brunoruviaro.github.io/ardour4-tutorial/images/Ardour4_Automation_Region_Specific_2.png | ||
| − | + | 与自动化音轨一样,一个'''Gain Automation Point增益自动化'''点可以用鼠标往任何方向拖拽。要删除一个增益自动化点,只需按住“''Shift''”键,右键点击它即可。 | |
| − | === | + | ===撤销激活和移除增益自动化=== |
| − | + | 增益自动化可以重置或着不激活,就在右键点击该区域弹出的右键菜单里。 | |
http://brunoruviaro.github.io/ardour4-tutorial/images/Ardour4_Automation_Gain_Tool_Reset.png | http://brunoruviaro.github.io/ardour4-tutorial/images/Ardour4_Automation_Gain_Tool_Reset.png | ||
| − | + | 在这里,增益自动化被称为'''Envelope 封装'''。 | |
| − | + | “''Reset Envelope 重置封装''” 将移除您在区域里描绘的增益自动化点。 | |
| − | + | “''Envelope Active 封装激活''” 将切换增益自动化封装开启或者关闭。 | |
| − | === | + | ===什么时候我该使用区域增益自动化或音轨淡化器自动化?=== |
| − | + | 正如上述所看到的那样,两者是非常相似的。通过练习您就会发现那些一个比另一个更方便的情况。这里有两个例子: | |
| − | + | *如果你所需要做的仅仅是在区域的一个特定部分做一点点的润色(减少或放大增益),并且您对余下的段落或整个音轨的电平感到满意,那么就使用区域特异性自动化。 | |
http://brunoruviaro.github.io/ardour4-tutorial/images/Ardour4_Automation_Region_Specific_2.png | http://brunoruviaro.github.io/ardour4-tutorial/images/Ardour4_Automation_Region_Specific_2.png | ||
| − | + | *如果您有一个更复杂的音轨,带有跨越整个区域的crossfades交叉淡化(淡入淡出),并且/或者需要在同一音轨里,穿过几个区域来塑造一个更长的动态曲线,那么就使用淡化器自动化。 | |
http://brunoruviaro.github.io/ardour4-tutorial/images/Ardour4_Automation_Gain_Comparison.png | http://brunoruviaro.github.io/ardour4-tutorial/images/Ardour4_Automation_Gain_Comparison.png | ||
| − | + | 上面的截图显示了一个简单的渐进式淡化,从音轨里的第一个区域开始,且结束于最后一个区域。用淡化器自动化来实现就非常直接明了,但如果用区域特异性自动化来做则会相当困难。 | |
=<center>— [[Ardour完全教程|返回主目录]] —</center>= | =<center>— [[Ardour完全教程|返回主目录]] —</center>= | ||
2016年3月7日 (一) 22:01的最新版本
混音区域
Mixing混音是将多个音轨转化为一个让所有仪器都能清晰听到的Stereo Mix立体声混音的过程,。
混音工具
用来实现一个好的混音的主要工具有Levels电平,Panning声相偏移,Equalization均衡(EQ)和Compression压缩。除了这些核心工具,众多的插件效果也可以用来优化声音,例如Reverb混响和Delay延迟。
混音器工具栏简介
Mixer Strip混音器工具栏是垂直排列的,包含有相关信号流的各种控制元件。在Ardour里的每个音轨和总线都拥有属于它自己的混音器工具栏。混音器工具栏也是我们在混合我们的音轨的过程中将要使用到的主要工具。在这一章节里,我们将对混音器工具栏做一个总体概述,并且对每一个部分进行阐述。我们还将列出包含有混音器工具栏各个方面特定信息的参考章节。
自上而下的混音器工具栏
混音器工具栏既以从Editor Window编辑器窗口也可以从Mixer Window混音器窗口访问到(快捷键“Alt”+“M”可以在两者之间切换)。混音器工具栏在任何一个窗口(不论是编辑器或者是混音器)上的操作都会互相镜像到另一个窗口:在混音器窗口里的一个混音器工具栏上执行的任何操作,将会被反映在编辑器窗口里相应的混音器工具栏中,反之亦然。在界面概述章节中对编辑器窗口和混音器窗口有更充分的讲解。
在Editor Window编辑器窗口中,您可以看到当前被选中的音轨的混音器工具栏位于窗口的左边。如果您没有看到它,按下“Ctrl”+“E”即可显示编辑器混音器工具栏。
概述
在这里我们看到的是整个混音器工具栏,正如它在编辑器窗口或混音器窗口里出现的那样。

常规模式和狭窄模式
混音器工具栏可以在常规宽度和一个为了节约空间而更狭窄的宽度之间切换。混合器工具栏的最顶端部分,如下图所示,使用左边的按钮即可切换常规模式和狭窄模式。右边的按钮则是用于彻底隐藏混音器工具栏。

音轨名称和路由按钮
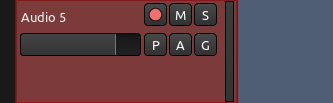
继续从上往下看,混音器工具栏的下一部分包含三个狭长的区域。这些区域的第一个显示的是音轨的名称(即下图所示的那个词“Audio 1”)。下一个区域,在下面这张图里命名为“1”的是一个按钮,允许访问输入路由。请参阅了解路由和录制音频章节可以了解关于输入路由的更多信息。最后一个狭长的区域控制的是phase reversing相位反转(在本教程我们不会深入讨论关于这个主题的细节)。
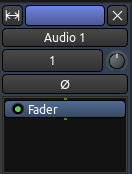
处理器框
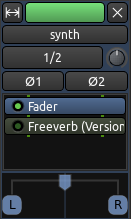
这部分底部的大片黑色区域是Processor Box处理器框(注:上面的那张图)。在这里您可以添加插件等,诸如此类的操作。处理器框将总是包含着一个蓝色的Fader淡化器处理器。这表明在处理器链条里已经安置了主要的声道淡化器——这就是淡化器在工具栏的下半部分所显示的。请参阅使用插件和使用发送章节里对这部分区域的详细讨论。
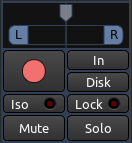
混音器工具栏的下一部分包括有Panning声相偏移,Record录制,Mute静音,以及Solo独奏,还有其它等等控制元件(注:下面的这张图)。
声相偏移
Panning声相偏移与左右扬声器之间声音的位置协同工作。有关更多信息请参阅声相一章。
独奏
当一条音轨或总线处于Solo独奏状态时,所有其它没有同样处在独奏状态的音轨或总线将会无法通过主控总线或监听来听见。我们也可以在音轨混音器里找到一个小型化的独奏按钮。注意,独奏一条总线不会令任何音轨无声,反之亦然。
当任何音轨或总线处在独奏状态时,在辅助控制工具栏里的Solo Indicator独奏指示器将闪亮红色。当这个独奏指示器闪烁时,点击它将会在会话中使每一个独奏都失效。

静音
任何音轨或总线处在Mute静音状态时,将无法通过主控总线或试听来听见。音轨混音器也包含有一个小型化的静音按钮,就位于录制预备按钮和独奏按钮之间。右键点击静音按钮将会为你弹出关于静音按钮行为的高级选项。
预备录制
录制按钮用于为录制预备音轨,请参阅录制音频章节。
淡化器,淡化 / 峰值计量仪
出现在混音器工具栏上的最突出的控制元件就是Fader淡化器,用于调整相应音轨或总线的整体增益。Peak Meter峰值计量仪显示的是已选中的音轨的峰值数值,就位于淡化器的右侧。每个由一个Bar Graph柱状图组成的峰值计量就仪是对应于一个单声道音轨,而两个柱状图就是对应于立体声音轨。计量仪上方的小的矩形里的数字显示的是到目前为止那个音轨所播放过的最高峰值数值。
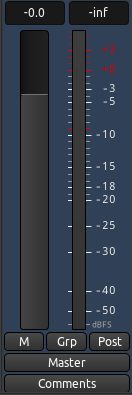
通过点击混音器工具栏底部右手边的按钮(即上图中标有“Post”的那个按钮),您将能够选择Metering Point计量点,例如从声卡直接“in 入”,“pre前置”淡化信号,或者“post后置”淡化信号。
正如您在下图中可以看到的那样,在每个音轨里都有一个较小版本的混音器工具栏,叫做Track Mixer音轨混音器。它包含有一个水平Fader淡化器,一个垂直Peak Meter峰值计量仪,也同样有微型的Arm Record预备录制按钮,Mute静音按钮,和Solo独奏按钮。它们都与音轨上的混音器工具栏里的按钮是相互镜像工作的。
关于使用淡化器和峰值计量仪更详细的说明请参考混音电平章节。
路由
最后,我们到达混音器工具栏的底部。这里我们能看到Output Routing Button输出路由按钮,即在前面的屏幕截图里标记为“master主控”的那个按钮,在理解路由章节中讲解过。
混音电平
Levels电平是每个音轨相对于其它音轨的音量。
如果您无法听到一个高于其他乐器的低音片段,显而易见的选择就是提高这个低音片段的音量。电平可以通过使用位于混音器工具栏或者每个音轨里的淡化器来调节,就在音轨的名称下方。混音的第一步是试听所有已经录制好的每一个声音,然后调节所有音轨的电平以便您能听清楚一切,除了为适合歌唱的表现手法以外。例如,声乐音轨通常比韵律吉他大声一些,因为人声正是歌唱作品的焦点。
使用淡化器
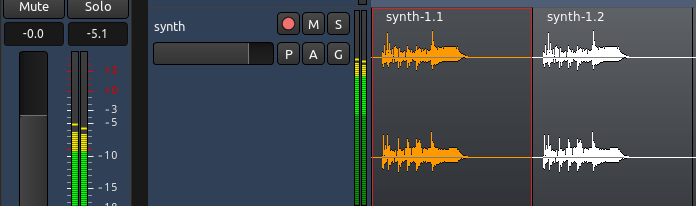
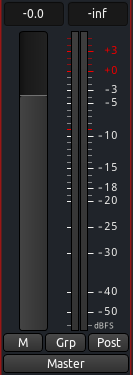
淡化器是每一个音轨的音量的主要控制元件。音轨电平的精确数值水平显示在淡化器上方的小的矩形数字区域。您可以通过拖动滑块或者在带有数字的矩形里直接键入一个新的数字来改变电平。淡化器默认被设置为 −0.0 dB,这意味着音轨的电平并没有改变。在下面的截图中,名为“synth”的音轨的淡化器设置为 -0.0,并且峰值计量仪显示到目前为止的最高峰值为 -5.1。
避免截波
混音的另一个重要的工作是避免Clipping截波。当信号已经达到峰值高于 0.0 dB 时,混音器工具栏上的峰值变成红色。您可以在混音时使用这个工具来监控您的音轨的最高电平。
在下面的截图中,名为“synth”的音轨刚刚被截去了 + 5.9。您还可以看到在它自身波形上的小小红色边缘,表明了以录制的声音被截去数据的确切位置。
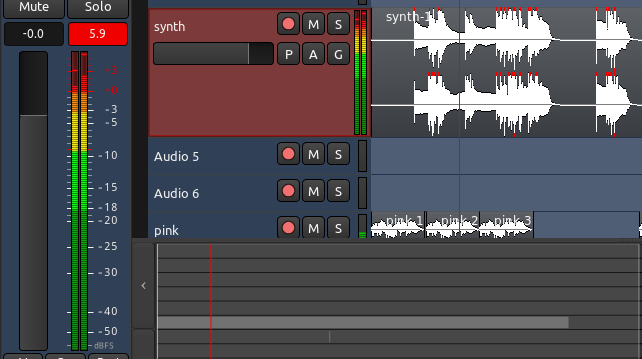
在峰值计量仪里的红色数字上点击,可以重置它。
- 提示:为了练习的方便,可以试着录制您的声音片段,然后让它出现截波。听一听回放是如何被扭曲的。
您应该确保任何您发送到您的声卡或者您将最终导出成为的一个声音文件(诸如 CD 母碟)永远不要超过0.0 dB 来避免出现实际的截波。
如果截波发生于一个沉重的打击乐的声音里,它几乎无法察觉到。您可以通过减少增益来隐藏它(例如,规范化区域到 0.0,或者一个更低的数字,例如 -1.0 )。然而,通常截波会导致已录制的声音能听到失真。在这种情况下,最好的解决方案是以较低的电平重新再录制一次。
声相偏移
Panning声相偏移有助于构建一个Stereo Field立体声音场,在扬声器之间的相对空间里面,放置您的声音和乐器。
一旦您在所有音轨上构建了一个良好的平衡的电平,您就可以开始考虑声相偏移。
声相偏移的界面
在Ardour里,Panning声相偏移的控制是位于混音器工具栏的中部。
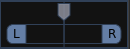
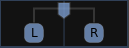
一个单声道音轨将拥有一个Mono Panner单声道声相器。它看起来像是这样:
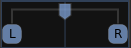
一个立体声音轨将拥有一个Stereo Panner立体声声相器,像这样:
单声道声相器
默认的单声道声相器分布着一个输入到二个输出。其行为是由一个单独的参数控制,即位置。默认情况下,声相器位于中央。您可以通过直接在单声道声相器上点击和拖动来改变这个位置。在声道器上右键单击可访问到它他选项。
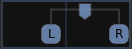
立体声声相器
默认的立体声声相器分布着 2 输入到 2 输出。其行为是由两个参数控制,即宽度和位置。默认情况下,声相器位于整体宽度的中央。
不论单击并拖动Left左边或者Right右边的按钮,都可以改变宽度。例如,如果您拉近它们之间的距离,它看起来将会像是这样:
在一个狭窄的宽度下,您还可以拖动顶部把柄,用来改变相对的中心位置,像这样:
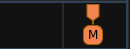
如果我们让Left左边和Right右边的按钮完全重叠(也就是说,宽度减少到零),把手会转变成一个单独的信号指示器,标记为“M”(即 mono 单声道):
声相偏移技巧
关于声相偏移的理念和技术更广泛的讨论超出了本教程的范围,但这里有一些通用的经验法则:
- 吉他更倾向于被声相偏移到左边和右边。
- 声乐和低音更倾向于被放置在中央。您打算创建一个平衡,这样一边不会比另一边更大声。
- 耳机可能有助于决定乐器应该被如何声相偏移,以及混音感觉是否不均衡,因为其中一边太大声了。
在创建一个“spatial有空间感”或者立体声音场时,另外两个很有用的工具是Reverb回声和Delay延迟。这些效果可以一起用于发送到创建一个鼓声发送,将带有混合着更多的回音的向后趋势。也可以用于一个可能会稍微有一点延迟的声乐发送,但声音比较接近鼓声。要了解更多的信息请参阅使用插件和使用发送章节。
提示:在对音轨进行声相偏移时,应当总是注意您的电平!声相偏移一条音轨到一个声道会增加那个声道的电平。这可能会改变您在之前章节里设置的电平的平衡,并且在极端情况下可能导致截波。当这种情况发生时,降低那条音轨的整体电平,并再次检查它在混音里所处的位置。
使用插件
Plugins插件可以用来改善或改造各个音轨的声音。
它们可以直接应用于一个单独的音轨,或者使用一个Send发送端的一组音轨。稍后在本教程中,我们将讨论一些插件,尤其是针对的混音过程的,诸如Compressors压缩器、Limiters限制器、Parametric Equalizers参数均衡器、Reverbs混响器等。
处理器框
在Ardour的术语里,一个Processor处理器就是被插入一个混音器工具栏里的任何东西,并且会将信号以某种方式进行处理。Ardour提供了一些内置的处理器,诸如Fader淡化器或者Panners声相器。处理器也可以是插件,用于产生特效影响或者作为乐器,也可以是发送端或者能影响信号路由的插入件。处理器的排序是可以任意的,且不限制可以有多少个。
上面截图所示的主要空间就是处理器框。蓝色的框Fader淡化器实际上就是默认在处理框里的一个处理器。它代表了您用来控制音轨的音量的Fader淡化器。所有的处理器都显示为彩色矩形,在它们的旁边有一个小小的“LED灯”,在处理器被启用时即点亮。处理器的颜色取决于它在序列里的位置;pre-fader前置于淡化器呈现红色,post-fader后置于淡化器呈现绿色。
添加一个插件到一条音轨或一条总线
可以通过在音轨或总线的处理器框里右键点击来添加插件。会弹出一个菜单选项。从菜单中选择,新的处理器即可被插入。
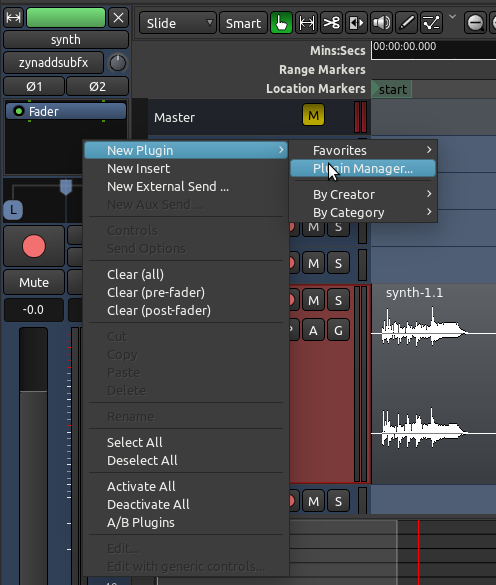
插件管理器是浏览和选择插件的一个方便途径:
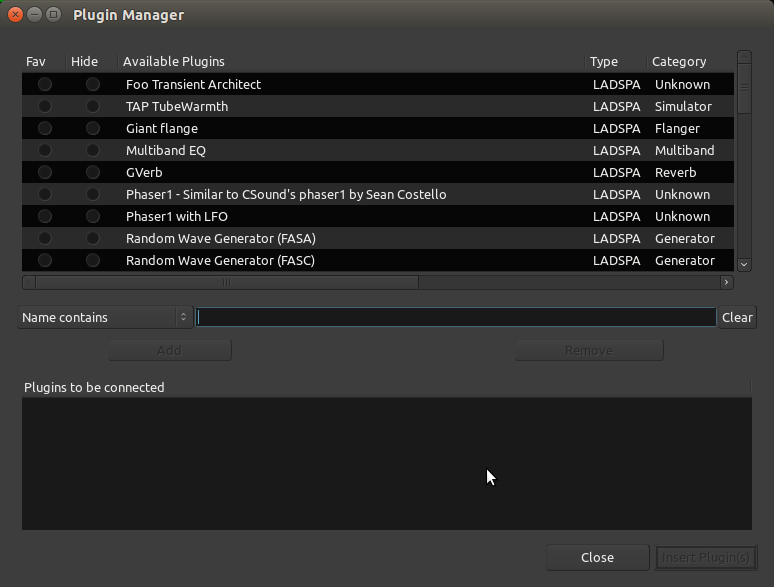
您可以从插件管理器中搜索插件,通过它们的名字,类型,或者通过从下拉菜单中可用的其它搜索参数来搜索。例如,我们将添加的reverb混响插件被称为“Freeverb”:
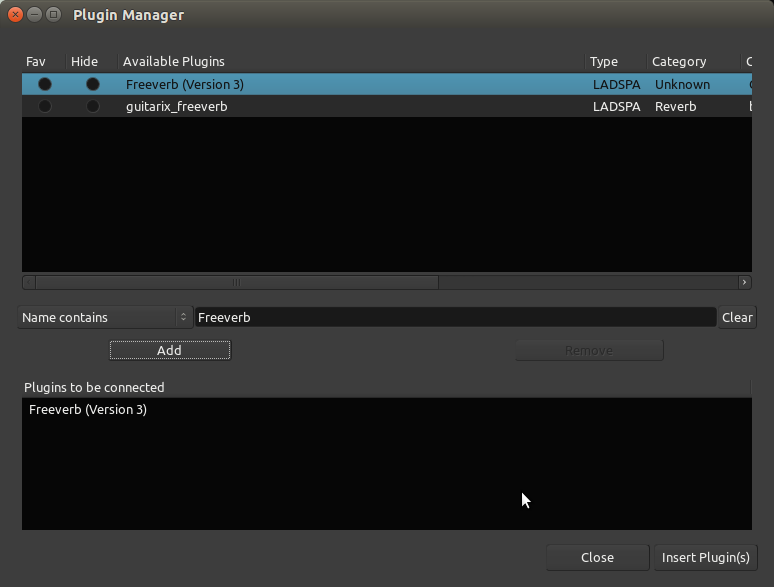
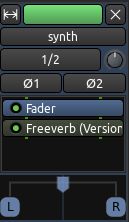
一旦插件被选中,点击“Add 添加”则插件将出现在底部的“Plugins to be connected 被连接的插件”列表里。然后单击“Insert Plugin(s) 插入插件”,则它们将会出现在处理器框里。
编辑插件参数
双击一个插件即可编辑它的参数。在这个例子中,我们双击“Freeverb“绿色框,然后弹出这个窗口:
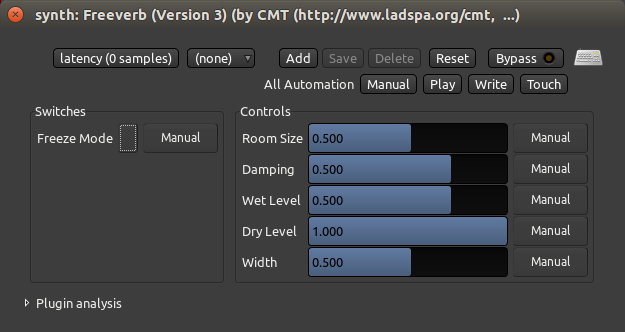
这里您可以控制reverb混响参数,诸如oom Size,房间大小、Damping衰减、Wet湿润和Dry干燥信号的程度,以及Width宽度。这效果将会应用到音轨里所包含的所有声音。
略过插件
要略过一个插件,在插件设置窗口里按下“Bypass 略过”按钮即可,或者在处理器框里简单点击插件的“LED灯”也行。这样就把插件关闭了,允许信号通过它而不受影响。这是非常有用的,尤其是当您想要比较一条音轨有或没有插件听起来会是什么样子时。
被略过的插件带着已关闭的“LED灯”显示呈灰色。
鼠标右键单击插件将会弹出带有几个选项的菜单,包括有Delete删除。
前置于淡化器和后置于淡化器
您可以选择您是否想在Processor Box处理器框里位于淡化器矩形框的之前或之后添加您的插件。Pre-Fader Plugins前置于淡化器插件被插入在淡化器之前的信号路径里,这样淡化器控制从插件出来的信号的电平。Post-Fader Plugins后置于淡化器插件被插入在淡化器的后面:淡化器控制进入插件的信号的电平。对于一些插件,Pre-前置或Post-后置于淡化器的放置并不重要。对另一些插件来说,这两者的区别是微妙的。而对于其它一些插件而言,插入它们到正确的位置是绝对必要的。
插件格式
对那些有兴趣学习更多关于插件格式的朋友,下面是一个快速概览:
LADSPA 插件是Ardour的“native原生”插件格式。他们最初是为Linux开发的,但此后也一样已经被移植到OS X。
LV2 是一个简单的但可扩展的 LADSPA 后继版本,可以用图形化的方式来显示声音特征。LV2 插件可以在OS X和Linux上使用。
AU 插件是OS X的“native原生”插件格式,在Ardour中,它们只会在您在下载程序时捐了款时工作。更多的详细信息,请参阅安装于OS X章节。AU 插件根本不会在Linux上工作。
VST 插件是一个与微软Windows共有的插件格式。一些 VST 插件可以在Linux上使用,然而它们可能不会正常工作,甚至会导致Ardour崩溃。使用这些插件需要手动编译Ardour应用程序,这个工作超出了本手册的范围。
关于使用Ardour插件的更多信息可以在这里找到: http://manual.ardour.org/working-with-plugins/
使用发送端
一个发送端就是带有它们自己独立淡化器的一条音轨或总线的一个额外的输出,可以用来把信号路由到Ardour里的其它应用点上。
这也称为Auxiliary Sends辅助发送端,它们信号流的特定点上采用信号(pre-fader前置于淡化器,post-fader后置于淡化器,在EQ均衡器之前或之后,以及其它插件,诸如此类等)并发送信号的一个副本到别的地方,,而不影响正常的信号向下流动到声道淡化器。
在Ardour中,您可以很容易地通过混音器工具栏添加Sends发送端到音轨和总线上。发送端是处理器,就像插件一样。
何时该用发送端?
在前面章节中,我们构建了一个鼓声组件架构,带有四个独立的音轨:kick底鼓,snare军鼓,hihat踩镲,以及clap拍击。让我们假设现在您打算添加一个鼓声的reverb回音。当然您可以为每个单独的音轨分别添加一个单独的插件,并且分别单独调整它们的设置,但这种方法增加了许多不必要的工作量。每次您打算全盘地为所有的鼓声改变一个reverb回音设置,您都必须打开所有四个reverb回声插件,然后以同样的方式修改它们。
- 这就是发送派上用场的时候:您可以使用它们来为一组音轨添加一个特殊效果,而不需要创建多个带有相同插件的实例。
以下是我们将如何实现这方法的概述:
- 创建一个带有所需插件的单独的总线。
- 为您打算实现那个效果的每一个鼓声音轨都添加一个发送端。
- 路由这些发送端到总线上。
创建总线并添加一个插件
创建一条总线(菜单 Track 音轨 > Add Track or Bus 添加音轨或总线),为它取一个适当的名称,然后在前置于淡化器区域里添加一个插件(在处理器框里的淡化器蓝色矩形的上面右键点击),正如使用插件章节里所阐述的那样,
在本例中,我们创建了一个名为“DRUMS 鼓”的单声道总线,并且添加了“Freeverb“ 这个 Reverb 回声 LADSPA 插件到总线。
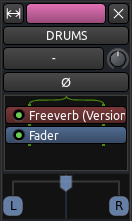
总线输入端
显示在总线输入按钮上的”-“号表明,目前还没有任何东西被路由到这条总线。稍后我们将会留意这里。
总线输出端
在路由一个发送端到这条总线之前,首先确保总线输出端已经被路由到主控总线。如下图所示(底部的按钮标有“master 主控”)。
另外,打开插件窗口(双击 Freeverb 矩形)然后设置插件的信号以 1.0 Wet Level 湿润度和 0.0 干燥度混合。
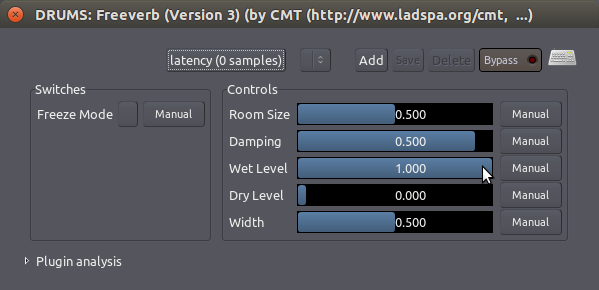
这确保总线携带了所有来自那个插件的已经处理过的信号(即“Wet 湿润”信号),并且没有未处理过的信号(即“Dry 干燥”信号)到主总线。记住,未处理过的”clean 干净“信号仍然可以来自于它们原来的音轨,因此在这条总线里没有必要复制它们。
创建并路由发送端
现在我们可以在其它音轨上创建发送端,并且将其路由到总线的输入端。
像插件一样,也可以在处理器框中创建发送端。在您的每个鼓声音轨上,在处理器框里右键单击空白处,然后创建一个 New Aux Send 新建辅助发送端,定向到恰当的总线(在我们的示例中,名称为 DRUMS 鼓)。
您现在应该可以看到,发送端出现在处理器框中:
你可以看到,刚好在绿色的矩形下面,有个小小的“Send 发送端”滑块,这是发送端淡化器,用于控制把多大的声音从这个音轨发送到总线。
后置于淡化和前置于淡化发送端
注意上图显示的是 Post-Fader Send 后置于淡化器发送端(它位于淡化器矩形的“after 后面”)。在后置于淡化发送端里,Send Level 发送级别是,第一级由音轨/总线淡化器一起控制,然后第二级由发送端淡化器控制。
在 Pre-Fader Send 前置于淡化器发送端中,另一方面。发送级别仅仅由发送端淡化器来控制,独立于音轨/总线淡化器。一个前置于淡化发送端看起来将会像是这个样子:
您可以在处理器框里上下拖拽发送端的矩形,根据需要让它前置于或者后置于淡化器。
- 提示:根据所使用的效果插件的类型,以及所期望的结果,来选择前置于或者后置于淡化器。对于本次练习,哪种都可以正常工作。
在处理器框里,一个发送端的行为就像任何其它的插件。您可以通过单击那个小小“LED灯”来暂时禁用它,并且您可以在矩形上右键单击来访问其它选项,包括“Delete 删除”。
发送端淡化器
要控制各个发送端的电平,只需单击并且拖动发送端淡化器,即可加大或者减小它的音量。
“DRUMS 鼓声”总线现在正在接收所有音轨的和,并且对它应用插件效果。一个应用于总线的单独的插件,控制着路由到那里的所有的鼓声的效果。以这种方式,您拥有对原始音轨“dry 干燥”(注:未处理过的)声音的独立控制,并且把“wet 湿润”(注:已处理过的)的声音流出总线。
因为这种带特效插件工作的类型,发送端是非常有用的,所以它们也通常被称为“Effect Sends 特效发送端”。
动态
在混音时您可能遇到的问题之一就是太大声,并且/或者安静的部分太安静。
如果使用的淡化器来单独调节电平,则这类问题不容易得到解决。您也许会设置过高的电平导致它们出现截波,或者您可能会通过简单地提高电平来增加不必要的背景噪音。所有这些问题都被称为 Dynamic Range 动态范围,即,您的会话中最大声部分和最安静部分之间的区别。在Ardour里有几种类型的工具可作为Plugins插件使用,可以用来调整动态范围,包括Limiting限制,Compression压缩和Gating闸门。
限制
一个 Limiter 限制器就是防止一条音轨的音量超过一定电平的一种工具,通常Peak Level峰值水平(0 dB 分贝)或接近它。许多限值器带有在实施限制之前就先提高导入信号电平的选项,通过这种方式您可以在您的混音最大声部分和最安静部分之间“ close the gap 缩小差距”。限制器可以用在主控总线上以避免整体混音出现Clipping截波。限制器几乎总是使用Post-Fader后置于淡化器。
可以在插件当中在找到 “Fast Lookahead Limiter 快速前瞻限制器”。要设置前瞻限制器多大的限制量,只需简单调整 “Limit (dB) 限制( 分贝)”滑块。快速超前限制器会如同字面上的含义那样“looks ahead 超前预览”在几毫秒的信号,当它看到的信号将要超过您设置的限制,它会自动将电平降低下来。
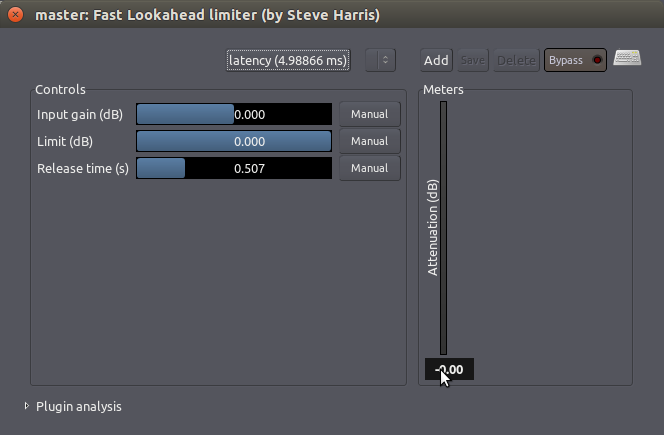
“Input Gain (dB) 输入增益(分贝)”滑块决定了到达限制器之前电平被加大多少量,位于右手边的“Attenuation (dB) 衰减(分贝)”计量仪显示在任何给定的时刻有多大的电平正被减少(注:“给定的时刻”即指针所在的时刻)。与此同时音量的降低是接近于即时发生的,“Release time (s) 发布时间(秒)”滑块决定了需要多长时间它才让限制器的衰减返回到 0 分贝。
注意, “harder 越是努力”驾驭限制器(通过增加输入增益并且/或者减少允许的最大峰值限制),限制器被迫作出的缩减就越多,就越有可能令这个处理呈现人工化的痕迹(诸如Distortions扭曲失真或音量的改变不稳定)。在主控总线上,一般来说最好避免过多的限制。
压缩
一个Compressor压缩器能提高声音的整体音总量,但之后“squeezes 压榨”的分量取决于它有多大声。这可以使声乐的人声听起来更均衡,或者使鼓声更饱满和响亮。最终的效果是类似于一个限制器能减少最安静和最响亮的声音之间的范围那样,然而在使用压缩器时,这效果有更多的可选择项目。
最简单的压缩器只有相对较少的几个控制元件,诸如下面所示的“Simple Compressor 简单的压缩器”插件。在这里,“Threshold 临界值”设置的是触发压缩器开始行动的电平,“Compression Ratio 压缩比”控制着该压缩器将“squeeze 压榨”多少声音。“Attack 上冲”和“Decay 衰减”参数控制着压缩器以多快的速度来影响这声音。

一个更复杂的压缩器,“SC1 Compressor 压缩器”插,如下图所示。
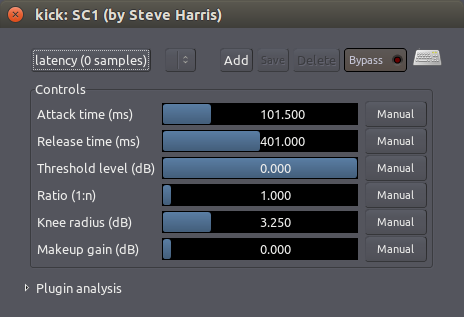
它有三个主要的按钮:
- “Threshold level (dB) 临界水平(分贝)”设置压缩器将压缩或者压榨这声音的电平。
- “Ratio (1:n) 比率(一比N)”控制它在的大道临界值时,将压榨多大程度。
- “Makeup gain (dB) 增益补偿(分贝)”用于在压缩的过程中提高整个信号的音量。
要舒柔化一个声乐,例如,您可以设定一个“Threshold level 临界值电平”大约为 10 dB,并且“Ratio 比率”为 2.5,然后使用“Makeup gain 增益补偿”来补充音量。
其它三个控制——“Attack time (ms) 上冲时间(毫秒)”,“Release time (ms) 释放时间(毫秒)”以及“Knee radius (dB) 拐点半径(分贝)”——允许您控制这个压缩的数学曲线的形状。
对于舒柔化声乐压缩,您会想要一个 semi-fast 稍快的“Attack time 上冲时间”,以便压缩器捕获每个歌词的开头,还有一个 slower 较慢的“Release time 释放时间”来让人声响起,以及一个 soft 舒缓的软“Knee radius 拐点半径”来为压缩创建一个不太明显的温和形态。
如果您想让鼓声听起来宏大,您可以尝试使用一个缓慢的“Attack time 上冲时间”这样您就不会压缩鼓的敲击声,用一个快速的“Release time 释放时间”以便压缩器可以捕获鼓的下一个敲击声,还有用一个很大的“Ratio 比率”来让鼓声敲击在开始和结束之间的 Dynamics 动态较为相似。
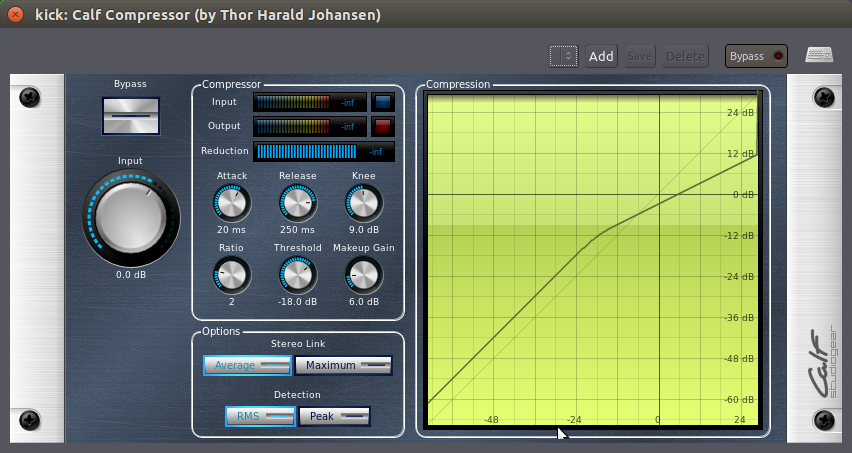
下面是来自于“Calf Plugins Package 牛犊插件套装”的一个近似压缩器的截图:
阀门
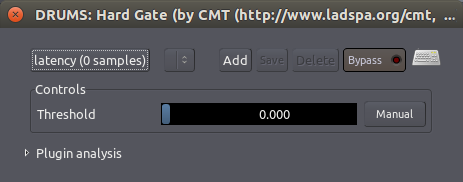
最简单的一种Gate阀门是,当信号超过一个限定的水平是就允许信号通过,并且阻挡低于这一水平的信号。
阀门常常被用来作为降噪的方法之一。例如,在一个麦克风声道上的阀门,可能仅仅当歌手正在唱歌时打开,当她不唱歌时防止其它背景噪音通过。Gated drums 鼓声阀门也是一个非常有名的制作技巧,可以使声音听起来“sharper 更清晰”。
在这里,“Hard Gate 硬性阀门”插件显示一个单独的控制参数,“Threshold 临界值”限定了打开大门并让信号通过的门槛。
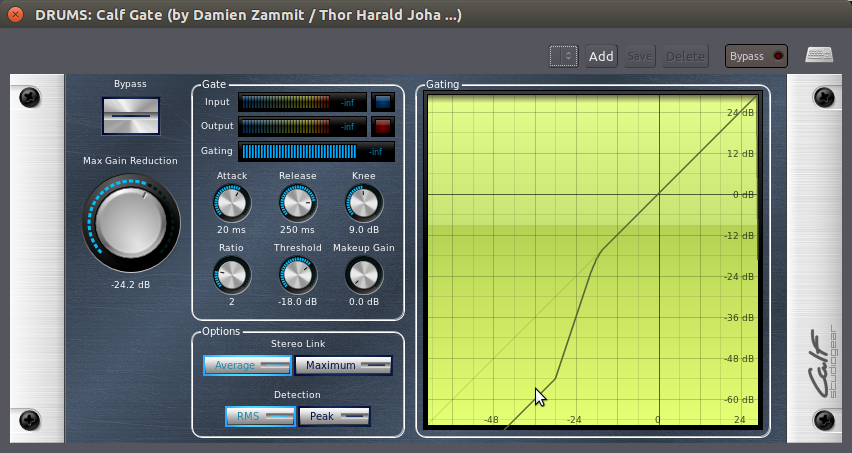
其他种类的阀门,诸如“Calf Gate 牛犊阀门”插件,则更为复杂。它们有独立的控制元件,用于控制阀门打开(“Attack 上冲”)和关闭(“Release 释放”)的速度,以及其它参数相当类似于上面章节描述的SC压缩机。
均衡
一个 Equalizer 均衡器(即 EQ)允许您分别控制一个声音中不同频率范围的增益。
这不仅可以用于雕琢一个独立声音的音色(例如,使它听起来sharper更尖锐或者smoother更平滑)也可以用于令音色变化的声音能更好的地整合入混音中。
通常,即使经过调整Levels电平和Panning声相偏移之后,带有类似频率内容的不同音轨(例如,一个低音吉他和一个踢鼓)在混音中有可能很难分辨出来。这时,一个均衡器就是解决这个问题的一个很好的工具。
三波段均衡器
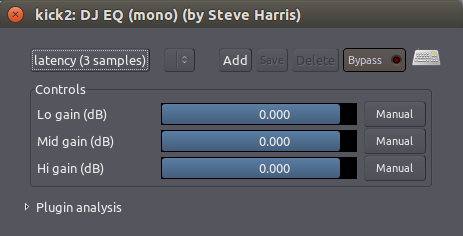
最简单的一种均衡器是一个在模拟混音器中我们所熟悉的那个。它有三个参数,调整三个Bands波段的电平,或者称为频率范围:一个Bass低音(低频),一个中段范围的频率,以及一个Treble高音(高频)。“DJ EQ”插件就是这样的一个EQ均衡器。
多波段(或图形)均衡器
一个更复杂的 Multi-Band (or Graphical) Equalizer 多波段(或图形)均衡器通常带有更多的波段。每个波段都是集中于一个频率,并且每个波段的电平都可以单独调节。在一些多波段均衡器里,例如下图所示的“TAP Equalizer 水龙头均衡器”插件,每个波段的中心频率可以由用户定义。这允许您或者衰减(或移除)一个不需要的频率,或加强(提高)所需要的那个波段。
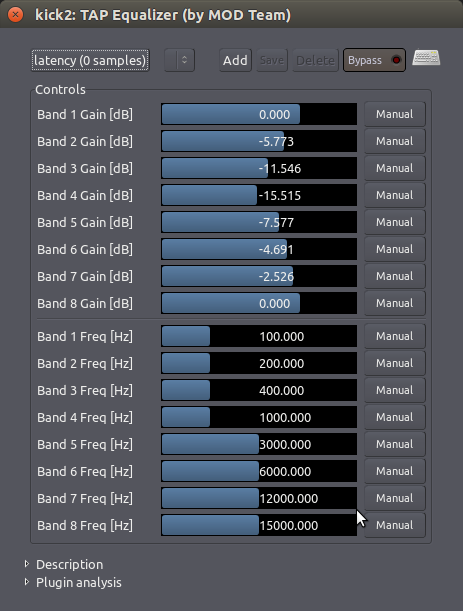
波段的整体“curve 曲线”也可以用来确定您的音轨或混音的general tone总体音调。在上面的示例中,中部频率的下部分已经被“scooped out 削除”了一点(注意波段 1 和 8 原封不动地停在 0 dB,而它们之间的 2 到 7 则画出了一个衰减曲线,波段 4 位于最低点 -15 dB)。
参量均衡器
Parametric Equalizer 参量均衡器是用于混音器的EQ中最万能的类型,因为它广泛控制着EQ参数的所有类型。在Ardour中,有一个参量均衡器称为“Triple Band Parametric with Shelves 带滤波架的三重波段参量”。还有一个来自于 Calf 牛犊插件包的类似均衡器,如下图所示:
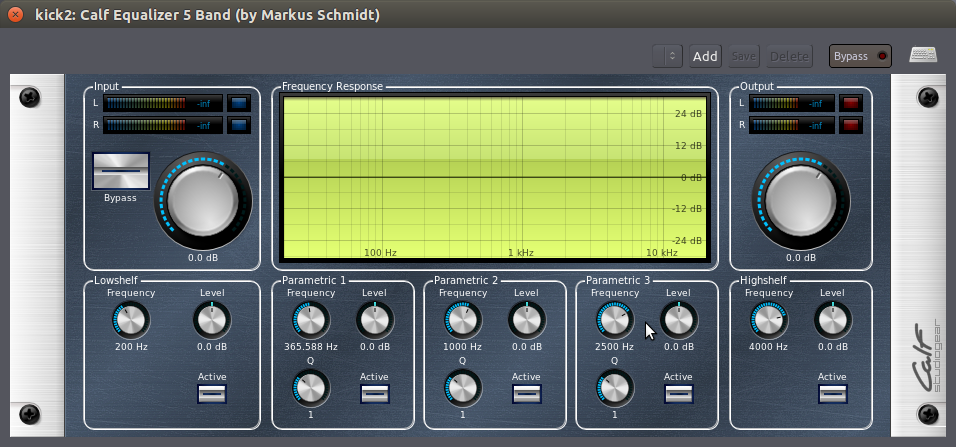
每个频率波段都有有三个选项(即方框 “Parametric 1 参数 1 ”、“2” 和 “3”)。这三个波段每个都有“Level (dB) 电平(分贝)”用于调整cut削减或boost增大频率,还有“Frequency (Hz) 频率(赫兹)”用于调整选择中心频率,以及一个 “Q” 用于调整决定使用多宽的频率范围来影响它。
高架,低架
这个插件还包含有一个High Shelf 高架和一个Low Shelf 低架。滤波架削减或增加所有高于(高架)或低于(低架)一个特定频率的全部东西。例如,一个低架可以用来移除不需要的rumbling隆隆声,一个高架可以用来减少hiss嘶嘶声。滤波架的“Frequency 频率”控制元件决定了截止频率。例如,一个带有截止频率是 200 Hz的低架意味着均衡器将会衰减所有低于这个频率的一切东西。使用Level电平旋钮控制衰减量。
使用均衡器的一个实例
为了通过使用EQ来实现在混音中更好地分离出两种乐器的声音,您首先需要找出两种乐器的重叠部分。
这里有一种途径。在上述所示的 Calf Equalizer 5 Band Plugin 牛犊均衡器5波段插件(或者 Triple Band Parametric with Shelves 带滤波架的三重波段参量)里,为每个乐器选择适当的波段。在低音吉他的情况下,这将是一个低频段(假设,起始于 100 Hz)。提高“gain 增益”到 10 dB,改变“Q”(也称为“bandwidth 带宽”)以形成一个狭窄的范围,然后慢慢地向上下滚动“frequency 频率”。您将会听到一个pitch音高上下移动。然后慢慢滚动下来,直到您听到两种乐器重叠的频率范围。现在简单地减少“gain 增益”到 -5 dB,然后您将很有希望能听到更清晰一点的乐器声。接下来,对其他乐器应用相同的处理。
EQ的处理方法有很多。希望提供的这个例子能为您在混音里开始“均衡”音轨有所帮助。但最重要的是,当需要用到EQ时,最好是尽量少用而不是尽量多用,除非您是有意识地使用极端的EQ作为创作参量。
使用自动化
Automation 自动化是一种随着时间而动态改变音频处理参数的工作方式。
到目前为止,我们在我们的音轨里使用的各种参数,都是固定的数值(例如,一个音轨淡化器设置为 -3.0 dB;或者一个单声道声相器设置为 100%;等等)。这些固定的数值将应用于整条音轨贯穿整个会话。
但您是否打算让这些数值随着时间以预先确定的方式而改变?例如,您可能打算让一个音轨的增益在20秒内逐渐减少。或者您可能希望所发出的声音在两秒内从左向右移动。
这可以用 Automation 自动化来完成。淡化器、声相偏移,以及在音轨中使用的任何插件都可以自动化。一个自动化的参数显示在其父系一级音轨下面的属于它自己的 Automation Track 自动化音轨中。Automation data 自动化数据直观地表示为一个 Automation Line 自动化线条,由许多 Automation Points 自动化点组成。下图就是一个自动化音轨看起来的样子:
在上图中,名称是“Fader 淡化器”的自动化音轨,是被关联到名称是“Audio 1 音频 1”的父系一级音轨。自动化线条随着时间控制着Fader淡化器(volume 音量)的改变。
创建一个淡化器自动化线条
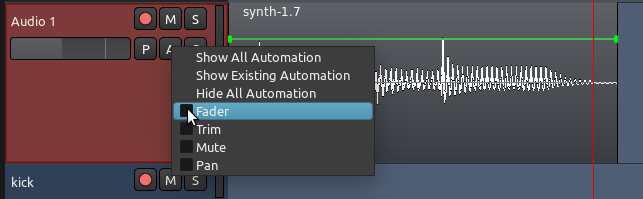
让我们来创建一个简单的淡化器自动化。在一条选中的音轨上点击“A”按钮,将会弹出一个菜单,您可以选择您打算要自动化的参数。现在选择“Fader 淡化器”。
一个自动化音轨将会显示出来。选择 Draw Mode 描绘模式(快捷键“D”):

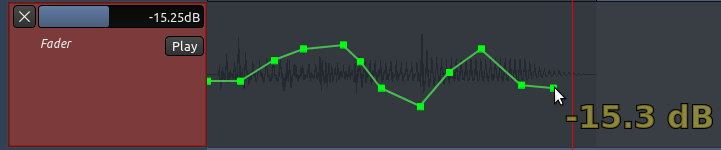
现在您可以通过在自动化音轨里点击任意地方来创建自动化点。自动化线条会连接您所添加的自动化点。黄色的数字(下图所示 -15.3 分贝)表示所选中的自动化点的增益电平。
自动化状态
然而,Automation Curve 自动化曲线不会播放,直到您设置自动化状态为“Play 播放”。
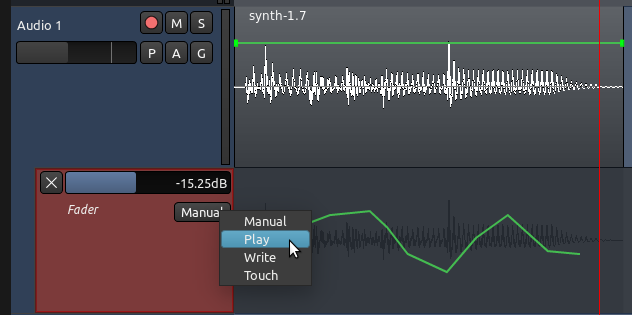
Manual 手动:设置为“Manual 手动”时,音轨将忽略任何自动化数据。它将仅仅播放淡化器所设置的任何音量。在这种模式下,您可以手动移动音轨淡化器来设置一个新的固定的电平。这是音轨在它被第一次创建的时候的默认方式。
Play 播放:当设置为“Play 播放”时,音轨将自动化地跟随自动化音轨里所描绘的自动化曲线绘制来改变增益电平。您将不再能够手工移动音轨淡化器。在回放期间,您将看到音轨淡化器根据曲线上下移动。
Write 编写模式将在播送播放时持续不断地记录用户更改自动化参数,创建一个自动化线条。例如,您可能会开始播放,然后使用您的音轨的淡化器在增益里进行实时的修改。您做出的所有更改都将被作为一个自动化线条而编写(recorded 记录),然后,您可以在稍后通过切换自动化模式,回到Play播放模式来回放。
Touch 改动模式类似于Write编写模式。然而与编写模式不同的是,改动模式不会记录超过现有的自动化数据,除非参数被改变。
如果这些概念对您来说都是崭新的,那么现在只需关注的前两个模式即可(Manual手动和Play播放),并且通过手工实践练习描绘自动化曲线来创建自动化。
创建一个插件自动化
您可以添加自动化到已经添加到音轨的任意插件。在下面的例子里,我们有一个音轨已经添加了一个“AM pitchshifter 中波音高替换器”插件。
要为自动化选择一个插件参数,点击音轨上标记为“a”的按钮,菜单就会弹出。在“Processor Automation 处理器自动化”(注:子菜单)下,您会发现您已经为那条音轨所添加了的插件的列表。
在所列出的每个插件中,您可以从列表中选择您打算要自动化哪个参数。在这个例子中,我们选择的是“AM pitchshifter 中波音高替换器”插件的参数“Pitch shift 音高替换”,这个参数的一个自动化音轨即可出现。注意,当您打开多个自动化音轨时,它们会在主父系一级音轨下方一个接一个地出现。
为那个参数描绘一个自动化曲线。别忘了设置自动化状态为“Play 播放”。
在上面的图片中,声音的音高替换正在随着时间的推移而改变,由曲线控制这一过程。
- 提示:您可以隐藏一个自动化音轨,只需点击位于自动化音轨左上角的“X”即可。注意,一个隐藏的自动化音轨仍继续发挥着作用,即使它是不可见的。
为自动化提高可视分辨率
您可以通过增加自动化音轨的高度来获得一个更大的垂直精度。移动你的鼠标靠近自动化音轨下方的边缘。鼠标指针变成一个垂直双箭头。按着它拖下来即可增加自动化音轨的高度。注意,到父系一级音轨和自动化音轨的高度是各自独立的,因此,当您在您的自动化曲线里工作时,你可以像这样来设置它们:
- 提示:记住您也可以在水平轴向上通过放大和缩小来增加分辨率。(注:快捷键是大键盘的“+”和“-”)
自动化点的常用操作
这里有几种方法可以调整自动化点,取决于您所在编辑模式:
- 一个自动化点可以用鼠标往任何方向拖拽(工作于抓取、描绘、以及编辑模式)。(注:把鼠标放在自动化点上,鼠标变成“小十字”,点击那个点,即可拖拽。如果鼠标没变成“小十字”点击则是添加点。)
- 要删除一个自动化点,只需按住“Shift”键不放,在那个点上面右键点击它(工作于抓取、描绘、以及编辑模式)。(注:把鼠标放在自动化点上,鼠标变成“小十字”,右键点击那个点,同时弹出的菜单里也有删除选项。)
- “Ctrl”+点击+拖拽,可以向任何方向移动当前点,并且在所有水平方向上,当前点及其随后的点也一起移动(工作于抓取、描绘、以及编辑模式)。
- 仅在编辑模式下:自动化线条上任何两个自动化点之间的线段都可以垂直拖拽,即同时影响两个端点,而不影响它们的水平位置。只需简单地在两点之间直线上(注:鼠标变成“大十字”)的某个地方点击,然后即可上下拖动。
- 如何一次删除多个自动化点(仅在抓取模式和编辑模式下):通过音轨的背景上使用鼠标在几个点周围拖拽画出一个方框,选中多个自动化点。然后被选中的这些点可以被删除,只需按下“Delete 删除”键(不是“Backspace 退格”键)。如果您是在Mac(苹果)系统上,没有一个真正的“Delete 删除”键,可以尝试使用“Function 功能”+“Backspace 退格”键。
在自动化曲线末端之后,它们的数值将为所有后续区域保持在这一电平,不论您是否延续描绘曲线。
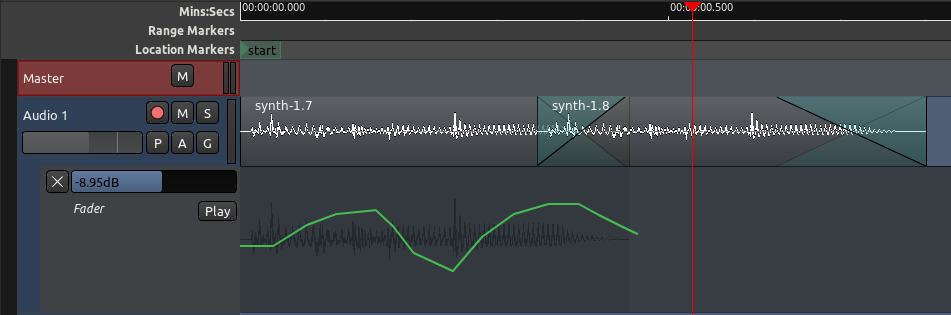
在上面的示例中,曲线的最后一点位于 -8.95 分贝。剩余的音轨将保持同样的电平,尽管那线条不是一直描绘到最后。
移动自动化
移动一个区域到一个新的位置将会自动地也把对齐着的自动化数据一起移动,正如下面的屏幕截图我们可以看到的:
移动前:
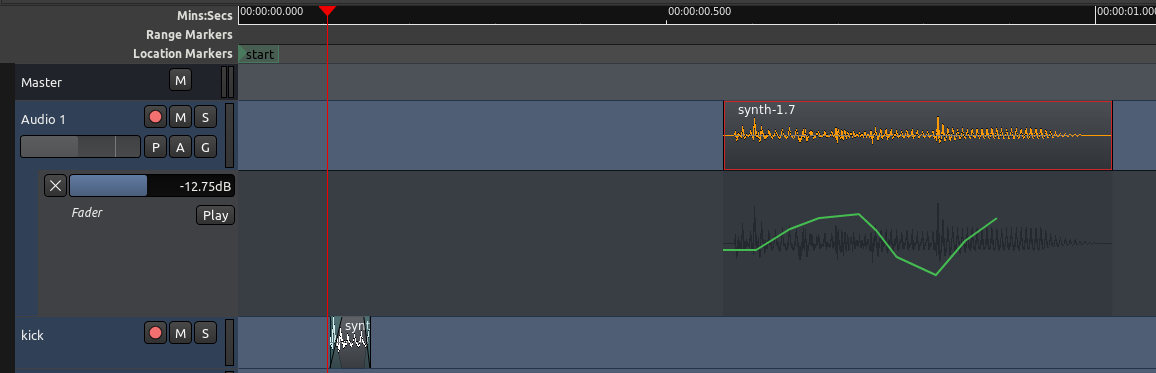
移动后:
如果你愿意,你可以改变这种行为方式。换句话说,如果您打算让自动化曲线保持在原地,即使您移动区域也不改变,那么可以去菜单里设置:Edit 编辑 > Preferences 首选项 > Editor 编辑器,取消勾选 “Move relevant automation when audio regions are moved 当音频区域移动时,也移动相关的自动化”。
区域特异性增益自动化
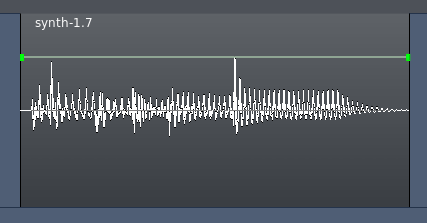
有一种方法可以创建一个直接绑定到一个区域的增益自动化。当您选择描绘模式时,在每个区域矩形的上半部分,您应该可以看到一个平直的线条:(注:这线条位于音频的原始区域音轨上,并不是在自动化音轨上。)
在那线条上直接点击即可创建自动化点。这将直接在区域本身上描绘,这与在自动化音轨里描绘或记录的淡化器自动化有所不同。区域增益自动化与与淡化器自动化是分开不同的。
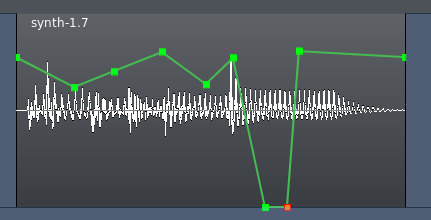
与自动化音轨一样,一个Gain Automation Point增益自动化点可以用鼠标往任何方向拖拽。要删除一个增益自动化点,只需按住“Shift”键,右键点击它即可。
撤销激活和移除增益自动化
增益自动化可以重置或着不激活,就在右键点击该区域弹出的右键菜单里。
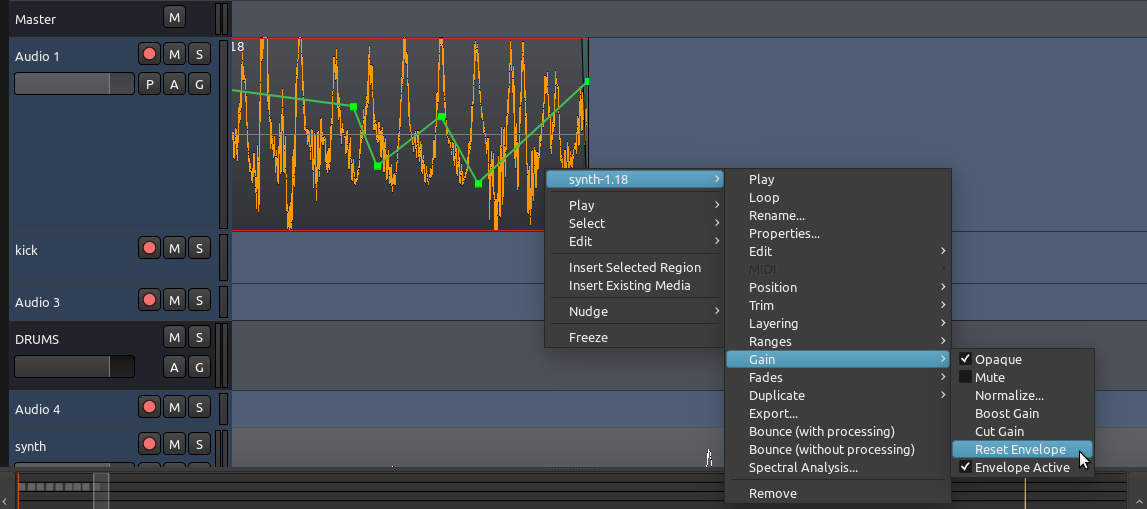
在这里,增益自动化被称为Envelope 封装。
“Reset Envelope 重置封装” 将移除您在区域里描绘的增益自动化点。
“Envelope Active 封装激活” 将切换增益自动化封装开启或者关闭。
什么时候我该使用区域增益自动化或音轨淡化器自动化?
正如上述所看到的那样,两者是非常相似的。通过练习您就会发现那些一个比另一个更方便的情况。这里有两个例子:
- 如果你所需要做的仅仅是在区域的一个特定部分做一点点的润色(减少或放大增益),并且您对余下的段落或整个音轨的电平感到满意,那么就使用区域特异性自动化。
- 如果您有一个更复杂的音轨,带有跨越整个区域的crossfades交叉淡化(淡入淡出),并且/或者需要在同一音轨里,穿过几个区域来塑造一个更长的动态曲线,那么就使用淡化器自动化。
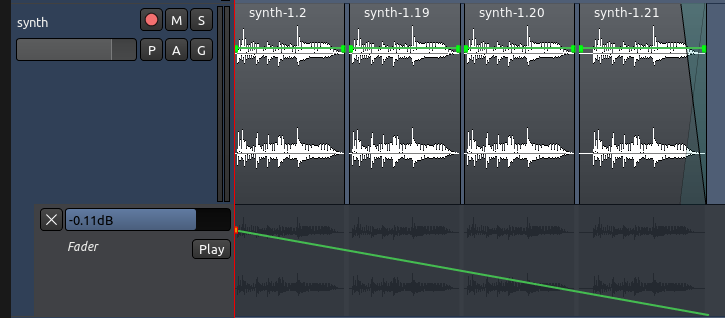
上面的截图显示了一个简单的渐进式淡化,从音轨里的第一个区域开始,且结束于最后一个区域。用淡化器自动化来实现就非常直接明了,但如果用区域特异性自动化来做则会相当困难。