“Ardour4 初学者教程 04 混音会话”的版本间的差异
来自Ubuntu中文
(→平移) |
(→使用插件) |
||
| 第164行: | 第164行: | ||
=使用插件= | =使用插件= | ||
[http://brunoruviaro.github.io/ardour4-tutorial/using-plugins/ (原文)] | [http://brunoruviaro.github.io/ardour4-tutorial/using-plugins/ (原文)] | ||
| + | |||
| + | Plugins can be used to enhance or transform the sound of individual Tracks. | ||
| + | |||
| + | They can be applied directly to a single track, or to a group of Tracks using a Send. Later in this tutorial, we will discuss some Plugins specific to the Mixing process, such as Compressors, Limiters, Parametric Equalizers, Reverbs and others. | ||
| + | |||
| + | ==Processor Box== | ||
| + | |||
| + | In Ardour terminology, a Processor is anything which gets plugged into a Mixer Strip, and treats the signal in some way. Ardour provides several built-in processors such as the Fader or Panners. Processors can also be plugins used for effects or as instruments, as well as sends or inserts which affect signal routing. The arrangement of processors is arbitrary, and there is no limit to how many there can be. | ||
| + | |||
| + | http://brunoruviaro.github.io/ardour4-tutorial/images/Ardour4_Mixer_Strip_2.png | ||
| + | |||
| + | The main space shown in the screenshot above is the Processor Box. The blue box Fader is in fact a Processor that comes by default inside the Processor Box. It represents the Fader that you use to control the Track’s volume. All Processors are shown as coloured rectangles, with a small “LED” beside them that lights up when the processor is enabled. The colour of the processor depends on its location in the sequence; processors that are pre-fader are coloured in red, and post-fader processors are coloured green. | ||
| + | |||
| + | ==Adding a Plugin to a Track or a Bus== | ||
| + | |||
| + | Plugins can be added by right-clicking in the Processor Box of the Track or Bus. A menu of options is presented. From the menu, new processors can be inserted. | ||
| + | |||
| + | http://brunoruviaro.github.io/ardour4-tutorial/images/Ardour4_Plugins_1.png | ||
| + | |||
| + | The Plugin Manager is a convenient way to browse and choose plugins: | ||
| + | |||
| + | http://brunoruviaro.github.io/ardour4-tutorial/images/Ardour4_Plugins_2.png | ||
| + | |||
| + | From the Plugin Manager, you can search them by Name, Type, or other search parameters available from the drop-down menu. For example, we will add the reverb plugin called “Freeverb”: | ||
| + | |||
| + | http://brunoruviaro.github.io/ardour4-tutorial/images/Ardour4_Plugins_3.png | ||
| + | |||
| + | Once selected, click “Add” and the plugin will show up in the bottom list of “Plugins to be connected”. Then click “Insert Plugin(s)” and they will show up in the Processor Box. | ||
| + | |||
| + | http://brunoruviaro.github.io/ardour4-tutorial/images/Ardour4_Plugins_Freeverb.png | ||
| + | |||
| + | ==Editing Plugin Parameters== | ||
| + | |||
| + | Double-click a Plugin to edit its parameters. In this example, we double click the “Freeverb” green box and get this window: | ||
| + | |||
| + | http://brunoruviaro.github.io/ardour4-tutorial/images/Ardour4_Plugin_Freeverb_Settings.png | ||
| + | |||
| + | Here you can control reverb parameters such as Room Size, Damping, amount of Wet and Dry signal, and Width. The effect will apply to all sounds contained in the Track. | ||
| + | |||
| + | ==Bypassing Plugins== | ||
| + | |||
| + | To bypass the Plugin, press the Bypass button in the Plugin settings window, or simply click the “LED” of the plugin in the Processor Box. This turns the Plugin off and allows the signal to pass by it unaffected. This is useful when you want to compare how a track sounds with and without the plugin. | ||
| + | |||
| + | http://brunoruviaro.github.io/ardour4-tutorial/images/Ardour4_Plugins_Bypass.png | ||
| + | |||
| + | Bypassed Plugins are shown greyed out and with the “LED” turned off. | ||
| + | |||
| + | Right-Clicking the Plugins will give a menu with several options, including Delete. | ||
| + | |||
| + | ==Pre-Fader vs Post-Fader== | ||
| + | |||
| + | You have a choice whether you would like to add your Plugin before or after the Fader rectangle in the Processor Box. Pre-Fader Plugins are inserted in the signal path before the Fader, so that the Fader controls the level of the signal coming out of the Plugin. Post-Fader Plugins are inserted after the Fader: the Fader controls the level of the signal going into the Plugin. For some Plugins, Pre- or Post-fader placement does not matter. For others, the difference is subtle. For others still, inserting them in the right place is absolutely essential. | ||
| + | |||
| + | ==Plugin Formats== | ||
| + | |||
| + | For those interested in learning more about plugin formats, here’s a quick overview: | ||
| + | |||
| + | LADSPA Plugins are the “native” Plugin format for Ardour. They were initially developed for Linux, but since have been ported to OS X as well. | ||
| + | |||
| + | LV2 is a simple but extensible successor of LADSPA, which can be used to display sound characteristics in a graphical manner. LV2 Plugins can be used on OS X and Linux. | ||
| + | |||
| + | AU Plugins are the “native” Plugin format for OS X. They will only work in Ardour if you have made a donation when you downloaded the program. See the Installing OS X chapter for details. AU Plugins will not work on Linux at all. | ||
| + | |||
| + | VST Plugins is a Plugin format common to Microsoft Windows. Some VST Plugins can be used on Linux, however they may not function correctly, or even cause Ardour to crash. Using these Plugins requires manually Compiling the Ardour application, a task which is outside the scope of this manual. | ||
| + | |||
| + | More information about using plugins with Ardour can be found here: http://manual.ardour.org/working-with-plugins/ | ||
| + | |||
=使用发送端= | =使用发送端= | ||
[http://brunoruviaro.github.io/ardour4-tutorial/using-sends/ (原文)] | [http://brunoruviaro.github.io/ardour4-tutorial/using-sends/ (原文)] | ||
2015年10月28日 (三) 21:18的版本
混音片段
Mixing is the process of converting multiple Tracks into a Stereo Mix where all the instruments can be heard clearly.
Mixing Tools
Levels, Panning, Equalization (EQ), and Compression are the main tools used to achieve a good Mix. In addition to these core tools, a wide range of Plugin effects can also be used to enhance to sound, such as Reverb and Delay.
Introducing the Mixer Strip
The Mixer Strip is the vertical column that contains various controls related to signal flow. Each Track and Bus in Ardour has its own Mixer Strip. The Mixer Strip is also the main tool we will use in the process of Mixing our Tracks. In this chapter, we will get a general overview of the Mixer Strip, with each section described. We will also provide references to chapters containing information specific to each aspect of the Mixer Strip.
The Mixer Strip from Top to Bottom
Mixer Strips can be accessed from both the Editor Window and the Mixer Window (shortcut “Alt” + “M” to toggle between the two). Mixer Strips in either window (Editor or Mixer) mirror each other: any actions performed on a Mixer Strip in the Mixer Window will be reflected in the corresponding Mixer Strip in the Editor Window, and vice-versa. The Editor Window and Mixer Window are more fully explained in the An Overview of the Interface chapter.
In theEditor Window, you can see the Mixer Strip of the currently selected track on the left side of the window. If you don’t see it, hit “Control” + “E” to display the Editor Mixer Strip.
Overview
Here we see the entire Mixer Strip, as it would appear in either the Editor Window or the Mixer Window.

Regular & Narrow Modes
The Mixer Strip can be switched between the regular width and a more narrow width to conserve space. The very top part of the Mixer Strip, pictured below, switches between regular and narrow modes using the left button. The right button hides the Mixer Strip entirely.

Track Name and Routing Button
Continuing from top to bottom, the next section of the Mixer Strip contains three narrow regions. The first of these regions shows the name of the Track (that’s the word “clap” in the image below). The next region, named “2” in the image below, is a button which allows access to the input Routing. Please see the Understanding Routing and Recording Audio chapters for more information on input Routing. The last narrow region controls phase reversing (we won’t go into details on this topic in this tutorial).
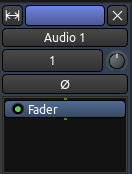
Processor Box
The large black region at the bottom of this section is the Processor Box. This is where you can add Plugins, for example. The processor box will always contain a blue Fader processor. This indicates where in the processor chain the main channel fader is located — this is the fader shown in the lower half of the strip. Please see Using Plugins and Using Sends for a detailed discussion of this area.
The next portion of the Mixer Strip includes controls for Panning, Record, Mute, and Solo, among others.
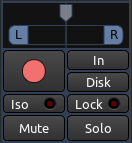
Panning
Panning has to do with placement of sounds anywhere between Left and Right speakers. Please refer to the Panning chapter for more information.
Solo
When a Track or Bus is on Solo, all the other Tracks or Busses which are not likewise on Solo will be inaudible through the Master Bus or the Audition. We can also find a miniaturized Solo Button in the Track Mixer. Note that soloing a bus will not silence any tracks and vice-versa.
When any Track or Bus is on Solo, the Solo Indicator in the Auxiliary Controls menu will flash red. Clicking the Solo Indicator while it is flashing will deactivate every Solo in the Session.

Mute
Any Track or Bus on Mute will be inaudible through the Master Bus or the Audition. The Track Mixer also contains a miniaturized Mute Button, in between the Record Arm Button and the Solo Button. Right-Clicking on the Mute Button gives you advanced options for the behavior of the mute button.
Arm Record
The Rec button arms the track for recording, as seen in the Recording Audio chapter.
Fader, Fade/Peak Meters
The most prominent control present in a Mixer Strip is the Fader, used to adjust the overall gain for the corresponding Track or Bus. The Peak Meter shows the Peak Value of the selected track, and is located directly to the right of the Fader. Each Peak Meter consists of one Bar Graph in the case of a Mono Track, and two Bar Graphs in case of a Stereo track. The small rectangular field above the meters shows the highest Peak Value that has been played on that track so far.
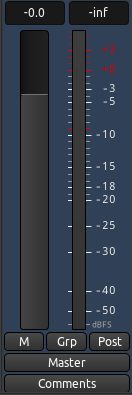
By clicking the right-hand button at the bottom of the Mixer Strip (it reads “post” in the image above), you will be able to select the Metering Point, for example the direct “in” from the sound card, the “pre” Fader signal, or the “post” fader signal.
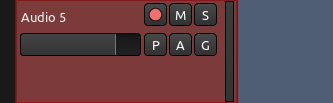
As you can see in the image below, there is a smaller version of the Mixer Strip in each Track, called the Track Mixer, which contains a horizontal Fader, a vertical Peak Meter as well as miniature buttons for Arm Record, Mute, and Solo. They all mirror those found in the Mixer Strip for that Track.
Please refer to the chapter on Mixing Levels for more detailed instruction about using the Fader and Peak Meters.
Routing
Finally, we reach the bottom of the Mixer Strip. Here we find the Output Routing Button, marked as “master” in the earlier screenshot, which is discussed in the Understanding Routing chapter.
混音音平
Levels are the volumes of each Track relative to the others.
If you can’t hear a bass line above the other instruments, the obvious choice would be to raise the bass line volume. Levels can be adjusted using the Fader in the Mixer Strip or in each Track, just below the Track name. The first step in Mixing is to listen to everything that has been recorded and adjust the levels of all Tracks so you can hear everything clearly, but in a manner that is appropriate for the song. For example, the vocal track is normally louder than the rhythm guitar because the voice is the focal point of the song.
Using the Fader
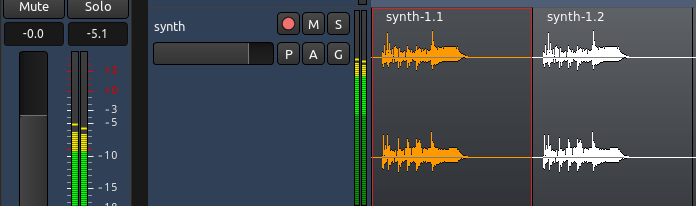
The Fader is the primary control of Levels for each Track. The exact value of the Track’s Levels are displayed in the small rectangular field above the Fader. You can change the Levels by either dragging the slider or typing in a new number directly into the rectangle with the number. By default the Fader is set to −0.0 dB, meaning that the Levels of the Track are not changed. In the screenshot below, the Fader for the track named “kick” is set to -0.0, and the Peak Meter indicates that the highest peak so far was -5.1.
Avoiding Clipping
One other important task in Mixing is to avoid Clipping. The Peak Value on the Mixer Strip turns red when the signal has peaked above 0.0dB. You can use this tool to monitor the highest Levels of your Track while Mixing.
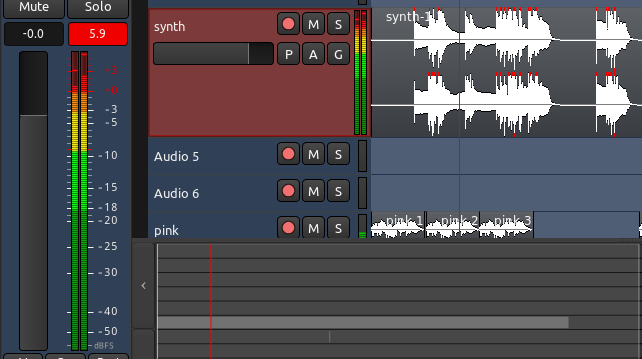
In the screenshot below, the synth track has just clipped to +5.9. You can also see little red edges on the waveform itself, indicating the exact locations where the recorded sound clipped.
Click on the red number in the Peak Meter to reset it.
TIP: for the sake of the exercise, try to record your voice so that it clips. Hear how the playback is distorted.
You should make sure that anything that you send to your sound card or that you will eventually Export as a sound file (such as for CD mastering) never goes above 0.0dB to avoid actual Clipping.
If the clipping occurs in a very percussive sound and it is almost unnoticeable, you may be able to hide it by decreasing the gain (for example, Normalize the region to 0.0, or a lower number like -1.0). However, often the clipping results in audible distortion of the recorded sound. The best solution in this case is to just record again with lower levels.
平移
Panning helps to establish a Stereo Field, a relative space between the speakers in which to place your sounds and instruments.
Once you have established a good balance of levels on all the Tracks, you can begin to think about panning.
The Panning Interface
The Panning control in Ardour is located in the middle of the mixer strip.
A Mono Track will have a Mono Panner. It looks like this:

A Stereo Track will have a Stereo Panner, like this:

Mono Panner
The default Mono Panner distributes 1 input to 2 outputs. Its behaviour is controlled by a single parameter, the position. By default, the panner is centered. You can change the position by clicking and dragging directly on the Mono Panner. Right-click on the panner to access other options.
Stereo Panner
The default Stereo Panner distributes 2 inputs to 2 outputs. Its behaviour is controlled by two parameters, width and position. By default, the panner is centered at full width.
Click and drag either the Left or the Right button to change the width. For example, if you bring them closer together it will look like this:

With a narrower width, you can also drag the top handle to change the relative center position, like this:

If we make the Left and Right buttons to overlap completely (that is, width is reduced to zero), the handles turn into a single signal indicator marked “M” (for mono):

Panning Tricks
A more extensive discussion of panning philosophy and techniques is beyond the scope of this tutorial, but here are some general rules of thumb:
   Guitars tend to be Panned to the left and right.
   Vocals and bass tend to placed in the center. You want to create a balance so that one side is not louder then the other.
   Headphones may be helpful in determining how instruments should be panned, and whether the mix feels lopsided because one side is too loud.
Two other tools that are useful in creating a “spatial” or Stereo Field are Reverb and Delay. These effects can be used together with sends to create a drum send which would be further back in the mix with more Reverb, and a vocal send which might have a little more Delay but sound closer than the drums. Please see the chapter on Using Plugins and Using Sends for more information.
TIP: Always keep an eye on your Levels while Panning Tracks! Panning a Track to one channel increases the Level of that channel. This may change the balance of Levels you set up in the previous chapter, and in extreme cases can result in Clipping. When this happens, reduce the overall Levels of that Track and check again how it sits in the Mix.
使用插件
Plugins can be used to enhance or transform the sound of individual Tracks.
They can be applied directly to a single track, or to a group of Tracks using a Send. Later in this tutorial, we will discuss some Plugins specific to the Mixing process, such as Compressors, Limiters, Parametric Equalizers, Reverbs and others.
Processor Box
In Ardour terminology, a Processor is anything which gets plugged into a Mixer Strip, and treats the signal in some way. Ardour provides several built-in processors such as the Fader or Panners. Processors can also be plugins used for effects or as instruments, as well as sends or inserts which affect signal routing. The arrangement of processors is arbitrary, and there is no limit to how many there can be.
The main space shown in the screenshot above is the Processor Box. The blue box Fader is in fact a Processor that comes by default inside the Processor Box. It represents the Fader that you use to control the Track’s volume. All Processors are shown as coloured rectangles, with a small “LED” beside them that lights up when the processor is enabled. The colour of the processor depends on its location in the sequence; processors that are pre-fader are coloured in red, and post-fader processors are coloured green.
Adding a Plugin to a Track or a Bus
Plugins can be added by right-clicking in the Processor Box of the Track or Bus. A menu of options is presented. From the menu, new processors can be inserted.
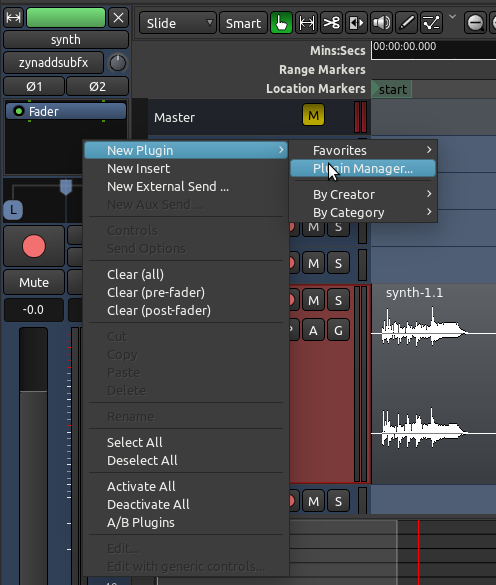
The Plugin Manager is a convenient way to browse and choose plugins:
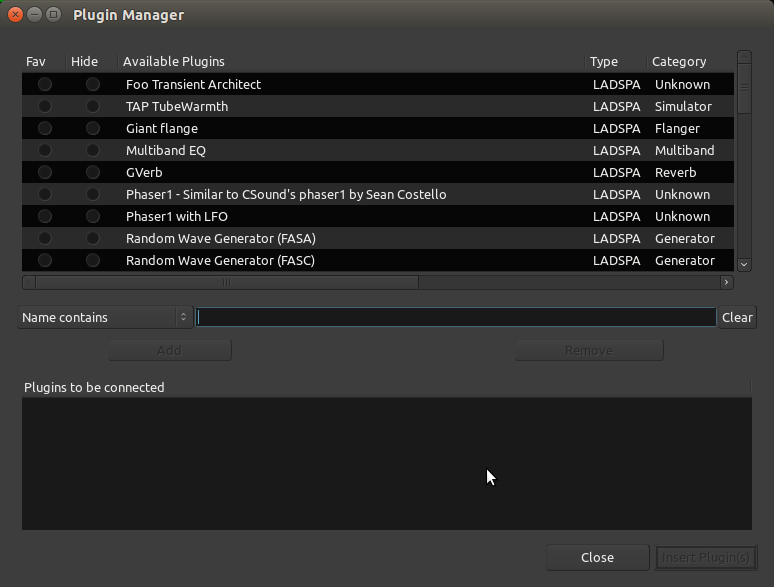
From the Plugin Manager, you can search them by Name, Type, or other search parameters available from the drop-down menu. For example, we will add the reverb plugin called “Freeverb”:
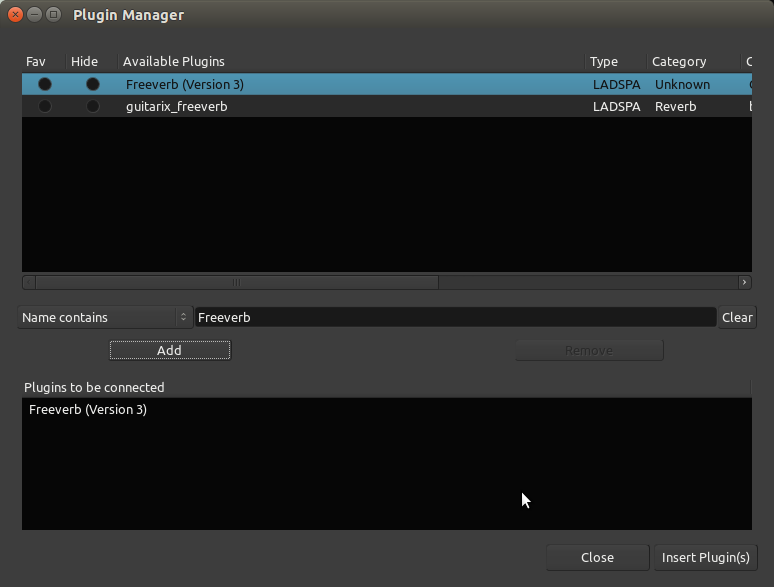
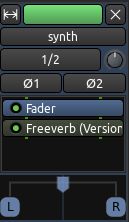
Once selected, click “Add” and the plugin will show up in the bottom list of “Plugins to be connected”. Then click “Insert Plugin(s)” and they will show up in the Processor Box.
Editing Plugin Parameters
Double-click a Plugin to edit its parameters. In this example, we double click the “Freeverb” green box and get this window:
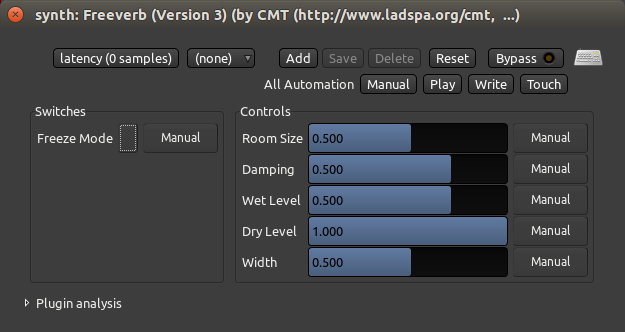
Here you can control reverb parameters such as Room Size, Damping, amount of Wet and Dry signal, and Width. The effect will apply to all sounds contained in the Track.
Bypassing Plugins
To bypass the Plugin, press the Bypass button in the Plugin settings window, or simply click the “LED” of the plugin in the Processor Box. This turns the Plugin off and allows the signal to pass by it unaffected. This is useful when you want to compare how a track sounds with and without the plugin.
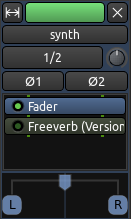
Bypassed Plugins are shown greyed out and with the “LED” turned off.
Right-Clicking the Plugins will give a menu with several options, including Delete.
Pre-Fader vs Post-Fader
You have a choice whether you would like to add your Plugin before or after the Fader rectangle in the Processor Box. Pre-Fader Plugins are inserted in the signal path before the Fader, so that the Fader controls the level of the signal coming out of the Plugin. Post-Fader Plugins are inserted after the Fader: the Fader controls the level of the signal going into the Plugin. For some Plugins, Pre- or Post-fader placement does not matter. For others, the difference is subtle. For others still, inserting them in the right place is absolutely essential.
Plugin Formats
For those interested in learning more about plugin formats, here’s a quick overview:
LADSPA Plugins are the “native” Plugin format for Ardour. They were initially developed for Linux, but since have been ported to OS X as well.
LV2 is a simple but extensible successor of LADSPA, which can be used to display sound characteristics in a graphical manner. LV2 Plugins can be used on OS X and Linux.
AU Plugins are the “native” Plugin format for OS X. They will only work in Ardour if you have made a donation when you downloaded the program. See the Installing OS X chapter for details. AU Plugins will not work on Linux at all.
VST Plugins is a Plugin format common to Microsoft Windows. Some VST Plugins can be used on Linux, however they may not function correctly, or even cause Ardour to crash. Using these Plugins requires manually Compiling the Ardour application, a task which is outside the scope of this manual.
More information about using plugins with Ardour can be found here: http://manual.ardour.org/working-with-plugins/