“Ardour4 初学者教程 03 编辑会话”的版本间的差异
来自Ubuntu中文
(→两个区域之间的交叉淡化) |
小 (→整理音轨) |
||
| (未显示同一用户的43个中间版本) | |||
| 第30行: | 第30行: | ||
*提示:您也可以使用这个标签页中的“''V''”复选框在主版面中显示或隐藏音轨。 | *提示:您也可以使用这个标签页中的“''V''”复选框在主版面中显示或隐藏音轨。 | ||
| − | 这里我们可以排序drumkit爵士鼓,以便让kick | + | 这里我们可以排序drumkit爵士鼓,以便让kick drum底鼓处在底部,snare军鼓和high ha踩镲在中间,而clap拍击在顶部。 |
http://brunoruviaro.github.io/ardour4-tutorial/images/Ardour4_Freesound_5.png | http://brunoruviaro.github.io/ardour4-tutorial/images/Ardour4_Freesound_5.png | ||
| 第230行: | 第230行: | ||
http://brunoruviaro.github.io/ardour4-tutorial/images/Ardour4_Crossfade_4.png | http://brunoruviaro.github.io/ardour4-tutorial/images/Ardour4_Crossfade_4.png | ||
| − | + | 如果您在尝试这样做时,使用的是我们之前导入的很短的敲击声,那么可能很难听到有什么不同。要想真正听到交叉淡化的效果,导入一对较长的样本再试试看(例如,一个雨声的样本,而另一个是人声)。把您的较长的样本放在同一音轨上重叠几秒钟。您将会听到其中的不同,当您移动第二个区域到底部(“''Lower to Bottom沉降到底部''”),以及再回到顶部(“Raise to Top提升到顶部”)。当它在顶部的时候,我们将会听到所需要的交叉淡化。当它在底部的时候,我们会听到没有没有交叉淡化,只是从第一个区域突然改变到第二个区域(假设您的第一个区域没有指定的淡出,正如上面的截图一样)。(注:第二个区域的淡入在最底部仍然有效。) | |
| − | == | + | ==使用网格设置== |
| − | + | 实验'''Grid网格'''设置,就如同在'''设置时间线'''章节里讨论的一样,给予不同种类的'''Quantization量化单位'''即可,换句话说,约束每个区域到特定网格的点。在本例子中,网格已经被激活,并且设置为'''Beats/16 每拍十六分''',量化区域为每一个小节16分音符。您可能希望修剪一些样本的终点,正如上面所讨论的,以匹配您已经设置的度量结构(例如,如下面的屏幕截图所示,样品hihat在已经被修剪,这样它们不会相互重叠)。 | |
http://brunoruviaro.github.io/ardour4-tutorial/images/Ardour4_Beat.png | http://brunoruviaro.github.io/ardour4-tutorial/images/Ardour4_Beat.png | ||
| 第241行: | 第241行: | ||
[http://brunoruviaro.github.io/ardour4-tutorial/further-region-operations/ (原文)] | [http://brunoruviaro.github.io/ardour4-tutorial/further-region-operations/ (原文)] | ||
| − | + | 在本节中,您将学习更多可以对区域进行操作的事情。 | |
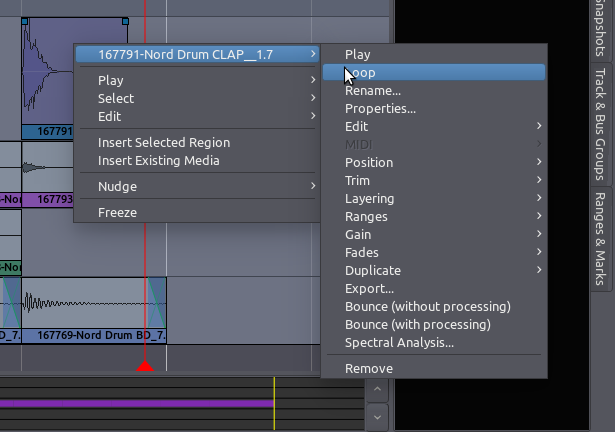
| − | + | 右键点击已选中的区域,会显示一个菜单。菜单第一个选项(带有该地区名称的标记)包含一个大的子菜单。所有这些操作也可以从Ardour的主要区域菜单中找到。 | |
| − | + | 本节所描述的是从这菜单里的一些最常用的操作。 | |
http://brunoruviaro.github.io/ardour4-tutorial/images/Ardour4_Region_Menu_1.png | http://brunoruviaro.github.io/ardour4-tutorial/images/Ardour4_Region_Menu_1.png | ||
| − | + | *'''Play播放''':从区域的起点播放到区域的终点(快捷键“''H''”)。 | |
| − | + | *'''Loop循环''':设置循环范围以适应该区域的持续时间,并立刻开始循环播放。 | |
| − | + | *'''Rename重命名''':修改一个区域的名称。 | |
| − | + | *'''Properties属性''':关于该区域的大量信息,还有改变其增益的能力。 | |
| − | + | *'''Position位置''':带有其他选项,在这个子菜单中,您会发现有'''Lock锁定'''复选框:锁定区域以便不能移动或削减区域。然而,它仍然可以拆分,并且产生的新区域将是解锁的状态。 | |
| − | + | *'''Edit编辑''':在这个子菜单中,您会发现一些有用的工具,例如'''Mute静音'''、'''Pitch Shift音高替换'''和'''Reverse反转'''。静音会使该区域无声。音高替换会改变一个区域的音高,而并不改变它的持续时间。反转会使得该区域反向播放。 | |
| − | + | *'''Gain增益''':有一些很有用的选项,例如'''Normalize规范化''','''Boost Gain放大增益''','''Cut Gain减小增益'''。(注:新版把静音放在了增益的子菜单里。) | |
| − | + | *'''Duplicate复制''':包括有'''Duplicate复制'''、'''Multi-Duplicate多个副本''',以及'''Fill Track填充音轨'''。这些选项的详细解释请参考'''区域常用操作'''章节。 | |
| − | + | *Spectral Analysis频谱分析:会弹出新窗口显示该区域的整体频率组成。 | |
| − | + | 您可以自己随意摸索子菜单里上面没有提到的其它选项。其中很多都是您可以在Ardour的区域菜单里找到的选项的镜像。下面我们将开始讨论一些最有用的功能的细节。 | |
| − | == | + | ==音高替换== |
| − | + | '''Pitch Shift音高替换'''功能可以改变一个区域的音高而不改变它的持续时间。该功能应用一个pitch-shifting音高替换算法来创建一个基于源剪辑片段的新的音频剪辑。 | |
| − | + | 音高替换窗口中,用户可以指定想要的变调的数额和方向。窗口中包含一个'''Preserve Formants保持共振峰'''按钮。当使用一个很大的数额来进行音高替换时,保持共振峰的选项可以使结果听起来稍微更自然,尤其是在使用声乐素材的时候。 | |
http://brunoruviaro.github.io/ardour4-tutorial/images/Ardour4_Pitch_Shift_Window.png | http://brunoruviaro.github.io/ardour4-tutorial/images/Ardour4_Pitch_Shift_Window.png | ||
| − | == | + | ==规范化== |
| − | + | '''Normalize规范化'''功能(快捷键“''Alt''”+“''3''”)非破坏性地加大已选中区域的电平,以便'''Peaks峰值'''处在 0 dB 或者更少。当规范化到 0.0 时,该区域将会在避免'''Clipping截波'''的情况下尽可能的变大声。有时您可能会发现规范化区域到数值小于 0 是很有用的,例如 -1.0,-3.0,或者 -6.0 分贝,那样它不会变得太大声。 | |
http://brunoruviaro.github.io/ardour4-tutorial/images/Ardour4_Normalize_Window.png | http://brunoruviaro.github.io/ardour4-tutorial/images/Ardour4_Normalize_Window.png | ||
| − | + | 另外两个对区域有用的增益操作是:Boost Gain加大增益(“''Alt''” + “''6''”),以及减小增益(“''Alt''” + “''7''”)。一定要试一试。 | |
| − | == | + | ==反转== |
| − | + | '''Reverse反转'''功能用来反转已选中区域的音频,实际上就是令其其向后播放。反转一个区域将会“在幕后”创建一个新的音频文件。 | |
| − | == | + | ==操作两个或更多已选中的区域== |
| − | + | 如果选择了超过一个以上的区域,该操作将适用于它们全部(例如,规范化、反转,诸如此类。) | |
| − | === | + | ===整合=== |
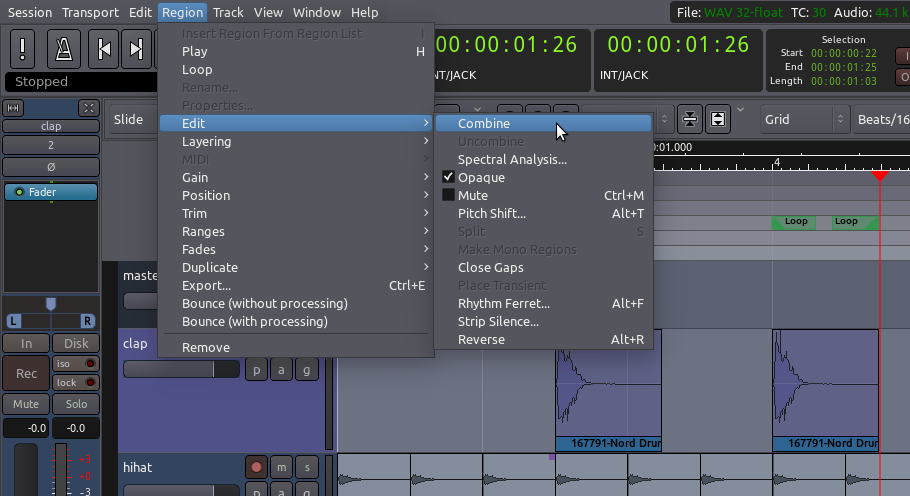
| − | + | 只有当选中了两个或更多的区域时,右键菜单中某些操作才会变成可用。例如,在子菜单“Edit编辑”中,看一看“Combine整合”功能。首先,我们选中两个相邻的区域:(注:同一音轨上) | |
http://brunoruviaro.github.io/ardour4-tutorial/images/Ardour4_Region_Combine.png | http://brunoruviaro.github.io/ardour4-tutorial/images/Ardour4_Region_Combine.png | ||
| − | + | 然后我们从鼠标右键菜单中选择“Combine整合”(注:在Edit编辑子菜单里),或者从Ardour的主菜单中选择 ''Region区域'' > ''Edit编辑'' > ''Combine组合'': | |
http://brunoruviaro.github.io/ardour4-tutorial/images/Ardour4_Region_Combine_2.png | http://brunoruviaro.github.io/ardour4-tutorial/images/Ardour4_Region_Combine_2.png | ||
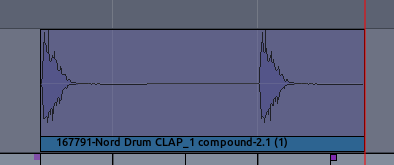
| − | + | 其结果是,已选中的区域被整合成为了一个区域。这是尤其有用,例如当您发现一个其效果恰巧就像您想要的那样的精确序列区域,,然后您想成组复制并且/或者移动整个序列时。 | |
| − | + | 注意整合区域的结果,就如同“compound联合”这个词那样,把它们的名称也连接到了一起。 | |
http://brunoruviaro.github.io/ardour4-tutorial/images/Ardour4_Region_Combine_3.png | http://brunoruviaro.github.io/ardour4-tutorial/images/Ardour4_Region_Combine_3.png | ||
| 第304行: | 第304行: | ||
[http://brunoruviaro.github.io/ardour4-tutorial/changing-edit-modes/ (原文)] | [http://brunoruviaro.github.io/ardour4-tutorial/changing-edit-modes/ (原文)] | ||
| − | + | 我们已经学习了一些关于抓取模式(选择/移动对象物体)和范围模式的内容。在这一章里,我们将概述在编辑器窗口里,'''Edit Modes编辑模式'''和'''Cursor Modes游标模式'''中所有可用的部分。 | |
| − | == | + | ==编辑模式和游标模式== |
http://brunoruviaro.github.io/ardour4-tutorial/images/Ardour4_Edit_Modes_Cursor_Modes.png | http://brunoruviaro.github.io/ardour4-tutorial/images/Ardour4_Edit_Modes_Cursor_Modes.png | ||
| − | + | 这些控件决定了的主版面的行为模式,以及游标的不同功能。 | |
| − | + | '''Edit Mode编辑模式'''下拉菜单包含三个选项。'''Slide Edit滑行编辑'''是标准模式,本教程中我们将使用这个模式。它允许您横向(在同一音轨)和纵向(不同音轨之间)自由拖动区域。其它两个选项限制或阻止您从原本位置移动区域的能力,但在此我们将不会详细讨论它们。 | |
| − | === | + | ===抓取模式(快捷键“''G''”)=== |
http://brunoruviaro.github.io/ardour4-tutorial/images/Ardour4_EditModes_G.png | http://brunoruviaro.github.io/ardour4-tutorial/images/Ardour4_EditModes_G.png | ||
| − | + | 这种游标模式允许您选择或者移动对象物体,例如区域和断点(在一个自动化曲线里)。当这个游标模式被选中时,您的鼠标指针看起来将会像是一个小手图标。 | |
| − | === | + | ===范围(快捷键“''R''”)=== |
http://brunoruviaro.github.io/ardour4-tutorial/images/Ardour4_EditModes_R.png | http://brunoruviaro.github.io/ardour4-tutorial/images/Ardour4_EditModes_R.png | ||
| − | + | 这个游标模式允许您点击并拖动来定义或调整范围。当这个游标模式被选中时,鼠标指针看起来将会像是一条垂直线。 | |
| − | === | + | ===切割模式(快捷键“C”)=== |
http://brunoruviaro.github.io/ardour4-tutorial/images/Ardour4_EditModes_C.png | http://brunoruviaro.github.io/ardour4-tutorial/images/Ardour4_EditModes_C.png | ||
| − | + | 使用这个游标模式将可以把区域拆分成为更小的区域。鼠标变成剪刀的形状。这允许您在一个区域上点取并点击,从而实现在鼠标所处位置拆分区域。 | |
| − | + | *提示:您也可以从抓取模式直接切割区域(有时这种方法可以更加实用)。不用离开抓取模式,只需将鼠标放在该区域要被切割的所需的位置,然后按下快捷键“''S''”(即“split拆分”)就行了。重要的是:您的''Edit Point编辑点''(网格设置的右边)必须设置为''Mouse鼠标''。 | |
| − | === | + | ===延伸/收缩区域(快捷键“T”)=== |
http://brunoruviaro.github.io/ardour4-tutorial/images/Ardour4_EditModes_T.png | http://brunoruviaro.github.io/ardour4-tutorial/images/Ardour4_EditModes_T.png | ||
| − | + | 这种光标模式允许您拖动并调整整个区域的持续时间,且不改变音高。这是有时被称为“Time stretching时间延伸”,,因此,快捷键是“''T''”。要了解更多的细节请参阅'''延伸/收缩区域'''章节。当这个游标模式被选中时,鼠标指针看起来将会像是一个斜对角的箭头。 | |
| − | === | + | ===监听模式(试听指定的区域)=== |
http://brunoruviaro.github.io/ardour4-tutorial/images/Ardour4_EditModes_Audition.png | http://brunoruviaro.github.io/ardour4-tutorial/images/Ardour4_EditModes_Audition.png | ||
| − | + | 这个游标模式允许您点击任何已存在于音轨上的区域,并立即回放。回放到该区域的终点时即停止。当这个游标模式被选中时,鼠标指针看起来将会像是一个小喇叭的图标。 | |
| − | + | *提示:您不用离开抓取模式,也可以快速监听一个已选中的区域。只需简单地选择一个区域,然后按下快捷键“''H''”。 | |
| − | === | + | ===描绘模式(快捷键“''D''”)=== |
| − | + | 使用这种模式可以描绘增益自动化点。鼠标看起来就像是一支铅笔。自动化相关内容将在'''使用自动化'''章节中详细讨论。 | |
| + | |||
| + | 在这种模式下,如果您把您的鼠标放在您想移动的自动化点的正上方(鼠标会变成一个小小的“十”字),您也可以编辑个性化的点(注:即移动,或右键选择编辑)。然而,如果您点击得不准确,这可能会变成意外地创建一个新的自动化点。如果真的遇到这个问题,您应该使用下一个模式,即只允许进行编辑已存在的点,而不是创建新的点。 | ||
| − | |||
http://brunoruviaro.github.io/ardour4-tutorial/images/Ardour4_EditModes_D.png | http://brunoruviaro.github.io/ardour4-tutorial/images/Ardour4_EditModes_D.png | ||
| − | === | + | ===内部编辑模式(快捷键“''E''”)=== |
| − | + | 使用这种模式可以编辑已存在的增益的自动化点。鼠标看起来像是一个手,当您放在一个存在的点上时,变成一个小小的“十”字。点击(按住鼠标左键不放)并拖动就能移动点。 | |
http://brunoruviaro.github.io/ardour4-tutorial/images/Ardour4_EditModes_E.png | http://brunoruviaro.github.io/ardour4-tutorial/images/Ardour4_EditModes_E.png | ||
| 第363行: | 第364行: | ||
===MIDI=== | ===MIDI=== | ||
| − | + | 上面阐述的最后两个按钮也可以用于创建和编辑MIDI信息,但在本教程中我们不讨论MIDI。 | |
| − | === | + | (注:MIDI 音乐设备数字接口 Musical Instrument Digital Interface) |
| + | |||
| + | ===水平缩放和视图选项=== | ||
http://brunoruviaro.github.io/ardour4-tutorial/images/Ardour4_Zoom_Options.png | http://brunoruviaro.github.io/ardour4-tutorial/images/Ardour4_Zoom_Options.png | ||
| − | + | 您可能会时常使用的主要快捷方式是“''-''”和“''=''”(分别是缩小和放大)。缩放的中心位置取决于''Edit Point编辑点''的当前选择(''Mouse鼠标''、''Marker标记''或者''Playhead指针'')。如果您对于选择编辑点的作用还不大明白,可以试试选择使用Mouse鼠标。 | |
| − | + | 缩放至整个会话按钮(快捷键“''_''”——这是下划线符号)可以根据需要放大或缩小,这样您就可以看到您的项目起点和终点标记。 | |
| − | + | 上面所讨论的缩放选项,控制着您将会在屏幕上看到的水平方向上内容的多少。一旦您有一个会话带有多个音轨,您还会想要控制您在屏幕垂直方向上所能适配(看到)的内容的多少。有好几种方法可以做到这一点: | |
| − | + | *使用“''Number of visible tracks可见音轨数量''”下拉菜单,选择您想在您的屏幕上适配多少条音轨。 | |
| + | *使用“''Shrink tracks收缩音轨''”按钮来让所有已选中的音轨变小一些。 | ||
| + | *使用“''Expand tracks扩展音轨''”按钮来让所有已选中的音轨变大一些。 | ||
| + | *你也可以通过拖动底部的边缘来改变一个独立的音轨尺寸,或者右键点击音轨前端标题栏,并选择所需的“Height高度”(注:子菜单)。 | ||
| − | + | ====导航工具==== | |
| − | + | 您可以使用编辑器窗口底部的导航工具来上下滚动显示整个会话中的内容,以及通过调整视图矩形的大小来调整水平和垂直缩放。 | |
| − | + | (注:如果没有看到这个工具栏,点击菜单栏的 ''View视图'' > ''Show Summary显示摘要''即可看到) | |
| − | + | ||
| − | + | ||
| − | + | ||
| − | + | ||
http://brunoruviaro.github.io/ardour4-tutorial/images/Ardour4_Navigation.png | http://brunoruviaro.github.io/ardour4-tutorial/images/Ardour4_Navigation.png | ||
| 第392行: | 第394行: | ||
[http://brunoruviaro.github.io/ardour4-tutorial/creating-looped-sections/ (原文)] | [http://brunoruviaro.github.io/ardour4-tutorial/creating-looped-sections/ (原文)] | ||
| − | + | 您可以在您的Ardour会话里很容易地重复音频部分。 | |
| − | + | 在这里,我们将使用我们在'''区域常用操作'''章节里创建的那个短的节奏段落,复制它并制造一个循环。 | |
| − | + | 在复制段落之前,推荐一个好主意,即把处在同一音轨的各个区域整合成为单独的一体:这样能更容易移动它们,并且它可以防止您意外地把一个hihat样本移动到不适当的位置,诸如此类。有两种方法能做到这一点:'''Combine Regions整合区域'''(允许您稍后uncombine撤销整合)以及'''Consolidate Range合并范围'''(如同刻在石头上,不允许您以后分开它们)。 | |
| − | + | 如果仍计划对节奏进行变更(添加、删除,或者移动个别区域),它可能还是的使用'''Combine整合'''区域选项比较好。如果您喜欢序列的方式并且不打算或者不介意稍后分割它们的能力,那您可以使用'''Consolidate合并'''范围选项。 | |
| − | == | + | ==整合区域== |
| − | + | 简单地选择所有您打算组合的区域: | |
http://brunoruviaro.github.io/ardour4-tutorial/images/Ardour4_Combine_Regions_1.png | http://brunoruviaro.github.io/ardour4-tutorial/images/Ardour4_Combine_Regions_1.png | ||
| − | + | 然后在菜单里选择 ''Region区域'' > ''Edit编辑'' > ''Combine整合''(或者右键点击已选中的区域,并且在弹出菜单里找到相同的选项即可,如下图所示): | |
http://brunoruviaro.github.io/ardour4-tutorial/images/Ardour4_Combine_Regions_2.png | http://brunoruviaro.github.io/ardour4-tutorial/images/Ardour4_Combine_Regions_2.png | ||
| − | + | 整合后的区域将看起来像是这样(注意在名称中有“compound”(混合)字样): | |
http://brunoruviaro.github.io/ardour4-tutorial/images/Ardour4_Combine_Regions_3.png | http://brunoruviaro.github.io/ardour4-tutorial/images/Ardour4_Combine_Regions_3.png | ||
| − | + | 在将来您需要再次分离它们的时候,只需选择这个整合区域并且在相同的菜单中选择“''Uncombine撤销整合''”选项。 | |
| − | == | + | ==合并范围== |
| − | + | 一个更永久替代'''Combine整合'''的是使用'''Consolidate合并'''。当您已经排列好您的区域成为一个单独的“loop cycle循环周期”,并且您对这声音感到很满意,那就创建一个将用于组成循环的包括所有区域的'''Range范围'''。首先,确保选中了在循环中被使用到的每一个音轨。未选中的音轨是灰色的,选中的是蓝色的(注:新版选中的音轨是红色的)。如果任何您使用的音轨没有被选中,可以按住''Shift''键的同时点击它们,即可将它们添加到选定的那组音轨里。最后,使用范围工具选择整个循环。 | |
| − | + | 再次提醒,'''Grid网格'''设置将帮助您在您的度量工具栏上精确地设置范围的起点和终点。一旦您已经选择了整个循环,右键单击这个范围并选择“''Consolidate range合并范围''”。如果您想把任何任何已经添加到循环里的Automation自动化或者Plugin插件效果也包括进来,可以选择“''Consolidate range with processing合并范围处理''”。 | |
http://brunoruviaro.github.io/ardour4-tutorial/images/Ardour4_Consolidate_Range_1.png | http://brunoruviaro.github.io/ardour4-tutorial/images/Ardour4_Consolidate_Range_1.png | ||
| − | + | 当范围已经被合并后,新的区域将出现在每个音轨上,每个都包含了所有您在之前步骤里设置的样品副本。记住,一旦范围被合并,就没有办法撤销该操作。在任何情况下,如果您发现您需要以任何方式改变节奏,您总是可以从区域列表中找回原来的个别样本然后用它们重建格局。 | |
http://brunoruviaro.github.io/ardour4-tutorial/images/Ardour4_Consolidate_Range_2.png | http://brunoruviaro.github.io/ardour4-tutorial/images/Ardour4_Consolidate_Range_2.png | ||
| − | == | + | ==复制范围== |
| − | + | 在您合并那些独立的区域形成您的格局之后(不论是使用'''Combine整合'''或者'''Consolidate合并'''),现在是复制这个格局以把它创造为几个小节的循环的时候了。 | |
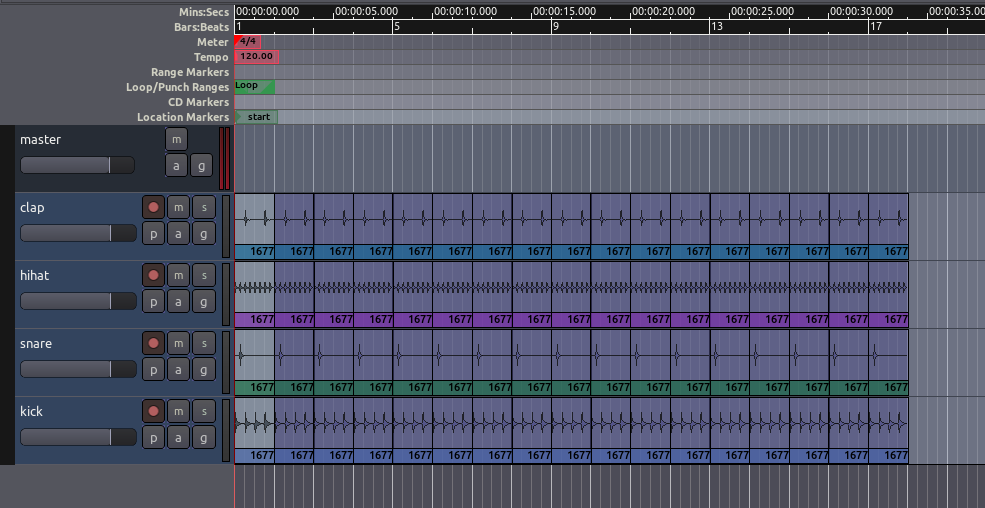
| − | + | '''Multi-Duplicate多个副本'''功能(请参阅'''区域常用操作'''章节)是实现该目标的一个好方法。回到Grab mode抓取模式(快捷“''G''”),选择所有区域,然后按住“''Shift''” + “''D''”。选择您打算复制这个格局多少次(例如,16)。复制之后我们的会话看起来像是这样的: | |
http://brunoruviaro.github.io/ardour4-tutorial/images/Ardour4_Multi-Duplicate.png | http://brunoruviaro.github.io/ardour4-tutorial/images/Ardour4_Multi-Duplicate.png | ||
| − | + | 简单回顾一下,其它您可以用于复制复制的选项有: | |
| − | + | *'''Fill Track填充音轨'''命令,位于菜单 ''Region区域'' > ''Duplicate复制'' > ''Fill Track填充音轨''。这将使用已选中的区域的副本来填充补整个音轨,一直填充到终点标记。(注:可能会使电脑变得很卡很慢!) | |
| − | + | *单独的'''Duplicate复制'''命,位于同样的菜单(快捷键“''Alt''”+“''D''”)。这可以让您一次创造出一个副本(拷贝)。 | |
| − | + | *单独的'''duplicate复制'''操作也可以按着“''Control''”+ 在区域上点击 + 拖一个副本。 | |
| − | + | ||
| − | + | ||
| − | + | ||
| − | = | + | =延伸/收缩区域= |
[http://brunoruviaro.github.io/ardour4-tutorial/stretching-shrinking-regions/ (原文)] | [http://brunoruviaro.github.io/ardour4-tutorial/stretching-shrinking-regions/ (原文)] | ||
| − | + | 区域可以延伸或收缩它的长度,而不改变他们的Pitch音高。方法是使用'''Stretch/Shrink Regions延伸/收缩区域'''工具(快捷键“''T''”,即“Time stretch时间延伸”)。 | |
| − | + | 对一个区域的长度进行一个小调整可能不会造就明显的声音Artifacts工艺品。然而,更极端的长度变化,处理声音的效果会更显著。 | |
http://brunoruviaro.github.io/ardour4-tutorial/images/Ardour4_EditModes_T.png | http://brunoruviaro.github.io/ardour4-tutorial/images/Ardour4_EditModes_T.png | ||
| − | + | 要使用'''Stretch/Shrink Region延伸/收缩区域''',需要将您的鼠标放在区域上面,然后点按住并向左或向右拖动。拖动时,您将看到一个突出显示的区域,代表着在您放开鼠标时,被收缩或延伸的区域在鼠标当前位置形成的新的持续时间。 | |
http://brunoruviaro.github.io/ardour4-tutorial/images/Ardour4_Stretch_Shrink_Action.png | http://brunoruviaro.github.io/ardour4-tutorial/images/Ardour4_Stretch_Shrink_Action.png | ||
| − | == | + | ==时间延伸一个区域以匹配循环== |
| − | + | 在本教程中,我们已经添加了另一个声音采样——这次,一个合成器片段——从freesound.org到我们在'''创建循环部分'''章节所合成的节奏段落(如果您想得到相同的样本,在Ardour的'''Search Freesound搜索自由声音'''标签页里搜索“1168”标签。作为一个新的音轨导入它)。 | |
| − | + | 在倒入这个synth片段之后,我们看到我们的新区域的长度并不匹配我们已经创建的现有的节奏。它对于一个小节来说太长了,而对于两个小节来说又太短了。 | |
http://brunoruviaro.github.io/ardour4-tutorial/images/Ardour4_Stretch_Shrink_1.png | http://brunoruviaro.github.io/ardour4-tutorial/images/Ardour4_Stretch_Shrink_1.png | ||
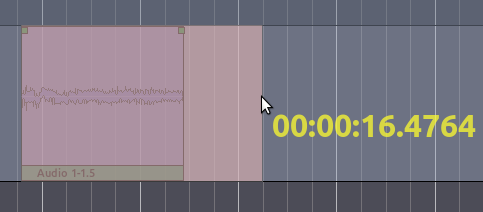
| − | + | 我们可以恰当地利用'''Stretch/Shrink延伸/收缩'''工具。选择您希望延伸的区域,然后拖出新长度直到第二小节的终点。再次提示,可以使用Grid settings网格设置的协助。 | |
| − | + | 当您释放鼠标按钮时,将会出现'''Time Stretch Audio时间延伸音频'''对话框。您可以尝试不同的时间拉伸操作设置。每个设置会以不同的方式影响这个声音。建议尝试一些不同的延伸设置,来找出哪个能给您带来最满意的结果。 | |
http://brunoruviaro.github.io/ardour4-tutorial/images/Ardour4_Stretch_Shrink_2.png | http://brunoruviaro.github.io/ardour4-tutorial/images/Ardour4_Stretch_Shrink_2.png | ||
| − | + | 在时间延伸对话框里点击''Stretch/Shrink延伸/收缩''以开始操作。 | |
| − | + | 当时间延伸操作完成时,该区域的合成器片段现在将精确地达到两个小节长度,而且应该匹配我们已经创建的鼓点样本的节奏。 | |
http://brunoruviaro.github.io/ardour4-tutorial/images/Ardour4_Stretch_Shrink_3.png | http://brunoruviaro.github.io/ardour4-tutorial/images/Ardour4_Stretch_Shrink_3.png | ||
=<center>— [[Ardour完全教程|返回主目录]] —</center>= | =<center>— [[Ardour完全教程|返回主目录]] —</center>= | ||
2016年2月11日 (四) 16:06的最新版本
安排音轨
在随后的章节中,我们将在Ardour中使用几个drumkit爵士鼓创建一个短小的韵律段落。
在以后的教程中,我们将持续为这个段落而工作,诸如Working with Regions与区域相关的工作,以及Creating Looped Sections创建循环部分。我们假设您已经阅读了Getting Started开始部分章节,并且熟悉Importing Audio导入音频、Tracks音轨和Timeline时间线。
导入样本
第一步是添加一些声音,这在Importing Audio导入音频章节中有详细阐述。在这里,我们使用的是Add existing media添加已存在的媒体对话框(“Ctrl” + “I”)导入一些drumkit爵士鼓样本作为区域。本教程中使用的样本是来自freesound.org网站的一个样本包。你可以从freesound.org本网站本身下载这些样本,但Ardour的导入窗口也内置有一个便于Search Freesound搜索自由声音的功能。从这里,您可以直接搜索和下载Freesound.org样品。
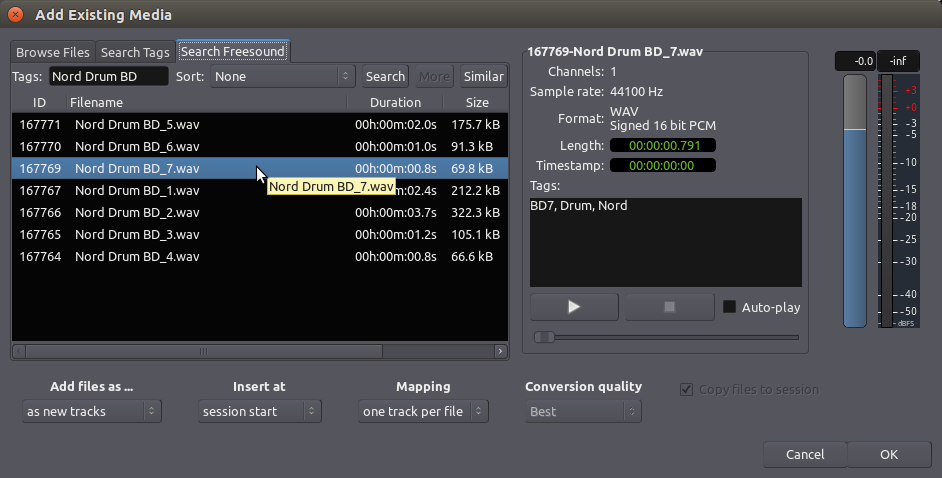
在上面的截图中,我们使用Ardour的搜索Freesound功能来搜索“Nord Drum BD”。注意,我们指定该音频文件应该“as new tracks作为新的音轨”添加进来,并且插入“at session start在会话起点”(菜单选项在左下角)。drumkit爵士鼓样本将会作为一个新的独立音轨显示在编辑器窗口里,每个音轨都使用音频文件的名称。
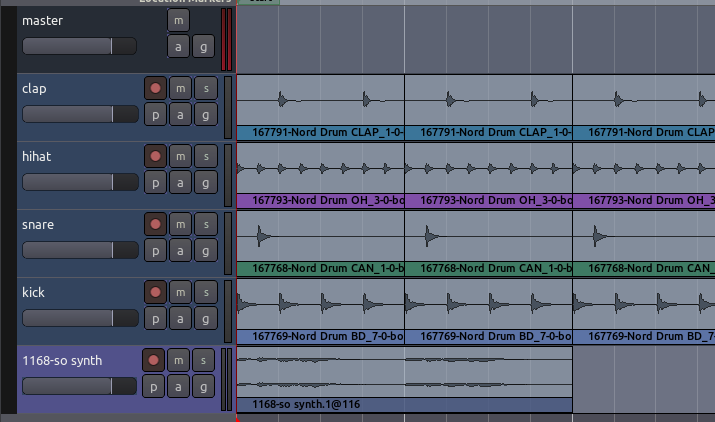
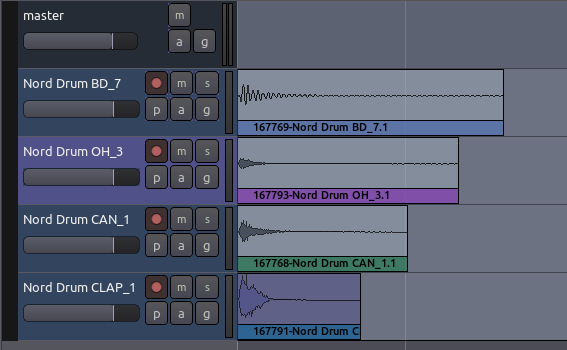
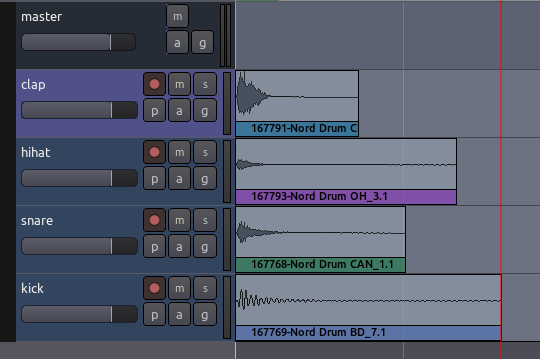
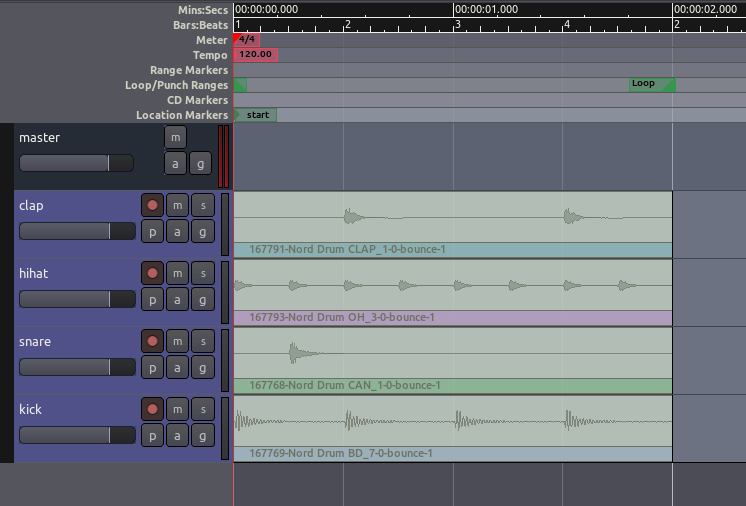
导入更多的声音后(一个snare军鼓,一个hi-hat踩镲,一个clap拍击),我们的会话看起来像这个样子(音轨名称来自于freesound.org里原样本的名称):
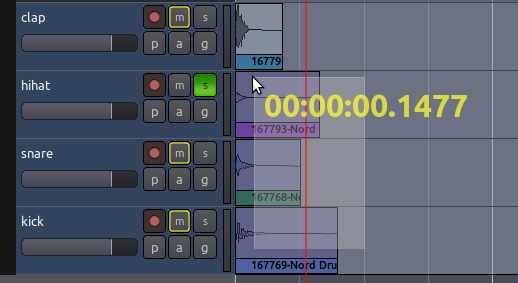
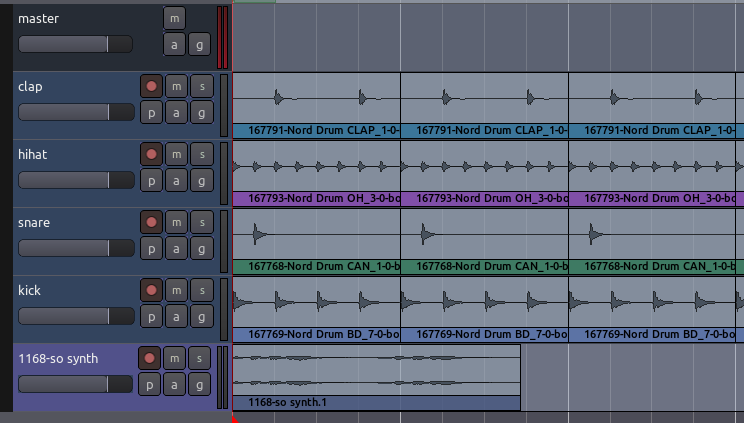
整理音轨
现在我们重命名音轨以便我们可以很快看到每个乐器的位置(双击音轨名称即可编辑它)。
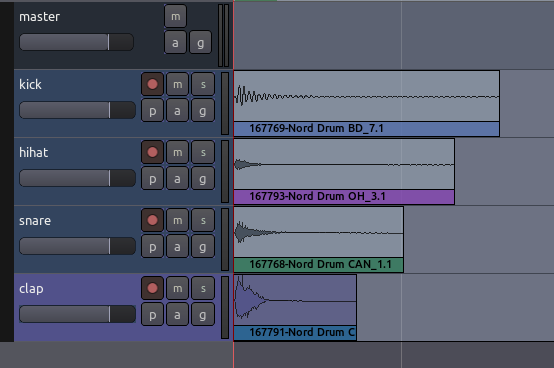
您可能也希望在编辑器窗口里从上到下重新排列音轨的顺序。点击编辑器窗口最右边的Tracks音轨 & Busses总线标签页,然后就可以拖放音轨到您想要的位置。
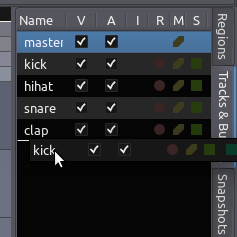
- 提示:您也可以使用这个标签页中的“V”复选框在主版面中显示或隐藏音轨。
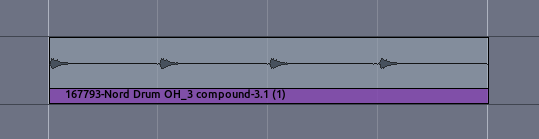
这里我们可以排序drumkit爵士鼓,以便让kick drum底鼓处在底部,snare军鼓和high ha踩镲在中间,而clap拍击在顶部。
设置节拍
Meter节拍决定了确定我们所合成的段落的音乐速度,以Beats Per Minute每分钟拍子数来衡量。
如果我们所合成的东西是有韵律的,在某种程度上它还将确定我们所使用的声音样本的长度。因此,在我们继续之前,能够对节拍进行设置是很重要的。
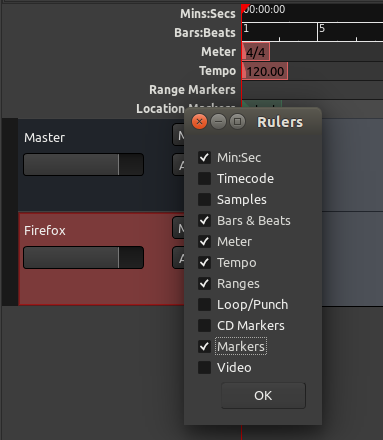
要看到我们的会话与节拍相关联的时间线,我们可以在标尺的“header首部”任何地方单击右键点击,并且勾选以下项目:Meter节拍,Bars & Beats小节&拍子,以及Tempo节奏。
可以为整个Ardour会话设置一个Meter节拍和Tempo节奏,而且可以在同一个会话的不同的地方改变它们。为了做到这一点,在编辑器窗口中定位Timeline Bar时间线栏目的节拍部分,然后右键单击第一个红色小标记打开Meter Dialog节拍对话框。
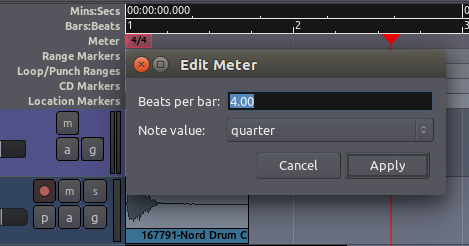
在这里您可以为Beats Per Bar每小节拍子数输入新数值,下面的Note Value音符数值也是一样。点击“Apply应用”以在您的会话中全局应用本次修改。
然后,在Tempo节奏部分里定位第一个红色标记,在它上面右键单击,为您的会话选择BPM(Beats Per Minute每分钟拍子数)。
如果在歌曲或合成里,您的会话的节拍或节奏后来又要改动,只需右键点击节拍或节奏时间线添简单加一个新的标记,并且在弹出的对话框中输入新的节奏或节拍。
使用范围
一个Range范围就是时间线上的一个已选中部分,可以包含一个或多个音轨。
范围工具(快捷键“R”)位于编辑窗口里的播送工具栏上。

当您选择了范围工具之后,您的鼠标指针看起来将会像是一条垂直线。
下面的操作可以有助于创建已选中部分范围,且在您的时间线上对齐区域的边缘。在网格和网格点菜单分别选择“Grid网格”和“Region bounds区域边界”项目,这样以后就能轻松创建范围了(注:快速选中区域以及区域之间的空隙)。

要创建一个已选中部分范围,在时间线上的任何地方拖动鼠标即可。当前的网格和网格点的选项决定了已选中部分范围将如何起作用。一旦范围选择好了,在范围上右键点击它,会打开一个Range-specific范围专用菜单。
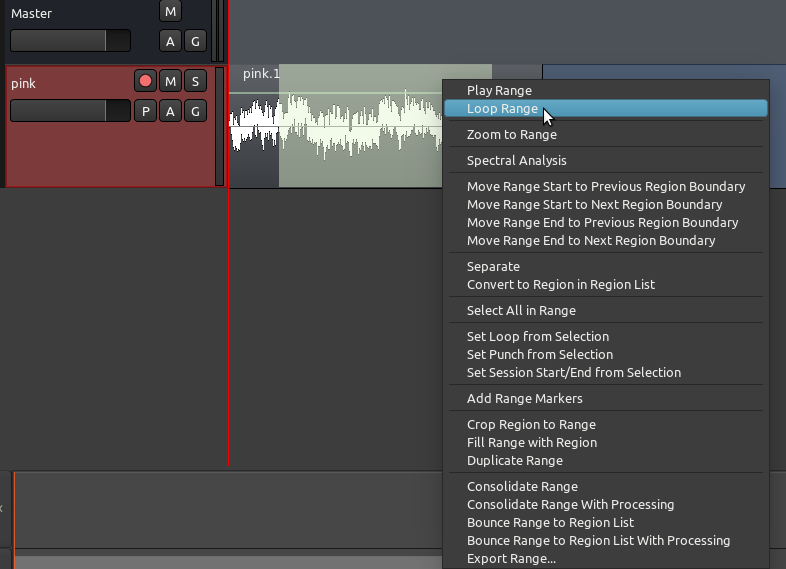
(注:在刚才的右键菜单中选择)Loop range循环范围,即是,在当前范围设置Loop Markers循环标记,并且开始循环播放。可以(在时间线上方的“Loop/Punch Ranges 循环/切换范围”里)通过移动的绿色三角形,来对应改变Loop Start循环的起点和Loop End循环的终点的每一个点。
与编辑有关的其它有用的选项,例如允许您Duplicate复制范围,在范围内Select All选择所有,或者Crop裁剪范围。
设立一个循环
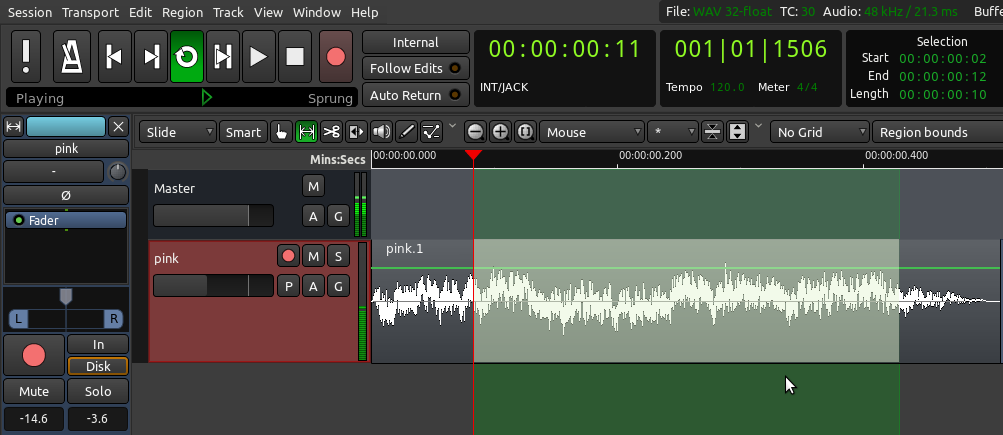
回到我们的韵律段落示例中,我们将希望听到我们合成的段落,当我们回转移动样本时,也许就像是一个循环。要做到这一点,我们必须在我们的会话中创建一个范围听一听,这样我们就能在会话中一次又一次地精确地回到这个点。
如果需要就缩小一些视图(快捷键“-”)以便在时间线里能看到完整的小节。使用范围工具在网格设置的帮助下选择整个小节,然后在范围内右键点击选择“Set loop from selection从已选中部分设置循环”。您可能会想要设置Grid网格,以便您的操作吸附到会话中的某些节拍元素(例如,吸附到Beats拍子)。一旦建立了一个小节的循环,屏幕将会看起来像是这样:
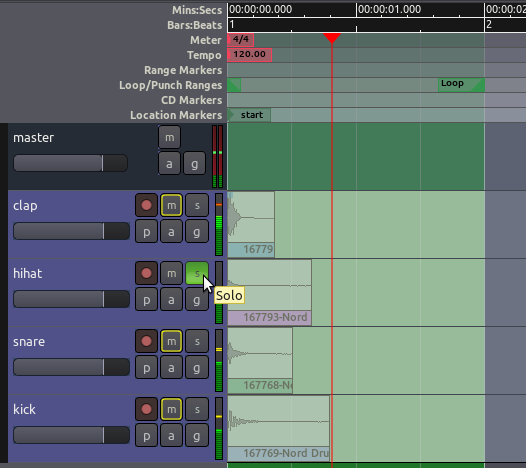
这将设置一个循环范围,您可以通过使用位于编辑器窗口顶端的Transport Menu播送工具栏里的Play Loop播放循环按钮(快捷键:“L”)。当范围循环播放时,您可以使用位于每个音轨上的Solo独奏按钮试听每一个单独的乐器。(注:这个循环对所有音轨有效。)
区域常用操作
在Ardour里,音频的已选中部分被称为Regions区域。
我们一直努力要合成一个简短的韵律段落,我们现在需要知道如何Select选择、Move移动、Split拆分和Trim修剪这些区域,还需要知道如何淡入或淡出它们的音量,以及如何在它们之间创建Crossfades交叉淡化。在合成里,这些选项中的某些部分可能需要发生在特定的Edit Points编辑点,或者在Timeline时间线和Grid网格上匹配我们所能定义的音乐节拍。
选择区域
Grab Mode抓取模式(快捷 G)是选择和移动对象物体的工具。它位于编辑器窗口播送工具栏的正下方(“小手”图标)。您在Ardour里将会经常频繁地使用到这个工具。

当它启用时,您的鼠标指针将看起来像一个小手图标。
请尝试下面的所有操作,实践一下:
- 点击该区域的波形以选中它。点击并拖动一个区域就可以四处移动它(可以在同一音轨向左和向右移动,而且也可以向上和向下移动到其它音轨)。
- 使用 “Ctrl”+“点击” 可以创建区域的一个副本并且可以四处拖动它。
- 选择时按住“Shift”键您就可以选择多个区域。
- 选择了多个区域后,就可以同时移动多个区域。
- 您可以在一个音轨上一次就选择好几个连续的区域,只需要在选择这个序列的第一个和最后一个区域时,按住“Shift”键即可(您在同一个轨道上复制一些区域可以就可以尝试这功能了)。
- 当您选择单独一个区域时,确保一定要点击在它的矩形方框内的波形部分。比波形更低的、带有该区域名字的彩色长条是用于不同的操作(请参考下面的修剪区域)。
- 使用“Del”键删除已选中的区域。
- 标准的复制(“Ctrl”+“C”)、剪切(Ctrl”+“X”),还有粘贴(“Ctrl”+“V”)操作也可以用于区域操作。
- 您还可以在多个区域上,用鼠标拖出一个选择框来全部选中它们。
移动区域
当移动的一个区域时,一个Timecode时间码将会以黄色的数字显示在屏幕上。这个时间码是该区域在时间轴上的起点。时间码的单位与第二计时器的单位是一样的,您可以通过右键点击第二计时器并选择新的单位(分:秒,小节:拍子,等)来改变所显示的时间码的单位。
你可以在同一音轨上水平移动区域(横向)到一个不同的时间点,或者您可以垂直移动已选中的区域(向上或向下)到一个不同的音轨。
当一组一个或多个区域被选中时,您你可以通过拖动鼠标来移动整套区域。
- 注意:一定要确保选择时区域点击在它的波形部分,因为点击在底部区域的标题栏上是用于不同的操作(请参考下面的修剪区域)。
复制区域
除了“Ctrl”+“点击”+“拖动”和标准复制/粘贴,Ardour还提供其它一些很方便的复制区域的方法。先使用选择/移动对象物体工具,选择一个或多个区域,然后使用菜单的Duplicate复制功能,就能复制出一个或多个副本(菜单Regions区域 > Duplicate复制)。有三个选项可用:
- Duplicate复制(快捷键“Alt”+“D”):在同一音轨上复制已选中的区域,直接跟随排在原来的后面。
- Multi-Duplicate多个副本(快捷键“Shift”+“D”):一次生成已选中区域的多个副本(相同的音轨,依次排列)。您可以指定副本的数量。
- Fill Track填充音轨:根据需要使用已选中的区域尽可能多的副本填满整个音轨,一直到时间线上的End终点标记处为止。(注:副本太多,这有可能会造系统变得迟钝缓慢。)
在下面的截图里,就是使用上述方法复制的区域。
使用编辑点
当您使用标准的复制/剪切/粘贴命令时,区域究竟会粘贴到什么地方?确切位置就是由编辑点下拉菜单决定的。
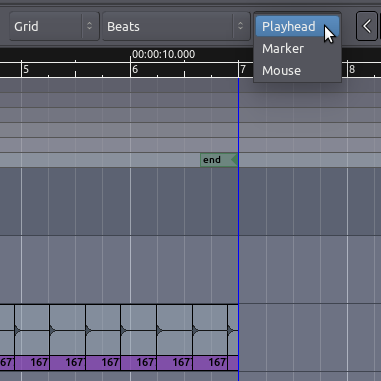
如果选择Mouse鼠标作为编辑点,那么被复制出来的区域会被粘贴到鼠标的当前位置。(注:可以复制到不同音轨)
如果选择Playhead指针作为编辑点,那么被复制出来的区域会被粘贴到原来区域所在的同一条音轨上的红色指针线条上。
最后,如果选择Marker标记作为编辑点,那么被复制出来的区域会被直接粘贴到当前已选中的位置标记的后面。(注:与原来区域所在的同一音轨上)
标记
在一个会话中,能够标记不同的位置,以便供后面的编辑和混音时使用,这是非常有用的。Ardour有好几种方法支持这样做。最常见的方法是使用Location Markers位置标记,在时间上定义确切的位置。
通过右键点击击位置标记工具栏,并选择Add New Location Marker添加新位置标记,即可把位置标记可以添加到时间线。如果您看不到位置标记工具栏,只需右键点击时间线(前端),然后在菜单里选择它,让它可见。位置标记也可以用鼠标选中,并移动到新的位置。右键点击一个位置标记可以让您重命名标记,在其中还有其他选项。
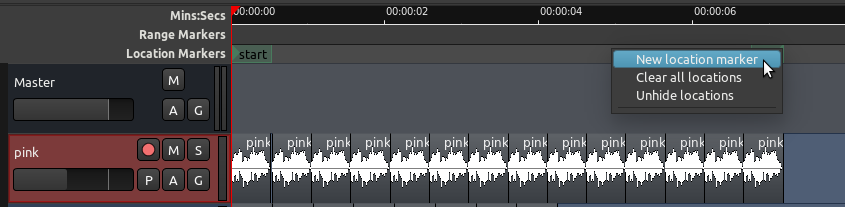
- 提示:当您首先创建一个新会话时,默认会自动添加两个位置标记。它们是start起点和end终点标记,正如您在上面的截图所见一样。如果您不看到end终点标记,缩小视图到足够小,您你就能找到它。
拆分区域
要Split拆分一个区域,简单来说就是把一个单独的区域分成两个独立的区域。有两种方式可以完成:
- 您可以使用剪切模式(快捷键“C”)在任何您打算拆分的地方点击;或者
- 您可以在抓取模式中使用快捷键“S”(即“Split拆分”)。在这种情况下,点区域被拆分的位置取决于当前已选中的编辑点。如果您的当前编辑点菜单里已选中的是鼠标,那么选择一个区域,并将光标放在您打算拆分的那点上,然后按下“S”(可以使用菜单Edit编辑 > Split Region拆分区域完成同样的操作)。

拆分之后,原来的单一区域就变成了两个独立的区域,各自带有一个新的名称,如上图所示。这两个新的区域现在是完全独立的。您可以分别移动和编辑它们。
也可以使用指针或者一个标记作为编辑点来拆分区域。
修剪区域
如果您移动光标靠近一个区域的左边或者右边的边缘附近,您会看到指针变成一个箭头。点击按住并且从区域的两端向内拖动,这个区域将被相应地缩短。这被称为Trimming修剪区域。区域从区域的起点开始修剪(在边缘从左向右拖动)或者从区域的终点开始修剪(从右向左拖动)。
这个操作是安全、非破坏性的:音频不会真的被删除。就好像您只是“隐藏”那些您不想要的或者不再需要的部分。以后,您可以“un-trim恢复修剪”区域(即,扩展它回到原来的完整大小),即使它已经被移动或复制到一个新的音轨也可以恢复。一个被修剪过的区域将继承它的原始区域名称来派生出它自己的名称,您将会在您的区域列表里看到派生的这名称。例如,在上面的图片中,一个原始的区域名称是sample_01,它的被修剪出来的版本则被命名为sample_01.1,sample_01.2,sample_01.15(…),诸如此类。
- 提示:修剪将会受到Grid网格设置的约束。如果您不想让您的修剪被任何网格所约束,只需简单地关闭网格(No Grid无网格)。
删除区域
因为Ardour是非破坏性的,所以您在音轨里删除区域并不是完全从会话中移除。它们总是可以再次从编辑器窗口右侧的区域列表中提取出来(可以从列表中把区域拖到任何音轨上)。
在区域中创建淡化
一个Fade淡化是一个区域的音量的变化,不论所作为该区域的开始或者结束都可以。在区域起点的淡化是一个Fade In淡入,在区域终点的淡化是一个Fade Out淡出。在每个区域顶部的角落都有两个小操纵杆,可以从边缘向内拖动它以创建一个淡入或者淡出。下面的屏幕截图显示了一个淡入(即:蓝色较暗部分所示)。
事实上,每一个区域都内置淡入和淡出。默认情况下,该地区的淡化很短,短得足以避免点击到位于区域起点和终点的过渡。通过如上述方法调整区域淡化的长度,即可实现更平缓的过渡。
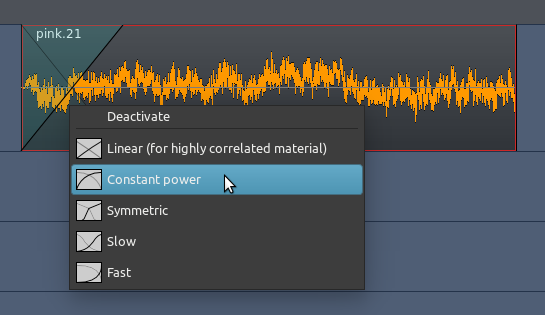
通过右键点击一个淡化(暗蓝色部分),淡化的速度也是可以调整的。
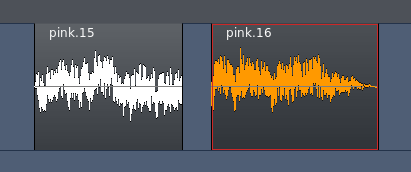
两个区域之间的交叉淡化
当一个区域淡出的同时,而另一个区域淡入,,这就被称为Crossfade交叉淡化(淡入淡出)。如果这两个地区分别处在不同的音轨,您可以使用上面描述的方法来处理淡入和淡出。下面的屏幕截图显示了一个例子。
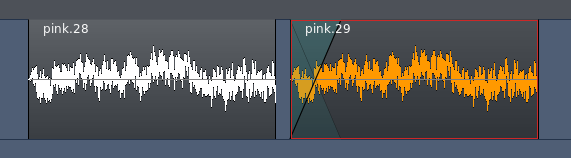
然而,如果这两个区域都处在同一音轨上,您就需要重叠它们以便创建一个交叉淡化。当多个区域重叠在同一个音轨上时,Ardour将它们视为layers层,也就是说,其中一个区域会被叠放在其它区域的上面。需要理解的重要的规则是:
- 处在最高层的区域的淡入(或者淡出)标志着两个区域之间的交叉淡化。
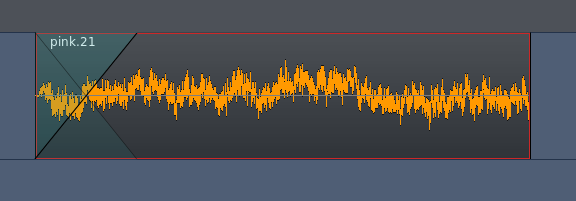
一旦您理解了这一原则,很容易创建和控制重叠区域之间的交叉淡化。这是一个例子。下图所示两个独立的区域将要被重叠在一起,以便创建一个交叉淡化。
注意,我们没有在第一个区域添加任何额外的淡出,但是我们确实在第二个区域添加了一个较长的淡入。然后拖动第二个区域局部地盖在了第一个区域上面:
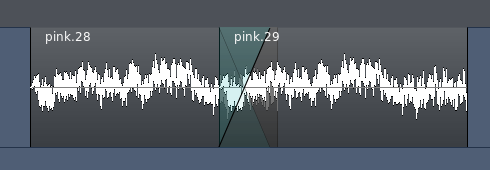
第二个区域的淡入现在作为两个区域之间的交叉淡化而起效用。换句话说,在第二个地区逐渐淡入时,第一个区域将以镜像的方式淡出。
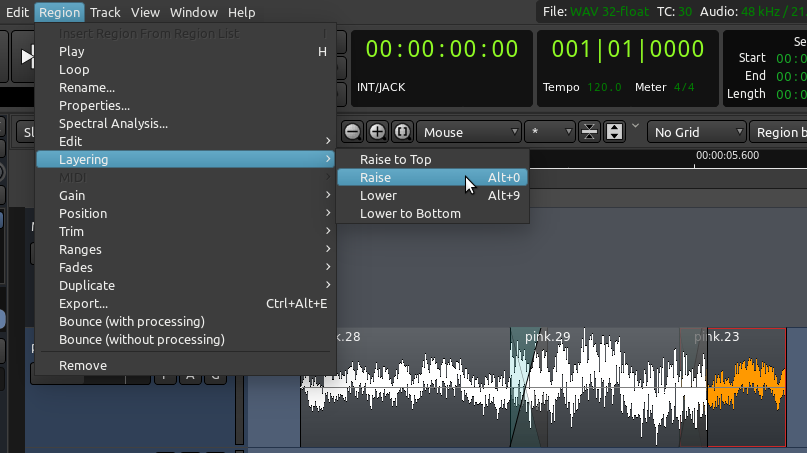
然而,为了使这个其效用,我们需要确保带有所需的淡化的区域是处在Ardour的分层系统的顶层。为了改变区域的分层,选中一个区域,然后在菜单里选择Region区域 > Layering分层。
如果您在尝试这样做时,使用的是我们之前导入的很短的敲击声,那么可能很难听到有什么不同。要想真正听到交叉淡化的效果,导入一对较长的样本再试试看(例如,一个雨声的样本,而另一个是人声)。把您的较长的样本放在同一音轨上重叠几秒钟。您将会听到其中的不同,当您移动第二个区域到底部(“Lower to Bottom沉降到底部”),以及再回到顶部(“Raise to Top提升到顶部”)。当它在顶部的时候,我们将会听到所需要的交叉淡化。当它在底部的时候,我们会听到没有没有交叉淡化,只是从第一个区域突然改变到第二个区域(假设您的第一个区域没有指定的淡出,正如上面的截图一样)。(注:第二个区域的淡入在最底部仍然有效。)
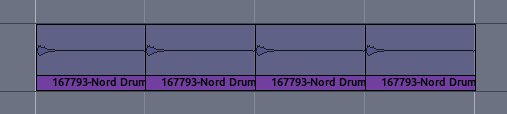
使用网格设置
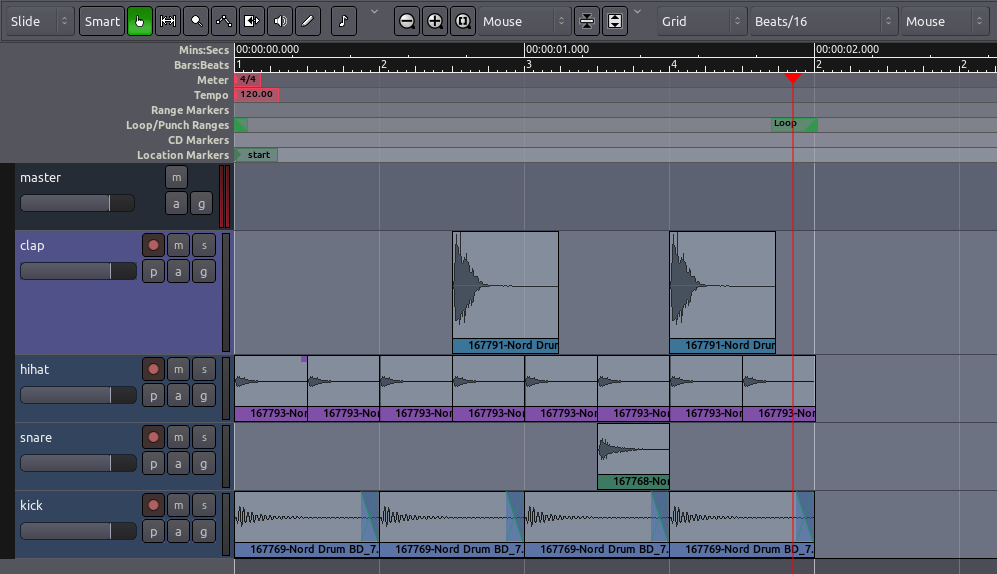
实验Grid网格设置,就如同在设置时间线章节里讨论的一样,给予不同种类的Quantization量化单位即可,换句话说,约束每个区域到特定网格的点。在本例子中,网格已经被激活,并且设置为Beats/16 每拍十六分,量化区域为每一个小节16分音符。您可能希望修剪一些样本的终点,正如上面所讨论的,以匹配您已经设置的度量结构(例如,如下面的屏幕截图所示,样品hihat在已经被修剪,这样它们不会相互重叠)。
区域进阶操作
在本节中,您将学习更多可以对区域进行操作的事情。
右键点击已选中的区域,会显示一个菜单。菜单第一个选项(带有该地区名称的标记)包含一个大的子菜单。所有这些操作也可以从Ardour的主要区域菜单中找到。
本节所描述的是从这菜单里的一些最常用的操作。
- Play播放:从区域的起点播放到区域的终点(快捷键“H”)。
- Loop循环:设置循环范围以适应该区域的持续时间,并立刻开始循环播放。
- Rename重命名:修改一个区域的名称。
- Properties属性:关于该区域的大量信息,还有改变其增益的能力。
- Position位置:带有其他选项,在这个子菜单中,您会发现有Lock锁定复选框:锁定区域以便不能移动或削减区域。然而,它仍然可以拆分,并且产生的新区域将是解锁的状态。
- Edit编辑:在这个子菜单中,您会发现一些有用的工具,例如Mute静音、Pitch Shift音高替换和Reverse反转。静音会使该区域无声。音高替换会改变一个区域的音高,而并不改变它的持续时间。反转会使得该区域反向播放。
- Gain增益:有一些很有用的选项,例如Normalize规范化,Boost Gain放大增益,Cut Gain减小增益。(注:新版把静音放在了增益的子菜单里。)
- Duplicate复制:包括有Duplicate复制、Multi-Duplicate多个副本,以及Fill Track填充音轨。这些选项的详细解释请参考区域常用操作章节。
- Spectral Analysis频谱分析:会弹出新窗口显示该区域的整体频率组成。
您可以自己随意摸索子菜单里上面没有提到的其它选项。其中很多都是您可以在Ardour的区域菜单里找到的选项的镜像。下面我们将开始讨论一些最有用的功能的细节。
音高替换
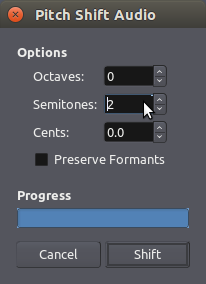
Pitch Shift音高替换功能可以改变一个区域的音高而不改变它的持续时间。该功能应用一个pitch-shifting音高替换算法来创建一个基于源剪辑片段的新的音频剪辑。
音高替换窗口中,用户可以指定想要的变调的数额和方向。窗口中包含一个Preserve Formants保持共振峰按钮。当使用一个很大的数额来进行音高替换时,保持共振峰的选项可以使结果听起来稍微更自然,尤其是在使用声乐素材的时候。
规范化
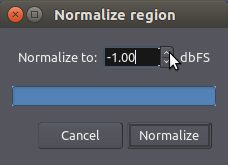
Normalize规范化功能(快捷键“Alt”+“3”)非破坏性地加大已选中区域的电平,以便Peaks峰值处在 0 dB 或者更少。当规范化到 0.0 时,该区域将会在避免Clipping截波的情况下尽可能的变大声。有时您可能会发现规范化区域到数值小于 0 是很有用的,例如 -1.0,-3.0,或者 -6.0 分贝,那样它不会变得太大声。
另外两个对区域有用的增益操作是:Boost Gain加大增益(“Alt” + “6”),以及减小增益(“Alt” + “7”)。一定要试一试。
反转
Reverse反转功能用来反转已选中区域的音频,实际上就是令其其向后播放。反转一个区域将会“在幕后”创建一个新的音频文件。
操作两个或更多已选中的区域
如果选择了超过一个以上的区域,该操作将适用于它们全部(例如,规范化、反转,诸如此类。)
整合
只有当选中了两个或更多的区域时,右键菜单中某些操作才会变成可用。例如,在子菜单“Edit编辑”中,看一看“Combine整合”功能。首先,我们选中两个相邻的区域:(注:同一音轨上)

然后我们从鼠标右键菜单中选择“Combine整合”(注:在Edit编辑子菜单里),或者从Ardour的主菜单中选择 Region区域 > Edit编辑 > Combine组合:
其结果是,已选中的区域被整合成为了一个区域。这是尤其有用,例如当您发现一个其效果恰巧就像您想要的那样的精确序列区域,,然后您想成组复制并且/或者移动整个序列时。
注意整合区域的结果,就如同“compound联合”这个词那样,把它们的名称也连接到了一起。
改变编辑模式
我们已经学习了一些关于抓取模式(选择/移动对象物体)和范围模式的内容。在这一章里,我们将概述在编辑器窗口里,Edit Modes编辑模式和Cursor Modes游标模式中所有可用的部分。
编辑模式和游标模式

这些控件决定了的主版面的行为模式,以及游标的不同功能。
Edit Mode编辑模式下拉菜单包含三个选项。Slide Edit滑行编辑是标准模式,本教程中我们将使用这个模式。它允许您横向(在同一音轨)和纵向(不同音轨之间)自由拖动区域。其它两个选项限制或阻止您从原本位置移动区域的能力,但在此我们将不会详细讨论它们。
抓取模式(快捷键“G”)

这种游标模式允许您选择或者移动对象物体,例如区域和断点(在一个自动化曲线里)。当这个游标模式被选中时,您的鼠标指针看起来将会像是一个小手图标。
范围(快捷键“R”)

这个游标模式允许您点击并拖动来定义或调整范围。当这个游标模式被选中时,鼠标指针看起来将会像是一条垂直线。
切割模式(快捷键“C”)

使用这个游标模式将可以把区域拆分成为更小的区域。鼠标变成剪刀的形状。这允许您在一个区域上点取并点击,从而实现在鼠标所处位置拆分区域。
- 提示:您也可以从抓取模式直接切割区域(有时这种方法可以更加实用)。不用离开抓取模式,只需将鼠标放在该区域要被切割的所需的位置,然后按下快捷键“S”(即“split拆分”)就行了。重要的是:您的Edit Point编辑点(网格设置的右边)必须设置为Mouse鼠标。
延伸/收缩区域(快捷键“T”)

这种光标模式允许您拖动并调整整个区域的持续时间,且不改变音高。这是有时被称为“Time stretching时间延伸”,,因此,快捷键是“T”。要了解更多的细节请参阅延伸/收缩区域章节。当这个游标模式被选中时,鼠标指针看起来将会像是一个斜对角的箭头。
监听模式(试听指定的区域)

这个游标模式允许您点击任何已存在于音轨上的区域,并立即回放。回放到该区域的终点时即停止。当这个游标模式被选中时,鼠标指针看起来将会像是一个小喇叭的图标。
- 提示:您不用离开抓取模式,也可以快速监听一个已选中的区域。只需简单地选择一个区域,然后按下快捷键“H”。
描绘模式(快捷键“D”)
使用这种模式可以描绘增益自动化点。鼠标看起来就像是一支铅笔。自动化相关内容将在使用自动化章节中详细讨论。
在这种模式下,如果您把您的鼠标放在您想移动的自动化点的正上方(鼠标会变成一个小小的“十”字),您也可以编辑个性化的点(注:即移动,或右键选择编辑)。然而,如果您点击得不准确,这可能会变成意外地创建一个新的自动化点。如果真的遇到这个问题,您应该使用下一个模式,即只允许进行编辑已存在的点,而不是创建新的点。

内部编辑模式(快捷键“E”)
使用这种模式可以编辑已存在的增益的自动化点。鼠标看起来像是一个手,当您放在一个存在的点上时,变成一个小小的“十”字。点击(按住鼠标左键不放)并拖动就能移动点。

MIDI
上面阐述的最后两个按钮也可以用于创建和编辑MIDI信息,但在本教程中我们不讨论MIDI。
(注:MIDI 音乐设备数字接口 Musical Instrument Digital Interface)
水平缩放和视图选项

您可能会时常使用的主要快捷方式是“-”和“=”(分别是缩小和放大)。缩放的中心位置取决于Edit Point编辑点的当前选择(Mouse鼠标、Marker标记或者Playhead指针)。如果您对于选择编辑点的作用还不大明白,可以试试选择使用Mouse鼠标。
缩放至整个会话按钮(快捷键“_”——这是下划线符号)可以根据需要放大或缩小,这样您就可以看到您的项目起点和终点标记。
上面所讨论的缩放选项,控制着您将会在屏幕上看到的水平方向上内容的多少。一旦您有一个会话带有多个音轨,您还会想要控制您在屏幕垂直方向上所能适配(看到)的内容的多少。有好几种方法可以做到这一点:
- 使用“Number of visible tracks可见音轨数量”下拉菜单,选择您想在您的屏幕上适配多少条音轨。
- 使用“Shrink tracks收缩音轨”按钮来让所有已选中的音轨变小一些。
- 使用“Expand tracks扩展音轨”按钮来让所有已选中的音轨变大一些。
- 你也可以通过拖动底部的边缘来改变一个独立的音轨尺寸,或者右键点击音轨前端标题栏,并选择所需的“Height高度”(注:子菜单)。
导航工具
您可以使用编辑器窗口底部的导航工具来上下滚动显示整个会话中的内容,以及通过调整视图矩形的大小来调整水平和垂直缩放。
(注:如果没有看到这个工具栏,点击菜单栏的 View视图 > Show Summary显示摘要即可看到)
创建循环部分
您可以在您的Ardour会话里很容易地重复音频部分。
在这里,我们将使用我们在区域常用操作章节里创建的那个短的节奏段落,复制它并制造一个循环。
在复制段落之前,推荐一个好主意,即把处在同一音轨的各个区域整合成为单独的一体:这样能更容易移动它们,并且它可以防止您意外地把一个hihat样本移动到不适当的位置,诸如此类。有两种方法能做到这一点:Combine Regions整合区域(允许您稍后uncombine撤销整合)以及Consolidate Range合并范围(如同刻在石头上,不允许您以后分开它们)。
如果仍计划对节奏进行变更(添加、删除,或者移动个别区域),它可能还是的使用Combine整合区域选项比较好。如果您喜欢序列的方式并且不打算或者不介意稍后分割它们的能力,那您可以使用Consolidate合并范围选项。
整合区域
简单地选择所有您打算组合的区域:
然后在菜单里选择 Region区域 > Edit编辑 > Combine整合(或者右键点击已选中的区域,并且在弹出菜单里找到相同的选项即可,如下图所示):

整合后的区域将看起来像是这样(注意在名称中有“compound”(混合)字样):
在将来您需要再次分离它们的时候,只需选择这个整合区域并且在相同的菜单中选择“Uncombine撤销整合”选项。
合并范围
一个更永久替代Combine整合的是使用Consolidate合并。当您已经排列好您的区域成为一个单独的“loop cycle循环周期”,并且您对这声音感到很满意,那就创建一个将用于组成循环的包括所有区域的Range范围。首先,确保选中了在循环中被使用到的每一个音轨。未选中的音轨是灰色的,选中的是蓝色的(注:新版选中的音轨是红色的)。如果任何您使用的音轨没有被选中,可以按住Shift键的同时点击它们,即可将它们添加到选定的那组音轨里。最后,使用范围工具选择整个循环。
再次提醒,Grid网格设置将帮助您在您的度量工具栏上精确地设置范围的起点和终点。一旦您已经选择了整个循环,右键单击这个范围并选择“Consolidate range合并范围”。如果您想把任何任何已经添加到循环里的Automation自动化或者Plugin插件效果也包括进来,可以选择“Consolidate range with processing合并范围处理”。

当范围已经被合并后,新的区域将出现在每个音轨上,每个都包含了所有您在之前步骤里设置的样品副本。记住,一旦范围被合并,就没有办法撤销该操作。在任何情况下,如果您发现您需要以任何方式改变节奏,您总是可以从区域列表中找回原来的个别样本然后用它们重建格局。
复制范围
在您合并那些独立的区域形成您的格局之后(不论是使用Combine整合或者Consolidate合并),现在是复制这个格局以把它创造为几个小节的循环的时候了。
Multi-Duplicate多个副本功能(请参阅区域常用操作章节)是实现该目标的一个好方法。回到Grab mode抓取模式(快捷“G”),选择所有区域,然后按住“Shift” + “D”。选择您打算复制这个格局多少次(例如,16)。复制之后我们的会话看起来像是这样的:
简单回顾一下,其它您可以用于复制复制的选项有:
- Fill Track填充音轨命令,位于菜单 Region区域 > Duplicate复制 > Fill Track填充音轨。这将使用已选中的区域的副本来填充补整个音轨,一直填充到终点标记。(注:可能会使电脑变得很卡很慢!)
- 单独的Duplicate复制命,位于同样的菜单(快捷键“Alt”+“D”)。这可以让您一次创造出一个副本(拷贝)。
- 单独的duplicate复制操作也可以按着“Control”+ 在区域上点击 + 拖一个副本。
延伸/收缩区域
区域可以延伸或收缩它的长度,而不改变他们的Pitch音高。方法是使用Stretch/Shrink Regions延伸/收缩区域工具(快捷键“T”,即“Time stretch时间延伸”)。
对一个区域的长度进行一个小调整可能不会造就明显的声音Artifacts工艺品。然而,更极端的长度变化,处理声音的效果会更显著。
要使用Stretch/Shrink Region延伸/收缩区域,需要将您的鼠标放在区域上面,然后点按住并向左或向右拖动。拖动时,您将看到一个突出显示的区域,代表着在您放开鼠标时,被收缩或延伸的区域在鼠标当前位置形成的新的持续时间。
时间延伸一个区域以匹配循环
在本教程中,我们已经添加了另一个声音采样——这次,一个合成器片段——从freesound.org到我们在创建循环部分章节所合成的节奏段落(如果您想得到相同的样本,在Ardour的Search Freesound搜索自由声音标签页里搜索“1168”标签。作为一个新的音轨导入它)。
在倒入这个synth片段之后,我们看到我们的新区域的长度并不匹配我们已经创建的现有的节奏。它对于一个小节来说太长了,而对于两个小节来说又太短了。
我们可以恰当地利用Stretch/Shrink延伸/收缩工具。选择您希望延伸的区域,然后拖出新长度直到第二小节的终点。再次提示,可以使用Grid settings网格设置的协助。
当您释放鼠标按钮时,将会出现Time Stretch Audio时间延伸音频对话框。您可以尝试不同的时间拉伸操作设置。每个设置会以不同的方式影响这个声音。建议尝试一些不同的延伸设置,来找出哪个能给您带来最满意的结果。

在时间延伸对话框里点击Stretch/Shrink延伸/收缩以开始操作。
当时间延伸操作完成时,该区域的合成器片段现在将精确地达到两个小节长度,而且应该匹配我们已经创建的鼓点样本的节奏。