Ardour4 初学者教程 01 介绍
来自Ubuntu中文
目录
什么是Ardour?
Ardour是一个专业、全功能的硬盘录音和数字音频工作站(简称DAW)。Ardour是免费/自由开源软件(FLOSS)。
它的特点有:无限的音频轨道和总线,非破坏性、非线性编辑,带有无限的撤销,以及“任意来源到任意目标“的信号路由,它支持标准文件格式,如BWF、WAV、WAV64、AIFF CAF,并且它可以使用LADSPA、LV2、VST和AudioUnit插件格式。
Ardour运行在Linux和Mac OS X系统平台上 (关于Windows平台,正在开发中,请参考这里), 并且可选择使用Jack音频连接工具包(简称JACK)连接到计算机声卡的接口,这与运行在相同系统平台的其它音频应用程序一样。
要了解关于Ardour更多的信息,请参考官方网站 http://ardour.org/
关于本教程
本教程为使用Ardour的初学者提供了一个关于基础录制和编辑音轨的介绍。假定您已经在计算机上安装有Ardour并且可以运行。请注意:本教程(暂时)不包括任何MIDI功能。
关于如何在Linux和Mac OS X系统平台上安装Ardour,请参考 https://ardour.org/requirements.html 如果使用Linux系统,例如KXStudio和UbuntuStudio发行版,有更多、更广、且更有用的音乐软件可供选择,包括Ardour。
这个页面的其余部分包括作者信息和本教程的约定格式。
作者信息
在2009年11月23日和27日期间,在荷兰鹿特丹的WORM,moddr实验室(http://moddr.net)里,由Derek Holzer领衔的Book Sprint编写了本教程的主体部分。(注:Book Sprint 文卷争先、书籍冲刺,汇集一组专家在3 - 5天编写完成一本书的活动,请参考 http://www.booksprints.net/about/ )。录入和支持是来自国际社会的Ardour用户和开发者。本教程最早是基于Ardour 2.x版本编写。原始的FLOSS手册可以在这里找到: http://en.flossmanuals.net/ardour/ (注:FLOSS Manuals 补螺丝手册,是一组自由与开源软件手册,由FLOSS Manuals Foundation补螺丝手册基金会维护,请参考 https://www.flossmanuals.net/ 或者 http://www.flossmanuals.org/ )
2014年12月,Ardour的教程更新到3.5版,并且迁移到GitHub。文本得到彻底修订,屏幕截图也被更新的截图取代。2015年8月,为了支持Ardour 4.2版,又做了一个类似的修订,更新了所有截图和文字。2014年和2015年的修订均由Bruno Ruviaro完成。
Ardour社区被邀请来贡献本教程的内容。所有的文本和图片都在线可访问: https://github.com/brunoruviaro/ardour4-tutorial ,这使得任何人都可以生成、修改、混编这个文本。需要了解更多的信息,请参考: http://brunoruviaro.github.io/ardour4-tutorial/how-to-contribute-0/
在补螺丝手册里补充编写的《Ardour参考手册》当前正在由Ardour社区开发中,旨在提供一个百科全书式的Ardour特性清单。该参考手册可以在 http://manual.ardour.org/ 上找到。
要了解完整的作者信息和许可证清单,请点击这里 。
本教程的约定格式
以下是我们在本手册采用的一些基本的格式约定。
鼠标按键
运行使用Ardour需要配备一个带有两个按键的鼠标(或者您的系统能以某种方式虚拟带两个按键的鼠标)。文章中的“点击”是指鼠标左键的点击行为。文章中的“右键点击”是指鼠标右键的点击行为。文章中的按着“Control键”、“Cmd键”或者“Apple键”同时点击鼠标,这与不按着其它键点击鼠标,可能会得到不同的结果。
按键名称与按键组合
按键的名称都写在双引号内,且用斜体字表示,就像这样:
“Control”, “Return”, “Backspace”, “R”
按键组合的表示方法,像这样:
“Control” + “X”
或者
“Apple” + “X”
菜单导航
在Ardour里许多功能都可以通过点击不同的菜单项来实现。另外,您可能需要通过访问OS X、Ubuntu或其他Linux发行版的菜单来输入某项参数。为了说明这一点,我们使用两个格式约定:第一是通过截图说明(图片),第二是通过类似这样的“语法”:
View > Zoom > Zoom to Session
上面的例子是一段缩写,意思是”首先点击视图菜单,然后选择列表中的缩放项目,然后点击放大到会话”。
Glossary Words
This tutorial does not assume any previous knowledge of computers or audio editing, so terms which might be unfamiliar to the general reader are capitalized throughout this manual, and are listed in Boldface the first time they are used in a chapter. Glossary words are also defined in-line the first time they occur in the manual, and are included in the Glossary at the end of this manual.
什么是数字音频?
Ardour is a Digital Audio Workstation (DAW). Beforing using it to record and edit sound, it might be useful to review how digital audio works.
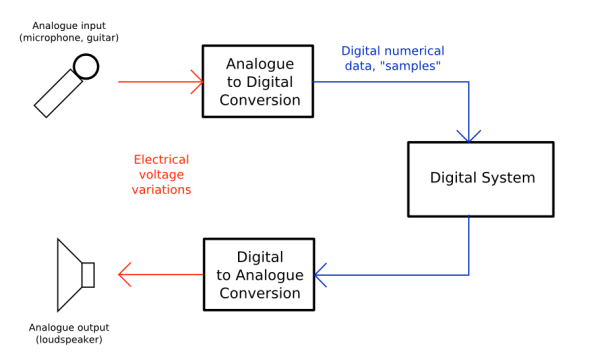
The diagram above shows how sound travels to and from your computer. The “Analogue to Digital Conversion” (ADC) and the “Digital to Analogue Conversion” (DAC) are done by the sound card or audio interface. The “Digital System” in this case is your computer running Ardour.
Frequency and Gain
Imagine a loudspeaker. To move the air in front of it and make sound, the membrane of the speaker must vibrate from its center position (at rest) backwards and forwards. The number of times the membrane vibrates each second determines the Frequency (the note, or pitch) of the sound you hear. The distance the membrane travels from its resting point determines the Amplitude (the volume, or loudness) of the sound. Normally, we measure Frequency in Hertz (Hz) and Amplitude in Decibels (dB).
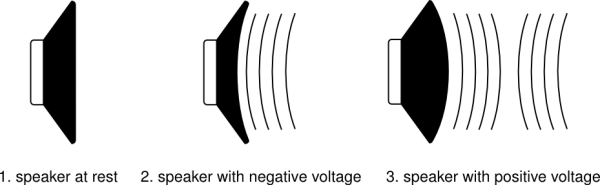
Check out the great animation on this page illustrating this process: http://animagraffs.com/loudspeaker/
A microphone works like a loudspeaker in reverse: vibrations in the air cause its membrane to vibrate. The microphone turns these acoustic vibrations into an electrical current. If you plug this microphone into a computer’s sound card and start recording, the sound card makes thousands of measurements of this electric current per second and records them as numbers. The number of Samples (i.e. measurements) made per second is called the Sample Rate, and the number of possible values each Sample can have is called the Bit Depth. The combination of Sample Rate and Bit Depth indicates how closely the digital signal can reproduce the sound it has recorded.
Peaks and Clipping
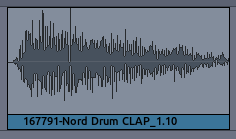
When Ardour displays the Samples which have been recorded, they appear as the Waveform we see below. The center horizontal line indicates the membrane of the speaker at rest, and the Peaks of the Waveform indicate the maximum Amplitude.
If we take a Waveform and increase its the Amplitude a lot, some of the Peaks may now fall outside the range that the computer can represent digitally. The computer’s inability to represent Peaks outside the range of Amplitude is called Clipping, which results in a permanent loss of digital information, as well as a change in the sound quality which is recognizable as Distortion. Ardour marks clipped Peaks with the color red, as can be seen in the image below.
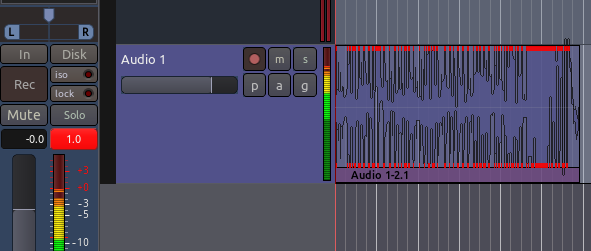
In the image above, one can also see the Mixer Strip on the far left, which gives a running measurement of the Peaks, as well as an indication at the top of the Peak Meters showing the maximum Peak so far. The red number indicates Clipping has occurred.
TIP: Clipping often can happen at the time of recording if you set your microphone levels too high.
The range of decibels between the region’s maximum peak and the clipping point is commonly referred to as Headroom, and common recording practice is to keep approximately three to six Decibels of Headroom between the maximum of your signal and the clipping point, with the clipping point itself being represented as 0 dB (zero Decibels). In other words, an audio region with a comfortable amount of Headroom would have its maximum peaks between −6 dB and −3 dB.
Also, because the Peaks of audio signals add together, care must be taken when Mixing several sources together to keep the combined signals from Clipping.
Sample Rate and Bit Depth
To make audio playable on a compact disc, for example, the computer must generate 44,100 Samples per second. The Sample Rate determines the highest frequency which can be recorded or played back by the computer. A sampling rate of 44.1 kHz means that the highest frequency which can be represented is just under 22.05 kHz. Since normal human hearing lies within the range of approximately 20 Hz to 20 kHz, this is commonly accepted as a reasonable Sample Rate. Other commonly used
Sample Rates include 48 kHz (DAT recorders) or 96 kHz (DVD audio).
Each Sample is recorded as a 16-bit number. One Bit is a piece of information which is either 0 or 1. If there are 16 bits together to make one sample, then there are 2^16 (65,536) possible values for each sample.
Thus, we can say that CD-quality audio has a Sample Rate of 44.1 kHz and a Bit Depth of 16 bits. Professional music recordings are usually mixed using 24 bits to preserve the highest amount of detail before being mixed down to 16 bits for CD. Older computer games have a distinctively rough sound, using only 8 bits. By increasing the Sample Rate, we are able to record higher sonic frequencies, and by increasing the Bit Depth, we are able to use a greater Dynamic Range (the difference between the quietest and the loudest sounds possible to record and play).
Click here for a great video tutorial explaining sampling rate and bit depth in a lot more detail.