“Ardour4 初学者教程 01 介绍”的版本间的差异
来自Ubuntu中文
小 (→什么是Ardour?) |
|||
| (未显示同一用户的43个中间版本) | |||
| 第6行: | 第6行: | ||
它的特点有:无限的音频轨道和总线,非破坏性、非线性编辑,带有无限的撤销,以及“任意来源到任意目标“的信号路由,它支持标准文件格式,如BWF、WAV、WAV64、AIFF CAF,并且它可以使用LADSPA、LV2、VST和AudioUnit插件格式。 | 它的特点有:无限的音频轨道和总线,非破坏性、非线性编辑,带有无限的撤销,以及“任意来源到任意目标“的信号路由,它支持标准文件格式,如BWF、WAV、WAV64、AIFF CAF,并且它可以使用LADSPA、LV2、VST和AudioUnit插件格式。 | ||
| − | Ardour运行在Linux和Mac OS X系统平台上 | + | Ardour运行在Linux和Mac OS X系统平台上 (关于Windows平台的版本正在开发中,请参考[http://ardour.org/windows.html 这里]), 并且可选择使用Jack音频连接工具包(简称JACK)连接到计算机声卡的接口,这与运行在相同系统平台的其它音频应用程序一样。 |
要了解关于Ardour更多的信息,请参考官方网站 http://ardour.org/ | 要了解关于Ardour更多的信息,请参考官方网站 http://ardour.org/ | ||
| 第13行: | 第13行: | ||
[http://brunoruviaro.github.io/ardour4-tutorial/about-this-tutorial/ (原文)] | [http://brunoruviaro.github.io/ardour4-tutorial/about-this-tutorial/ (原文)] | ||
| − | + | 本教程为使用Ardour的初学者提供了一个关于基础录制和编辑音轨的介绍。假定您已经在计算机上安装有Ardour并且可以运行。请注意:本教程(暂时)不包括任何MIDI功能。 | |
| − | + | 关于如何在Linux和Mac OS X系统平台上安装Ardour,请参考 https://ardour.org/requirements.html 如果使用Linux系统,例如KXStudio和UbuntuStudio发行版,有更多、更广、且更有用的音乐软件可供选择,包括Ardour。 | |
| − | + | 这个页面的其余部分包括作者信息和本教程的约定格式。 | |
| − | == | + | ==作者信息== |
| − | + | 在2009年11月23日和27日期间,在荷兰鹿特丹的WORM,moddr实验室(http://moddr.net)里,由Derek Holzer领衔的'''Book Sprint'''编写了本教程的主体部分。(注:Book Sprint 文卷争先、书籍冲刺,汇集一组专家在3 - 5天编写完成一本书的活动,请参考 http://www.booksprints.net/about/ )。录入和支持是来自国际社会的Ardour用户和开发者。本教程最早是基于Ardour 2.x版本编写。原始的FLOSS手册可以在这里找到: http://en.flossmanuals.net/ardour/ (注:FLOSS Manuals 补螺丝手册,是一组自由与开源软件手册,由FLOSS Manuals Foundation补螺丝手册基金会维护,请参考 https://www.flossmanuals.net/ 或者 http://www.flossmanuals.org/ ) | |
| − | + | 2014年12月,Ardour的教程更新到3.5版,并且迁移到GitHub。文本得到彻底修订,屏幕截图也被更新的截图取代。2015年8月,为了支持Ardour 4.2版,又做了一个类似的修订,更新了所有截图和文字。2014年和2015年的修订均由Bruno Ruviaro完成。 | |
| − | + | Ardour社区被邀请来贡献本教程的内容。所有的文本和图片都在线可访问: https://github.com/brunoruviaro/ardour4-tutorial ,这使得任何人都可以生成、修改、混编这个文本。需要了解更多的信息,请参考: http://brunoruviaro.github.io/ardour4-tutorial/how-to-contribute-0/ | |
| − | + | 在补螺丝手册里补充编写的《Ardour参考手册》当前正在由Ardour社区开发中,旨在提供一个百科全书式的Ardour特性清单。该参考手册可以在 http://manual.ardour.org/ 上找到。 | |
| − | + | 要了解完整的作者信息和许可证清单,请点击[http://brunoruviaro.github.io/ardour4-tutorial/credits 这里 ] | |
| + | 。 | ||
| − | == | + | ==本教程的约定格式== |
| − | + | 以下是我们在本手册采用的一些基本的格式约定。 | |
| − | === | + | ===鼠标按键=== |
| − | + | 运行使用Ardour需要配备一个带有两个按键的鼠标(或者您的系统能以某种方式虚拟带两个按键的鼠标)。文章中的'''点击'''是指鼠标左键的点击行为。文章中的'''右键点击'''是指鼠标右键的点击行为。文章中的按着''“Control”''键、''“Cmd”''键或者''“Apple”''键同时点击鼠标,这与不按着其它键点击鼠标,可能会得到不同的结果。 | |
| − | === | + | ===按键名称与按键组合=== |
| − | + | 按键的名称都写在双引号内,且用斜体字表示,就像这样: | |
| − | + | ''“Control“'',''“Return"'',''"Backspace"'',''"R"'' | |
| − | + | 按键组合的表示方法,像这样: | |
| − | + | ''“Control“ + “X"'' | |
| − | + | 或者 | |
| − | + | ''“Apple“ + “X“'' | |
| − | === | + | ===菜单导航=== |
| + | 在Ardour里许多功能都可以通过点击不同的菜单项来实现。另外,您可能需要通过访问OS X、Ubuntu或其他Linux发行版的菜单来输入某项参数。为了说明这一点,我们使用两个格式约定:第一是通过截图说明(图片),第二是通过类似这样的“语法”: | ||
| − | + | ''View > Zoom > Zoom to Session'' | |
| − | + | ''视图 > 缩放 > 缩放到会话'' | |
| − | + | 上面的例子是一段缩写,意思是”首先点击‘View视图‘菜单,然后选择列表中的‘Zoom缩放‘项目,然后点击‘Zoom to Session缩放到会话‘”。(注:为兼顾使用英文版的用户,以及由于有部分菜单及参数选项未翻译完全,本教程关于菜单及参数选项的翻译将采用中英文同列的形式。) | |
| − | === | + | ===术语词汇=== |
| − | + | 本教程不采用任何旧有的电脑或音频编辑知识,所以有些一般读者可能不大熟悉的词语,在本手册中会始终用首字母大写的单词来表示,并且它在该章节的第一次出现时会以'''黑体字'''来表示。当术语词汇第一次出现在手册里时,就会按上述方法标记注明,并且也会包含在本手册末尾的'''术语表'''中。(注:为兼顾使用英文版的用户,以及由于有部分菜单及参数选项未翻译完全,本教程相关术语词汇第一次出现时的翻译将采用中英文同列的形式。) | |
=什么是数字音频? = | =什么是数字音频? = | ||
[http://brunoruviaro.github.io/ardour4-tutorial/what-is-digital-audio/ (原文)] | [http://brunoruviaro.github.io/ardour4-tutorial/what-is-digital-audio/ (原文)] | ||
| − | + | Ardour是一个数字音频工作站(DAW——Digital Audio Workstation)。在使用它录制和编辑声音之前,应该了解一下数字音频是如何工作的。 | |
http://brunoruviaro.github.io/ardour4-tutorial/images/Ardour4_Digital_Audio_1.png | http://brunoruviaro.github.io/ardour4-tutorial/images/Ardour4_Digital_Audio_1.png | ||
| − | + | 模拟信号输入(如:话筒、电子吉他) --> 模拟数字转换 --> 数字数值数据,“采样” --> 数字系统 --> 数字模拟转换 --> 模拟信号输出(如:扬声器)(红色部分:电气电压变化) | |
| − | + | 上方的简图揭示了声音在您电脑里运行的旅程。“ADC模拟数字转换(Analogue to Digital Conversion)”和“DAC数字模拟转换(Digital to Analogue Conversion)”都是通过声卡或音频接口来完成。从这个角度而言,其中的“Digital System数字系统”就是您的电脑运行着的Ardour。 | |
| − | + | ==频率和增益== | |
| + | |||
| + | 设想有一个扬声器,为了振动它前方的空气以致于能产生声音,喇叭上的膜必须从它(静止时)的中心位置向前以及向后往复振动。膜每秒钟振动的次数决定了你所听到的声音的'''“Frequency频率”'''(音调,note或者pitch)。膜从它的静止点移动的距离决定了'''“Amplitude振幅”'''(音量,volume或者loudness)。通常,我们使用'''“Hertz赫兹”'''(Hz)来衡量频率,使用'''“Decibels分贝”'''(dB)来衡量音量。 | ||
http://brunoruviaro.github.io/ardour4-tutorial/images/Ardour4_Digital_Audio_2.png | http://brunoruviaro.github.io/ardour4-tutorial/images/Ardour4_Digital_Audio_2.png | ||
| − | + | 1、扬声器静止时 2、扬声器加载负电压 3、扬声器加载正电压 | |
| − | + | 一个极好的动画演示了扬声器的工作过程,请查看这个页面: http://animagraffs.com/loudspeaker/ | |
| − | + | 一个话筒(麦克风)的工作原理就像扬声器的反向行为:空气的震动引起话筒里膜的振动,话筒把这些声学振动转换为电流。如果您把这个话筒插入计算机的声卡并开始录音,声卡就会以每秒上万次的速度测量这电流,并且把它们记录为数字。每秒'''“样本Samples“'''(即:measurements测量)的数量被称为'''“Sample Rate采样率“''',并且每一个样本的可取值的数目被称为'''“Bit Depth位深“'''(比特深度)。采样率和位深的组合表明,数字信号可以如此接近真实地重现它所记录的声音。 | |
| − | + | ==峰值和截波== | |
| + | |||
| + | 当Ardour显示样本已经被记录下来后,它们会显示为'''“Waveform波形”'''如下图所示。中央的水平横线标示的是静止时的膜,且波形的“Peaks峰值”标示的是最大“Amplitude振幅”。 | ||
http://brunoruviaro.github.io/ardour4-tutorial/images/Ardour4_Digital_Audio_Waveform.png | http://brunoruviaro.github.io/ardour4-tutorial/images/Ardour4_Digital_Audio_Waveform.png | ||
| − | + | 167791-诺德电子鼓拍打_1.10 | |
| − | + | 如果我们把波形的振幅加大很多很多,这时,某些峰值有可能会超出计算机所能表示的数值范围。计算机无法表示的这部分超出振幅范围的峰值,被称为'''“Clipping截波”''',会导致数字信息永久性的损失,以及对音质造成肉耳可分辨的'''“Distortion失真“'''变化。Ardour使用红色标记截波峰值,如下图所示。 | |
| − | + | http://brunoruviaro.github.io/ardour4-tutorial/images/Ardour4_Digital_Audio_Clipping2.png | |
| − | + | 音频 1-2.1 | |
| − | + | 在上图中,可以看到最左边的'''“Mixer Strip混音栏”'''给出了一个运行中的峰值测量,并且在'''“Peak Meters峰值计量仪“'''的顶端有个读数,显示的是到目前为止的最大峰值。红色数字表明已经产生了截波。 | |
| − | + | *''提示:如果您在录音时设置话筒电平太高,那么就容易产生截波。'' | |
| − | + | 在最大峰值和截波点之间的区域的分贝范围,被称为'''“Headroom净空高度”''',通常的录音经验是,在您的最大信号值和截波点之间,保持大约3到6分贝的净空高度,而截波点本身被标示为 0 dB(零分贝)。换句话说,一个带有恰当的净空高度的音频区域,它的最大峰值应该位于 −6 dB和 −3 dB之间。(注:看上图左边的峰值计量仪刻度即可明白。) | |
| − | + | 还有,因为峰值和音频信号叠加在一起,所以,当'''“Mixing混音”'''几个输入源到一起时,必须当心不要让汇总的信号产生截波。 | |
| − | + | ==采样率和位深== | |
| − | + | 要想播放激光唱片上的音频,举例来说,计算机必须每秒产生44100个样本。样本率决定了计算机能记录或回放的最高频率。一个数值为44.1 kHz的采样率意味着最高频率可以视为略低于22.05 kHz。因为通常人类的听觉能力分布在大约20赫兹到20千赫的范围内,这是普遍可以接受的一个合理采样率。其他常用的样本率包括48千赫(DAT录音机)或96千赫(DVD音频)。 | |
| − | + | 每个样本都被记录为一个'''“16位(比特)数字16-bit number”'''。一个'''“Bit位(比特)”'''的信息不是1就是0,如果有16位一起做一个样本,那么每个样本将会有2的16次方(65536)个可能的值。 | |
| − | + | 因此,我们可以说CD品质的音频拥有44.1千赫的采样率和16位的'''“Bit Depth位深”'''。专业音乐录音通常混音使用24位,以确保在被混音到16位CD之前能最大程度地保留着声音的细节。老旧的电脑游戏有一种独特的粗糙的声音,仅使用8位。通过增加采样率,我们能够记录更高的声波频率;而通过增加位深,我们能够使用跨度更大的'''“Dynamic Range动态范围”'''(即录制和播放最安静和最响亮声音这两者之间的不同)。 | |
| + | 点击[https://www.youtube.com/watch?v=zC5KFnSUPNo 这里]可看到一个极好的视频教程,更详细地解释了采样率和位深。 | ||
| − | + | =<center>— [[Ardour完全教程|返回主目录]] —</center>= | |
2016年1月10日 (日) 12:06的最新版本
目录
什么是Ardour?
Ardour是一个专业、全功能的硬盘录音和数字音频工作站(简称DAW)。Ardour是免费/自由开源软件(FLOSS)。
它的特点有:无限的音频轨道和总线,非破坏性、非线性编辑,带有无限的撤销,以及“任意来源到任意目标“的信号路由,它支持标准文件格式,如BWF、WAV、WAV64、AIFF CAF,并且它可以使用LADSPA、LV2、VST和AudioUnit插件格式。
Ardour运行在Linux和Mac OS X系统平台上 (关于Windows平台的版本正在开发中,请参考这里), 并且可选择使用Jack音频连接工具包(简称JACK)连接到计算机声卡的接口,这与运行在相同系统平台的其它音频应用程序一样。
要了解关于Ardour更多的信息,请参考官方网站 http://ardour.org/
关于本教程
本教程为使用Ardour的初学者提供了一个关于基础录制和编辑音轨的介绍。假定您已经在计算机上安装有Ardour并且可以运行。请注意:本教程(暂时)不包括任何MIDI功能。
关于如何在Linux和Mac OS X系统平台上安装Ardour,请参考 https://ardour.org/requirements.html 如果使用Linux系统,例如KXStudio和UbuntuStudio发行版,有更多、更广、且更有用的音乐软件可供选择,包括Ardour。
这个页面的其余部分包括作者信息和本教程的约定格式。
作者信息
在2009年11月23日和27日期间,在荷兰鹿特丹的WORM,moddr实验室(http://moddr.net)里,由Derek Holzer领衔的Book Sprint编写了本教程的主体部分。(注:Book Sprint 文卷争先、书籍冲刺,汇集一组专家在3 - 5天编写完成一本书的活动,请参考 http://www.booksprints.net/about/ )。录入和支持是来自国际社会的Ardour用户和开发者。本教程最早是基于Ardour 2.x版本编写。原始的FLOSS手册可以在这里找到: http://en.flossmanuals.net/ardour/ (注:FLOSS Manuals 补螺丝手册,是一组自由与开源软件手册,由FLOSS Manuals Foundation补螺丝手册基金会维护,请参考 https://www.flossmanuals.net/ 或者 http://www.flossmanuals.org/ )
2014年12月,Ardour的教程更新到3.5版,并且迁移到GitHub。文本得到彻底修订,屏幕截图也被更新的截图取代。2015年8月,为了支持Ardour 4.2版,又做了一个类似的修订,更新了所有截图和文字。2014年和2015年的修订均由Bruno Ruviaro完成。
Ardour社区被邀请来贡献本教程的内容。所有的文本和图片都在线可访问: https://github.com/brunoruviaro/ardour4-tutorial ,这使得任何人都可以生成、修改、混编这个文本。需要了解更多的信息,请参考: http://brunoruviaro.github.io/ardour4-tutorial/how-to-contribute-0/
在补螺丝手册里补充编写的《Ardour参考手册》当前正在由Ardour社区开发中,旨在提供一个百科全书式的Ardour特性清单。该参考手册可以在 http://manual.ardour.org/ 上找到。
要了解完整的作者信息和许可证清单,请点击这里 。
本教程的约定格式
以下是我们在本手册采用的一些基本的格式约定。
鼠标按键
运行使用Ardour需要配备一个带有两个按键的鼠标(或者您的系统能以某种方式虚拟带两个按键的鼠标)。文章中的点击是指鼠标左键的点击行为。文章中的右键点击是指鼠标右键的点击行为。文章中的按着“Control”键、“Cmd”键或者“Apple”键同时点击鼠标,这与不按着其它键点击鼠标,可能会得到不同的结果。
按键名称与按键组合
按键的名称都写在双引号内,且用斜体字表示,就像这样:
“Control“,“Return","Backspace","R"
按键组合的表示方法,像这样:
“Control“ + “X"
或者
“Apple“ + “X“
菜单导航
在Ardour里许多功能都可以通过点击不同的菜单项来实现。另外,您可能需要通过访问OS X、Ubuntu或其他Linux发行版的菜单来输入某项参数。为了说明这一点,我们使用两个格式约定:第一是通过截图说明(图片),第二是通过类似这样的“语法”:
View > Zoom > Zoom to Session
视图 > 缩放 > 缩放到会话
上面的例子是一段缩写,意思是”首先点击‘View视图‘菜单,然后选择列表中的‘Zoom缩放‘项目,然后点击‘Zoom to Session缩放到会话‘”。(注:为兼顾使用英文版的用户,以及由于有部分菜单及参数选项未翻译完全,本教程关于菜单及参数选项的翻译将采用中英文同列的形式。)
术语词汇
本教程不采用任何旧有的电脑或音频编辑知识,所以有些一般读者可能不大熟悉的词语,在本手册中会始终用首字母大写的单词来表示,并且它在该章节的第一次出现时会以黑体字来表示。当术语词汇第一次出现在手册里时,就会按上述方法标记注明,并且也会包含在本手册末尾的术语表中。(注:为兼顾使用英文版的用户,以及由于有部分菜单及参数选项未翻译完全,本教程相关术语词汇第一次出现时的翻译将采用中英文同列的形式。)
什么是数字音频?
Ardour是一个数字音频工作站(DAW——Digital Audio Workstation)。在使用它录制和编辑声音之前,应该了解一下数字音频是如何工作的。
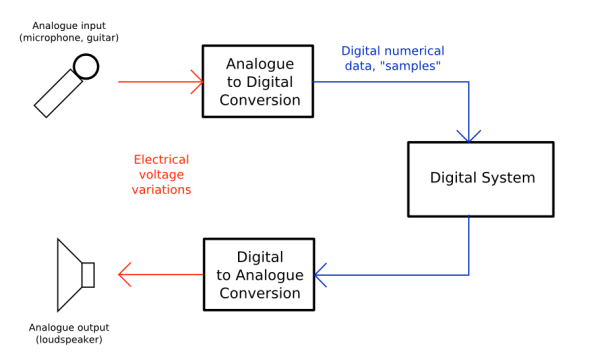
模拟信号输入(如:话筒、电子吉他) --> 模拟数字转换 --> 数字数值数据,“采样” --> 数字系统 --> 数字模拟转换 --> 模拟信号输出(如:扬声器)(红色部分:电气电压变化)
上方的简图揭示了声音在您电脑里运行的旅程。“ADC模拟数字转换(Analogue to Digital Conversion)”和“DAC数字模拟转换(Digital to Analogue Conversion)”都是通过声卡或音频接口来完成。从这个角度而言,其中的“Digital System数字系统”就是您的电脑运行着的Ardour。
频率和增益
设想有一个扬声器,为了振动它前方的空气以致于能产生声音,喇叭上的膜必须从它(静止时)的中心位置向前以及向后往复振动。膜每秒钟振动的次数决定了你所听到的声音的“Frequency频率”(音调,note或者pitch)。膜从它的静止点移动的距离决定了“Amplitude振幅”(音量,volume或者loudness)。通常,我们使用“Hertz赫兹”(Hz)来衡量频率,使用“Decibels分贝”(dB)来衡量音量。
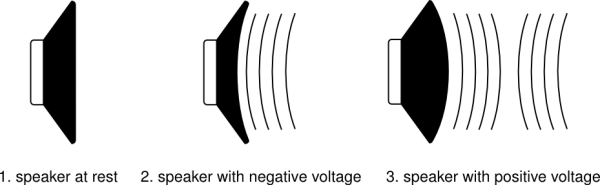
1、扬声器静止时 2、扬声器加载负电压 3、扬声器加载正电压
一个极好的动画演示了扬声器的工作过程,请查看这个页面: http://animagraffs.com/loudspeaker/
一个话筒(麦克风)的工作原理就像扬声器的反向行为:空气的震动引起话筒里膜的振动,话筒把这些声学振动转换为电流。如果您把这个话筒插入计算机的声卡并开始录音,声卡就会以每秒上万次的速度测量这电流,并且把它们记录为数字。每秒“样本Samples“(即:measurements测量)的数量被称为“Sample Rate采样率“,并且每一个样本的可取值的数目被称为“Bit Depth位深“(比特深度)。采样率和位深的组合表明,数字信号可以如此接近真实地重现它所记录的声音。
峰值和截波
当Ardour显示样本已经被记录下来后,它们会显示为“Waveform波形”如下图所示。中央的水平横线标示的是静止时的膜,且波形的“Peaks峰值”标示的是最大“Amplitude振幅”。
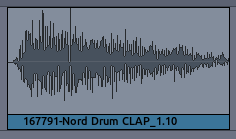
167791-诺德电子鼓拍打_1.10
如果我们把波形的振幅加大很多很多,这时,某些峰值有可能会超出计算机所能表示的数值范围。计算机无法表示的这部分超出振幅范围的峰值,被称为“Clipping截波”,会导致数字信息永久性的损失,以及对音质造成肉耳可分辨的“Distortion失真“变化。Ardour使用红色标记截波峰值,如下图所示。
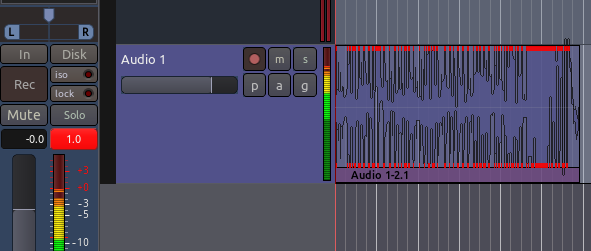
音频 1-2.1
在上图中,可以看到最左边的“Mixer Strip混音栏”给出了一个运行中的峰值测量,并且在“Peak Meters峰值计量仪“的顶端有个读数,显示的是到目前为止的最大峰值。红色数字表明已经产生了截波。
- 提示:如果您在录音时设置话筒电平太高,那么就容易产生截波。
在最大峰值和截波点之间的区域的分贝范围,被称为“Headroom净空高度”,通常的录音经验是,在您的最大信号值和截波点之间,保持大约3到6分贝的净空高度,而截波点本身被标示为 0 dB(零分贝)。换句话说,一个带有恰当的净空高度的音频区域,它的最大峰值应该位于 −6 dB和 −3 dB之间。(注:看上图左边的峰值计量仪刻度即可明白。)
还有,因为峰值和音频信号叠加在一起,所以,当“Mixing混音”几个输入源到一起时,必须当心不要让汇总的信号产生截波。
采样率和位深
要想播放激光唱片上的音频,举例来说,计算机必须每秒产生44100个样本。样本率决定了计算机能记录或回放的最高频率。一个数值为44.1 kHz的采样率意味着最高频率可以视为略低于22.05 kHz。因为通常人类的听觉能力分布在大约20赫兹到20千赫的范围内,这是普遍可以接受的一个合理采样率。其他常用的样本率包括48千赫(DAT录音机)或96千赫(DVD音频)。
每个样本都被记录为一个“16位(比特)数字16-bit number”。一个“Bit位(比特)”的信息不是1就是0,如果有16位一起做一个样本,那么每个样本将会有2的16次方(65536)个可能的值。
因此,我们可以说CD品质的音频拥有44.1千赫的采样率和16位的“Bit Depth位深”。专业音乐录音通常混音使用24位,以确保在被混音到16位CD之前能最大程度地保留着声音的细节。老旧的电脑游戏有一种独特的粗糙的声音,仅使用8位。通过增加采样率,我们能够记录更高的声波频率;而通过增加位深,我们能够使用跨度更大的“Dynamic Range动态范围”(即录制和播放最安静和最响亮声音这两者之间的不同)。
点击这里可看到一个极好的视频教程,更详细地解释了采样率和位深。