ZabbixManual1.4/Installation/zh
| 点击翻译: |
English {{#ifexist: {{#if: ZabbixManual1.4/Installation | ZabbixManual1.4/Installation | {{#if: | :}}ZabbixManual1.4/Installation/zh}}/af | • {{#if: ZabbixManual1.4/Installation|Afrikaans| [[::ZabbixManual1.4/Installation/zh/af|Afrikaans]]}}|}} {{#ifexist: {{#if: ZabbixManual1.4/Installation | ZabbixManual1.4/Installation | {{#if: | :}}ZabbixManual1.4/Installation/zh}}/ar | • {{#if: ZabbixManual1.4/Installation|العربية| [[::ZabbixManual1.4/Installation/zh/ar|العربية]]}}|}} {{#ifexist: {{#if: ZabbixManual1.4/Installation | ZabbixManual1.4/Installation | {{#if: | :}}ZabbixManual1.4/Installation/zh}}/az | • {{#if: ZabbixManual1.4/Installation|azərbaycanca| [[::ZabbixManual1.4/Installation/zh/az|azərbaycanca]]}}|}} {{#ifexist: {{#if: ZabbixManual1.4/Installation | ZabbixManual1.4/Installation | {{#if: | :}}ZabbixManual1.4/Installation/zh}}/bcc | • {{#if: ZabbixManual1.4/Installation|جهلسری بلوچی| [[::ZabbixManual1.4/Installation/zh/bcc|جهلسری بلوچی]]}}|}} {{#ifexist: {{#if: ZabbixManual1.4/Installation | ZabbixManual1.4/Installation | {{#if: | :}}ZabbixManual1.4/Installation/zh}}/bg | • {{#if: ZabbixManual1.4/Installation|български| [[::ZabbixManual1.4/Installation/zh/bg|български]]}}|}} {{#ifexist: {{#if: ZabbixManual1.4/Installation | ZabbixManual1.4/Installation | {{#if: | :}}ZabbixManual1.4/Installation/zh}}/br | • {{#if: ZabbixManual1.4/Installation|brezhoneg| [[::ZabbixManual1.4/Installation/zh/br|brezhoneg]]}}|}} {{#ifexist: {{#if: ZabbixManual1.4/Installation | ZabbixManual1.4/Installation | {{#if: | :}}ZabbixManual1.4/Installation/zh}}/ca | • {{#if: ZabbixManual1.4/Installation|català| [[::ZabbixManual1.4/Installation/zh/ca|català]]}}|}} {{#ifexist: {{#if: ZabbixManual1.4/Installation | ZabbixManual1.4/Installation | {{#if: | :}}ZabbixManual1.4/Installation/zh}}/cs | • {{#if: ZabbixManual1.4/Installation|čeština| [[::ZabbixManual1.4/Installation/zh/cs|čeština]]}}|}} {{#ifexist: {{#if: ZabbixManual1.4/Installation | ZabbixManual1.4/Installation | {{#if: | :}}ZabbixManual1.4/Installation/zh}}/de | • {{#if: ZabbixManual1.4/Installation|Deutsch| [[::ZabbixManual1.4/Installation/zh/de|Deutsch]]}}|}} {{#ifexist: {{#if: ZabbixManual1.4/Installation | ZabbixManual1.4/Installation | {{#if: | :}}ZabbixManual1.4/Installation/zh}}/el | • {{#if: ZabbixManual1.4/Installation|Ελληνικά| [[::ZabbixManual1.4/Installation/zh/el|Ελληνικά]]}}|}} {{#ifexist: {{#if: ZabbixManual1.4/Installation | ZabbixManual1.4/Installation | {{#if: | :}}ZabbixManual1.4/Installation/zh}}/es | • {{#if: ZabbixManual1.4/Installation|español| [[::ZabbixManual1.4/Installation/zh/es|español]]}}|}} {{#ifexist: {{#if: ZabbixManual1.4/Installation | ZabbixManual1.4/Installation | {{#if: | :}}ZabbixManual1.4/Installation/zh}}/fa | • {{#if: ZabbixManual1.4/Installation|فارسی| [[::ZabbixManual1.4/Installation/zh/fa|فارسی]]}}|}} {{#ifexist: {{#if: ZabbixManual1.4/Installation | ZabbixManual1.4/Installation | {{#if: | :}}ZabbixManual1.4/Installation/zh}}/fi | • {{#if: ZabbixManual1.4/Installation|suomi| [[::ZabbixManual1.4/Installation/zh/fi|suomi]]}}|}} {{#ifexist: {{#if: ZabbixManual1.4/Installation | ZabbixManual1.4/Installation | {{#if: | :}}ZabbixManual1.4/Installation/zh}}/fr | • {{#if: ZabbixManual1.4/Installation|français| [[::ZabbixManual1.4/Installation/zh/fr|français]]}}|}} {{#ifexist: {{#if: ZabbixManual1.4/Installation | ZabbixManual1.4/Installation | {{#if: | :}}ZabbixManual1.4/Installation/zh}}/gu | • {{#if: ZabbixManual1.4/Installation|ગુજરાતી| [[::ZabbixManual1.4/Installation/zh/gu|ગુજરાતી]]}}|}} {{#ifexist: {{#if: ZabbixManual1.4/Installation | ZabbixManual1.4/Installation | {{#if: | :}}ZabbixManual1.4/Installation/zh}}/he | • {{#if: ZabbixManual1.4/Installation|עברית| [[::ZabbixManual1.4/Installation/zh/he|עברית]]}}|}} {{#ifexist: {{#if: ZabbixManual1.4/Installation | ZabbixManual1.4/Installation | {{#if: | :}}ZabbixManual1.4/Installation/zh}}/hu | • {{#if: ZabbixManual1.4/Installation|magyar| [[::ZabbixManual1.4/Installation/zh/hu|magyar]]}}|}} {{#ifexist: {{#if: ZabbixManual1.4/Installation | ZabbixManual1.4/Installation | {{#if: | :}}ZabbixManual1.4/Installation/zh}}/id | • {{#if: ZabbixManual1.4/Installation|Bahasa Indonesia| [[::ZabbixManual1.4/Installation/zh/id|Bahasa Indonesia]]}}|}} {{#ifexist: {{#if: ZabbixManual1.4/Installation | ZabbixManual1.4/Installation | {{#if: | :}}ZabbixManual1.4/Installation/zh}}/it | • {{#if: ZabbixManual1.4/Installation|italiano| [[::ZabbixManual1.4/Installation/zh/it|italiano]]}}|}} {{#ifexist: {{#if: ZabbixManual1.4/Installation | ZabbixManual1.4/Installation | {{#if: | :}}ZabbixManual1.4/Installation/zh}}/ja | • {{#if: ZabbixManual1.4/Installation|日本語| [[::ZabbixManual1.4/Installation/zh/ja|日本語]]}}|}} {{#ifexist: {{#if: ZabbixManual1.4/Installation | ZabbixManual1.4/Installation | {{#if: | :}}ZabbixManual1.4/Installation/zh}}/ko | • {{#if: ZabbixManual1.4/Installation|한국어| [[::ZabbixManual1.4/Installation/zh/ko|한국어]]}}|}} {{#ifexist: {{#if: ZabbixManual1.4/Installation | ZabbixManual1.4/Installation | {{#if: | :}}ZabbixManual1.4/Installation/zh}}/ksh | • {{#if: ZabbixManual1.4/Installation|Ripoarisch| [[::ZabbixManual1.4/Installation/zh/ksh|Ripoarisch]]}}|}} {{#ifexist: {{#if: ZabbixManual1.4/Installation | ZabbixManual1.4/Installation | {{#if: | :}}ZabbixManual1.4/Installation/zh}}/mr | • {{#if: ZabbixManual1.4/Installation|मराठी| [[::ZabbixManual1.4/Installation/zh/mr|मराठी]]}}|}} {{#ifexist: {{#if: ZabbixManual1.4/Installation | ZabbixManual1.4/Installation | {{#if: | :}}ZabbixManual1.4/Installation/zh}}/ms | • {{#if: ZabbixManual1.4/Installation|Bahasa Melayu| [[::ZabbixManual1.4/Installation/zh/ms|Bahasa Melayu]]}}|}} {{#ifexist: {{#if: ZabbixManual1.4/Installation | ZabbixManual1.4/Installation | {{#if: | :}}ZabbixManual1.4/Installation/zh}}/nl | • {{#if: ZabbixManual1.4/Installation|Nederlands| [[::ZabbixManual1.4/Installation/zh/nl|Nederlands]]}}|}} {{#ifexist: {{#if: ZabbixManual1.4/Installation | ZabbixManual1.4/Installation | {{#if: | :}}ZabbixManual1.4/Installation/zh}}/no | • {{#if: ZabbixManual1.4/Installation|norsk| [[::ZabbixManual1.4/Installation/zh/no|norsk]]}}|}} {{#ifexist: {{#if: ZabbixManual1.4/Installation | ZabbixManual1.4/Installation | {{#if: | :}}ZabbixManual1.4/Installation/zh}}/oc | • {{#if: ZabbixManual1.4/Installation|occitan| [[::ZabbixManual1.4/Installation/zh/oc|occitan]]}}|}} {{#ifexist: {{#if: ZabbixManual1.4/Installation | ZabbixManual1.4/Installation | {{#if: | :}}ZabbixManual1.4/Installation/zh}}/pl | • {{#if: ZabbixManual1.4/Installation|polski| [[::ZabbixManual1.4/Installation/zh/pl|polski]]}}|}} {{#ifexist: {{#if: ZabbixManual1.4/Installation | ZabbixManual1.4/Installation | {{#if: | :}}ZabbixManual1.4/Installation/zh}}/pt | • {{#if: ZabbixManual1.4/Installation|português| [[::ZabbixManual1.4/Installation/zh/pt|português]]}}|}} {{#ifexist: {{#if: ZabbixManual1.4/Installation | ZabbixManual1.4/Installation | {{#if: | :}}ZabbixManual1.4/Installation/zh}}/ro | • {{#if: ZabbixManual1.4/Installation|română| [[::ZabbixManual1.4/Installation/zh/ro|română]]}}|}} {{#ifexist: {{#if: ZabbixManual1.4/Installation | ZabbixManual1.4/Installation | {{#if: | :}}ZabbixManual1.4/Installation/zh}}/ru | • {{#if: ZabbixManual1.4/Installation|русский| [[::ZabbixManual1.4/Installation/zh/ru|русский]]}}|}} {{#ifexist: {{#if: ZabbixManual1.4/Installation | ZabbixManual1.4/Installation | {{#if: | :}}ZabbixManual1.4/Installation/zh}}/si | • {{#if: ZabbixManual1.4/Installation|සිංහල| [[::ZabbixManual1.4/Installation/zh/si|සිංහල]]}}|}} {{#ifexist: {{#if: ZabbixManual1.4/Installation | ZabbixManual1.4/Installation | {{#if: | :}}ZabbixManual1.4/Installation/zh}}/sq | • {{#if: ZabbixManual1.4/Installation|shqip| [[::ZabbixManual1.4/Installation/zh/sq|shqip]]}}|}} {{#ifexist: {{#if: ZabbixManual1.4/Installation | ZabbixManual1.4/Installation | {{#if: | :}}ZabbixManual1.4/Installation/zh}}/sr | • {{#if: ZabbixManual1.4/Installation|српски / srpski| [[::ZabbixManual1.4/Installation/zh/sr|српски / srpski]]}}|}} {{#ifexist: {{#if: ZabbixManual1.4/Installation | ZabbixManual1.4/Installation | {{#if: | :}}ZabbixManual1.4/Installation/zh}}/sv | • {{#if: ZabbixManual1.4/Installation|svenska| [[::ZabbixManual1.4/Installation/zh/sv|svenska]]}}|}} {{#ifexist: {{#if: ZabbixManual1.4/Installation | ZabbixManual1.4/Installation | {{#if: | :}}ZabbixManual1.4/Installation/zh}}/th | • {{#if: ZabbixManual1.4/Installation|ไทย| [[::ZabbixManual1.4/Installation/zh/th|ไทย]]}}|}} {{#ifexist: {{#if: ZabbixManual1.4/Installation | ZabbixManual1.4/Installation | {{#if: | :}}ZabbixManual1.4/Installation/zh}}/tr | • {{#if: ZabbixManual1.4/Installation|Türkçe| [[::ZabbixManual1.4/Installation/zh/tr|Türkçe]]}}|}} {{#ifexist: {{#if: ZabbixManual1.4/Installation | ZabbixManual1.4/Installation | {{#if: | :}}ZabbixManual1.4/Installation/zh}}/vi | • {{#if: ZabbixManual1.4/Installation|Tiếng Việt| [[::ZabbixManual1.4/Installation/zh/vi|Tiếng Việt]]}}|}} {{#ifexist: {{#if: ZabbixManual1.4/Installation | ZabbixManual1.4/Installation | {{#if: | :}}ZabbixManual1.4/Installation/zh}}/yue | • {{#if: ZabbixManual1.4/Installation|粵語| [[::ZabbixManual1.4/Installation/zh/yue|粵語]]}}|}} {{#ifexist: {{#if: ZabbixManual1.4/Installation | ZabbixManual1.4/Installation | {{#if: | :}}ZabbixManual1.4/Installation/zh}}/zh | • {{#if: ZabbixManual1.4/Installation|中文| [[::ZabbixManual1.4/Installation/zh/zh|中文]]}}|}} {{#ifexist: {{#if: ZabbixManual1.4/Installation | ZabbixManual1.4/Installation | {{#if: | :}}ZabbixManual1.4/Installation/zh}}/zh-hans | • {{#if: ZabbixManual1.4/Installation|中文(简体)| [[::ZabbixManual1.4/Installation/zh/zh-hans|中文(简体)]]}}|}} {{#ifexist: {{#if: ZabbixManual1.4/Installation | ZabbixManual1.4/Installation | {{#if: | :}}ZabbixManual1.4/Installation/zh}}/zh-hant | • {{#if: ZabbixManual1.4/Installation|中文(繁體)| [[::ZabbixManual1.4/Installation/zh/zh-hant|中文(繁體)]]}}|}} |
{{#ifeq:ZabbixManual1.4/Installation|:ZabbixManual1.4/Installation/zh|请不要直接编辑翻译本页,本页将定期与来源同步。}} |
{{#ifexist: :ZabbixManual1.4/Installation/zh/zh | | {{#ifexist: ZabbixManual1.4/Installation/zh/zh | | {{#ifeq: {{#titleparts:ZabbixManual1.4/Installation/zh|1|-1|}} | zh | | }} }} }} {{#ifeq: {{#titleparts:ZabbixManual1.4/Installation/zh|1|-1|}} | zh | | }}
How to Get ZABBIX
Check the ZABBIX Home Page at http://www.zabbix.com for information about the current version and for downloading instructions.
Requirements
Hardware Requirements
Memory Requirements
ZABBIX requires both physical and disk memory. 128 MB of physical memory and 256 MB of free disk space could be a good starting point. However, the amount of required disk memory obviously depends on the number of hosts and parameters that are being monitored. If you're planning to keep a long history of monitored parameters, you should be thinking of at least a couple of gigabytes to have enough space to store the history in the database.
Each ZABBIX daemon process requires several connections to a database server. Amount of memory allocated for the connection depends on configuration of the database engine.
Note: The more physical memory you have, the faster the database (and therefore ZABBIX) works!
CPU Requirements
ZABBIX and especially ZABBIX database may require significant CPU resources depending on number of monitored parameters and chosen database engine.
Other hardware
A serial communication port and a serial GSM Modem required for using SMS notifications built-in ZABBIX.
Examples of hardware configuration
The table provides several hardware configurations:
| Name | Platform | CPU/Memory | Database | Monitored hosts |
| Small | Ubuntu Linux | P2 350MHz/256MB | MySQL MyISAM | 20 |
| Medium | Ubuntu Linux 64 bit | AMD Athlon 3200+/2GB | MySQL MyISAM | 500 |
| Large | Ubuntu Linux 64 bit | Intel Dual Core 6400/4GB/RAID | MySQL MyISAM or PostgreSQL | >1000 |
| Very large | RedHat Enterprise | Intel Xeon 2 CPU/8GB/RAID | MySQL MyISAM or PostgreSQL | >10000 |
Note: Actual configuration depends on number of active items and refresh rates very much. It is recommended to keep database engine on a separate box for large installations.
Supported Platforms
Due to security requirements and mission-critical nature of monitoring server, UNIX is the only operating system that can consistently deliver the necessary performance, fault tolerance and resilience. ZABBIX operates on market leading versions.
ZABBIX is tested on the following platforms:
- AIX
- FreeBSD
- HP-UX
- Linux
- Mac OS/X
- OpenBSD
- SCO Open Server
- Solaris
Note: ZABBIX may work on other Unix-like operating systems as well.
Software Requirements
ZABBIX is built around modern Apache WEB server, leading database engines, and the PHP scripting language.
The following software is required to run ZABBIX:
| Software | Version | Comments |
| Apache | 1.3.12 or later | |
| PHP | 4.3 or later | |
| PHP modules:
php-gd php-bcmath |
4.3 or later | PHP GD module must support PNG images. |
| MySQL
php-mysql |
3.22 or later | Required if MySQL is used as ZABBIX backend database. |
| Oracle
php-sqlora8 |
9.2.0.4 or later | Required if Oracle is used as ZABBIX backend database. |
| PostgreSQL
php-pgsql |
7.0.2 or later | Required if PostgreSQL is used as ZABBIX backend database.Consider using PostgreSQL 8.x or later for much better performance. |
| SQLite
php-sqlite3 |
3.3.5 or later | Required if SQLite is used as ZABBIX backend database. |
Note: ZABBIX may work on previous versions of Apache, MySQL, Oracle, and PostgreSQL as well.
WEB browser on client side
Support for HTML and PNG images required. MS Explorer (5.xx and 6.xx) and Mozilla 1.x work perfectly. Cookies and JavaScript must be enabled. Other browsers may work with ZABBIX as well.
Choice of database engine
ZABBIX supports four database engines:
- MySQL
- Oracle
- PostgreSQL
- SQLite
Each database engine has its own advantages. We cannot recommend one over another.
Choice of database engine depends on the following aspects:
- how powerful is your hardware
- free or commercial database engine
- how busy is ZABBIX Server
The table can be used as a general recommendation on choice of database engine.
| Usage of ZABBIX Server | Database engine of choice |
| Heavy duty Node/Standalone | MySQL MyISAM |
| Light duty Node/Standalone | PostgreSQL
MySQL MyISAM |
| Remote zero-admin Node | PostgreSQL
SQLite |
| Standalone light duty | MySQL MyISAM |
Time synchronisation
It is very important to have precise system date on server with ZABBIX running. timed is one of most popular daemons that synchronises the host’s time with the time of other machines.
Components
ZABBIX Components
ZABBIX consists of several major software components, the responsibilities of which are outlined below.
ZABBIX Server
This is the centre of the ZABBIX software. The Server can remotely check networked services (such as web servers and mail servers) using simple service checks, but it is also the central component to which the Agents will report availability and integrity information and statistics. The Server is the central repository in which all configuration, statistical and operational data are stored, and it is the entity in the ZABBIX software that will actively alert administrators when problems arise in any of the monitored systems.
ZABBIX can also perform agent-less monitoring and also monitor network devices using SNMP agents.
ZABBIX Agent
In order to actively monitor local resources and applications (such as harddrives, memory, processor statistics etc.) on networked systems, those systems must run the ZABBIX Agent. The Agent will gather operational information from the system on which it is running, and report these data to the ZABBIX for further processing. In case of failures (such as a harddisk running full, or a crashed service process), the ZABBIX Server can actively alert the administrators of the particular machine that reported the failure.
The ZABBIX Agents are extremely efficient because of use of native system calls for gathering statistical information.
The WEB Interface
In order to allow easy access to the monitoring data and then configuration of ZABBIX from anywhere and from any platform, the Web-based Interface is provided. The Interface is a part of the ZABBIX Server, and is usually (but not necessarily) run on the same physical machine as the one running the ZABBIX Server.
Note: ZABBIX front-end must run on the same physical machine of SQLite is used.
Installation from Source
Software requirements
Building of ZABBIX server or agents from sources requires additional software.
The following software is required to compile ZABBIX: One of the following database engines:
  MySQL Headers and Libraries
  Version 3.22 or later required.
  Oracle Headers and Libraries
  Sqlora8 headers and libraries are required.
  PostgreSQL Headers and Libraries
  Version 7.0.2 or later required. Consider using PostgreSQL 8.x for much better performance.
  SQLite Headers and Libraries
  Version 3.3.5 or later required.
Note: Usually provided as part of mysql-dev, postgresql-dev, sqlite3-dev packages.
NET-SNMP (or UCD-SNMP) library and header files
Required for SNMP support. Optional.
Iksemel library and header files
Required to enable Jabber messaging. Optional.
Libcurl library and header files
Required for WEB monitoring module. Optional.
C Compiler
C compiler is required. GNU C compiler is the best choice for open platforms. Other (HP, IBM) C compilers may be used as well.
GNU Make
GNU make is required to process ZABBIX Makefiles.
Structure of ZABBIX distribution
doc
The directory contains this Manual in different formats
src
The directory contains sources for all ZABBIX processes except frontends.
src/zabbix_server
The directory contains Makefile and sources for zabbix_server.
src/zabbix_agent
The directory contains Makefile and sources for zabbix_agent and zabbix_agentd.
src/zabbix_sender
The directory contains Makefile and sources for zabbix_sender.
include
The directory contains include ZABBIX files.
misc
misc/init.d
The directory contains start-up scripts for different platforms.
misc/pinger
- The directory contains scripts for ICMP pinging, pinger.pl.
frontends
frontends/php
The directory contains sources for PHP frontend.
create
The directory contains SQL script for initial database creation.
create/mysql
MySQL database schema.
create/postgresql
PostgreSQL database schema.
create/data
Data for initial database creation.
upgrades
The directory contains upgrade procedures for different versions of ZABBIX.
ZABBIX Server
Server side
Step 1 Create the ZABBIX superuser account
This is the user the server will run as. For production use you should create a dedicated unprivileged account ('zabbix' is commonly used). Running ZABBIX as 'root','bin', or any other account with special rights is a security risk. Do not do it!
Note: ZABBIX server process (zabbix_server) is protected from being run under root account.
Step 2 Untar ZABBIX sources
shell> gunzip zabbix.tar.gz && tar -xvf zabbix.tar
Step 3 Create the ZABBIX database
ZABBIX comes with SQL scripts used to create the required database schema and also to insert a default configuration. There are separate scripts for MySQL and PostgreSQL.
For MySQL:
shell> mysql -u<username> -p<password>
mysql> create database zabbix;
mysql> quit;
shell> cd create/mysql
shell> cat schema.sql |mysql -u<username> -p<password> zabbix
shell> cd ../data
shell> cat data.sql |mysql -u<username> -p<password> zabbix
shell> cat images_mysql.sql |mysql -u<username> -p<password> zabbix
For PostgreSQL:
shell> psql -U <username>
psql> create database zabbix;
psql> \q
shell> cd create/postgresql
shell> cat schema.sql|psql -U <username> zabbix
shell> cd ../data
shell> cat data.sql|psql -U <username> zabbix
shell> cat images_pgsql.sql |psql -U <username> zabbix
For SQLite:
shell> cd create/sqlite
shell> cat schema.sql | sqlite3 /var/lib/sqlite/zabbix.db
shell> cd ../data
shell> cat data.sql | sqlite3 /var/lib/sqlite/zabbix.db
shell> cat images.sql | sqlite3 /var/lib/sqlite/zabbix.db
Note: The database will be automatically created if not exists.
Step 4 Configure and compile the source code for your system
The sources must be compiled for both the server (monitoring machine) as well as the clients (monitored machines). To configure the source for the server, you must specify which database will be used.
shell> ./configure --enable-server --with-mysql --with-net-snmp –with-jabber –with-libcurl # for MySQL + Jabber + WEB monitoring
or
shell> ./configure --enable-server --with-pgsql --with-net-snmp –with-jabber –with-libcurl # for PostgreSQL + Jabber + WEB monitoring
or
shell> ./configure --enable-server --with-oracle=/home/zabbix/sqlora8 --with-net-snmp –with-jabber –with-libcurl # for Oracle + Jabber + WEB monitoring
Note: Use flag --with-oracle to specify location of sqlora8 library. The libary is required for Oracle support. The library can be found at libsqlora8 homepage
Note: Use flag --enable-static to statically link libraries. If you plan to distribute compiled binaries among different servers, you must use this flag to make these binaries work without required libraries. --enable-static does not work under Solaris. Flag --with-ucd-snmp can be used instead of --with-net-snmp. If no SNMP support required, both --with-net-snmp and --with-ucd-snmp may be skipped.
However, if you want to compile client binaries along with server binaries, run:
shell> ./configure --enable-server --enable-agent --with-mysql --with-net-snmp --with-jabber –with-libcurl
Parameter —enable-static may be used to force static linkage.
Step 5 Make and install everything
shell> make install
By default,
make install
will install all the files in /usr/local/bin, /usr/local/lib etc. You can specify an installation prefix other than /usr/local using --prefix
Step 6 Configure /etc/services
The step is not real requirement. However, it is recommended. On the client (monitored) machines, add the following lines to /etc/services:
zabbix_agent 10050/tcp
zabbix_trap 10051/tcp
Step 7 Configure /etc/inetd.conf
If you plan to use zabbix_agent instead of the recommended zabbix_agentd, the following line must be added:
zabbix_agent stream tcp nowait.3600 zabbix /opt/zabbix/bin/zabbix_agent
Restart inetd
shell> killall -HUP inetd
Modify default settings in configuration files
Step 8 Configure /etc/zabbix/zabbix_agent.conf
You need to configure this file for every host having zabbix_agent installed. The file should contain IP address of ZABBIX server. Connections from other hosts will be denied. You may take misc/conf/zabbix_agent.conf as example.
Step 9 Configure /etc/zabbix/zabbix_agentd.conf
You need to configure this file for every host with zabbix_agentd installed. The file should contain the IP address of the ZABBIX server. Connectionsfrom other hosts will be denied. You may take misc/conf/zabbix_agentd.conf as example.
Step 10 Configure /etc/zabbix/zabbix_server.conf
For small installations (up to ten monitored hosts), default parameters are sufficient. However, you should change default parameters to maximize performance from ZABBIX. See section [Performance tuning] for more details.
You may take misc/conf/zabbix_server.conf as example.
Step 11 Run server processes
Run zabbix_server on server side.
shell> cd bin
shell> ./zabbix_server
Step 12 Run agents
Run zabbix_agentd where necessary.
shell> cd bin
shell> ./zabbix_agentd
ZABBIX Agent
Client side
Step 1 Create the ZABBIX account
This is the user the agent will run as. For production use you should create a dedicated unprivileged account (“zabbix” is commonly used). ZABBIX agents have protection against running under root account.
Step 2 Untar ZABBIX sources
shell> gunzip zabbix.tar.gz && tar xvf zabbix.tar
Step 3 Configure and compile the source code for your system
The sources must be compiled for the client only. To configure the source for the client:
shell> ./configure --enable-agent
Note: Use flag --enable-static to statically link libraries. If you plan to distribute compiled binaries among different servers, you must use this flag to make these binaries work without required libraries.
Step 4 Build agent
shell> make
Copy created binaries from bin/ to /opt/zabbix/bin or any other directory Other common directories are /usr/local/bin or /usr/local/zabbix/bin.
Step 5 Configure /etc/services
The step is not real requirement. However, it is recommended. On the client (monitored) machines, add the following lines to /etc/services:
zabbix_agent 10050/tcp
zabbix_trap 10051/tcp
Step 6 Configure /etc/inetd.conf
If you plan to use zabbix_agent instead of the recommended zabbix_agentd, the following line must be added:
zabbix_agent stream tcp nowait.3600 zabbix /opt/zabbix/bin/zabbix_agent
Restart inetd
shell> killall -HUP inetd
Step 7 Configure /etc/zabbix/zabbix_agent.conf
You need to configure this file for every host having zabbix_agent installed. The file should contain IP address of ZABBIX server. Connections from other hosts will be denied. Note, that no end of line character should present in the file.
You may take misc/conf/zabbix_agent.conf as example.
Step 8 Configure /etc/zabbix/zabbix_agentd.conf
You need to configure this file for every host with zabbix_agentd installed. The file should contain IP address of ZABBIX server. Connections from other hosts will be denied. You may take misc/conf/zabbix_agentd.conf as example.
Step 9 Run zabbix_agentd on all monitored machines
shell> /opt/zabbix/bin/zabbix_agentd
Note: You should not run zabbix_agentd if you have chosen to use zabbix_agent!
ZABBIX WEB Interface
Step 1 Point your browser to ZABBIX URL.
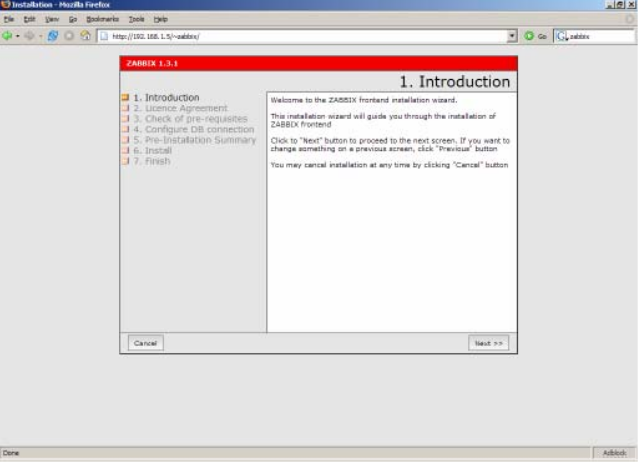
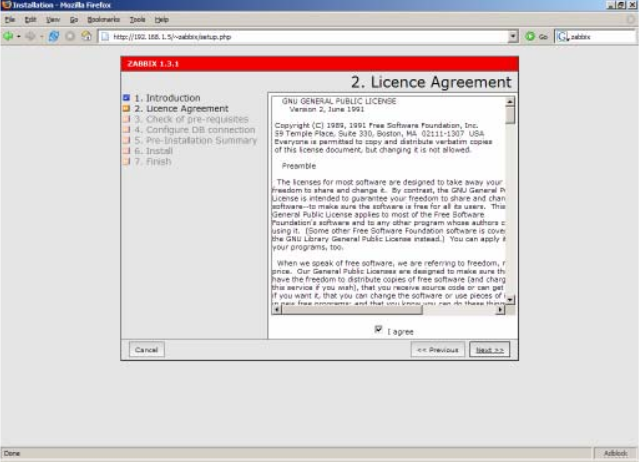
Step 2 Read and accept GPL v2.
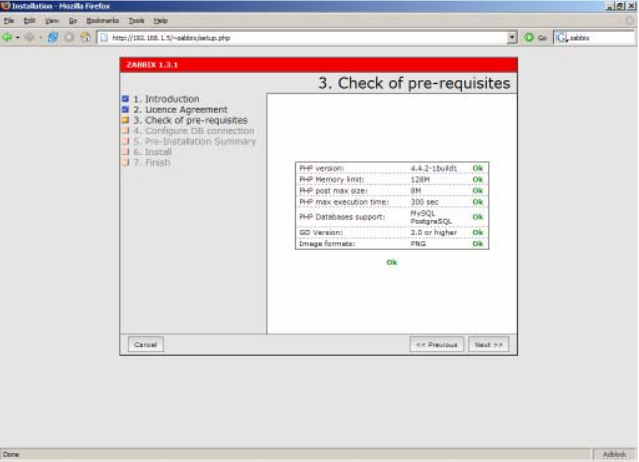
Step 3 Make sure that all software pre-requisites are met.
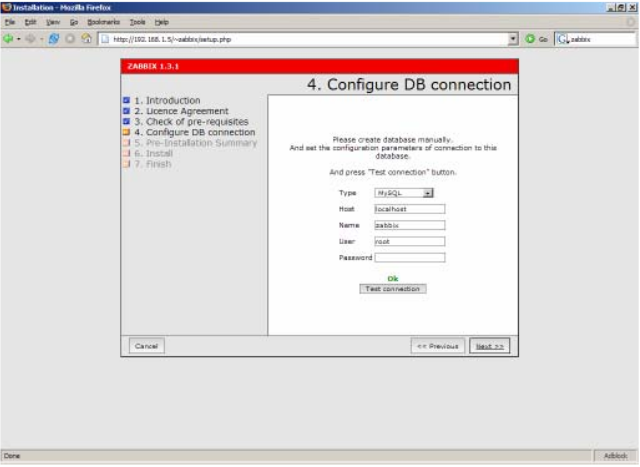
Step 4 Configure database settings. ZABBIX database must already be created.
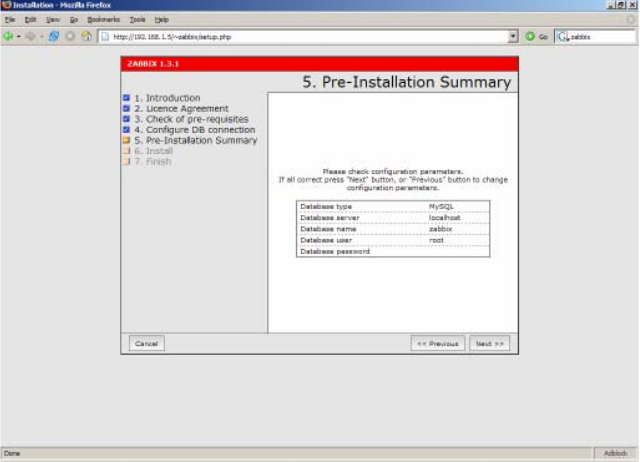
Step 5 See summary of settings.
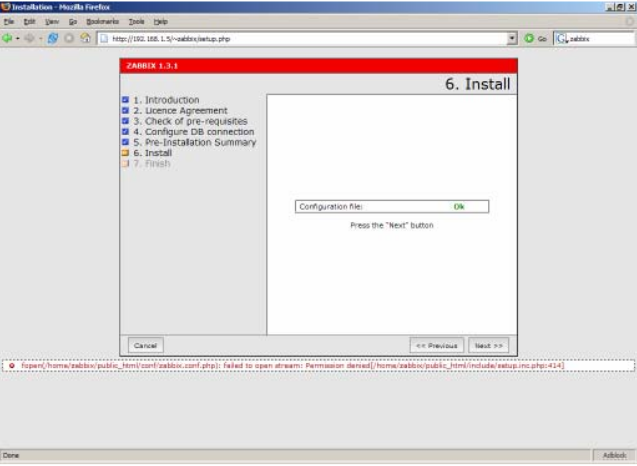
Step 6 Download configuration file and place it under conf/.
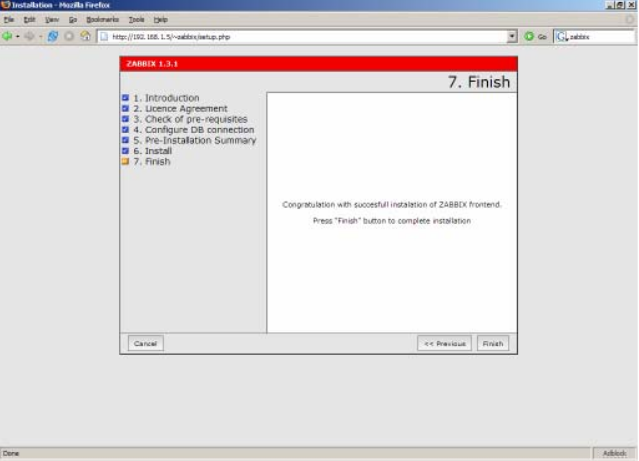
Step 7 Check if everything is fine.
Step 9 For distributed monitoring only!
If used in a distributed environment you have to run:
shell> ./zabbix_server –n <nodeid>
where Node ID is an unique Node identificator. For example:
shell> ./zabbix_server –n 1
This will convert database data for use with Node ID ‘1’ and also adds a local node.
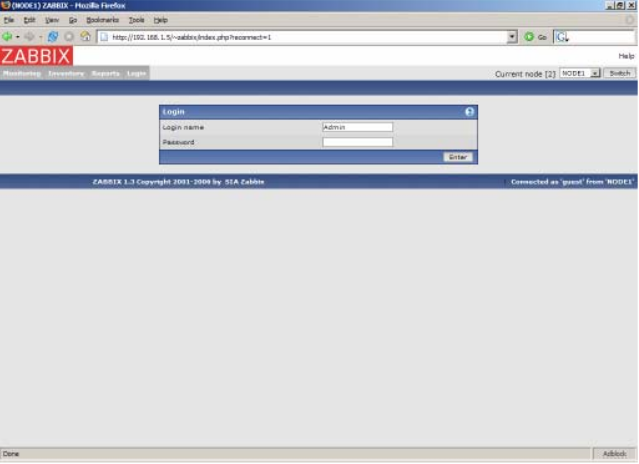
Step 10 ZABBIX frontend is ready! Default username is ‘Admin’ with no password.
