Vps:修订间差异
小 →多域名配置 |
小 →多域名配置 |
||
| 第492行: | 第492行: | ||
这里推荐编辑器直接使用记事本,不要使用其他的高级编辑器。 | 这里推荐编辑器直接使用记事本,不要使用其他的高级编辑器。 | ||
注意下面的 | 注意下面的 '''DocumentRoot /var/www/test/''' 中的 '''/var/www/test/''' 应该修改为你上传站点的文件目录。 | ||
编辑www.test.com的站点配置文件 test.com.txt ,其中站点 www.test.com 和 test.com 的网站目录为 /var/www/test/ | 编辑www.test.com的站点配置文件 test.com.txt ,其中站点 www.test.com 和 test.com 的网站目录为 /var/www/test/ | ||
2012年8月15日 (三) 15:52的版本
Linux VPS Ubuntu 系统配置指南
拿到的帐号
BurstNET VPS 开通后,你将收到如下的帐号:
ACCOUNT INFORMATION
Order ID: 111111
Hosting Package: VPS #1 (Virtual Private Server) - vePortal - (SCRANTON, PA) - RESALE
Domain: XXX.XXX.XXX
Billing Cycle: Monthly
Next Due Date: 09/12/2011

SERVER INFORMATION
VPS ID: 111111
VPS IP Address: 184.82.9.30
SSH Root Password: pass001
如果是OpenVZ的,则额外提供了如下面板,XEN的没有:
VPS Control Panel URL (non-SSL): http://184.82.9.30:2407
VPS Control Panel URL (SSL): https://184.82.9.30:2408
VPS Control Panel Username: user001
VPS Control Panel Password: pass001
比较重要的事情是:
- VPS地址:184.82.9.30 ,第二个IP是地址的最后一位+1,如果你的IP是 173.210.202.198 , 第二个IP则是 173.210.202.199
- 面板的地址:打开 https://184.82.9.30:2408 地址后,会自动跳转到另外一个地址 https://64.120.201.42:2408/ ,
 请记录此地址,这个才是你真实的面板地址,当VPS无法启动时,使用原地址将无法自动跳转,需要直接使用真实的面板地址才可以登录面板。(不同的VPS,跳转后的地址是不一样的,请勿照搬)
以下的指南都是针对 ubuntu 的,请centos或其它Linux用户到面板reload到ubuntu 10.10 x86 然后继续。
如何远程访问
Linux VPS支持ssh远程访问,因此需要使用putty工具来访问。
1 下载putty
下载地址: http://the.earth.li/~sgtatham/putty/latest/x86/putty.exe
2 运行putty
这个程序不需要安装,下载后直接运行,后在Host地址输入VPS的IP如下:
3 登录vps
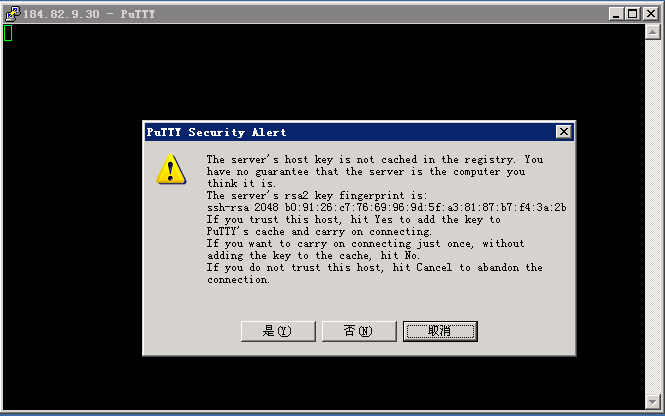
点击上图中的 Open 按钮,第一次登录会出现确认密钥的提示,如下图,请点击 “是” 按钮。
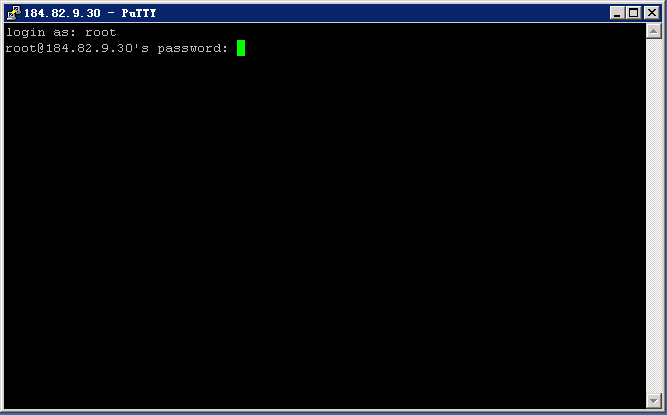
4 如下图输入登录用户名 root 回车,继续输入密码。
![]() 注意输入密码是不会显示 “*” 的,同时密码是区分大小写的。
注意输入密码是不会显示 “*” 的,同时密码是区分大小写的。
有个技巧,直接去复制密码后,鼠标点击 putty 的输入密码窗口,直接按下鼠标右键,然后回车即可登录。 在putty的窗口按下鼠标右键表示粘贴。
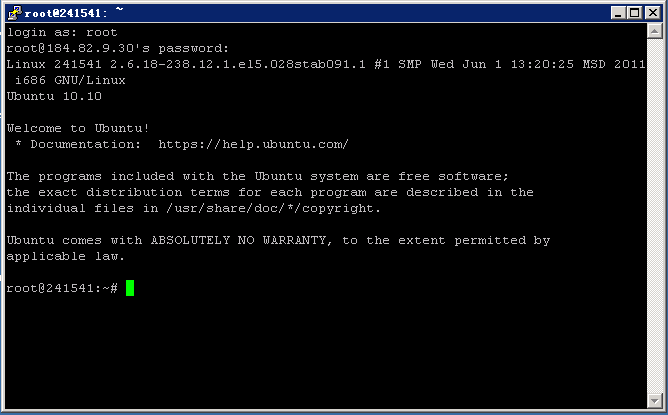
5 如果显示下图则表示登录成功了。
6 设置 putty 支持 vps 的中文文件名或中文文件内容显示,此步骤非必需,可以忽略:
在主窗口,点击左上角的图标,在弹出菜单中选择 Change Settings... 菜单,出现设置窗口。
设置显示字体,左边窗口点击 Window -> Appearance ,右边点击 Font settings -> Change 如下图:
字体选择 新宋体 字符集选择 CHINESE_GB2312 ,字体大小随你喜好设置。设置完毕后点确定
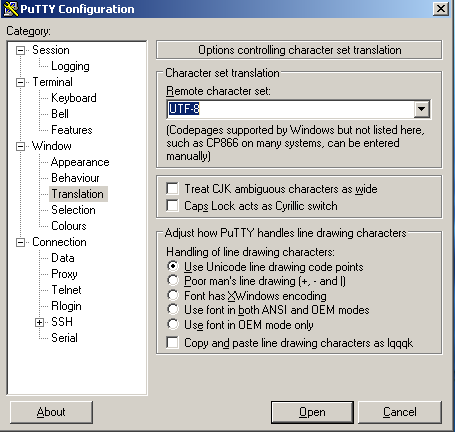
设置终端字符,左边窗口点 Window -> Translation ,右边选择 Remote character set 的下拉框选择 UTF-8 ,如下图:
如何上传和下载文件
VPS 直接支持ssh协议,因此不需要采用 ftp 方式上传,可以直接使用支持 sftp 协议的客户端上传文件,这里使用 FileZilla。
1 下载FileZilla
官网下载地址: http://filezilla-project.org/download.php?type=client
2 下载完毕后安装 FileZilla
3 添加站点
运行FileZilla,点击菜单 文件 -> 站点管理器
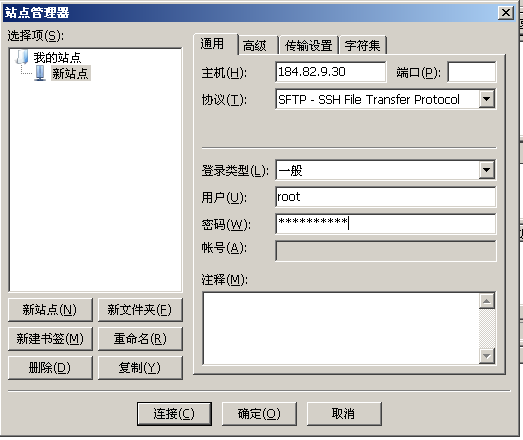
点击后如下图:
再点击面板的 "新站点" 按钮,在右边的输入地方,输入:
主机:VPS的IP,本例输入 184.82.9.30
协议:选择 SFTP
登录类型:选一般
用户:输入root
密码:输入ssh的登录密码,注意密码区分大小写。
如下图:
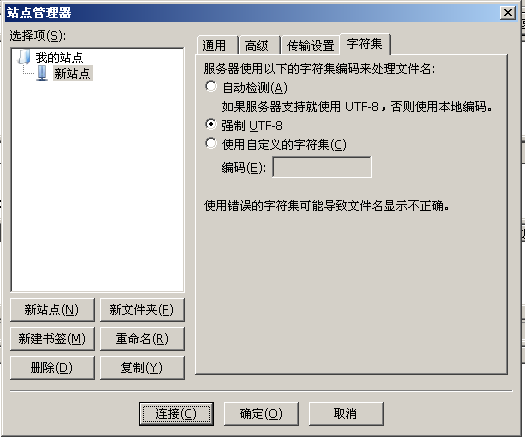
输入完毕后,再切换到字符集,选择 "强制 UTF-8" ,如下图:
输入完毕后直接点击 “连接” 按钮即可,连接完毕后如下图所示,你就可以直接上传和下载文件了。
下一次打开 FileZilla 时,直接到站点管理器,点击连接即可。
更新软件源
以下命令均需要使用 putty 登录到服务器远程执行命令操作,你可以直接复制下面的命令,然后点击 putty 窗口按鼠标右键,粘贴命令。
本步骤不可跳过,需要先执行,后面才可以继续,建议每次安装新软件时,都执行一遍本步骤。
输入如下命令更新软件源:
apt-get update
下面的提示不同的Linux的版本存在不同的差异,但有如下类似的提示时,表示更新成功:
root@241541:~# apt-get update
Get:1 http://archive.ubuntu.com maverick Release.gpg [198B]
Ign http://archive.ubuntu.com/ubuntu/ maverick/main Translation-en
Ign http://archive.ubuntu.com/ubuntu/ maverick/restricted Translation-en
Ign http://archive.ubuntu.com/ubuntu/ maverick/universe Translation-en
Get:2 http://archive.ubuntu.com maverick-updates Release.gpg [198B]
Ign http://archive.ubuntu.com/ubuntu/ maverick-updates/main Translation-en
Ign http://archive.ubuntu.com/ubuntu/ maverick-updates/restricted Translation-en
Ign http://archive.ubuntu.com/ubuntu/ maverick-updates/universe Translation-en
Get:3 http://archive.ubuntu.com maverick-security Release.gpg [198B]
Ign http://archive.ubuntu.com/ubuntu/ maverick-security/main Translation-en
Ign http://archive.ubuntu.com/ubuntu/ maverick-security/restricted Translation-en
Ign http://archive.ubuntu.com/ubuntu/ maverick-security/universe Translation-en
Get:4 http://archive.ubuntu.com maverick Release [39.8kB]
Get:5 http://archive.ubuntu.com maverick-updates Release [31.4kB]
Get:6 http://archive.ubuntu.com maverick-security Release [31.4kB]
Get:7 http://archive.ubuntu.com maverick/main i386 Packages [1492kB]
Get:8 http://archive.ubuntu.com maverick/restricted i386 Packages [5992B]
Get:9 http://archive.ubuntu.com maverick/universe i386 Packages [5791kB]
Get:10 http://archive.ubuntu.com maverick-updates/main i386 Packages [380kB]
Get:11 http://archive.ubuntu.com maverick-updates/restricted i386 Packages [1797B]
Get:12 http://archive.ubuntu.com maverick-updates/universe i386 Packages [157kB]
Get:13 http://archive.ubuntu.com maverick-security/main i386 Packages [157kB]
Get:14 http://archive.ubuntu.com maverick-security/restricted i386 Packages [14B]
Get:15 http://archive.ubuntu.com maverick-security/universe i386 Packages [77.9kB]
Fetched 8166kB in 4s (1724kB/s)
Reading package lists... Done
安装常用软件
VPS里面缺乏一些常用工具软件,一次安装好:
输入如下命令安装解压缩、下载和数据同步以及系统日志软件:
apt-get install unzip zip wget rsync
如果提示如下命令,表示之前已经安装好:
root@241541:~# apt-get install unzip zip wget rsync
Reading package lists... Done
Building dependency tree
Reading state information... Done
unzip is already the newest version.
wget is already the newest version.
rsync is already the newest version.
0 upgraded, 0 newly installed, 0 to remove and 26 not upgraded.
如果之前没有安装会提示如下命令,表示已经安装好
root@241541:~# apt-get install unzip zip wget rsync
Reading package lists... Done
Building dependency tree
Reading state information... Done
The following NEW packages will be installed:
  rsync unzip wget zip
0 upgraded, 4 newly installed, 0 to remove and 26 not upgraded.
Need to get 319kB/1125kB of archives.
After this operation, 2314kB of additional disk space will be used.
Get:1 http://archive.ubuntu.com/ubuntu/ maverick/main zip i386 3.0-3 [319kB]
Fetched 319kB in 0s (417kB/s)
Selecting previously deselected package wget.
(Reading database ... 22549 files and directories currently installed.)
Unpacking wget (from .../wget_1.12-1.1ubuntu3_i386.deb) ...
Selecting previously deselected package rsync.
Unpacking rsync (from .../rsync_3.0.7-2ubuntu1.1_i386.deb) ...
Selecting previously deselected package unzip.
Unpacking unzip (from .../archives/unzip_6.0-4_i386.deb) ...
Selecting previously deselected package zip.
Unpacking zip (from .../archives/zip_3.0-3_i386.deb) ...
Setting up wget (1.12-1.1ubuntu3) ...
Setting up rsync (3.0.7-2ubuntu1.1) ...
Setting up unzip (6.0-4) ...
Setting up zip (3.0-3) ...
使用 Apache 搭建站点
如果希望使用 Nginx ,可以跳过此部分,直接转到指南的 nginx 部分来安装。
安装 Apache2 Web 服务
VPS 默认有安装Apache2,但如果你删除了,就需要重新安装;如果没有删除,执行下面的命令会退出来,不会对系统产生任何影响。
输入如下命令安装
apt-get install apache2
正常情况下会给出如下提示,说明Apache2默认已经安装好了:
root@241541:~# apt-get install apache2
Reading package lists... Done
Building dependency tree... Done
apache2 is already the newest version.
0 upgraded, 0 newly installed, 0 to remove and 0 not upgraded.
开启 Apache2 的伪静态
如果希望开启Apache2 伪静态 rewrite 支持,输入如下命令安装
a2enmod rewrite
正常情况下会给出如下提示,说明已经安装成功:
root@241541:~# a2enmod rewrite
Module rewrite installed; run /etc/init.d/apache2 force-reload to enable.
提示需要重新加载Apache2的配置,由于下一步是安装mysql,所以暂时不用重启。
或出现如下提示,表示已经开启了 rewrite
root@241541:~# a2enmod rewrite
Mudule rewrite already enabled
安装 mysql 数据库服务
安装mysql前,#1的vps需要先关闭apache2,因为mysql的安装会初始化数据,占了很大内存,如果apache2不关闭,有可能导致安装mysql失败。
1 输入如下命令关闭 apache2
/etc/init.d/apache2 stop
如果输入正确,会提示如下信息,表示apache2已经停止
root@241541:~# /etc/init.d/apache2 stop
 * Stopping web server apache2                                                  apache2: Could not reliably determine the server's fully qualified domain name, using 0.3.175.133 for ServerName
 ... waiting                                                             [ OK ]
2 输入如下命令安装mysql
apt-get install mysql-server
如果输入正确,会提示如下信息,
root@241541:~# apt-get install mysql-server
Reading package lists... Done
Building dependency tree... Done
The following extra packages will be installed:
  libdbd-mysql-perl libdbi-perl libhtml-template-perl libmysqlclient16
  libnet-daemon-perl libplrpc-perl mysql-client-5.1 mysql-client-core-5.1
  mysql-common mysql-server-5.1 mysql-server-core-5.1
Suggested packages:
  libipc-sharedcache-perl libterm-readkey-perl tinyca
The following NEW packages will be installed:
  libdbd-mysql-perl libdbi-perl libhtml-template-perl libmysqlclient16
  libnet-daemon-perl libplrpc-perl mysql-client-5.1 mysql-client-core-5.1
  mysql-common mysql-server mysql-server-5.1 mysql-server-core-5.1
0 upgraded, 12 newly installed, 0 to remove and 26 not upgraded.
Need to get 22.9MB of archives.
After this operation, 54.4MB of additional disk space will be used.
Do you want to continue [Y/n]?
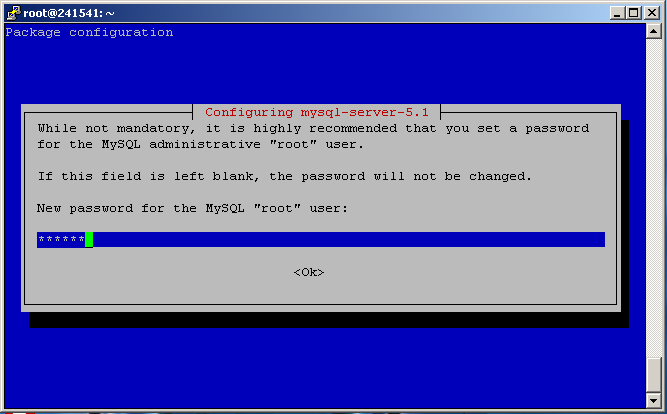
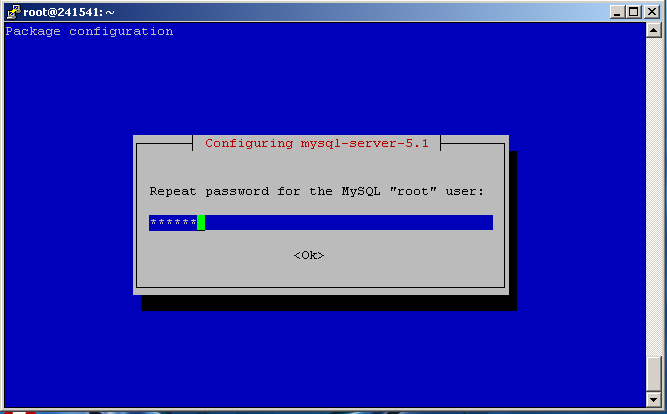
输入 Y 回车,继续安装 会提示输入 mysql 的 root 用户密码,你可以输入密码后回车,也可以不输入任何密码直接回车。 (不输入密码不会影响到Mysql的安全性,因为Mysql仅仅用于本地监听,但不输入密码会导致后续phpmyadmin无法运行)
需要重新输入一遍密码,如下图所示:
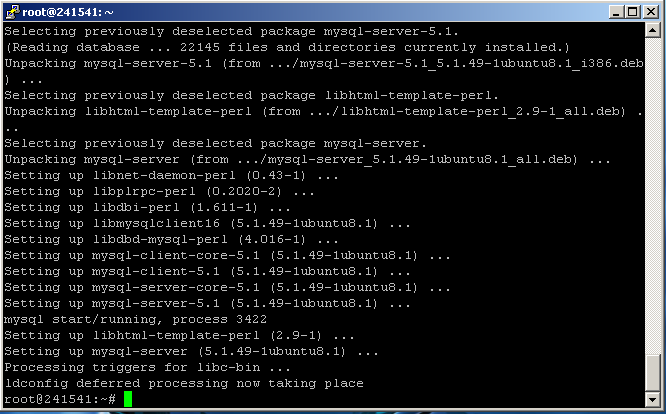
最后提示如下界面,表示mysql安装成功。
mysql 数据库优化
如果你的VPS的内存只有512M,请按如下步骤进行优化,如果是1G或以上可以忽略本步骤。执行本步骤可以将Mysql的占用内存由150M降到100M。
输入如下命令配置 Mysql
cp /etc/mysql/my.cnf /etc/mysql/my.cnf.`date +%s`
find /usr/share/doc/mysql* -name my-small.cnf -exec cp {} /etc/mysql/my.cnf \;
sed -i 's/skip-locking/user            = mysql\n&/' /etc/mysql/my.cnf
执行结果如下所示:
root@241541:~# cp /etc/mysql/my.cnf /etc/mysql/my.cnf.`date +%s`
root@241541:~# find /usr/share/doc/mysql* -name my-small.cnf -exec cp {} /etc/mysql/my.cnf \;
root@241541:~# sed -i 's/skip-locking/user            = mysql\n&/' /etc/mysql/my.cnf
重启下 Mysql服务:
/etc/init.d/mysql restart
执行结果如下所示:
root@241541:~# /etc/init.d/mysql restart
Rather than invoking init scripts through /etc/init.d, use the service(8)
utility, e.g. service mysql restart

Since the script you are attempting to invoke has been converted to an
Upstart job, you may also use the restart(8) utility, e.g. restart mysql
mysql start/running, process 9886
安装php环境
执行如下命令安装apache2的php5扩展和php的mysql扩展
apt-get install libapache2-mod-php5 php5-gd php5-mysql php5-curl php5-mcrypt php5-common php-apc
如下提示:
root@241541:~# apt-get install libapache2-mod-php5 php5-gd php5-mysql php5-mcrypt php5-common php-apc
Reading package lists... Done
Building dependency tree
Reading state information... Done
The following extra packages will be installed:
  libgd2-xpm libjpeg62 libt1-5 libx11-6 libx11-data libxau6 libxcb1 libxdmcp6
  libxpm4 php5-cli php5-common php-apc
Suggested packages:
  php-pear libgd-tools php5-suhosin
The following NEW packages will be installed:
  libapache2-mod-php5 libgd2-xpm libjpeg62 libt1-5 libx11-6 libx11-data
  libxau6 libxcb1 libxdmcp6 libxpm4 php5-cli php5-common php5-gd php5-mysql php5-mcrypt
0 upgraded, 15 newly installed, 0 to remove and 26 not upgraded.
Need to get 8128kB of archives.
After this operation, 22.7MB of additional disk space will be used.
Do you want to continue [Y/n]?
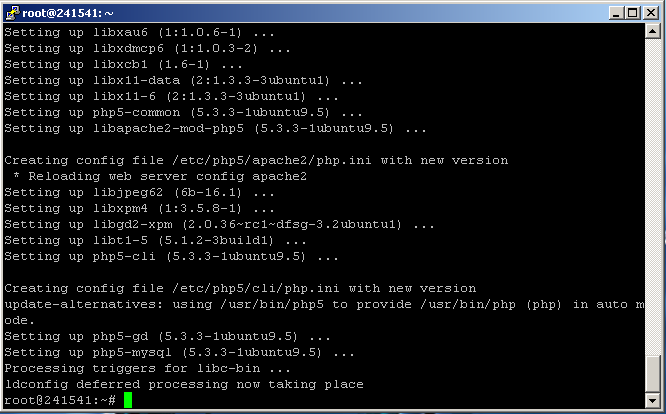
输入 Y,回车继续,以下表示安装完成。
重新启动apache2, 输入如下命令:
/etc/init.d/apache2 restart
提示如下,表示启动成功:
root@241541:~# /etc/init.d/apache2 restart
* Restarting web server apache2                                                  apache2: Could not reliably determine the server's fully qualified domain name, using 0.3.175.133 for ServerName
                                                                         [ OK ]
测试站点
以上命令已经完整安装好一台Web服务器所具有的环境,以下来搭建一个最简单的站点。
web 的根目录位于 /var/www 你可以将自己的程序直接放到此目录。
安装 phpsysinfo
使用putty登录到服务器,依次执行如下命令安装phpsysinfo:
cd /var/www
wget http://sourceforge.net/projects/phpsysinfo/files/phpsysinfo/3.0.13/phpsysinfo-3.0.13.tar.gz/download -O phpsysinfo-3.0.13.tar.gz
tar xzvf phpsysinfo-3.0.13.tar.gz
cd phpsysinfo
mv config.php.new config.php
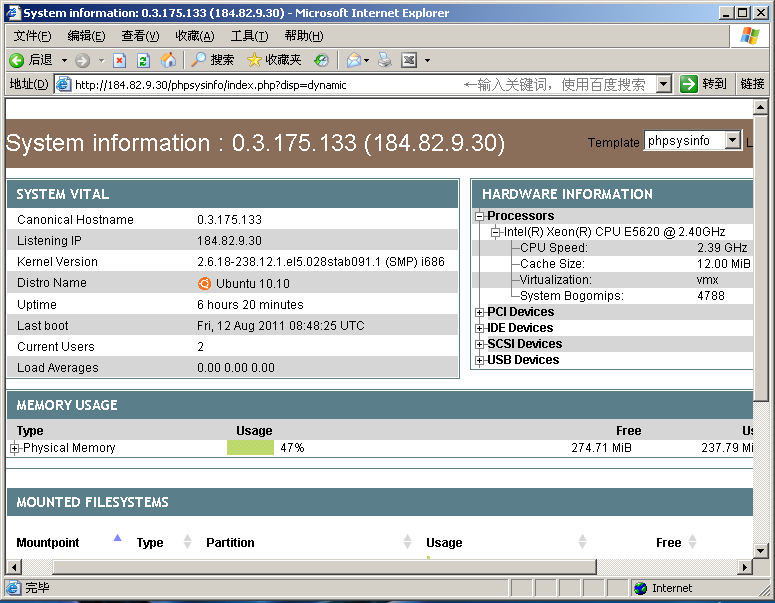
执行完毕后,在浏览器的地址输入: http://184.82.9.30/phpsysinfo/ 查看,显示如下:
安装 php 探针
使用putty登录到服务器,依次执行如下命令安装:
cd /var/www
wget http://www.duyaofei.com/downloads/tz.zip
unzip tz.zip
运行结果如下所示:
root@241541:~# cd /var/www
root@241541:/var/www# wget http://www.duyaofei.com/downloads/tz.zip
--2011-08-13 09:18:40--  http://www.duyaofei.com/downloads/tz.zip
Resolving www.duyaofei.com... 74.220.215.201
Connecting to www.duyaofei.com|74.220.215.201|:80... connected.
HTTP request sent, awaiting response... 200 OK
Length: 10490 (10K) [application/zip]
Saving to: `tz.zip'

100%[======================================>] 10,490      --.-K/s   in 0.07s

2011-08-13 09:18:41 (152 KB/s) - `tz.zip' saved [10490/10490]

root@241541:/var/www# unzip tz.zip
Archive:  tz.zip
  inflating: tz.php
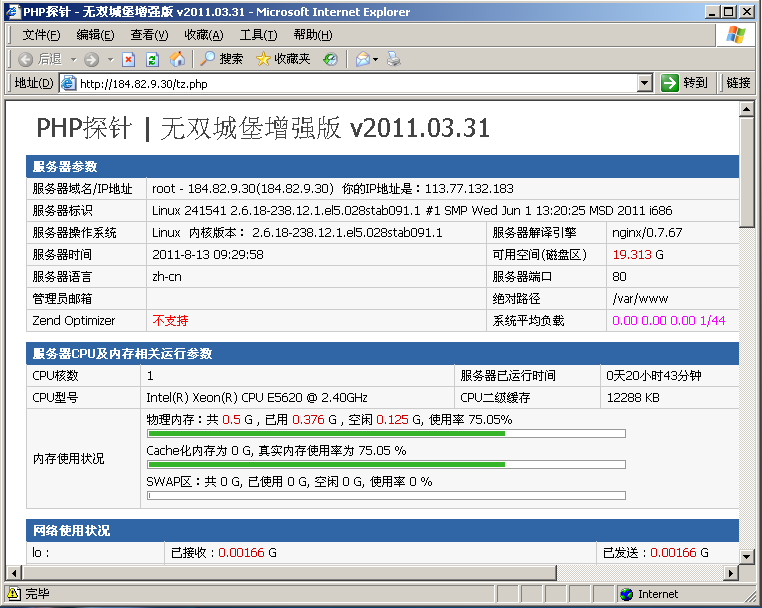
执行完毕后,在浏览器的地址输入: http://184.82.9.30/tz.php 查看,显示如下:
安装 phpmyadmin
安装phpmyadmin,需要mysql事先配置好root的密码。
使用putty登录到服务器,执行下面安装
apt-get install phpmyadmin
提示如下:
root@241541:~# apt-get install phpmyadmin
Reading package lists... Done
Building dependency tree
Reading state information... Done
The following extra packages will be installed:
  dbconfig-common javascript-common libjs-mootools libmcrypt4 php5-mcrypt
  wwwconfig-common
Suggested packages:
  libmcrypt-dev mcrypt postgresql-client apache apache-ssl
The following NEW packages will be installed:
  dbconfig-common javascript-common libjs-mootools libmcrypt4 php5-mcrypt
  phpmyadmin wwwconfig-common
0 upgraded, 7 newly installed, 0 to remove and 26 not upgraded.
Need to get 5184kB of archives.
After this operation, 21.3MB of additional disk space will be used.
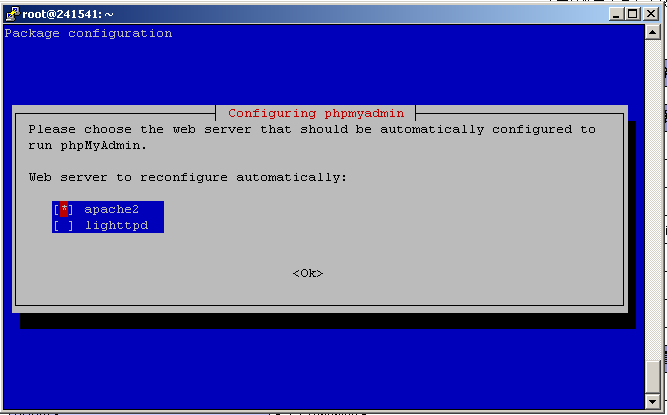
Do you want to continue [Y/n]?
输入 Y, 回车继续。
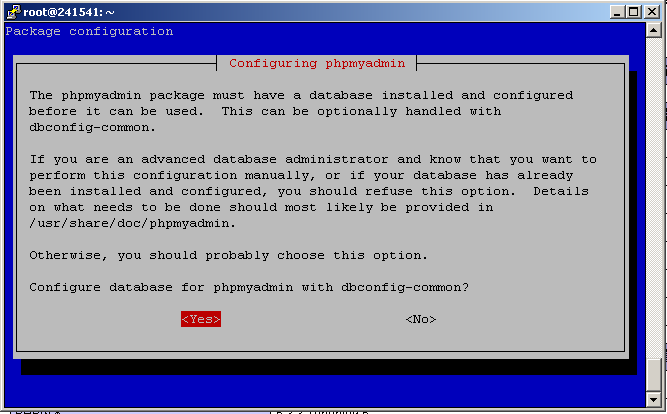
选择完毕后,回车继续,提示如下图,是否需要创建phpmyadmin数据库,
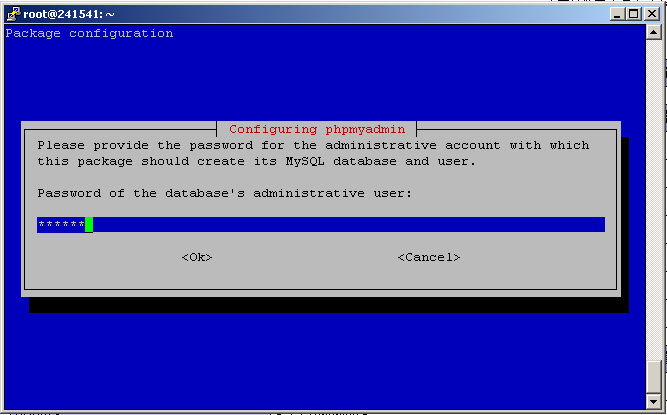
直接回车继续,提示输入mysql的管理员密码,输入后如下所示:
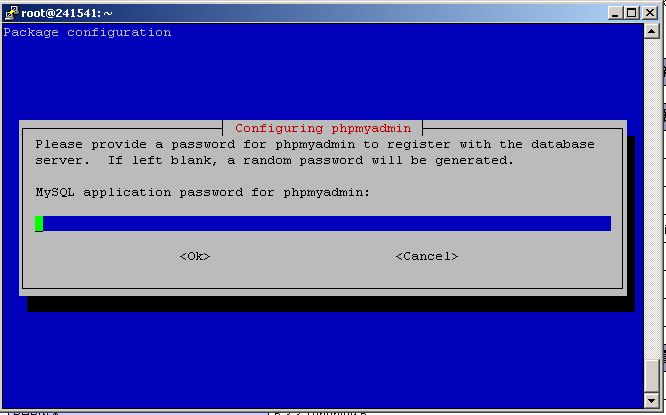
回车继续后,如下图,提示输入phpmyadmin连接数据的密码,直接回车由系统随机产生一个即可。
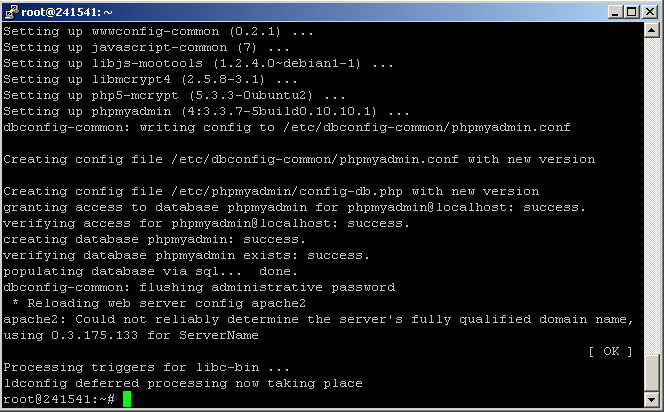
完成安装提示如下:
现在访问如下地址测试: http://184.82.9.30/phpmyadmin/
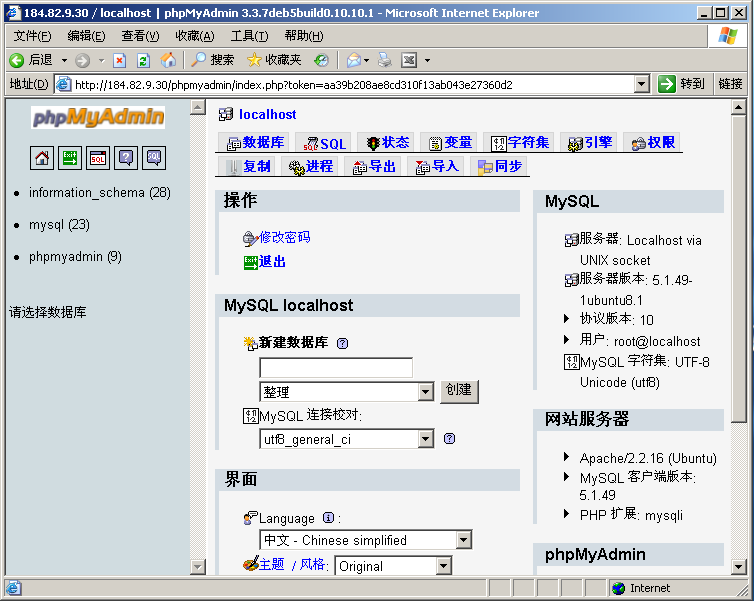
输入mysql的root帐号和mysql的密码,点击 执行 进行登录,进行正常访问如下:
如果访问提示 404 ,检查输入无问题后, 尝试执行如下命令:
ln -s /usr/share/phpmyadmin /var/www
然后再访问。
配置虚拟站点
假设前提: 你有一个域名 test.com ,你希望搭建两个站点,第一个站点是 www.test.com 和 test.com 为主页,同时希望提供 bbs.test.com 为论坛。
注意,下面的文档对多个不同的域名也是适用的。
配置域名
去域名商提供的面板将 test.com 域名的 A 记录修改为 VPS 的 IP.
上传程序
约定两个站点的目录如下,为了方便备份,站点的目录最好集中存放在 /var/www 目录。
www.test.com(test.com) 对应目录: /var/www/test
bbs.test.com 对应目录: /var/www/bbs
假设主站点安装帝国的CMS程序,论坛采用DZ的论坛,程序需要下载UTF-8的版本。
使用前面提到的上传方法,利用 FileZilla 连接服务器,创建这两个目录。
分别上传程序
多域名配置
这里推荐编辑器直接使用记事本,不要使用其他的高级编辑器。
注意下面的 DocumentRoot /var/www/test/ 中的 /var/www/test/ 应该修改为你上传站点的文件目录。
编辑www.test.com的站点配置文件 test.com.txt ,其中站点 www.test.com 和 test.com 的网站目录为 /var/www/test/
<VirtualHost *:80>
    ServerName www.test.com
    ServerAlias test.com
    DocumentRoot /var/www/test/
</VirtualHost>
编辑bbs.test.com的站点配置文件 bbs.test.com.txt , 其中站点 bbs.test.com 的网站目录为 /var/www/bbs/
<VirtualHost *:80>
    ServerName bbs.test.com
    DocumentRoot /var/www/bbs/
</VirtualHost>
如图所示:
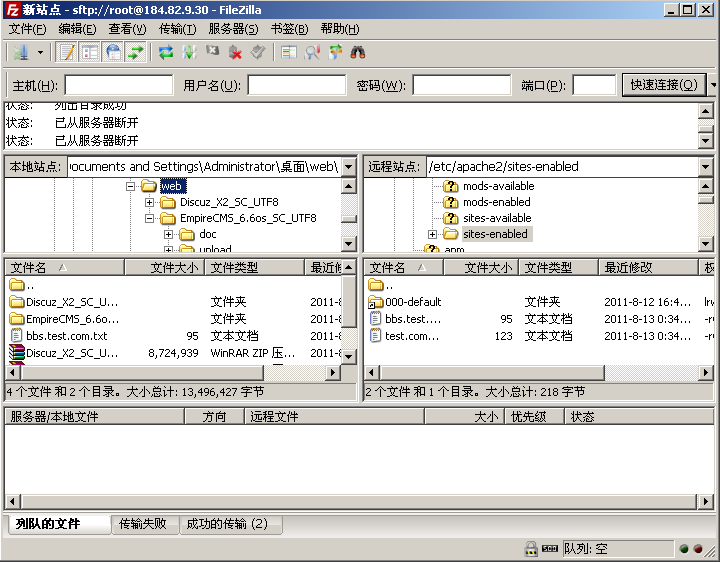
将这两个文件上传到 /etc/apache2/sites-enabled/ 目录
如图所示:
修改上传文件权限
由于上传的文件的所有者为 root ,Apache 无法正常写入,所以需要设置上传文件的宿主为 www-data。
使用putty登录vps执行如下命令,设置 /var/www下的所有文件的宿主都是 www-data,这样apache2就可以正常读写:
chown -R www-data:www-data /var/www
/etc/init.d/apache2 restart
执行结果如下所示:
root@241541:~# chown -R www-data:www-data /var/www
root@241541:~# /etc/init.d/apache2 restart
 * Restarting web server apache2                                                apache2: Could not reliably determine the server's fully qualified domain name, using 0.3.175.133 for ServerName
 ... waiting apache2: Could not reliably determine the server's fully qualified domain name, using 0.3.175.133 for ServerName
                                                                        [ OK ]
安装配置
主站点程序访问 http://www.test.com 如下图所示,进一步安装:
论坛程序访问 http://bbs.test.com 如下图所示,进一步安装:
以上就是完成多域名的配置。
mysql 管理
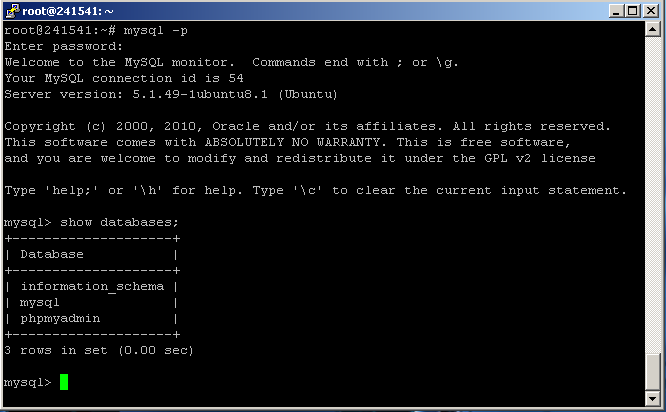
对于mysql数据库维护可以使用前面安装的 phpmyadmin 进行维护,或直接在 putty 中输入 mysql -p 进行管理如图所示:
Apache2 优化
请一定要执行本步骤,不要认为小站,访问的人数少,有时候蜘蛛会按照超过20个以上的并发抓取数据,直接爆掉vps。表现为:可以ping,但网站打不开、数据库连不上或无法ssh。
为了防止Vps被大的访问量爆掉,需要限制并发数,这里#1 VPS 调整为10, #2可以将下面的10修改为20,#3为30,以此类推。
也可以根据指南最后的压力测试来确定最大并发数,确定后,将下面的命令中的 10 改为你确定的并发数即可,其它数值如 5 不要修改。
请复制命令后到putty直接按鼠标右键粘贴执行:
sed -i -e "s/^[[:blank:]]*StartServers[[:blank:]]*.*/StartServers       5/"  /etc/apache2/apache2.conf
sed -i -e "s/^[[:blank:]]*MinSpareServers[[:blank:]]*.*/MinSpareServers    5/" /etc/apache2/apache2.conf
sed -i -e "s/^[[:blank:]]*MaxSpareServers[[:blank:]]*.*/MaxSpareServers    10/" /etc/apache2/apache2.conf
sed -i -e "s/^[[:blank:]]*ServerLimit[[:blank:]]*.*/ServerLimit       10/" /etc/apache2/apache2.conf
sed -i -e "s/^[[:blank:]]*MaxClients[[:blank:]]*.*/MaxClients        10/" /etc/apache2/apache2.conf
sed -i -e "s/^[[:blank:]]*MinSpareThreads[[:blank:]]*.*/MinSpareThreads    5/" /etc/apache2/apache2.conf
sed -i -e "s/^[[:blank:]]*MaxSpareThreads[[:blank:]]*.*/MaxSpareThreads    10/" /etc/apache2/apache2.conf
执行完毕后后,再执行以下命令,重启下apache2。
/etc/init.d/apache2 restart
执行结果如下所示:
root@241541:~# sed -i -e "s/^[[:blank:]]*StartServers[[:blank:]]*.*/StartServers       5/"  /etc/apache2/apache2.conf
root@241541:~# sed -i -e "s/^[[:blank:]]*MinSpareServers[[:blank:]]*.*/MinSpareServers    5/" /etc/apache2/apache2.conf
root@241541:~# sed -i -e "s/^[[:blank:]]*MaxSpareServers[[:blank:]]*.*/MaxSpareServers    10/" /etc/apache2/apache2.conf
root@241541:~# sed -i -e "s/^[[:blank:]]*ServerLimit[[:blank:]]*.*/ServerLimit       10/" /etc/apache2/apache2.conf
root@241541:~# sed -i -e "s/^[[:blank:]]*MaxClients[[:blank:]]*.*/MaxClients        10/" /etc/apache2/apache2.conf
root@241541:~# sed -i -e "s/^[[:blank:]]*MinSpareThreads[[:blank:]]*.*/MinSpareThreads    5/" /etc/apache2/apache2.conf
root@241541:~# sed -i -e "s/^[[:blank:]]*MaxSpareThreads[[:blank:]]*.*/MaxSpareThreads    10/" /etc/apache2/apache2.conf
root@241541:~# /etc/init.d/apache2 restart
 * Restarting web server apache2                                                apache2: Could not reliably determine the server's fully qualified domain name, using 0.4.54.225 for ServerName
 ... waiting apache2: Could not reliably determine the server's fully qualified domain name, using 0.4.54.225 for ServerName
                                                                         [ OK ]
查看 Apache2 日志
Apache2的日志放在 /var/log/apache2/ 目录下,可以直接使用filezilla去下载下来看。
使用 Nginx 搭建站点
为什要使用nginx?因为apache太耗内存了,使用nginx可以节约内存。
采用 nginx + php-fpm + mysql 搭建。
删除 apache2
使用putty登录vps,执行如下命令:
输入如下命令关闭 apache2
/etc/init.d/apache2 stop
如果输入正确,会提示如下信息,表示apache2已经停止
root@241541:~# /etc/init.d/apache2 stop
 * Stopping web server apache2                                                  apache2: Could not reliably determine the server's fully qualified domain name, using 0.3.175.133 for ServerName
 ... waiting                                                             [ OK ]
输入如下命令删除 apache2
apt-get remove apache2 apache2.2-common
出现类似如下提示时,输入 Y 并回车。
0 upgraded, 1 newly installed, 7 to remove and 26 not upgraded.
Need to get 5837kB of archives.
After this operation, 14.5MB disk space will be freed.
Do you want to continue [Y/n]?
最后会出现如下提示,表示已经删除 apache2
Removing libapache2-mod-php5 ...
Module php5 disabled.
Run '/etc/init.d/apache2 restart' to activate new configuration!
Removing apache2-mpm-prefork ...
 * Stopping web server apache2                                                  apache2: Could not reliably determine the  server's fully qualified domain name, using 0.3.175.133 for ServerName
 ... waiting                                                             [ OK ]
Removing apache2.2-common ...
Removing apache2-utils ...
Removing apache2.2-bin ...
安装 php5-fpm php5-cgi
由于 Ubuntu 10.04 没有 php5-fpm 软件,需要增加第三方源,所以请先检查下 Ubuntu 的版本,使用putty登录vps执行如下命令来检查:
cat /etc/issue
如果看到,执行结果如下所示:
root@195669:~# cat /etc/issue
Ubuntu 10.04 LTS \n \l
则表示你当前的版本的 10.04 ,需要执行如下步骤,增加第三方源,否则略过。
apt-get -y install python-software-properties
add-apt-repository ppa:nginx/stable
add-apt-repository ppa:brianmercer/php
apt-get -y update
和前面一样,如果碰到 “Do you want to continue [Y/n]? ” 的提示,请输入 Y 回车继续。
Ubuntu 10.10 或 执行完毕上述命令的 Ubuntu 10.04 系统可以开始安装 php5-fpm 了,执行如下命令:
apt-get install php5-cgi php5-fpm php5-gd php5-mysql php5-curl php5-mcrypt php5-common php-apc
出现下面的提示表示安装成功
root@241541:~# apt-get install php5-cgi php5-fpm php5-gd php5-mysql php5-mcrypt php5-common php-apc
Reading package lists... Done
Building dependency tree
Reading state information... Done
php5-cgi is already the newest version.
php5-cgi set to manually installed.
Suggested packages:
  php-pear
The following NEW packages will be installed:
  libevent-1.4-2 php5-fpm
0 upgraded, 2 newly installed, 0 to remove and 26 not upgraded.
Need to get 3002kB of archives.
After this operation, 7967kB of additional disk space will be used.
Get:1 http://archive.ubuntu.com/ubuntu/ maverick/main libevent-1.4-2 i386 1.4.13-stable-1 [56.2kB]
Get:2 http://archive.ubuntu.com/ubuntu/ maverick-updates/universe php5-fpm i386 5.3.3-1ubuntu9.5 [2946kB]
Fetched 3002kB in 1s (2181kB/s)
Selecting previously deselected package libevent-1.4-2.
(Reading database ... 21902 files and directories currently installed.)
Unpacking libevent-1.4-2 (from .../libevent-1.4-2_1.4.13-stable-1_i386.deb) ...
Selecting previously deselected package php5-fpm.
Unpacking php5-fpm (from .../php5-fpm_5.3.3-1ubuntu9.5_i386.deb) ...
Setting up libevent-1.4-2 (1.4.13-stable-1) ...
Setting up php5-fpm (5.3.3-1ubuntu9.5) ...
update-rc.d: warning: php5-fpm stop runlevel arguments (0 1 6) do not match LSB Default-Stop values (none)
 * Starting PHP5 FPM...                                                         Aug 13 06:25:50.352643 [WARNING] [pool  www] pm.start_servers is not set. It's been set to 20.
                                                                        [ OK ]

Creating config file /etc/php5/fpm/php.ini with new version
Processing triggers for libc-bin ...
ldconfig deferred processing now taking place
安装完毕后,重启下 php5-fpm,执行如下命令重启
/etc/init.d/php5-fpm restart
出现如下提示,表示重启成功
root@241541:~# /etc/init.d/php5-fpm restart
* Stopping PHP5 FPM...                                                  [ OK ]
* Starting PHP5 FPM...                                                  [ OK ]
Jun 25 19:43:58.592184 [WARNING] [pool www] pm.start_servers is not set. It's been set to 20.
安装 mysql
见前面的安装 mysql 的步骤。
安装 nginx
使用putty登录vps,执行如下命令:
apt-get install nginx
出现如下提示,表示已经安装完毕:
root@241541:~# apt-get install nginx
Reading package lists... Done
Building dependency tree
Reading state information... Done
Suggested packages:
  ufw
The following NEW packages will be installed:
  nginx
0 upgraded, 1 newly installed, 0 to remove and 26 not upgraded.
Need to get 341kB of archives.
After this operation, 827kB of additional disk space will be used.
Get:1 http://archive.ubuntu.com/ubuntu/ maverick/universe nginx i386 0.7.67-3ubuntu1 [341kB]
Fetched 341kB in 0s (437kB/s)
Selecting previously deselected package nginx.
(Reading database ... 21918 files and directories currently installed.)
Unpacking nginx (from .../nginx_0.7.67-3ubuntu1_i386.deb) ...
Setting up nginx (0.7.67-3ubuntu1) ...
再执行下面的命令启动nginx服务:
/etc/init.d/nginx start
结果如下所示,表示nginx顺利启动:
root@241541:~# /etc/init.d/nginx start
Starting nginx: nginx.
测试站点
由于nginx默认的站点不支持php,所以需要修改默认站点。
编辑文件名为 default.txt ,注意下面的 server_name 修改为你的vps的ip地址,可以写一个IP,也可以都写上,IP和IP之间有空格。
配置文件中的 root 就是站点的目录了,可以更改为你的站点的路径。
server	{
	listen       80;
	server_name 184.82.9.30 184.82.9.31;
	index index.html index.htm index.php;
	root  /var/www/;
	location ~ \.php$ {
		include /etc/nginx/fastcgi_params;
		fastcgi_param  SCRIPT_FILENAME    $document_root$fastcgi_script_name;
		fastcgi_pass  127.0.0.1:9000;
		}
	}
将 default.txt 文件使用 filezilla 上传到 /etc/nginx/sites-enabled 目录下
使用 putty 登录vps,输入如下命令重启 nginx 服务
/etc/init.d/nginx restart
重启结果如下所示:
root@241541:~# /etc/init.d/nginx restart
Restarting nginx: nginx.
安装phpsysinfo
按照前面apache2讲述的安装
安装 php 探针
按照前面apache2讲述的安装
安装 phpmyadmin
照前面 Apache2 安装 phpmyadmin, 注意第二步不要再按空格选择 apache2 , 直接回车下一步。
如果已经之前已经安装过 phpmyadmin ,不需要删除,继续使用。
安装完毕 phpmyadmin 后, 继续在 putty 里面执行如下命令即可:
cd /var/www
ln -s /usr/share/phpmyadmin .
执行情况如下所示:
root@241541:~# cd /var/www
root@241541:/var/www# ln -s /usr/share/phpmyadmin .
root@241541:/var/www#
然后就可以在浏览器里面访问 phpmyadmin 了。 访问地址: http://184.82.9.30/phpmyadmin/
配置虚拟站点
以上运行环境均已经安装完毕,下面讲如何配置 nginx 的多域名。
假设前提: 你有一个域名 test.com ,你希望搭建两个站点,第一个站点是 www.test.com 和 test.com 为主页,同时希望提供 bbs.test.com 为论坛。
下面的文档对多个不同的域名也是适用的。
配置域名
参考上面 apache2 的配置域名部分。
上传程序
参考上面 apache2 的上传程序部分。
多域名配置
这里推荐编辑器直接使用记事本,不要使用其他的高级编辑器。
编辑www.test.com的站点配置文件 test.com.txt
server	{
	listen       80;
	server_name www.test.com test.com;
	index index.html index.htm index.php;
	root  /var/www/test/;
	location ~ \.php$ {
		include /etc/nginx/fastcgi_params;
		fastcgi_param  SCRIPT_FILENAME    $document_root$fastcgi_script_name;
		fastcgi_pass  127.0.0.1:9000;
		}
	}
编辑bbs.test.com的站点配置文件 bbs.test.com.txt
server	{
	listen       80;
	server_name bbs.test.com;
	index index.html index.htm index.php;
	root  /var/www/bbs/;
	location ~ \.php$ {
		include /etc/nginx/fastcgi_params;
		fastcgi_param  SCRIPT_FILENAME    $document_root$fastcgi_script_name;
		fastcgi_pass  127.0.0.1:9000;
		}
	}
将这两个文件使用 filezilla 上传到 /etc/nginx/sites-enabled/ 目录
Nginx 伪静态
下面是常用的一些伪静态配置,复制出来,插入到站点的配置文件最后一个 } 号之前,如下:
server	{
	listen       80;
	server_name bbs.test.com;
	index index.html index.htm index.php;
	root  /var/www/bbs/;
	location ~ \.php$ {
		include /etc/nginx/fastcgi_params;
		fastcgi_param  SCRIPT_FILENAME    $document_root$fastcgi_script_name;
		fastcgi_pass  127.0.0.1:9000;
		}
       #伪静态代码段开始
	location / {
        ...............................
		}
       #伪静态代码段结束
	}
Discuz!X 在 Nginx 下的伪静态配置如下:
location / {
   	rewrite ^([^\.]*)/topic-(.+)\.html$ $1/portal.php?mod=topic&topic=$2 last;
   	rewrite ^([^\.]*)/article-([0-9]+)-([0-9]+)\.html$ $1/portal.php?mod=view&aid=$2&page=$3 last;
   	rewrite ^([^\.]*)/forum-(\w+)-([0-9]+)\.html$ $1/forum.php?mod=forumdisplay&fid=$2&page=$3 last;
   	rewrite ^([^\.]*)/thread-([0-9]+)-([0-9]+)-([0-9]+)\.html$ $1/forum.php?mod=viewthread&tid=$2&extra=page%3D$4&page=$3 last;
   	rewrite ^([^\.]*)/group-([0-9]+)-([0-9]+)\.html$ $1/forum.php?mod=group&fid=$2&page=$3 last;
   	rewrite ^([^\.]*)/space-(username|uid)-(.+)\.html$ $1/home.php?mod=space&$2=$3 last;
   	rewrite ^([^\.]*)/blog-([0-9]+)-([0-9]+)\.html$ $1/home.php?mod=space&uid=$2&do=blog&id=$3 last;
   	rewrite ^([^\.]*)/(fid|tid)-([0-9]+)\.html$ $1/index.php?action=$2&value=$3 last;
	}
将这一段代码加入到上面的站点配置文件中,例如:
server	{
	listen       80;
	server_name bbs.test.com;
	index index.html index.htm index.php;
	root  /var/www/bbs/;
	location ~ \.php$ {
		include /etc/nginx/fastcgi_params;
		fastcgi_param  SCRIPT_FILENAME    $document_root$fastcgi_script_name;
		fastcgi_pass  127.0.0.1:9000;
		}
	location / {
   		rewrite ^([^\.]*)/topic-(.+)\.html$ $1/portal.php?mod=topic&topic=$2 last;
   		rewrite ^([^\.]*)/article-([0-9]+)-([0-9]+)\.html$ $1/portal.php?mod=view&aid=$2&page=$3 last;
   		rewrite ^([^\.]*)/forum-(\w+)-([0-9]+)\.html$ $1/forum.php?mod=forumdisplay&fid=$2&page=$3 last;
   		rewrite ^([^\.]*)/thread-([0-9]+)-([0-9]+)-([0-9]+)\.html$ $1/forum.php?mod=viewthread&tid=$2&extra=page%3D$4&page=$3 last;
   		rewrite ^([^\.]*)/group-([0-9]+)-([0-9]+)\.html$ $1/forum.php?mod=group&fid=$2&page=$3 last;
   		rewrite ^([^\.]*)/space-(username|uid)-(.+)\.html$ $1/home.php?mod=space&$2=$3 last;
   		rewrite ^([^\.]*)/blog-([0-9]+)-([0-9]+)\.html$ $1/home.php?mod=space&uid=$2&do=blog&id=$3 last;
   		rewrite ^([^\.]*)/(fid|tid)-([0-9]+)\.html$ $1/index.php?action=$2&value=$3 last;
		}
	}
WordPress 在 Nginx 下的伪静态配置如下:
location / {
	if (-f $request_filename/index.html){
		rewrite (.*) $1/index.html break;
		}
	if (-f $request_filename/index.php){
		rewrite (.*) $1/index.php;
		}
	if (!-f $request_filename){
		rewrite (.*) /index.php;
		}
	}
ECShop 在 Nginx 下的伪静态配置如下:
location / {
	if (!-e $request_filename) {
		rewrite "^/index\.html" /index.php last;
		rewrite "^/category$" /index.php last;
		rewrite "^/feed-c([0-9]+)\.xml$" /feed.php?cat=$1 last;
		rewrite "^/feed-b([0-9]+)\.xml$" /feed.php?brand=$1 last;
		rewrite "^/feed\.xml$" /feed.php last;
		rewrite "^/category-([0-9]+)-b([0-9]+)-min([0-9]+)-max([0-9]+)-attr([^-]*)-([0-9]+)-(.+)-([a-zA-Z]+)(.*)\.html$" /category.php?id=$1&brand=$2&price_min=$3&price_max=$4&filter_attr=$5&page=$6&sort=$7&order=$8 last;
		rewrite "^/category-([0-9]+)-b([0-9]+)-min([0-9]+)-max([0-9]+)-attr([^-]*)(.*)\.html$" /category.php?id=$1&brand=$2&price_min=$3&price_max=$4&filter_attr=$5 last;
		rewrite "^/category-([0-9]+)-b([0-9]+)-([0-9]+)-(.+)-([a-zA-Z]+)(.*)\.html$" /category.php?id=$1&brand=$2&page=$3&sort=$4&order=$5 last;
		rewrite "^/category-([0-9]+)-b([0-9]+)-([0-9]+)(.*)\.html$" /category.php?id=$1&brand=$2&page=$3 last;
		rewrite "^/category-([0-9]+)-b([0-9]+)(.*)\.html$" /category.php?id=$1&brand=$2 last;
		rewrite "^/category-([0-9]+)(.*)\.html$" /category.php?id=$1 last;
		rewrite "^/goods-([0-9]+)(.*)\.html" /goods.php?id=$1 last;
		rewrite "^/article_cat-([0-9]+)-([0-9]+)-(.+)-([a-zA-Z]+)(.*)\.html$" /article_cat.php?id=$1&page=$2&sort=$3&order=$4 last;
		rewrite "^/article_cat-([0-9]+)-([0-9]+)(.*)\.html$" /article_cat.php?id=$1&page=$2 last;
		rewrite "^/article_cat-([0-9]+)(.*)\.html$" /article_cat.php?id=$1 last;
		rewrite "^/article-([0-9]+)(.*)\.html$" /article.php?id=$1 last;
		rewrite "^/brand-([0-9]+)-c([0-9]+)-([0-9]+)-(.+)-([a-zA-Z]+)\.html" /brand.php?id=$1&cat=$2&page=$3&sort=$4&order=$5 last;
		rewrite "^/brand-([0-9]+)-c([0-9]+)-([0-9]+)(.*)\.html" /brand.php?id=$1&cat=$2&page=$3 last;
		rewrite "^/brand-([0-9]+)-c([0-9]+)(.*)\.html" /brand.php?id=$1&cat=$2 last;
		rewrite "^/brand-([0-9]+)(.*)\.html" /brand.php?id=$1 last;
		rewrite "^/tag-(.*)\.html" /search.php?keywords=$1 last;
		rewrite "^/snatch-([0-9]+)\.html$" /snatch.php?id=$1 last;
		rewrite "^/group_buy-([0-9]+)\.html$" /group_buy.php?act=view&id=$1 last;
		rewrite "^/auction-([0-9]+)\.html$" /auction.php?act=view&id=$1 last;
		rewrite "^/exchange-id([0-9]+)(.*)\.html$" /exchange.php?id=$1&act=view last;
		rewrite "^/exchange-([0-9]+)-min([0-9]+)-max([0-9]+)-([0-9]+)-(.+)-([a-zA-Z]+)(.*)\.html$" /exchange.php?cat_id=$1&integral_min=$2&integral_max=$3&page=$4&sort=$5&order=$6 last;
		rewrite "^/exchange-([0-9]+)-([0-9]+)-(.+)-([a-zA-Z]+)(.*)\.html$" /exchange.php?cat_id=$1&page=$2&sort=$3&order=$4 last;
		rewrite "^/exchange-([0-9]+)-([0-9]+)(.*)\.html$" /exchange.php?cat_id=$1&page=$2 last;
		rewrite "^/exchange-([0-9]+)(.*)\.html$" /exchange.php?cat_id=$1 last;
		}
	}
修改上传文件权限
由于上传的文件的所有者为 root ,Nginx 无法正常写入,所以需要设置上传文件的宿主为 www-data。
使用putty登录vps执行如下命令,设置 /var/www下的所有文件的宿主都是 www-data,这样nginx就可以正常读写:
chown -R www-data:www-data /var/www
/etc/init.d/nginx restart
执行结果如下所示:
root@241541:~# chown -R www-data:www-data /var/www
root@195669:~# /etc/init.d/nginx restart
Restarting nginx: nginx.
安装配置
见 apache2 的安装配置部分
nginx 优化
请一定要执行本步骤,不要认为小站,访问的人数少,有时候蜘蛛会按照超过20个以上的并发抓取数据,直接爆掉vps。表现为:可以ping,但网站打不开、数据库连不上或无法ssh。
为了防止Vps被大的访问量爆掉,需要限制并发数,这里#1 VPS 调整为10, #2可以将下面的10修改为20,#3为30,以此类推。
也可以根据指南最后的压力测试来确定最大并发数,确定后,将下面的命令中的 10 改为你确定的并发数即可,其它数值如 5 不要修改。
因为命令中包括了 ` 号,所以请复制命令后到putty直接按鼠标右键粘贴执行:
sed -i -e 's/pm.max_children =.*$/pm.max_children = 10/' `grep -R -l pm.max_children /etc/php5/fpm`
sed -i -e 's/pm.start_servers =.*$/pm.start_servers = 5/' `grep -R -l pm.max_children /etc/php5/fpm`
sed -i -e 's/pm.max_spare_servers =.*$/pm.max_spare_servers = 10/' `grep -R -l pm.max_children /etc/php5/fpm`
执行完毕后,重启下 php-fpm 服务:
/etc/init.d/php5-fpm restart
查看 nginx 日志
Nginx的日志放在 /var/log/nginx/ 目录下,可以使用 filezilla 下载下来查看。
安装邮件服务器
如果没有特殊的原因,请忽略此步骤,官方对架设邮件服务器非常限制,担心对外发垃圾邮件,一旦被举报或smtpd的进程过多,就直接封VPS。
在 Putty 使用如下命令,安装 postfix
apt-get install postfix
安装完成后,请运行如下命令限制 postfix 为 10 个并发:
postconf -e default_process_limit=10
/etc/init.d/postfix restart
VPS 自我监控
为了防止VPS的内存超过,或系统负载过重,建议采用如下监控脚本:
规则:当剩余内存小于50M或当前负载大于5时,系统重启。
在 Putty 里面执行下面的语句,创建 /usr/bin/vpscheck.sh 脚本,
cat << EOF > /usr/bin/vpscheck.sh
#!/bin/bash
free_mem=\$(grep MemFree /proc/meminfo | awk '{print \$2}')
echo 'Free Memory:'\$free_mem
if [ \$free_mem -lt 50000 ];then
   shutdown -r now
fi
load=\$(awk '\$1 > 5 {print \$1}' /proc/loadavg)
echo "Load:"\$load
if [ -n "\$load" ];then
   shutdown -r now
fi
EOF
chmod +x /usr/bin/vpscheck.sh
再配置定时器,让上面的脚本可以每5分钟运行一次检查,继续在putty里面执行如下命令:
echo "*/5 * * * * root  /usr/bin/vpscheck.sh" > /etc/cron.d/vpscheck
/etc/init.d/cron restart
大功告成。
安全相关事项
vps的root密码不要设置的太简单,这样很容易被攻破,你可以安装如下软件来降低vps被攻破的机会。
![]() 请慎重考虑,已经发生了多起自己的IP被封的情况,如果你的本地互联网IP是固定的,请不要执行本段。
请慎重考虑,已经发生了多起自己的IP被封的情况,如果你的本地互联网IP是固定的,请不要执行本段。
输入如下命令:
apt-get install denyhosts
提示如下表示安装完成:
root@241541:/# apt-get install denyhosts
Reading package lists... Done
Building dependency tree
Reading state information... Done
The following NEW packages will be installed:
  denyhosts
0 upgraded, 1 newly installed, 0 to remove and 26 not upgraded.
Need to get 73.8kB of archives.
After this operation, 451kB of additional disk space will be used.
Get:1 http://archive.ubuntu.com/ubuntu/ maverick/universe denyhosts all 2.6-7 [73.8kB]
Fetched 73.8kB in 0s (131kB/s)
Selecting previously deselected package denyhosts.
(Reading database ... 22621 files and directories currently installed.)
Unpacking denyhosts (from .../denyhosts_2.6-7_all.deb) ...
Setting up denyhosts (2.6-7) ...
 * Starting DenyHosts denyhosts                                          [ OK ]
这样如果用户5次密码输入错误,将会自动将其IP加到黑名单,不允许再登录。
备份站点
将 vps 成功安装好软件后,面临的第二大的事情是如何备份现有的东西?
你需要备份 3 个方面的内容: 1 站点配置文件 2 站点文件 3 数据库, 分别讲解如下:
备份站点配置文件
看前面的设置,一般情况,我们需要备份Apache或Nginx,如果你修改了Mysql的配置,则需要备份Mysql的配置。
注意在使用 tar 备份时,推荐使用 “tar czf 备份文件名 需要备份的路径” 来备份,你也可以使用 “tar czvf ..." 来显示备份详细的进度;但当备份文件很多时,显示中间的备份过程会很花时间和带宽,所以并不建议使用。
备份完毕后,就可以直接使用 filezilla 到 /root 目录去下载你备份的文件了。
备份Apache配置文件
执行如下命令备份Apache的配置到 /root 下 :
cd
tar czf apache2.tar.gz /etc/apache2
备份的文件名叫 apache2.tar.gz ,执行结果如下:
root@241541:~# cd
root@241541:~# tar czf apache2.tar.gz /etc/apache2
tar: Removing leading `/' from member names
检查下备份的文件大小,输入
ls -l apache2.tar.gz
结果显示如下,表示备份成功
root@241541:~# ls -l apache2.tar.gz
-rw-r--r-- 1 root root 31021 Aug 13 18:32 apache2.tar.gz
备份Nginx配置文件
执行如下命令备份Nginx的配置到 /root 下 :
cd
tar czf nginx.tar.gz /etc/nginx
备份的文件名叫 nginx.tar.gz ,执行结果如下:
root@241541:~# cd
root@241541:~# tar czf nginx.tar.gz /etc/nginx
tar: Removing leading `/' from member names
检查下
root@241541:~# ls -l nginx.tar.gz
-rw-r--r-- 1 root root 5179 Aug 13 18:21 nginx.tar.gz
备份Mysql配置文件
执行如下命令备份Mysql的配置到 /root 下 :
cd
tar czf mysql.tar.gz /etc/mysql
备份的文件名叫 mysql.tar.gz ,执行结果如下:
root@241541:~# cd
root@241541:~# tar czf mysql.tar.gz /etc/mysql
tar: Removing leading `/' from member names
检查下
root@241541:~# ls -l mysql.tar.gz
-rw-r--r-- 1 root root 2639 Aug 13 18:25 mysql.tar.gz
备份站点文件
执行如下命令备份 /var/www 的配置到 /root 下 :
cd
tar czf www.tar.gz /var/www
备份的文件名叫 www.tar.gz ,执行结果如下:
root@241541:~# cd
root@241541:~# tar czf www.tar.gz /var/www
tar: Removing leading `/' from member names
检查如下
root@241541:~# ls -l www.tar.gz
-rw-r--r-- 1 root root 12042534 Aug 13 18:43 www.tar.gz
备份数据库
由于数据库本身包含了帐号和权限信息,所以我们完整备份整个数据库。
执行以下命令备份数据库到 /root 目录
cd
mysqldump -p --all-databases |gzip > mysql.sql.gz
会提示输入密码,输入mysql的密码后回车完成备份,如下所示。
root@241541:~# mysqldump -p --all-databases |gzip > mysql.sql.gz
Enter password:
备份的文件名为 mysql.sql.gz ,检查一下备份的时间和大小
root@241541:~# ls -l mysql.sql.gz
-rw-r--r-- 1 root root 133351 Aug 13 19:01 mysql.sql.gz
恢复站点
当 vps 出现故障后如何恢复?
首先你需要重新去reload系统到原来的系统,然后再按照前面的指南,安装好和之前一样的运行环境。
然后将你备份的所有文件使用 filezilla 上传到 vps 的 /root 目录下。
最后需要恢复 3 个方面的内容: 1 站点配置文件 2 站点文件 3 数据库, 分别讲解如下:
恢复站点配置文件
恢复Apache配置文件
假设 apache 的备份文件名为 apache2.tar.gz ,使用 putty 登录 vps ,执行如下命令恢复:
cd
tar xzf apache2.tar.gz
cp -a etc/apache2 /etc/apache2
执行结果如下,不会有任何回应:
root@241541:~# cd
root@241541:~# tar xzf apache2.tar.gz
root@241541:~# cp -a etc/apache2 /etc/apache2
使用如下命令重启 Apache2 :
/etc/init.d/apache2 restart
恢复Nginx配置文件
假设 nginx 的备份文件名为 nginx.tar.gz ,使用 putty 登录 vps ,执行如下命令恢复:
cd
tar xzf nginx.tar.gz
cp -a etc/nginx /etc/nginx
执行结果如下,不会有任何回应:
root@241541:~# cd
root@241541:~# tar xzf nginx.tar.gz
root@241541:~# cp -a etc/nginx /etc/nginx
使用如下命令重启 nginx :
/etc/init.d/nginx restart
恢复Mysql配置文件
假设 mysql 的备份文件名为 mysql.tar.gz ,使用 putty 登录 vps ,执行如下命令恢复:
cd
tar xzf mysql.tar.gz
cp -a etc/mysql /etc/mysql
执行结果如下,不会有任何回应:
root@241541:~# cd
root@241541:~# tar xzf mysql.tar.gz
root@241541:~# cp -a etc/mysql /etc/mysql
恢复站点文件
由于站点占用的空间比较大,所有我们不复制过去,解压缩后直接移动过去。
假设站点的备份文件名为 www.tar.gz ,使用 putty 登录 vps ,执行如下命令恢复:
cd
tar xzf www.tar.gz
rm -fr /var/www/*
mv var/www/* /var/www/
执行结果如下,不会有任何回应:
root@241541:~# cd
root@241541:~# tar xzf www.tar.gz
root@241541:~# rm -fr /var/www/*
root@241541:~# mv var/www/* /var/www/
恢复数据库
假设 mysql 的备份文件名为 mysql.sql.gz ,使用 putty 登录 vps ,执行如下命令恢复:
cd
gunzip < mysql.sql.gz | mysql -p
会提示输入当前新安装的mysql密码,输入密码后回车继续。
执行结果如下:
root@241541:~# cd
root@241541:~# gunzip < mysql.sql.gz | mysql -p
Enter password:
使用 Dropbox 每天自动备份
注册 Dropbox
Dropbox 是一个美国的在线网盘,默认提供了2G的空间,同时可以通过邀请其他朋友使用的手段增加容量。
为什么使用这个,主要是 VPS 到 Dropbox 备份可以到 1M 的真实传输速度,加上可以加容量,所以是非常理想的备份方式。
点击 注册 Dropbox 并登录到 Dropbox 网页。
BTW:淘宝上也有人提供扩容到20G的服务,风险自行承担。
Dropbox 将申请150M内存,实际消耗17M内存,所以请注意控制内存。
安装 Dropbox 客户端
打开 putty 执行如下命令安装,如果是32位的系统,采用如下命令。执行完毕后,请不要再执行下面给64位系统执行的命令:
cd ~ && wget -O - https://www.dropbox.com/download?plat=lnx.x86 | tar xzf -
64位系统的采用如下命令,
cd ~ && wget -O - "https://www.dropbox.com/download?plat=lnx.x86_64" | tar xzf -
执行结果如下所示:
root@241541:~# cd ~ && wget -O - https://www.dropbox.com/download?plat=lnx.x86 | tar xzf -
--2012-02-22 06:44:40--  https://www.dropbox.com/download?plat=lnx.x86
Resolving www.dropbox.com... 199.47.217.171, 199.47.216.170, 199.47.216.171, ...
Connecting to www.dropbox.com|199.47.217.171|:80... connected.
HTTP request sent, awaiting response... 302 FOUND
Location: https://dl-web.dropbox.com/u/17/dropbox-lnx.x86-1.2.52.tar.gz [following]
--2012-02-22 06:44:40--  https://dl-web.dropbox.com/u/17/dropbox-lnx.x86-1.2.52.tar.gz
Resolving dl-web.dropbox.com... 107.20.132.92, 107.20.138.135, 107.20.170.126, ...
Connecting to dl-web.dropbox.com|107.20.132.92|:80... connected.
HTTP request sent, awaiting response... 200 OK
Length: 15794278 (15M) [application/x-tar]
Saving to: `STDOUT'

100%[======================================>] 15,794,278   893K/s   in 15s

2012-02-22 06:44:57 (1.01 MB/s) - written to stdout [15794278/15794278]
看到类似信息,表示安装完成。
设置帐号
执行如下命令开始设置帐号
~/.dropbox-dist/dropboxd
当看到
Please visit https://www.dropbox.com/cli_link?host_id=xxx&cl=en_US to link this machine.
的提示时,复制里面https的链接地址使用浏览器打开,会出现Dropbox的密码框,输入你刚刚注册的密码,等到 putty 里面出现
Client successfully linked, Welcome xxx!
的提示即可完成设置。完成后,使用 Ctrl+C 键中断运行。
完整如下所示:
root@241541:~# ~/.dropbox-dist/dropboxd
This client is not linked to any account...
Please visit https://www.dropbox.com/cli_link?host_id=db0a5acabdf1fba62f360ffb8ebe910e&cl=en_US to link this machine.
This client is not linked to any account...
Please visit https://www.dropbox.com/cli_link?host_id=db0a5acabdf1fba62f360ffb8ebe910e&cl=en_US to link this machine.
This client is not linked to any account...
Please visit https://www.dropbox.com/cli_link?host_id=db0a5acabdf1fba62f360ffb8ebe910e&cl=en_US to link this machine.
This client is not linked to any account...
Please visit https://www.dropbox.com/cli_link?host_id=db0a5acabdf1fba62f360ffb8ebe910e&cl=en_US to link this machine.
Client successfully linked, Welcome guest!
开始使用
完成以上设置后,会在当然的目录下出现 Dropbox 目录,这个目录就是同步目录,当在这个目录下放置的任何文件都会同步到 Dropbox 网盘上。
root@241541:~# ls
Dropbox
root@241541:~# cd Dropbox/
root@241541:~/Dropbox# ls
Getting Started.pdf  Photos  Public
第一次测试: 在Dropbox目录下创建一个内容为 Hello 的 a.txt 文件。
root@241541:~/Dropbox# echo "Hello" > a.txt
运行同步程序
root@241541:~/Dropbox# ~/.dropbox-dist/dropboxd
打开Dropbox网页的 Files ,就会看到你的文件了。 输入 Ctrl+C 中断同步,下面开始讲如何配置自动运行同步。
自动运行 Dropbox
512M内存的VPS请不要自动启动服务,需要时,手工运行即可,启动后会太占内存。
到Vps的 /etc/init.d/ 目录下创建 dropbox 文件,文件内容如下,你可以在Windows里面创建好,再使用filezilla上传到 /etc/init.d/ 目录。
#!/bin/bash
# dropbox service
DAEMON=.dropbox-dist/dropbox

start() {
    echo "Starting dropbox..."
    if [ -x /root/$DAEMON ]; then
       HOME="/root" start-stop-daemon -b -o -c root -S -u root -x /root/$DAEMON
    fi
}

stop() {
    echo "Stopping dropbox..."
    HOMEDIR=`getent passwd $dbuser | cut -d: -f6`
    if [ -x /root/$DAEMON ]; then
        start-stop-daemon -o -c root -K -u root -x /root/$DAEMON
    fi
}

status() {
    dbpid=`pgrep -u root dropbox`
    if [ -z $dbpid ]; then
        echo "dropboxd not running."
    else
        echo "dropboxd running (pid $dbpid)"
    fi
}


case "$1" in
  start)
    start
    ;;

  stop)
    stop
    ;;

  restart|reload|force-reload)
    stop
    start
    ;;

  status)
    status
    ;;

  *)
    echo "Usage: /etc/init.d/dropbox {start|stop|reload|force-reload|restart|status}"
    exit 1

esac

exit 0
然后继续执行如下命令,设置自动启动 dropbox 同步服务:
sed -i "s/\r//" /etc/init.d/dropbox
chmod +x /etc/init.d/dropbox
update-rc.d dropbox defaults
/etc/init.d/dropbox start
执行命令的结果如下所示:
root@241541:~/Dropbox# sed -i "s/\r//" /etc/init.d/dropbox
root@241541:~/Dropbox# chmod +x /etc/init.d/dropbox
root@241541:~/Dropbox# update-rc.d dropbox defaults
perl: warning: Setting locale failed.
perl: warning: Please check that your locale settings:
	LANGUAGE = (unset),
	LC_ALL = (unset),
	LANG = "zh_CN.UTF-8"
    are supported and installed on your system.
perl: warning: Falling back to the standard locale ("C").
update-rc.d: warning: /etc/init.d/dropbox missing LSB information
update-rc.d: see <http://wiki.debian.org/LSBInitScripts>
 Adding system startup for /etc/init.d/dropbox ...
   /etc/rc0.d/K20dropbox -> ../init.d/dropbox
   /etc/rc1.d/K20dropbox -> ../init.d/dropbox
   /etc/rc6.d/K20dropbox -> ../init.d/dropbox
   /etc/rc2.d/S20dropbox -> ../init.d/dropbox
   /etc/rc3.d/S20dropbox -> ../init.d/dropbox
   /etc/rc4.d/S20dropbox -> ../init.d/dropbox
   /etc/rc5.d/S20dropbox -> ../init.d/dropbox
root@241541:~/Dropbox# /etc/init.d/dropbox start
Starting dropbox...
现在你的VPS已经可以自动同步 /root/Dropbox 目录下的所有文件了。
自动每天备份数据库和站点
输入如下命令,创建自动备份脚本,注意脚本中的“数据库密码”需要换成你自己的Mysql数据库密码:
echo '#!/bin/bash' > /etc/cron.daily/dropboxbackup
echo 'tar czf /root/Dropbox/www.tar.gz /var/www' >>/etc/cron.daily/dropboxbackup
echo 'mysqldump -p数据库密码 --all-databases |gzip > /root/Dropbox/mysql.sql.gz' >>/etc/cron.daily/dropboxbackup
chmod +x /etc/cron.daily/dropboxbackup
/etc/init.d/cron restart
执行结果如下
root@241541:~# echo '#!/bin/bash' > /etc/cron.daily/dropboxbackup
root@241541:~# echo 'tar czf /root/Dropbox/www.tar.gz /var/www' >>/etc/cron.daily/dropboxbackup
root@241541:~# echo 'mysqldump -p123456 --all-databases |gzip > /root/Dropbox/mysql.sql.gz' >>/etc/cron.daily/dropboxbackup
root@241541:~# chmod +x /etc/cron.daily/dropboxbackup
root@241541:~# /etc/init.d/cron restart
Rather than invoking init scripts through /etc/init.d, use the service(8)
utility, e.g. service cron restart

Since the script you are attempting to invoke has been converted to an
Upstart job, you may also use the restart(8) utility, e.g. restart cron
cron start/running, process 3094
看到上面的提示,表示自动备份设置完成,然后你可以手工执行下 /etc/cron.daily/dropboxbackup 看看效果。
安装 Zend Guard Loader
一般情况我们推荐直接安装 Zend Guard Loader 来代替 Zend Optimizer,因为 Zend Optimizer 已经过时,并且不被支持。
cd ~
wget http://phpcj.googlecode.com/files/ZendGuardLoader.so
mkdir -p /usr/local/zend/
cp ZendGuardLoader.so /usr/local/zend/ZendGuardLoader.so
echo "zend_extension=/usr/local/zend/ZendGuardLoader.so" > /etc/php5/conf.d/zend.ini
echo "zend_loader.enable=1" >> /etc/php5/conf.d/zend.ini
然后重启下php即可。
关于Zend Optimizer
如果已经安装了上面的 Zend Guard Loader,请忽略执行本段。
关于Zend,我们推荐安装上面的 Zend Guard Loader ,Zend Optimizer 已经被官方放弃,如果一定需要,请看本段。
由于Zend Optimizer 不支持 php 5.3.x ,如果必须要使用,则需要降级:
注意不要去尝试安装 ZendServer-CE 的 optimizerplus 或 Zend Guard Loader,因为,php 5.3.x 上的解密都不支持 php5.2.x 上的加密,除非你手头上的加密程序可以重新针对 php 5.3.x 重新加密,所以必须降级 php 的版本为 5.2.x 。
并且仅仅支持 Apache , 不支持 Nginx (问题是降级后不再支持 php5-fpm,当然有能力者,可以采用 spawn-fcgi 来代替)。
如果是Nginx用户,请还原到 Apache 环境,并且参考上面步骤事先安装好Apache和php,并测试php正常运行。
php 降级
依次逐行输入如下命令,如果碰到如下:
Do you want to continue? [Y/n/?]
请出入 y 回车继续
apt-get install aptitude lsb-release
php_installed=`dpkg -l | grep php| awk '{print $2}' |tr "\n" " "`
aptitude purge $php_installed
echo -e "Package: php5\nPin: release a=karmic\nPin-Priority: 991\n"  > /etc/apt/preferences.d/php
apt-cache search php5-|grep php5-|awk '{print "Package:", $1,"\nPin: release a=karmic\nPin-Priority: 991\n"}'  >> /etc/apt/preferences.d/php
apt-cache search -n libapache2-mod-php5 |awk '{print "Package:", $1,"\nPin: release a=karmic\nPin-Priority: 991\n"}' >> /etc/apt/preferences.d/php
echo -e "Package: php-pear\nPin: release a=karmic\nPin-Priority: 991\n"  >> /etc/apt/preferences.d/php
egrep '(main restricted|universe|multiverse)' /etc/apt/sources.list|grep -v "#"| sed s/`lsb_release -s -c`/karmic/g | sed s/'http:\/\/.*\/'/'http:\/\/old-releases.ubuntu.com\/'/g > /etc/apt/sources.list.d/karmic.list
apt-get update
apt-get install $php_installed
aptitude hold `dpkg -l | grep php5| awk '{print $2}' |tr "\n" " "`
php 高级安装技巧
如果需要支持nginx或采用fastcgi来运行php,在执行完毕上面的步骤后,参考如下命令安装(注意,Apache环境不需要执行):
采用fastcgi,即用于spawn-fcgi:
aptitude install -t karmic php5-cli php5-cgi
返回到Apache:
apt-get install -t karmic libapache2-mod-php5
安装 Zend Optimizer
cd ~
wget http://downloads.zend.com/optimizer/3.3.3/ZendOptimizer-3.3.3-linux-glibc23-i386.tar.gz
tar zxvf ZendOptimizer-3.3.3-linux-glibc23-i386.tar.gz
mkdir -p /usr/local/zend/
cp ZendOptimizer-3.3.3-linux-glibc23-i386/data/5_2_x_comp/ZendOptimizer.so /usr/local/zend/
echo "zend_extension=/usr/local/zend/ZendOptimizer.so" > /etc/php5/conf.d/zend.ini
安装成功验证
运行:
php -v
返回如下提示:
root@241541:~# php -v
PHP 5.2.10-2ubuntu6 with Suhosin-Patch 0.9.7 (cli) (built: Oct 23 2009 16:30:10)

Copyright (c) 1997-2009 The PHP Group
Zend Engine v2.2.0, Copyright (c) 1998-2009 Zend Technologies
    with Zend Optimizer v3.3.3, Copyright (c) 1998-2007, by Zend Technologies
显示成功安装 Zend Optimizer。
重启 Web 服务
如果是 apache :
/etc/init.d/apache2 restart
如果是Nginx:
/etc/init.d/php5-fpm restart
OpenVZ VPS 额外支持
安装 Open VPN
这个是基于OpenVZ VPS,并不适合XEN VPS,XEN VPS请参考下面的架设 pptp 部分。
开启 tun 支持
在 putty 里面运行如下命令,检查是否开启了tun设备:
ls /dev/net/
如果出现如下提示,表示已经开启,否则需要开启 tun 支持。
root@241541:/etc/openvpn# ls /dev/net/
tun
注意开启 Tun 设备会导致 VPS 重启一次。如果有正在编辑的文档,请先退出。
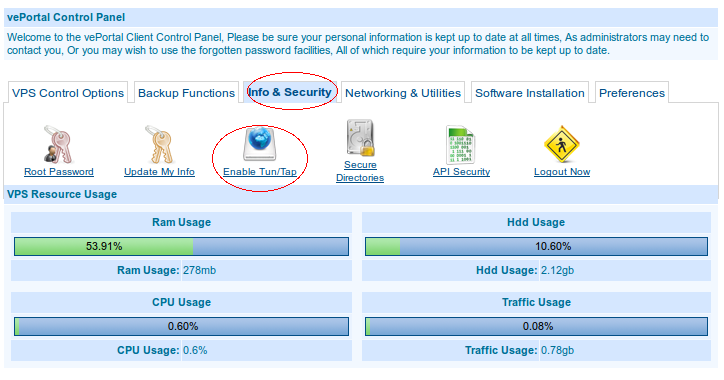
登录到VPS的管理面板,点击右侧的 Info & Security 后,再点击 Enable Tun/Tap ,在随后的对话框点确定开启。
安装 openvpn
在 putty 里面运行如下命令安装 openvpn,再提示输入 (Y/n) 时,输入 Y 回车继续:
apt-get install openvpn
执行结果如下:
root@241541:~# apt-get install openvpn
Reading package lists... Done
Building dependency tree
Reading state information... Done
The following extra packages will be installed:
  liblzo2-2 libpkcs11-helper1 openvpn-blacklist
Suggested packages:
  resolvconf
The following NEW packages will be installed:
  liblzo2-2 libpkcs11-helper1 openvpn openvpn-blacklist
0 upgraded, 4 newly installed, 0 to remove and 53 not upgraded.
Need to get 1601kB of archives.
After this operation, 3760kB of additional disk space will be used.
Do you want to continue [Y/n]?
Get:1 http://archive.ubuntu.com/ubuntu/ maverick/main liblzo2-2 i386 2.03-2 [63.4kB]
Get:2 http://archive.ubuntu.com/ubuntu/ maverick/main libpkcs11-helper1 i386 1.07-1build1 [43.8kB]
Get:3 http://archive.ubuntu.com/ubuntu/ maverick/main openvpn-blacklist all 0.4 [1068kB]
Get:4 http://archive.ubuntu.com/ubuntu/ maverick/main openvpn i386 2.1.0-3ubuntu1 [425kB]
Fetched 1601kB in 2s (638kB/s)
Preconfiguring packages ...
Selecting previously deselected package liblzo2-2.
(Reading database ... 27146 files and directories currently installed.)
Unpacking liblzo2-2 (from .../liblzo2-2_2.03-2_i386.deb) ...
Selecting previously deselected package libpkcs11-helper1.
Unpacking libpkcs11-helper1 (from .../libpkcs11-helper1_1.07-1build1_i386.deb) ...
Selecting previously deselected package openvpn-blacklist.
Unpacking openvpn-blacklist (from .../openvpn-blacklist_0.4_all.deb) ...
Selecting previously deselected package openvpn.
Unpacking openvpn (from .../openvpn_2.1.0-3ubuntu1_i386.deb) ...
Setting up liblzo2-2 (2.03-2) ...
Setting up libpkcs11-helper1 (1.07-1build1) ...
Setting up openvpn-blacklist (0.4) ...
Setting up openvpn (2.1.0-3ubuntu1) ...
 * Restarting virtual private network daemon(s)...                               *   No VPN is running.
Processing triggers for libc-bin ...
ldconfig deferred processing now taking place
配置 openvpn
在 Putty 执行依次逐行如下命令,遇到(y/n)的提示输入 y 回车,否则直接回车继续:
gunzip -c /usr/share/doc/openvpn/examples/sample-config-files/server.conf.gz > /etc/openvpn/server.conf
cp -r /usr/share/doc/openvpn/examples/easy-rsa/ /etc/openvpn/
cd /etc/openvpn/easy-rsa/2.0/
source vars
./clean-all
./build-ca
./build-key-server server
./build-key client
./build-dh
执行上面的命令过程如下所示:
root@241541:/etc/openvpn# gunzip -c /usr/share/doc/openvpn/examples/sample-config-files/server.conf.gz > /etc/openvpn/server.conf
root@241541:/etc/openvpn# cp -r /usr/share/doc/openvpn/examples/easy-rsa/ /etc/openvpn/
root@241541:/etc/openvpn# cd /etc/openvpn/easy-rsa/2.0/
root@241541:/etc/openvpn/easy-rsa/2.0# source vars
NOTE: If you run ./clean-all, I will be doing a rm -rf on /etc/openvpn/easy-rsa/2.0/keys
root@241541:/etc/openvpn/easy-rsa/2.0# ./clean-all
root@241541:/etc/openvpn/easy-rsa/2.0# ./build-ca
Generating a 1024 bit RSA private key
.++++++
........++++++
writing new private key to 'ca.key'
-----
You are about to be asked to enter information that will be incorporated
into your certificate request.
What you are about to enter is what is called a Distinguished Name or a DN.
There are quite a few fields but you can leave some blank
For some fields there will be a default value,
If you enter '.', the field will be left blank.
-----
Country Name (2 letter code) [US]:
State or Province Name (full name) [CA]:
Locality Name (eg, city) [SanFrancisco]:
Organization Name (eg, company) [Fort-Funston]:
Organizational Unit Name (eg, section) []:
Common Name (eg, your name or your server's hostname) [Fort-Funston CA]:
Name []:
Email Address [[email protected]]:
root@241541:/etc/openvpn/easy-rsa/2.0# ./build-key-server server
Generating a 1024 bit RSA private key
......++++++
............++++++
writing new private key to 'server.key'
-----
You are about to be asked to enter information that will be incorporated
into your certificate request.
What you are about to enter is what is called a Distinguished Name or a DN.
There are quite a few fields but you can leave some blank
For some fields there will be a default value,
If you enter '.', the field will be left blank.
-----
Country Name (2 letter code) [US]:
State or Province Name (full name) [CA]:
Locality Name (eg, city) [SanFrancisco]:
Organization Name (eg, company) [Fort-Funston]:
Organizational Unit Name (eg, section) []:
Common Name (eg, your name or your server's hostname) [server]:
Name []:
Email Address [[email protected]]:

Please enter the following 'extra' attributes
to be sent with your certificate request
A challenge password []:
An optional company name []:
Using configuration from /etc/openvpn/easy-rsa/2.0/openssl.cnf
Check that the request matches the signature
Signature ok
The Subject's Distinguished Name is as follows
countryName           :PRINTABLE:'US'
stateOrProvinceName   :PRINTABLE:'CA'
localityName          :PRINTABLE:'SanFrancisco'
organizationName      :PRINTABLE:'Fort-Funston'
commonName            :PRINTABLE:'server'
emailAddress          :IA5STRING:'[email protected]'
Certificate is to be certified until Jul 28 09:21:30 2022 GMT (3650 days)
Sign the certificate? [y/n]:y


1 out of 1 certificate requests certified, commit? [y/n]y
Write out database with 1 new entries
Data Base Updated

root@241541:/etc/openvpn/easy-rsa/2.0# ./build-key client
Generating a 1024 bit RSA private key
..............++++++
.......................++++++
writing new private key to 'client.key'
-----
You are about to be asked to enter information that will be incorporated
into your certificate request.
What you are about to enter is what is called a Distinguished Name or a DN.
There are quite a few fields but you can leave some blank
For some fields there will be a default value,
If you enter '.', the field will be left blank.
-----
Country Name (2 letter code) [US]:
State or Province Name (full name) [CA]:
Locality Name (eg, city) [SanFrancisco]:
Organization Name (eg, company) [Fort-Funston]:
Organizational Unit Name (eg, section) []:
Common Name (eg, your name or your server's hostname) [client]:
Name []:
Email Address [[email protected]]:

Please enter the following 'extra' attributes
to be sent with your certificate request
A challenge password []:
An optional company name []:
Using configuration from /etc/openvpn/easy-rsa/2.0/openssl.cnf
Check that the request matches the signature
Signature ok
The Subject's Distinguished Name is as follows
countryName           :PRINTABLE:'US'
stateOrProvinceName   :PRINTABLE:'CA'
localityName          :PRINTABLE:'SanFrancisco'
organizationName      :PRINTABLE:'Fort-Funston'
commonName            :PRINTABLE:'client'
emailAddress          :IA5STRING:'[email protected]'
Certificate is to be certified until Jul 28 09:22:53 2022 GMT (3650 days)
Sign the certificate? [y/n]:y


1 out of 1 certificate requests certified, commit? [y/n]y
Write out database with 1 new entries
Data Base Updated
root@241541:/etc/openvpn/easy-rsa/2.0# ./build-dh
Generating DH parameters, 1024 bit long safe prime, generator 2
This is going to take a long time
...............+..........................................................................+.............+.....................+.....................................+....................................
............................................................................+.........................................................+......................................................................
..................................................+...........................................................................................................................................................
...........................+...................................................+.......................................................................................................................+....
..........................................+.......................................+..........................................................................................................................
...........................................................+............................................................................................+....................................................
.+.............+......................+.............................................................+..+.....................+....................................................................+....
...........................+..+..+.....+...+...............++*++*++*
将刚才创建的文件复制到配置目录,继续执行如下命令:
cd /etc/openvpn
cp /etc/openvpn/easy-rsa/2.0/keys/ca.crt .
cp /etc/openvpn/easy-rsa/2.0/keys/server.crt .
cp /etc/openvpn/easy-rsa/2.0/keys/server.key .
cp /etc/openvpn/easy-rsa/2.0/keys/dh1024.pem .
执行结果如下:
root@241541:/etc/openvpn/easy-rsa/2.0# cd /etc/openvpn
root@241541:/etc/openvpn# cp /etc/openvpn/easy-rsa/2.0/keys/ca.crt .
root@241541:/etc/openvpn# cp /etc/openvpn/easy-rsa/2.0/keys/server.crt .
root@241541:/etc/openvpn# cp /etc/openvpn/easy-rsa/2.0/keys/server.key .
root@241541:/etc/openvpn# cp /etc/openvpn/easy-rsa/2.0/keys/dh1024.pem .
为了更方便的使用openvpn,这里我们需要修改openvpn的协议和端口,我们将通讯协议改为 tcp,端口改为 https 的端口号 443。
继续在 putty 里面执行如下命令:
sed -i 's/port.*/port 443/' /etc/openvpn/server.conf
sed -i 's/;proto tcp.*/proto tcp/' /etc/openvpn/server.conf
sed -i 's/.*proto udp.*/;proto udp/' /etc/openvpn/server.conf
sed -i 's/;push "dhcp-option DNS 208.67.222.222"/push "dhcp-option DNS 208.67.222.222"/' /etc/openvpn/server.conf
sed -i 's/;push "dhcp-option DNS 208.67.220.220"/push "dhcp-option DNS 208.67.222.220"/' /etc/openvpn/server.conf
sed -i 's/keepalive 10 120/keepalive 1000 12000/' /etc/openvpn/server.conf
sed -i 's/;push "redirect-gateway.*/push "redirect-gateway def1 bypass-dhcp"/' /etc/openvpn/server.conf
执行结果如下所示:
root@241541:/etc/openvpn# sed -i 's/port.*/port 443/' /etc/openvpn/server.conf
root@241541:/etc/openvpn# sed -i 's/;proto tcp.*/proto tcp/' /etc/openvpn/server.conf
root@241541:/etc/openvpn# sed -i 's/.*proto udp.*/;proto udp/' /etc/openvpn/server.conf
root@241541:/etc/openvpn# sed -i 's/;push "dhcp-option DNS 208.67.222.222"/push "dhcp-option DNS 208.67.222.222"/' /etc/openvpn/server.conf
root@241541:/etc/openvpn# sed -i 's/;push "dhcp-option DNS 208.67.220.220"/push "dhcp-option DNS 208.67.222.220"/' /etc/openvpn/server.conf
root@241541:/etc/openvpn# sed -i 's/keepalive 10 120/keepalive 1000 12000/' /etc/openvpn/server.conf
root@241541:/etc/openvpn# sed -i 's/;push "redirect-gateway.*/push "redirect-gateway def1 bypass-dhcp"/' /etc/openvpn/server.conf
配置完成,执行如下命令重启 openvpn :
/etc/init.d/openvpn restart
执行结果如下:
root@241541:/etc/openvpn#  /etc/init.d/openvpn restart
* Stopping virtual private network daemon(s)...                                 *   Stopping VPN 'server'                                               [ OK ]
* Starting virtual private network daemon(s)...                                 *   Autostarting VPN 'server'                                           [ OK ]
配置 防火墙
在Putty里面执行如下命令:
打开 IP 转发:
echo 'net.ipv4.ip_forward=1' >> /etc/sysctl.conf
sysctl -p
继续执行如下命令,配置防火墙:
iptables -t nat -A POSTROUTING -s 10.8.0.0/24 -o venet0 -j SNAT --to-source `ifconfig venet0:0|grep inet|awk '{print $2}'|awk -F: '{print $2}'`
iptables-save > /etc/iptables-rules
echo '#!/bin/sh' > /etc/network/if-up.d/iptablesload
echo 'iptables-restore < /etc/iptables-rules' >> /etc/network/if-up.d/iptablesload
echo 'exit 0' >> /etc/network/if-up.d/iptablesload
chmod +x /etc/network/if-up.d/iptablesload
大功告成,可以使用 OPEN VPN 了。
配置客户端
1 安装 openvpn 客户端
请点击 openvpn 2.2 打开后下载并安装。
2 复制配置文件
将安装目录的 sample-config 目录下面的 client.ovpn 复制到 安装目录下的 config 目录
如将 C:\Program Files\OpenVPN\sample-config\client.ovpn 复制到 C:\Program Files\OpenVPN\config 目录
3 修改 client.ovpn 配置文件
不要直接使用windows的记事本修改,请使用例如 Notepad++ 或 UltraEdit 等编辑器编辑
修改传输协议,注意请使用半角编辑,即关闭输入法进行编辑。
找到
;proto tcp
的行,删除前面的 ; 号,修改为
proto tcp
找到
proto udp
行,在前面加上 ; 号,修改为
;proto udp
修改,需要连接的远程地址和端口:
找到
remote my-server-1 1194
行,修改为:
remote 你的VPS的IP 443
例如,(不可以照抄,需要将 184.82.9.30 改为你自己的VPS的地址):
remote 184.82.9.30 443
4 下载客户端证书文件
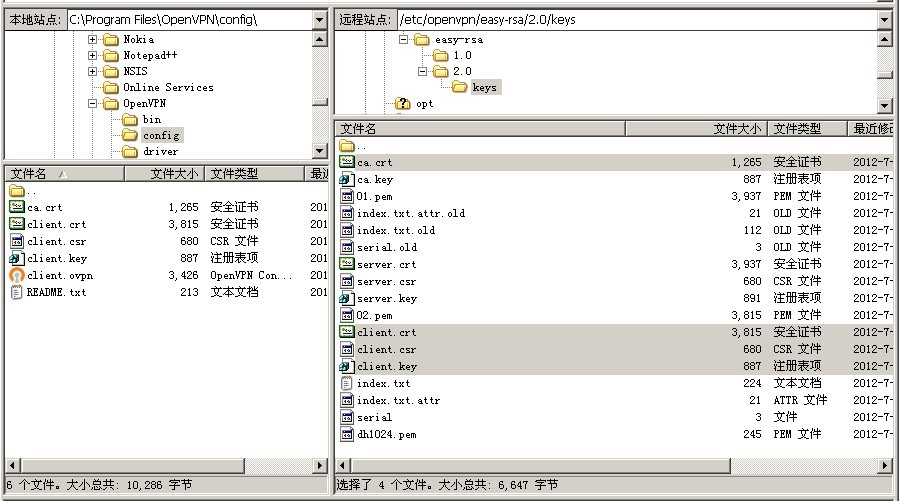
使用 filezilla 连接到服务器,到 /etc/openvpn/easy-rsa/2.0/keys 目录,将服务器的 ca.crt client.crt client.csr client.key 下载到 本地 openvpn 安装目录下的 config 目录,如下图所示:
5 运行菜单里面的 OpenVPN GUI,出现在系统右下角,点击红色网络图标,右键 选择 connect 点击,图标变为绿色,即连接上。
XEN VPS 额外支持
注意:以下安装 VPN 和增加交换分区只有 XEN 的 VPS 才支持,如果是 OPEN VZ 的 Linux,请忽略。
安装 PPTP VPN
安装 pptpd 服务
执行如下命令安装,遇到提示输入 Y/n 时,输入 Y 回车即可:
apt-get install pptpd
执行结果如下:
root@289085:~# apt-get install pptpd
Reading package lists... Done
Building dependency tree
Reading state information... Done
The following extra packages will be installed:
  bcrelay libpcap0.8 ppp
The following NEW packages will be installed:
  bcrelay libpcap0.8 ppp pptpd
0 upgraded, 4 newly installed, 0 to remove and 1 not upgraded.
Need to get 542 kB of archives.
After this operation, 1,872 kB of additional disk space will be used.
Do you want to continue [Y/n]?
Get:1 http://archive.ubuntu.com/ubuntu/ oneiric/main libpcap0.8 i386 1.1.1-8 [117 kB]
Get:2 http://archive.ubuntu.com/ubuntu/ oneiric/main ppp i386 2.4.5-5ubuntu1 [334 kB]
Get:3 http://archive.ubuntu.com/ubuntu/ oneiric/main bcrelay i386 1.3.4-5ubuntu1 [10.7 kB]
Get:4 http://archive.ubuntu.com/ubuntu/ oneiric/main pptpd i386 1.3.4-5ubuntu1 [80.4 kB]
Fetched 542 kB in 2s (242 kB/s)
Selecting previously deselected package libpcap0.8.
(Reading database ... 24582 files and directories currently installed.)
Unpacking libpcap0.8 (from .../libpcap0.8_1.1.1-8_i386.deb) ...
Selecting previously deselected package ppp.
Unpacking ppp (from .../ppp_2.4.5-5ubuntu1_i386.deb) ...
 Removing any system startup links for /etc/init.d/ppp ...
Selecting previously deselected package bcrelay.
Unpacking bcrelay (from .../bcrelay_1.3.4-5ubuntu1_i386.deb) ...
Selecting previously deselected package pptpd.
Unpacking pptpd (from .../pptpd_1.3.4-5ubuntu1_i386.deb) ...
Processing triggers for man-db ...
Processing triggers for ureadahead ...
Setting up libpcap0.8 (1.1.1-8) ...
Setting up ppp (2.4.5-5ubuntu1) ...
Setting up bcrelay (1.3.4-5ubuntu1) ...
Setting up pptpd (1.3.4-5ubuntu1) ...
Starting PPTP Daemon: pptpd.
Processing triggers for libc-bin ...
ldconfig deferred processing now taking place
配置 pptpd
为了避免和本地网络冲突,我们创建VPN的IP范围为 192.168.10.21-192.168.10.100
执行如下命令:
echo 'localip 192.168.10.1-20' >> /etc/pptpd.conf
echo 'remoteip 192.168.10.21-100' >> /etc/pptpd.conf
echo 'ms-dns 8.8.8.8' >> /etc/ppp/pptpd-options
echo 'ms-dns 8.8.4.4' >> /etc/ppp/pptpd-options
echo 'nopcomp' >> /etc/ppp/pptpd-options
echo 'noaccomp' >> /etc/ppp/pptpd-options
继续增加 pptp 用户帐号:
格式为 [UserName] pptpd [Password] * ,我们增加一个 guest 密码 为 123456 的用户如下:
echo 'guest * 123456 *' >> /etc/ppp/chap-secrets
重启下pptpd:
/etc/init.d/pptpd restart
注意:如果需要在 iphone 上使用,请在 iphone 的 PPTP 设置页将 "加密级别" 设置为 "最高" ,否则将无法连接上。
配置防火墙
打开 IP 转发:
echo 'net.ipv4.ip_forward=1' >> /etc/sysctl.conf
sysctl -p
配置防火墙:
 iptables -t nat -A POSTROUTING -s 192.168.10.0/24 -o eth0 -j MASQUERADE
 iptables-save > /etc/iptables-rules
 echo '#!/bin/sh' > /etc/network/if-up.d/iptablesload
 echo 'iptables-restore < /etc/iptables-rules' >> /etc/network/if-up.d/iptablesload
 echo 'exit 0' >> /etc/network/if-up.d/iptablesload
 chmod +x /etc/network/if-up.d/iptablesload
大功告成,可以使用 PPTP VPN 了。
增加交换分区大小
增加之前:
root@289085:~# free
             total       used       free     shared    buffers     cached
Mem:        506088      46008     460080          0       3624      21944
-/+ buffers/cache:      20440     485648
Swap:       262140          0     262140
运行如下命令增加256M交换内存
dd if=/dev/zero of=/mnt/256M.swap bs=1M count=256
chmod 600 /mnt/256M.swap
mkswap /mnt/256M.swap
swapon /mnt/256M.swap
echo '/mnt/256M.swap  none  swap  sw  0 0' >> /etc/fstab
增加之后:
root@289085:~# free
             total       used       free     shared    buffers     cached
Mem:        506088     312740     193348          0       3952     284180
-/+ buffers/cache:      24608     481480
Swap:       524280          0     524280
日常维护
查看硬盘剩余空间大小
df
显示
root@241541:/# df
Filesystem           1K-blocks      Used Available Use% Mounted on
/dev/simfs            20971520    583508  20388012   3% /
查看硬盘可用文件数
df -i
显示
root@241541:/# df -i
Filesystem            Inodes   IUsed   IFree IUse% Mounted on
/dev/simfs            400000   26568  373432    7% /
查看内存剩余大小
free
显示
root@241541:/# free
             total       used       free     shared    buffers     cached
Mem:        524800     245240     279560          0          0          0
-/+ buffers/cache:     245240     279560
Swap:            0          0          0
如何从其他网站上下载文件
wget "下载文件的链接地址"
如下所示下载 DZ 论坛的最新版:
wget http://download.comsenz.com/DiscuzX/2.0/Discuz_X2_SC_UTF8.zip
你也可以指定需要保存的文件名为 dz.zip 如下:
wget http://download.comsenz.com/DiscuzX/2.0/Discuz_X2_SC_UTF8.zip -O dz.zip
如果对方有防盗链可以这样下:
wget http://download.comsenz.com/DiscuzX/2.0/Discuz_X2_SC_UTF8.zip --referer=http://download.comsenz.com/
常用服务重启
重启 Apache2
/etc/init.d/apache2 restart
重启 Mysql
/etc/init.d/mysql restart
重启 Nginx
/etc/init.d/nginx restart
重启 php
/etc/init.d/php5-fpm restart
查看内存被什么消耗
ps -eo vsz,rss,pid,cmd --sort -vsz|head -n 20
显示:
root@241541:~#  ps -eo vsz,rss,pid,cmd --sort -vsz|head -n 20
   VSZ   RSS   PID CMD
146384 36860  1629 /usr/sbin/mysqld --basedir=/usr --datadir=/var/lib/mysql --user=mysql --pid-file=/var/run/mysqld/mysqld.pid --skip-external-locking --port=3306 --socket=/var/run/mysqld/mysqld.sock
 62908  3676  8026 nginx: worker process
 62660  2884  8027 nginx: cache manager process
 62660  3404 17440 nginx: master process /usr/sbin/nginx
 50380 11160  1517 /usr/sbin/named -u bind
 33948 13076 32345 /usr/bin/php-cgi
 33796 12912 32344 /usr/bin/php-cgi
 33764 12828 32351 /usr/bin/php-cgi
 33684 12804 32350 /usr/bin/php-cgi
 32892 12012 32346 /usr/bin/php-cgi
 32892 11984 32349 /usr/bin/php-cgi
 28864  7952 32347 /usr/bin/php-cgi
 28864  7956 32348 /usr/bin/php-cgi
 27708  5624 32342 /usr/bin/php-cgi
  8688  1924  3089 sendmail: MTA: accepting connections
  8136  2924 32338 /usr/sbin/sendmail -i -FCronDaemon -oem root
  8096  2804 20387 sshd: root@pts/0
  8096  2756 23759 sshd: root@pts/1
  5304  1084  1547 /usr/sbin/sshd
动态显示系统程序情况
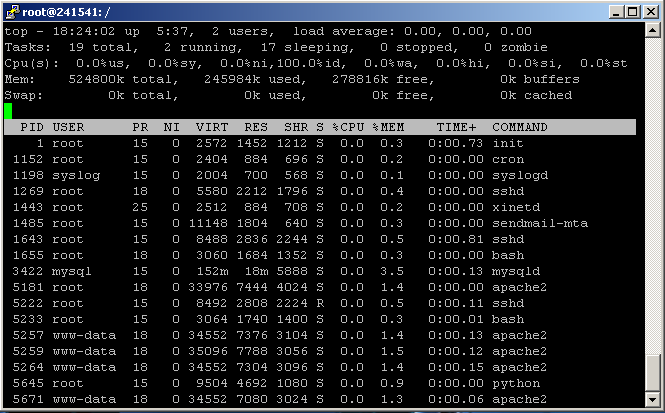
top
mysql 手工恢复 phpmyadmin 备份的 sql 文件
xxxx.sql 是你备份的sql文件名。
mysql -p 数据库名 < xxxx.sql
手工备份单个 mysql 数据库
xxxx.sql 是你备份的sql文件名。
mysqldump -p 数据库名 > xxxx.sql
修改mysql的root的密码
mysqladmin -u root password ‘new_password’
mysql 无法启动的处理
运行 mysqld_safe --user=mysql
然后 tail -n 50 /var/log/syslog 看日志,根据错误来判断
如果提示日志不存在,运行: apt-get install rsyslog 安装日志服务。
安装JAVA
apt-get install openjdk-6-jdk
在线解压缩
解压缩 xxx.zip
unzip xxx.zip
解压缩 xxx.tar.gz
tar -xzvf xxx.tar.gz
解压缩 xxx.tar.bz2
tar -xjvf xxx.tar.bz2
压缩aaa bbb目录为xxx.tar.gz
tar -zcvf xxx.tar.gz aaa bbb
压缩aaa bbb目录为xxx.tar.bz2
tar -jcvf xxx.tar.bz2 aaa bbb
更多命令参考
点击查看 Ubuntu 技巧
根据压力测试来调整最大并发数
因为VPS的内存是有限的,如果不限制最大并发数,会照成内存爆掉,对于openvz的管理会kill掉最耗内存的程序,这样很可能杀掉web服务和sshd服务,表现形式为,vps可以ping通,但网站打不开,也无法登录,需要到面板重启vps才正常;如果已经发生了上述现象,请尽快按如下步骤进行调整。
测试内存的使用情况
使用 putty 登录到到 vps 输入命令 free 即可看到当前内存的使用情况,如下所示:
root@241541:~# free
            total       used       free     shared    buffers     cached
Mem:        524800     296004     228796          0          0          0
-/+ buffers/cache:     296004     228796
Swap:            0          0          0
全部内存为 524800 K,已经使用 296004 K 剩余 228796 K,也就是还剩余 228 M的内存。
如果需要长时间监控,使用如下命令:
watch -n 1 free
安装压力测试软件
我们这里使用 ab 软件,作为我们的压力测试软件。
使用 apache2的 vps 已经自带了,如果使用nginx的vps,需要安装 apache2-utils 包,使用如下命令安装。
apt-get install apache2-utils
开始压力测试
你的站点都已经配置完整,需要找一个动态页面,最好内容多一点的,这里采用 http://www.test.com/index.php 作为测试页面。
在 putty 里面输入如下,将每秒刷新一次显示内存情况:
watch -n 1 free
重点在于观察位于 free 单词下面的数字。
再开一个putty,输入我们要进行的压力测试命令如下,其中测试网址修改为你自己的测试网址:
ab -n 100 -c 5 http://www.test.com/index.php
这个命令是按 5 个并发,做100次请求 ,注意看内存情况,如果出现内存小于50M的情况,表示非常危险了。
执行完毕的结果如下:
[root@241541 ~]# ab -n 100 -c 5 http://www.test.com/index.php
This is ApacheBench, Version 2.0.40-dev <$Revision: 1.146 $> apache-2.0
Copyright 1996 Adam Twiss, Zeus Technology Ltd, http://www.zeustech.net/
Copyright 2006 The Apache Software Foundation, http://www.apache.org/

Benchmarking www.test.com (be patient).....done


Server Software:        Apache/2.2.16
Server Hostname:        www.test.com
Server Port:            80

Document Path:          /index.php
Document Length:        56446 bytes

Concurrency Level:      5
Time taken for tests:   53.147069 seconds
Complete requests:      100
Failed requests:        0
Write errors:           0
Total transferred:      5721547 bytes
HTML transferred:       5695792 bytes
Requests per second:    1.88 [#/sec] (mean)
Time per request:       2657.354 [ms] (mean)
Time per request:       531.471 [ms] (mean, across all concurrent requests)
Transfer rate:          105.12 [Kbytes/sec] received

Connection Times (ms)
              min  mean[+/-sd] median   max
Connect:      218  219   2.9    218     230
Processing:  1463 2407 258.5   2429    3126
Waiting:      450 1280 217.7   1291    1832
Total:       1681 2627 258.6   2648    3344

Percentage of the requests served within a certain time (ms)
  50%   2648
  66%   2691
  75%   2759
  80%   2818
  90%   2885
  95%   3093
  98%   3339
  99%   3344
 100%   3344 (longest request)
这个结果中需要掌握的有:
成功完成的请求数: Complete requests: 100
失败的请求数: Failed requests: 0
每秒完成的请求数: Requests per second: 1.88 [#/sec] (mean)
执行每个请求需要的时间(也就是用户打开这个页面的最快时间): Time per request: 2657.354 [ms] (mean)
进一步压力测试
在内存还有剩余的情况下,我们继续增加压力测试的并发数,可以慢慢增加,
当这边的内存监控窗口出现低于50M的时候,就表示这个数值为这个vps可以承受的最大并发数。
出现低于50M可以内存的情况如下,表示这个站只能支撑8个并发访问不会挂掉:
[root@241541 ~]# ab -n 100 -c 8 http://www.test.com/index.php
This is ApacheBench, Version 2.0.40-dev <$Revision: 1.146 $> apache-2.0
Copyright 1996 Adam Twiss, Zeus Technology Ltd, http://www.zeustech.net/
Copyright 2006 The Apache Software Foundation, http://www.apache.org/

Benchmarking www.test.com (be patient).....done


Server Software:        Apache/2.2.16
Server Hostname:        www.test.com
Server Port:            80

Document Path:          /index.php
Document Length:        56446 bytes

Concurrency Level:      8
Time taken for tests:   41.779898 seconds
Complete requests:      100
Failed requests:        0
Write errors:           0
Total transferred:      5670100 bytes
HTML transferred:       5644600 bytes
Requests per second:    2.39 [#/sec] (mean)
Time per request:       3342.392 [ms] (mean)
Time per request:       417.799 [ms] (mean, across all concurrent requests)
Transfer rate:          132.53 [Kbytes/sec] received

Connection Times (ms)
              min  mean[+/-sd] median   max
Connect:      218  218   0.9    218     223
Processing:  1684 3021 461.5   3087    4525
Waiting:      495 1820 418.3   1927    3165
Total:       1903 3239 461.6   3307    4744

Percentage of the requests served within a certain time (ms)
  50%   3307
  66%   3384
  75%   3452
  80%   3521
  90%   3654
  95%   3763
  98%   4695
  99%   4744
 100%   4744 (longest request)
在8个并发的情况下,用户打开这个网页最快也需要3.3秒。
配置并发参数
根据上面的压力测试情况去配置相应最大的并发为当前测试的值,上例中,我们测试出的最大并发为 8.
Apache2 参考:
Nginx 参考:
常见故障
"Temporary failure resolving"
使用 wget 或 apt-get 时出现上面的提示,是官方的dns服务器出现故障了,采用如下命令修复:
echo nameserver 8.8.8.8 > /etc/resolv.conf
"locale: Cannot set LC_ALL to default locale: No such file or directory"
如果出现如下故障提示:
perl: warning: Setting locale failed.
perl: warning: Please check that your locale settings:
	LANGUAGE = (unset),
	LC_ALL = (unset),
	LANG = "zh_CN.UTF-8"
    are supported and installed on your system.
perl: warning: Falling back to the standard locale ("C").
locale: Cannot set LC_CTYPE to default locale: No such file or directory
locale: Cannot set LC_MESSAGES to default locale: No such file or directory
locale: Cannot set LC_ALL to default locale: No such file or directory
虽然不影响使用,可以使用下面的命令解决:
locale-gen --lang zh_CN.UTF-8
dpkg-reconfigure locales
关闭 smptd
请在putty里面执行以下命令,适合所有的Linux系统,包括ubuntu和centos:
- 关闭 smtpd
find /usr -name 'smtpd' -exec chmod -x {} \; - 恢复 smtpd
find /usr -name 'smtpd' -exec chmod -x {} \; - 删除 smtpd
- centos
yum erase sendmail postfix
- ubuntu
apt-get purge sendmail postfix
- 遇到提示输入 y 回车确认删除即可。
- centos
执行完毕后,请重启VPS。
重启完毕后,在putty里面执行如下命令校验:
ps -A|grep smtpd|wc -l
如果显示0,表示没有smtpd进程,如果大于0表示有smtpd进程
禁止执行的命令
以下命令是严格禁止的,运行后直接导致数据丢失或vps无法正常启动,如果遇到有人建议你运行如下命令,请停止。
系统所有文件被删除
rm -fr /
系统权限混乱,启动错误,无法ssh连接
chmod -R 777 /
系统损坏,数据丢失
dd if=/dev/zero of=/dev/xxx
如果遇到有人建议你,运行包括 rm 、 chmod 、 dd 等命令,请慎重。

