Ardour4 初学者教程 02 开始入门:修订间差异
| (未显示同一用户的109个中间版本) | |||
| 第16行: | 第16行: | ||
==使用Cadence(Linux系统)== | ==使用Cadence(Linux系统)== | ||
启动 Cadence。如果 JACK 已经运行,您将看到这样的一个窗口: | |||
http://brunoruviaro.github.io/ardour4-tutorial/images/Ardour4_JACK_Cadence.png | http://brunoruviaro.github.io/ardour4-tutorial/images/Ardour4_JACK_Cadence.png | ||
更多关于 Cadence 的信息请参考: | |||
http://kxstudio.sourceforge.net/Documentation:Manual:cadence_introduction | |||
==使用Qjackctl(Linux系统)== | ==使用Qjackctl(Linux系统)== | ||
| 第49行: | 第51行: | ||
点击'''Ardour-4'''即可启动程序。 | 点击'''Ardour-4'''即可启动程序。 | ||
(注:在UbuntuStudio系统,您可以点击左上角任务栏主菜单,在" | (注:在UbuntuStudio系统,您可以点击左上角任务栏主菜单,在"Audio Production音频制作"子菜单里就能找到Ardour。) | ||
一旦您启动了Ardour,接下来就会出现'''会话设置Session Setup'''窗口。 | 一旦您启动了Ardour,接下来就会出现'''会话设置Session Setup'''窗口。 | ||
| 第55行: | 第57行: | ||
http://brunoruviaro.github.io/ardour4-tutorial/images/Ardour4_Session_Setup.png | http://brunoruviaro.github.io/ardour4-tutorial/images/Ardour4_Session_Setup.png | ||
您可以点击''' | 您可以点击'''New Session新会话'''按钮创建一个全新的会话,或者您使用下方的'''Other Sessions最近的会话'''选项,可以打开一个已经存在的回话。现在让我们创建一个新的会话,点击'''New Session新建会话'''按钮,会弹出一个窗口如下图所示。 | ||
为您的新建工程输入一个名字,点击''' | 为您的新建工程输入一个名字,点击'''Open打开''' 。 | ||
http://brunoruviaro.github.io/ardour4-tutorial/images/Ardour4_Session_Setup_2.png | http://brunoruviaro.github.io/ardour4-tutorial/images/Ardour4_Session_Setup_2.png | ||
| 第66行: | 第68行: | ||
[http://brunoruviaro.github.io/ardour4-tutorial/starting-a-session/ (原文)] | [http://brunoruviaro.github.io/ardour4-tutorial/starting-a-session/ (原文)] | ||
Ardour将对您在''' | Ardour将对您在'''Sessions会话'''里的工作进行分组打包。一个会话是一组'''Tracks音轨''',,最终可能会被混音成一个单声道、立体声或多声道声音文件。会话实质上就是工程,您所有的数据都被保存在这一个单独的会话文件夹中。 | ||
当您启动Ardour,您会看到一个提示窗问您是否启用一个新会话,或者打开一个已经存在的会话。当您创建一个新会话时,您必须为它起个名字。 | 当您启动Ardour,您会看到一个提示窗问您是否启用一个新会话,或者打开一个已经存在的会话。当您创建一个新会话时,您必须为它起个名字。 | ||
| 第74行: | 第76行: | ||
您还需要为Ardour指定您想要把新会话文件夹存储在哪个目录下。 | 您还需要为Ardour指定您想要把新会话文件夹存储在哪个目录下。 | ||
当您一切准备就绪,点击'' | 当您一切准备就绪,点击''Open打开'',Ardour将创建新会话,然后打开它。 | ||
http://brunoruviaro.github.io/ardour4-tutorial/images/Ardour4_Session_Setup_2.png | http://brunoruviaro.github.io/ardour4-tutorial/images/Ardour4_Session_Setup_2.png | ||
| 第82行: | 第84行: | ||
如果您单击小三角形打开''高级选项Advanced Options‘’,您将可以通过以下选项对工程进行更细致的设置: | 如果您单击小三角形打开''高级选项Advanced Options‘’,您将可以通过以下选项对工程进行更细致的设置: | ||
*是否创建''' | *是否创建'''Master Bus主控总线'''(即:会话最终输出的音频)且包含有多少个channels声道。 | ||
* | *是否自动把电脑音频接口(声卡)的输入连接到会话的音轨上,且需要使用几个声道。 | ||
*是否自动连接到输出,是输出到主控总线或是输出到音频接口的输出,且需要使用几个声道。 | *是否自动连接到输出,是输出到主控总线或是输出到音频接口的输出,且需要使用几个声道。 | ||
| 第94行: | 第96行: | ||
主要选项有: | 主要选项有: | ||
''' | '''Audio System音频系统''' —— 您可以选择JACK(如果您已经安装有),或者选择您电脑里默认的音频系统(Linux系统是ALSA,苹果Mac系统是CoreAudio)。 | ||
''' | '''Device驱动''' —— 或者是您的内置声卡,或者是你也许安装有的一个外置声卡(诸如:一个USB接口的声卡)。 | ||
''' | '''Sample Rate采样率''' —— 48K或者44.1K是常用的选择。 | ||
(注:关于如何避免硬件延迟,选择UbuntuStudio系统有个好处就是,在开机启动菜单可以选择使用低延迟lowlatency的系统内核。) | (注:关于如何避免硬件延迟,选择UbuntuStudio系统有个好处就是,在开机启动菜单可以选择使用低延迟lowlatency的系统内核。) | ||
| 第104行: | 第106行: | ||
如果您在启动Ardour之前就已经启动了JACK,你就不需要处理到这个窗口。 | 如果您在启动Ardour之前就已经启动了JACK,你就不需要处理到这个窗口。 | ||
如果要在Audour已经启动后,再创建一个Ardour会话,选择菜单中的''' | 如果要在Audour已经启动后,再创建一个Ardour会话,选择菜单中的'''Session会话 > New新建'''。 | ||
=界面概览= | =界面概览= | ||
| 第111行: | 第113行: | ||
本节将为您概括介绍Ardour的基本界面。 | 本节将为您概括介绍Ardour的基本界面。 | ||
我们将看一下''' | 我们将看一下'''Editor Window编辑器窗口'''和'''Mixer Window混音器窗口'''。在此列出的各项功能将会在后面的章节中介绍更多的细节信息。 | ||
==编辑器窗口== | ==编辑器窗口== | ||
当您创建一个新的会话之后,Ardour会打开一个空的新窗口即''' | 当您创建一个新的会话之后,Ardour会打开一个空的新窗口即'''Editor Window编辑器窗口'''。在Ardour里,编辑器窗口是最重要的窗口,因为在此你不但能够控制程序,而且还能查看和编辑您已经导录制或导入的音频。 | ||
http://brunoruviaro.github.io/ardour4-tutorial/images/Ardour4_Empty_Session.png | http://brunoruviaro.github.io/ardour4-tutorial/images/Ardour4_Empty_Session.png | ||
位于编辑器窗口顶部的,是几个主要功能区:''' | 位于编辑器窗口顶部的,是几个主要功能区:'''Transport Menu播送工具栏''','''Clocks计时器''','''Edit Modes/Cursor Modes编辑模式/游标模式'''工具栏,'''Snap Mode吸附模式'''工具栏和'''Auxiliary Controls附加控制'''。下面的功能区是Main Canvas主版面,包括了在会话中使用的'''Tracks音轨'''和'''Busses总线'''。音轨的'''Mixer Strips混音器工具栏'''显示在左边,另一组用于概览的选项卡显示在右边,其中有:'''Regions区域''','''Tracks/Busses音轨/总线''','''Snapshots快照'''、'''Edit Groups编辑群组'''和'''Chunks模块'''。最底部的窗口是'''Summary摘要'''view视图,这是一个小型的时间线视图,可以在整段会话中快速导航。 | ||
我们将在这里简略介绍这些控件,而在后续章节将会专门详细地讲解它们。 | 我们将在这里简略介绍这些控件,而在后续章节将会专门详细地讲解它们。 | ||
=== | ===播送工具栏=== | ||
http://brunoruviaro.github.io/ardour4-tutorial/images/Ardour4_Transport_Menu.png | http://brunoruviaro.github.io/ardour4-tutorial/images/Ardour4_Transport_Menu.png | ||
''' | '''Transport Menu播送工具栏'''的控制包括以下按钮: | ||
{| align=center border=0 style="width: 80%;" | {| align=center border=0 style="width: 80%;" | ||
| 第137行: | 第139行: | ||
|- bgcolor=#FFDDAA | |- bgcolor=#FFDDAA | ||
| MIDI重置 | | MIDI重置 | ||
| Ctrl+Alt+P | | ''Ctrl+Alt+P'' | ||
| MIDI Panic | | MIDI Panic | ||
|- bgcolor=#FFDDAA | |- bgcolor=#FFDDAA | ||
| 启用/禁用音频识别声(节拍器) | | 启用/禁用音频识别声(节拍器) | ||
| 7 | | ''7'' (大键盘数字键) | ||
| Enable/Disable audio click (metronome) | | Enable/Disable audio click (metronome) | ||
|- bgcolor=#FFDDAA | |- bgcolor=#FFDDAA | ||
| 跳转到会话起点 | | 跳转到会话起点 | ||
| Home | | ''Home/向左键'' | ||
| Rewind(原文有误,不是倒放) | | Rewind(原文有误,不是倒放) | ||
|- bgcolor=#FFDDAA | |- bgcolor=#FFDDAA | ||
| 跳转到会话终点 | | 跳转到会话终点 | ||
| End | | ''End/向右键'' | ||
| Fast forward(原文有误,不是快进) | | Fast forward(原文有误,不是快进) | ||
|- bgcolor=#FFDDAA | |- bgcolor=#FFDDAA | ||
| 循环播放 | | 循环播放 | ||
| L | | ''L'' | ||
| Loop playback | | Loop playback | ||
|- bgcolor=#FFDDAA | |- bgcolor=#FFDDAA | ||
| 第161行: | 第163行: | ||
|- bgcolor=#FFDDAA | |- bgcolor=#FFDDAA | ||
| 从指针起播放 | | 从指针起播放 | ||
| 空格 | | ''空格'' | ||
| Play from playhead | | Play from playhead | ||
|- bgcolor=#FFDDAA | |- bgcolor=#FFDDAA | ||
| 停止 | | 停止 | ||
| 空格 | | ''空格'' | ||
| Stop | | Stop | ||
|- bgcolor=#FFDDAA | |- bgcolor=#FFDDAA | ||
| 启用录音 | | 启用录音 | ||
| Shift+R | | ''Shift+R'' | ||
| Record-enable | | Record-enable | ||
|- bgcolor=#FFDDAA | |- bgcolor=#FFDDAA | ||
| | | 推放/滑播(速度)控制 | ||
| | | (''鼠标拖动绿色方块'') | ||
| Jog/shuttle controls | | Jog/shuttle controls | ||
|} | |} | ||
=== | ===计时器=== | ||
http://brunoruviaro.github.io/ardour4-tutorial/images/Ardour4_Clocks.png | http://brunoruviaro.github.io/ardour4-tutorial/images/Ardour4_Clocks.png | ||
计时器位于播送控制的旁边。Ardour的计时器时可以显示4种不同的时间格式:时间码、小节:拍子、,分钟:秒、采样。右键点击计时器即可选择其中一种格式。您也可以关闭计时器。有两个播送计时器的原因是,它允许您以两个不同的时间单位查看指针的位置,而无需改变任何设置。 | |||
要了解关于计时器的更多细节,请参阅'''设置时间线'''章节。 | |||
=== | ===编辑模式和游标模式=== | ||
http://brunoruviaro.github.io/ardour4-tutorial/images/Ardour4_Edit_Modes_Cursor_Modes.png | http://brunoruviaro.github.io/ardour4-tutorial/images/Ardour4_Edit_Modes_Cursor_Modes.png | ||
'''Edit Modes编辑模式'''和'''Cursor Mode游标模式'''控制定义主版幅的行为,以及指定不同功能的游标。在下拉菜单里有三种编辑模式:'''Slide滑动''','''Ripple波纹'''和'''Lock锁定'''。右边的Smart智能按钮是用于游标模式: | |||
{| align=center border=0 style="width: 50%;" | |||
|+ | |||
|- bgcolor=#EECC55 | |||
| 中文 | |||
| 快捷键 | |||
| 英文 | |||
|- bgcolor=#FFDDAA | |||
| 智能模式 | |||
| ''Y'' | |||
| Smart Mode | |||
|- bgcolor=#FFDDAA | |||
| 抓取模式 | |||
| ''G'' | |||
| Grab Mode | |||
|- bgcolor=#FFDDAA | |||
| 范围模式 | |||
| ''R'' | |||
| Range Mode | |||
|- bgcolor=#FFDDAA | |||
| 切割模式 | |||
| ''C'' | |||
| Cut Mode | |||
|- bgcolor=#FFDDAA | |||
| 伸展模式 | |||
| ''T'' | |||
| Stretch Mode | |||
|- bgcolor=#FFDDAA | |||
| 监听模式 | |||
| (鼠标点按着不放) | |||
| Audition Mode | |||
|- bgcolor=#FFDDAA | |||
| 描绘模式 | |||
| ''D'' | |||
| Draw Mode | |||
|- bgcolor=#FFDDAA | |||
| 内部编辑模式 | |||
| ''E'' | |||
| Internal Edit Mode | |||
|} | |||
它们中的大多数都是在'''区域常用操作'''这一章里详述。最后两个在'''使用自动化'''这一章里详述。 | |||
'''Smart Mode智能模式'''实际上是抓取模式和范围模式的组合。启用时,游标如果是在区域的上半部分时是“范围模式”,游标在下半部分时则是“抓取模式”。 | |||
(注:最右上角的向下箭头,点击它可以把工具栏提取出来成为一个单独的窗口,然后这个窗口可以移动放置在任意地方。同样,点击窗口里最右上角的向上箭头,或者点击窗口边框的X关闭按钮,可以把工具栏恢复到原位。) | |||
=== | ===吸附选项=== | ||
http://brunoruviaro.github.io/ardour4-tutorial/images/Ardour4_Snap_Options_and_Nudge_Controls.png | http://brunoruviaro.github.io/ardour4-tutorial/images/Ardour4_Snap_Options_and_Nudge_Controls.png | ||
吸附选项工具栏控制着'''Snap Options吸附选项'''、'''Grid Points网格点'''和'''Edit Point编辑点'''。请参见'''设置节拍'''、'''使用范围'''和'''区域常用操作'''章节以了解更多的细节。 | |||
=== | ===缩放选项=== | ||
http://brunoruviaro.github.io/ardour4-tutorial/images/Ardour4_Zoom_Options.png | http://brunoruviaro.github.io/ardour4-tutorial/images/Ardour4_Zoom_Options.png | ||
在'''Cursor Modes游标模式'''和'''Snap Options吸附选项'''之间的是'''Zoom Options缩放选项'''。在这里您可以限定缩放操作的行为。您可以使用标准的'''Zoom In放大'''(推进)和'''Zoom Out缩小'''(拉远)按钮,加上第三个被称为'''Zoom to Session缩放到会话'''的按钮(对于快速概览您的整个会话十分有用:它根据屏幕可用空间缩放显示整个会话)。 | |||
{| align=center border=0 style="width: 50%;" | |||
|+ | |||
|- bgcolor=#EECC55 | |||
| 中文 | |||
| 快捷键 | |||
| 英文 | |||
|- bgcolor=#FFDDAA | |||
| 放大 | |||
| ''-'' | |||
| Zoom In | |||
|- bgcolor=#FFDDAA | |||
| 缩小 | |||
| ''='' | |||
| Zoom Out | |||
|- bgcolor=#FFDDAA | |||
| 缩放到会话 | |||
| ''Shift+_'' | |||
| Zoom to Session | |||
|} | |||
*''提示:使用快捷键 = (主键盘上的等于号)放大,使用快捷键 - (主键盘上的减号)缩小,使用快捷键 Shift +_ (主键盘上同时按着Shift键和减号键)缩放到会话。'' | |||
接着的下拉菜单控制着'''Zoom Focus缩放焦点'''。它限定缩放操作的焦点。您可以尝试每一种不同的放大和缩小焦点。例如,选择指针(playhead播放头)将导致以指针所在的位置为中心进行缩放。选择鼠标将以您当前鼠标的位置作为参考进行缩放,诸如此类。 | |||
(注:该菜单的选项有——左、右、中、指针、鼠标、编辑点) | |||
接着的下拉菜单和最后两个按钮控制着“垂直缩放”。它们允许您在垂直方向上延展和收缩所有的音轨及总线。使用下拉菜单选择一个您想在屏幕上显示的特定音轨数量(注:即屏幕最多能同时显示多少个音轨)。使用那两个按钮可以延展和收缩所有音轨(或者如果已经有了一个选区,则仅针对已选中的音轨)。 | |||
===辅助控制=== | |||
想了解主界面上其它按钮的更多信息,请参考Ardour手册 http://manual.ardour.org/ 。 | |||
==主版面== | |||
主版面略低于上述的控制按钮行。它基本上包含了'''Rulers标尺'''、'''Tracks音轨'''和'''Busses总线'''显示的空间、以及底部的'''Summary摘要'''view视图。 | |||
在Ardour的编辑器窗口(整个窗口的右上角)的最顶端,您可以发现非常有用的信息,例如会话的采样率,可用的记录时间,以及DSP使用率。(注:Digital Signal Process数字信号处理器) | |||
===标尺=== | |||
右键点击标尺名称,您将看到一个菜单,列出的是可供您显示的所有标尺类型。您可以取消勾选您不需要的标尺勾选,以节省屏幕空间。更多的相关操作信息可以参考'''设置时间线'''和'''设置节拍'''章节。 | |||
(注:菜单的选项有——分:秒、时间码、采样、小节&拍子、节拍、节奏、范围标记、循环/转切、CD标记、位置标记、视频时间线) | |||
http://brunoruviaro.github.io/ardour4-tutorial/images/Ardour4_Overview_Rulers.png | http://brunoruviaro.github.io/ardour4-tutorial/images/Ardour4_Overview_Rulers.png | ||
=== | ===音轨和总线=== | ||
标尺的下方显示的是音轨和总线。如下图所示,您可以看到一个总线名叫“''Master''”,以及一条音轨名叫“''MyTrack''”。其中MyTrack音轨包括了一个区域,其所显示的一个音频文件被描绘成它的波形。更多关于音轨和总线的信息请参考'''创建一条音轨或总线'''章节。 | |||
http://brunoruviaro.github.io/ardour4-tutorial/images/Ardour4_Track.png | http://brunoruviaro.github.io/ardour4-tutorial/images/Ardour4_Track.png | ||
=== | ===编辑器混音器=== | ||
编辑器混音器位于编辑窗口的左边。它显示的是当前选中的音轨或总线的'''Mixer Strip混音器工具栏'''信息。它控制着音量、插件以及与音轨和总线相对应的路由。您可以切换显示或隐藏编辑器混音器,只需点击菜单''View视图 > Show Editor Mixer显示编辑器混音器'' (快捷键 “''Shift +''E”)。混音器的更多信息请参考'''使用混音器'''章节。 | |||
(注:下图为选中音轨后的混音器工具栏显示状态) | |||
http://brunoruviaro.github.io/ardour4-tutorial/images/Ardour4_Editor_Mixer.png | http://brunoruviaro.github.io/ardour4-tutorial/images/Ardour4_Editor_Mixer.png | ||
=== | ===区域、音轨/总线、快照、群组、范围、标记=== | ||
在Ardour的编辑器窗口的右边区域,根据所选中的标签页不同,可以有5个不同的功能:'''Regions区域'''、'''Tracks/Busses音轨/总线'''、'''Snapshots快照'''、'''Track & Bus Groups音轨和总线群组'''、以及'''Ranges & Marks范围&标记'''。默认是区域标签页被选中。因此编辑器窗口的这部分通常被称为'''Regions List区域列表'''。区域所代表的音频文件存储在银盘上,可以直接把它从区域列表里拖到主版面的音轨上。想了解更多区域的信息可参考'''区域常用操作'''章节。音轨标签页的功能请参考'''安排音轨'''章节,快照标签页的功能请参考'''保存一个快照'''章节。 | |||
http://brunoruviaro.github.io/ardour4-tutorial/images/Ardour4_Region_List.png | http://brunoruviaro.github.io/ardour4-tutorial/images/Ardour4_Region_List.png | ||
== | ==混音器窗口控件== | ||
第二个窗口,'''Mixer Window混音器窗口''',点击主菜单的 ''Window窗口 > Mixer混音器'' 即可显示。 | |||
http://brunoruviaro.github.io/ardour4-tutorial/images/Ardour4_Mixer_Window_1.png | http://brunoruviaro.github.io/ardour4-tutorial/images/Ardour4_Mixer_Window_1.png | ||
混音器窗口的主要功能是显示所有的混音器工具栏,各个音轨并排显示,以便于参考。这个窗口主要应用于'''Mixing混音'''流程,它还提供了访问'''Plugins插件'''和其他'''Routing路由'''功能。若需要更的详细信息,请参阅'''理解路由'''、'''混音'''和'''使用插件'''章节。 | |||
http://brunoruviaro.github.io/ardour4-tutorial/images/Ardour4_Mixer_Window_2.png | http://brunoruviaro.github.io/ardour4-tutorial/images/Ardour4_Mixer_Window_2.png | ||
这个窗口的左上角还包含有一个可见混音器工具栏清单。这部分的复选框可以用来查看和隐藏不同音轨的混音器工具栏。最后,还有一个区域来管理'''Groups群组'''。 | |||
=== | ===切换窗口=== | ||
您可以使用组合键 ''Alt + M''(苹果Mac系统 ''Control + M'')来切换窗口置顶:编辑器或混合器。 | |||
=== | ===分离和重新放置工具栏=== | ||
编辑器窗口的大部分工具栏是可以从编辑器窗口脱离开来,只需点击右上角白色向下的小箭头即可。 | |||
http://brunoruviaro.github.io/ardour4-tutorial/images/Ardour4_Zoom_Options.png | http://brunoruviaro.github.io/ardour4-tutorial/images/Ardour4_Zoom_Options.png | ||
分离出来的工具栏在屏幕上将成为一个单独的窗口,而如果要重新放会编辑器窗口的原处,只需点击右上角白色向上的小箭头即可。 | |||
=设置时间线= | =设置时间线= | ||
[http://brunoruviaro.github.io/ardour4-tutorial/setting-up-the-timeline/ (原文)] | [http://brunoruviaro.github.io/ardour4-tutorial/setting-up-the-timeline/ (原文)] | ||
因为不同的用户使用Ardour处理不同的工作,所在应用程序中,时间的衡量方式应当是可以变更的。 | |||
用户创建音频播放、纪录片、新闻报道或者环境音效可能希望使用'''Minutes分钟'''和'''Seconds秒''',又例如,录制乐队或出品电子音乐将最有可能使用'''Bars小节'''和'''Beats拍子'''。视频出品则希望以一个视频帧每秒的'''Timecode时间码'''来操作,而那些希望极致精度的甚至可能希望使用'''Samples采样'''。所有这些方式都可以在Ardour中显示和使用,以此作为一种手段来组织您的区域和编辑。 | |||
== | ==主计时器和次计时器== | ||
'''Editor Window编辑器窗口'''顶部附近有两个计时器,以数字格式显示时间的格式:时间码,小节:拍子,分:秒和采样。右键点击这两个时钟的任意一个即可以更改它的格式。 | |||
http://brunoruviaro.github.io/ardour4-tutorial/images/Ardour4_Clock_Units.png | http://brunoruviaro.github.io/ardour4-tutorial/images/Ardour4_Clock_Units.png | ||
这些被称为播送计时器。左边是播送计时器,右边是次播送计时器。有两个播送计时器的优点是您能够以在两个不同的时间单位看到指针的位置,而无需改变任何设置。 | |||
在这两个计时器的右边,您还可以看到一组5个计时器,用于显示当前已选择的范围和切换范围。关于时钟显示更多的信息请参阅Ardour手册。 | |||
== | ==吸附模式== | ||
Snap Mode吸附模式工具栏位于计时器下方靠右的地方。它们控制'''Quantization量化'''时间网格的方式,即:“吸附”一个音频'''Region区域'''到您所选择的网格类型。 | |||
http://brunoruviaro.github.io/ardour4-tutorial/images/Ardour4_Snap_Options_and_Nudge_Controls.png | http://brunoruviaro.github.io/ardour4-tutorial/images/Ardour4_Snap_Options_and_Nudge_Controls.png | ||
当选中了''No Grid无网格'',可以在音轨内自由移动区域。当选中了''Grid网格'',区域将会“吸附”到最近的'''Grid Point.网格点'''。当选中了''Magnetic磁性吸附'',可以自由移动区域,但当它们被移动到非常接近一个网格点时,将会“吸附”到网格点。 | |||
中间的'''Units单位'''菜单用于选择以什么来作为网格点,例如拍子、小节、标记、分钟、秒、各种SMPTE时间码,或者或区域的边缘。 | |||
== | ==时间线== | ||
'''Timeline时间线'''位于吸附模式工具栏下方,主版面的正上方。通过在时间线上右键单击,您可以设置复选框,勾选希望显示的不同类型的时间信息。 | |||
http://brunoruviaro.github.io/ardour4-tutorial/images/Ardour4_Overview_Rulers.png | http://brunoruviaro.github.io/ardour4-tutorial/images/Ardour4_Overview_Rulers.png | ||
=== | ===分/秒=== | ||
要在时间线上查看分和秒,右键点击时间线,然后选择'''Min分:Sec秒'''。您将能够以秒或者分来设置网格。 | |||
=== | ===小节/拍子=== | ||
要在时间线上查看小节和拍子,右键点击时间线,然后选择'''Bars小节 & Beats拍子'''。您将能够以小节\拍子或者多拍的简写,例如3、4、8、16或32。 | |||
不但可以为整个Ardour回话设置一个'''Meter节拍'''和'''Tempo节奏''',还可以在同一个会话中的不同地方改变它们。有关这方面的更多信息,请参阅'''Setting Up the Meter设置节拍'''章节。 | |||
== | ===时间码=== | ||
要想以SMPTE视频时间码进行工作,首先您需要设置'''Timecode时间码fps'''(帧每秒)。可以在会话属性窗口(菜单栏 ''Session会话 > Properties属性'',或者快捷键 ''Alt + O'')找到时间码标签页。 | |||
http://brunoruviaro.github.io/ardour4-tutorial/images/Ardour4_Timecode.png | http://brunoruviaro.github.io/ardour4-tutorial/images/Ardour4_Timecode.png | ||
一旦您完成设置,请在时间线上右键点击,勾选''Timecode时间码''复选框,以确保您的时间码尺可见。你将能够以''SMPTE Frames帧、SMPTE Seconds秒和SMPTE Minutes分''设置网格。 | |||
=创建一个音轨或一条总线= | =创建一个音轨或一条总线= | ||
[http://brunoruviaro.github.io/ardour4-tutorial/creating-a-track-or-bus/ (原文)] | [http://brunoruviaro.github.io/ardour4-tutorial/creating-a-track-or-bus/ (原文)] | ||
== | ==什么是音频轨道?== | ||
一个'''Audio Track音频轨道'''就是一个您可以从您的'''Region List区域列表'''拖动一个'''Region区域'''的地方,您还可以录制来自外部声源的声音。 | |||
一个区域代表一个音频剪辑片段。例如,您的声音文件或者声音文件的某一部分。在下图中,被标记为“''Audio 1''” 和 “''Audio 2''”的水平条状区域就是音轨。在音轨Audio 1 内包含有音频信息(命名为“''某某声音''”)的矩形被成为一个区域。 | |||
http://brunoruviaro.github.io/ardour4-tutorial/images/Ardour4_Tracks.png | http://brunoruviaro.github.io/ardour4-tutorial/images/Ardour4_Tracks.png | ||
== | ==什么是总线?== | ||
一条'''Bus总线'''类似于音轨,除了它不包含属于它自己的区区域。您不能直接录制到一条总线,也不能拖拽区域到总线里。在上面的图片中,被标记为“''master''”的就是一条总线。通常每个会话都有一个'''Master Bus主总线'''。从您的会话导出的所有音频都将被发送到主总线。 | |||
== | ==如何使用音轨和总线?== | ||
音频处理'''Plugins插件'''和'''Automation自动化'''都可以应用于音轨和总线。 | |||
音频轨道可以被路由到总线。事实上,许多音轨可以同时被路由到一条总线。总线通常被用作是将任何信号处理一次同时应用到许多音轨的简便方法。您可能会发现它有用,例如,路由所有包含鼓声的音轨到一个单独的、您将命名为“''drum bus鼓声总线''”的总线。然后,如果你决定你所有的鼓声音轨太大声,您可以快速调整“''drum bus鼓声总线''”的电平,而不是调整汇聚到一起的每个单独的音轨。 | |||
总线的另一个用处是可以拥有一个共用的'''Reverberation混响'''插件,因此任何需要Reverb混响效果的音频轨道都可以被路由到一个单独的总线。 | |||
== | ==添加音轨和总线== | ||
在任何现有的音轨和总线下方的空白区域右键点击,或者,点击菜单 ''Track音轨 > Add Track/Bus添加音轨/Bus总线''(快捷键 ''Ctrl'' + ''Shift'' + ''N'')。将会出现以下窗口: | |||
http://brunoruviaro.github.io/ardour4-tutorial/images/Ardour4_Add_Track_or_Bus.png | http://brunoruviaro.github.io/ardour4-tutorial/images/Ardour4_Add_Track_or_Bus.png | ||
'''Add添加'''允许您指定要创建多少音轨(或总线)。 | |||
在菜单中选择'''Audio Tracks音频轨道'''或者'''Busses总线'''以确定您要创建的是音轨或者总线。您也能选择创建一条'''MIDI Track音乐设备数字接口音轨'''或者一条'''Audio+MIDI Track音频+音乐设备数字接口音轨'''。Ardour提供的这三种音轨类型是取决于他们所包含的数据类型,而区分这三种音轨模式则是取决于他们的录制方式。本教程将仅介绍音频轨道和总线(全部音轨类型的详细介绍请参阅Ardour手册)。 | |||
您可以为所创建的音轨或总线随意起一个'''Name名称'''。'''Configuration配置'''下拉菜单允许您指定您希望新的音轨或总线可以处理有多少声道。例如,如果您将使用一个单独的麦克风录制您的声音到这个音轨上,可选择'''Mono单声道'''。如果您计划从现有的歌曲导入一个片段并放置到这个音轨上,可选择'''Stereo立体声'''。此处的选择也会影响到哪些插件可以使用在这音轨上(单声道音轨不能使用立体声插件,反之亦然)。 | |||
'''Track Mode音轨模式'''菜单能让您选择'''Normal普通''','''Non Layered不分层'''和'''Tape磁带'''。正常模式为每次录制创建一个新区域,建议初学者使用。在其他模式下的更多信息,请查看Ardour手册。关于乐器和分组选项的附加信息也可以在手册的其它页面找到。 | |||
'''Group分组'''选项允许您把新的音轨添加到现有的分组,或者在创建新的音轨时也创建一个新组。如果您是一个初学者,您现在还不必担心分组。仅供未来参考,您可以在Ardour手册找到更多的信息。 | |||
最后一个选项('''Insert插入''')允许您选择把新的音轨或总线放置在什么地方:起始点、结束点、已选中部分之前或之后。 | |||
最后,点击'''Add添加'''按钮创建您刚刚配置好的音轨或总线。您会看到它们作为新的一行出现在'''Main Canvas主版面'''上。 | |||
=导入音频= | =导入音频= | ||
[http://brunoruviaro.github.io/ardour4-tutorial/importing-audio/ (原文)] | [http://brunoruviaro.github.io/ardour4-tutorial/importing-audio/ (原文)] | ||
在Ardour里,音频的一部分被称为'''Regions区域'''。一个区域可以是整个声音文件或者是声音文件的一部分。在此您将学习到如何从您的电脑的硬盘导入音频文件,以便能在您的Ardour里使用它们。 | |||
要导入一个音频文件,首先在位于最右边的编辑器窗口的'''Region List区域列表'''上右键点击,如果您没有看到它,确保“''View视图''”菜单里已经勾选“''Show Editor List显示编辑器列表''”。一旦您看到编辑器列表,请注意这个地方显示的功能选项也会随着标签页的改变而改变。在您右键点击之前,确保区域标签页已经被选中。 | |||
http://brunoruviaro.github.io/ardour4-tutorial/images/Ardour4_RegionList_EditorList.png | http://brunoruviaro.github.io/ardour4-tutorial/images/Ardour4_RegionList_EditorList.png | ||
一旦您右键点击了,会出现一个菜单,其中有''Import to Region List导入到区域列表''这个选项,点击这个选项。 | |||
http://brunoruviaro.github.io/ardour4-tutorial/images/Ardour4_Import_To_Region_List.png | http://brunoruviaro.github.io/ardour4-tutorial/images/Ardour4_Import_To_Region_List.png | ||
现在您将会看到''Add existing media添加已存在的媒体''对话框(注意:打开到这个窗口的快捷方式是“''Ctrl''”+“''I''”)。在这个对话框的左边,您会看到一个文件浏览器,让您可以从硬盘里搜索您要添加的声音文件(初学者最好是从一个通用的文件格式开始,诸如WAV或AIFF)。在左下角有一个菜单,指明这些文件将被如何添加。“''Add files as new tracks添加文件作为新的音轨''”将导入音频文件并把它们放在一个新创建的音轨上。“Add files to region list添加文件到区域列表”将简单地把音频文件导入到该区域列表,不创建任何新的音轨。现在选择则个选项,因为在此我们不想让Ardour创建任何音轨。 | |||
http://brunoruviaro.github.io/ardour4-tutorial/images/Ardour4_Add_Existing_Media.png | http://brunoruviaro.github.io/ardour4-tutorial/images/Ardour4_Add_Existing_Media.png | ||
*提示:如果您在硬盘里没有任何合适的音频文件来跟着这些步骤做,可以点击“''Search Freesound搜索自由声音''”标签页(或访问freesound.org),从那里您可以找到大量的、遵循Public Domain and Creative Commons–licensed公用领域和知识共享协议许可的、具有各种不同的采样率和格式的声音样例。 | |||
在'''Add existing media添加已存在的媒体'''对话框的右边,您可以看到有一处选项,允许您检查您所选择的文件的属性。在这里您将看到文件名,声道的数量,采样率,声音文件的格式和长度,以及您选择添加到文件的任何标签说明。 | |||
'''Play播放'''按钮允许您使用试听总线来预览文件。最后,这个对话框提供有一个选项,能让您选择复制(多个)文件到当前会话的文件夹('''Copy Files to Session复制文件到会话''')。这是安全的,但是它会占用更多的硬盘空间。如果你不勾选这个选项,Ardour将使用硬盘上当前位置的这个声音文件。在这种情况下,如果文件被移动到硬盘上的一个新的位置,您可能会遇到麻烦,因为在下次您打开这个会话时Ardour无法找到它。'''在此强烈建议您勾选离开这个复选框(“Copy Files to Session复制文件到会话复制文件到会话”)。''' | |||
单击'''OK确定'''继续。您所选择的(多个)文件将会成排出现在您的区域列表中。 | |||
*提示:如果您选择的文件的采样率不匹配当前会话的采样率,Ardour会以红色显示不匹配的采样率。如果您试图导入这个文件,Ardour也会警告您采样率不匹配,并且询问您是否确认您无论如何都要嵌入。如果您选择嵌入这个有问题的文件,它不会以它所录制的采样率来回放,而是以当前Ardour会话的采样率来回放。这将导致声音以错误的速度和切换方式来播放。 | |||
一旦您已经经成功地在该区域列表里嵌入了您的音频文件,您就会在屏幕上看到它。在下面的截图中,三个文件已经被导入:“''toaster_8''”、“''short-drone-mono''”、“''wheels-mono''”。在“''toaster_8''”后面的数字[2]表明它是一个立体声文件。 | |||
http://brunoruviaro.github.io/ardour4-tutorial/images/Ardour4_Region_List_Stereo_File.png | http://brunoruviaro.github.io/ardour4-tutorial/images/Ardour4_Region_List_Stereo_File.png | ||
通过拖拽并放置区域到主版面,您可以把它插入到一个现有的音轨里。 | |||
*提示:当该区域的名字是用蓝色突出显示时,如果您点击中间的文字,Ardour会认为您正在试图重命名该区域(名字将变成可编辑状态)。为了从列表中点击并拖动一个突出显示的区域,您需要把鼠标刚好指向并点击在名字之前或之后。 | |||
释放按着的鼠标完成拖放操作。该区域将被插入在您放开它的那个准确的时间点。 | |||
重要:您应当总是确保把立体声区域放置在立体声音轨上。如果您拖放一个立体声文件到一个单声道音频轨道上,那么只有左边声道会被使用。在下面的屏幕截图中,一个立体声文件具有非常独特的左声道和右声道,它被拖放到了立体声音轨和单声道音轨上。注意在单声道音轨上只有左边声道被显示出来(以及被回放)。 | |||
http://brunoruviaro.github.io/ardour4-tutorial/images/Ardour4_Stereo_Mono_Comparison.png | http://brunoruviaro.github.io/ardour4-tutorial/images/Ardour4_Stereo_Mono_Comparison.png | ||
== | ==直接导入音频到一个音轨== | ||
如前所述,'''Add existing media添加已存在的媒体'''对话允许您直接导入音频到一个音轨。 | |||
选择'''Add files: as new tracks添加文件:作为新的音轨'''以自动创建一个新的音轨并将已选中的文件添加到它上面。将以声音文件的名称来命名音轨。 | |||
http://brunoruviaro.github.io/ardour4-tutorial/images/Ardour4_Add_As_New_Track.png | http://brunoruviaro.github.io/ardour4-tutorial/images/Ardour4_Add_As_New_Track.png | ||
如果您之前已选中一个或更多个音轨,菜单将显示额外的选项'''Add files: to selected tracks添加文件:到已选中的音轨'''以添加声音文件到现有的已选中的音轨。 | |||
=== | ===选择插入点=== | ||
当使以上选项中的任意一个(“''add as new track添加为新音轨''”或“''add to selected tracks添加到已选中的音轨''”)时,您还应该指定在音轨里您要放置的新区域。在下面的截图中,我们选择“''session start会话起点''”。 | |||
http://brunoruviaro.github.io/ardour4-tutorial/images/Ardour4_Insert_At.png | http://brunoruviaro.github.io/ardour4-tutorial/images/Ardour4_Insert_At.png | ||
在会话中该区域出现在一个新的音轨里。新的音轨自动继承所导入的声音文件的名称。 | |||
声音文件也将出现在该区域列表中,以便它也可以插入到其它音轨(拖放即可)。 | |||
== | ==从音轨移除区域== | ||
要从一个音轨中移除一个区域,可以用鼠标选中它,并使用菜单中的''Cut剪切''功能,''Ctrl''键(或''Apple苹果''键)和''X''键,''Delete删除''键或''fn''和''Backspace退格''键的组合(例如,可用于没有一个适当的删除键的笔记本电脑键盘上)。 | |||
*提示:经常保存您的工作!快捷键“''Control''”+“''S''”将是您的好伙伴,会经常用到它。 | |||
=录制音频= | =录制音频= | ||
[http://brunoruviaro.github.io/ardour4-tutorial/recording-audio/ (原文)] | [http://brunoruviaro.github.io/ardour4-tutorial/recording-audio/ (原文)] | ||
除了导入音频,在您的Ardour会话里创建区域的另一种方法是录制新的音频。 | |||
这音频的来源可能是您的音频设备(声卡)上的接线或麦克风输入,或者它甚至可以是来自您的计算机上的、已通过JACK连接到Ardour的、其它应用程序的原始声音。更多细节请参阅'''Routing路由'''部分。 | |||
本节将向您展示如何从一个外部源(例如:一个麦克风)录制音频到Ardour里的一个音轨。 | |||
http://brunoruviaro.github.io/ardour4-tutorial/images/Ardour4_Editor_Mixer_Input.png | http://brunoruviaro.github.io/ardour4-tutorial/images/Ardour4_Editor_Mixer_Input.png | ||
首先,您应该检查适当的输入已经被路由到您想录制到的音轨上。 | |||
#(在主版面)通过在略低于音轨名称和音量滑块的地方点击空白处选择音轨。 | |||
#音轨变成突出显示。 | |||
#'''Editor Mixer编辑器混音器'''垂直栏目位于编辑器窗口的左侧,现在应该显示刚才选择的音轨(上图''Audio 1音频1'')。 | |||
#在编辑器混合器中的音轨名称下方,您会发现一个按钮,允许您编辑路由。 | |||
#右键点击那个按钮(会弹出一个新窗口)查看路由。(如果是左键点击则需要在菜单中选择''Routing Grid路由网格'') | |||
*提示:如果您没看到'''Editor Mixer编辑器混音器'''栏目,可以使用快捷键“''Ctrl''” + “''E''”让其显示出来。 | |||
在接下来的图中您可以看到,这个单声道音轨唯一的输入是从''system capture_1系统捕获_1''接收信号。这通常意味着您的声卡的第一个麦克风输入。 | |||
http://brunoruviaro.github.io/ardour4-tutorial/images/Ardour4_Audio_1_input.png | http://brunoruviaro.github.io/ardour4-tutorial/images/Ardour4_Audio_1_input.png | ||
您可看到在左边垂直显示的标签是可用的来源。右下角的“''Audio 1 in音频1输入''”是目的地。绿点代表一个连接。 | |||
带有'''Ardour'''字样的标签页显示的是从Ardour里的其它来源生成的连接。'''Other其它'''标签页显示的是从其它软件来的音频可用连接而不是来自Ardour。'''Hardware硬件'''标签页显示的是硬件连接(例如,您的电脑内置的麦克风或者来自于您的声卡的输入端)。在所有情况下,这个路由矩阵直接与JACK沟通以在JACK系统它本身内改变路由。这方面在'''Understanding Routing理解路由'''章节有更详细的解释。 | |||
本章节的目的,只是简单确认system capture_1系统捕获_1(从Hardware硬件标签页)连接到Audio 1音频1音轨,这样我们可以做一个测试录音。如果您没有看到像上面截图中的一个绿点,手动点击矩阵进行连接即可。您现在可以关闭此窗口。 | |||
*注意:上面的示例假设您录制一个Mono单声道声源到一条Mono单声道音轨。如果您想录制Stereo立体声,操作指南几乎是相同的,但是您应该创建一个Stereo立体声音轨。您应该会看到两个绿点,一个为''capture_1捕获_1''以及另一个为''capture_2捕获_2''。 | |||
== | ==预备音轨== | ||
“Arming the | “Arming the Track预备音轨”是简单地让音轨准备进行录制。一旦您确认正确的捕获输入被路由到音轨,您可以通过点击水平音轨栏目上的小红点图标来装备音轨(不是播送控制里的那个大红点图标)。 | ||
http://brunoruviaro.github.io/ardour4-tutorial/images/Ardour4_Arming_The_Track.png | http://brunoruviaro.github.io/ardour4-tutorial/images/Ardour4_Arming_The_Track.png | ||
正确预备之后,小红点图标将持续突出显示,且您将能够通过查看在编辑器混合器或者水平音轨栏目上的'''Peak Meter峰值节拍'''看到传入的信号。 | |||
*注意:除非您有告诉Ardour去做,否则,正在被录制的输入将通过'''Audition试听'''的输出被监控着(换句话说,被听到)。如果你不使用耳机来监控录音过程,你可能在这一点上会得到一些太大声的反馈! | |||
== | ==预备Ardour并开始录制== | ||
现在您已经为录制预备了音轨,您必须通过点击播送工具栏的大红圆点按钮预备Ardour本身以录制。红色圆点按钮将闪烁,表明Ardour已经准备录制。要开始录制,点击播送工具栏的播放按钮,或者按下您的电脑键盘上的空格键。再次单击播放按钮(或按下空格键)将停止录制。 | |||
http://brunoruviaro.github.io/ardour4-tutorial/images/Ardour4_Recording.png | http://brunoruviaro.github.io/ardour4-tutorial/images/Ardour4_Recording.png | ||
录制时,预备音轨将从输入捕获声音。在录制过程中,任何在其它音轨的已有的声音将会正常播放。这允许您随着其它您已经录制或嵌入到您的会话的区域和音轨来播放、歌唱或者说话。 | |||
录制时,您将能够看到导入的声音的电平(分贝振幅),录制的同时也能看到波形的峰值的显现。 | |||
== | ==避免截波== | ||
从下方截图中可看到,录制的音频太大声,并且产生了截波(换句话说,录制的信号超出了数字所能表达的范围之外)。导致信息的损失和声音的失真。在波形中,使用用红色来标记截波峰值。 | |||
http://brunoruviaro.github.io/ardour4-tutorial/images/Ardour4_Clipping.png | http://brunoruviaro.github.io/ardour4-tutorial/images/Ardour4_Clipping.png | ||
避免截波最好的和最容易的方法是,在输入的音频信号到达声卡之前,就对音量进行一些控制。例如,您可以移动麦克风远离将被录制的声音,或者使用混音器降低输入信号的音量。 | |||
当音频信号被录制在适当的范围内,您应该看到没有红色的峰值,以及电平计量应该显示一个负数的最大峰值(例如,一个最大的峰值到截波点之间有−3.0分贝是一个恰当的距离)。 | |||
在区域的最大峰值和截波点之间的分贝通常称为'''Headroom净空高度'''。通常录制时的做法是,在您的信号最大值和截波点之间,保持大约3到6分贝的净空高度,截波点本身被表示为0dB(零分贝)。换句话说,一个带有适当净空高度的音频区域,其拥有的最大峰值处在−6dB和−3dB之间。 | |||
== | ==区域列表== | ||
录制好的音频作为一个新的区域出现在录制的音轨上。像所有区域一样,这个新录制的区域显示在区域列表中,从那里您可以在需要的时候拖拽它到其它轨道。 | |||
您刚才录制的区域将自动继承用来录制它的音轨的名字,不同的是会自动加上编号。在下面的截图中,“''Audio 1-1音频1-1''”和“''Audio 1-2音频1-2''”代表了在一个名为“''Audio 1音频1''”的音轨上的两次不同的记录。 | |||
http://brunoruviaro.github.io/ardour4-tutorial/images/Ardour4_RegionList_Recording.png | http://brunoruviaro.github.io/ardour4-tutorial/images/Ardour4_RegionList_Recording.png | ||
您可能希望以适当的名称为不同的音轨提前计划和组织您的录制会话。例如,仅用于录制vocals声乐的音轨可以命名为“Voice声音”。这种方式,录制后的声音文件将会被相应地命名,并且显示在区域列表中的不同的磁带将被标识为“Voice-1声音-1”,“Voice-2声音-2”,等等诸如此类,而不是默认的通用名称,如“Audio 1音频1”。 | |||
要重命名一条音轨,只需双击它的名称(在您为录制而预备的音轨的前面)然后就可以输入新的名称。 | |||
http://brunoruviaro.github.io/ardour4-tutorial/images/Ardour4_Rename_Track.png | http://brunoruviaro.github.io/ardour4-tutorial/images/Ardour4_Rename_Track.png | ||
*提示:记得我们提到'''经常保存您的工作'''是多么重要吗?现在按下“''Ctrl''”+“''S''”即可。要养成每隔几分钟就按下“''Ctrl''”+“''S''”的习惯。 | |||
=理解路由= | =理解路由= | ||
[http://brunoruviaro.github.io/ardour4-tutorial/understanding-routing/ (原文)] | [http://brunoruviaro.github.io/ardour4-tutorial/understanding-routing/ (原文)] | ||
Routing路由一个音频信号就是把音频信号从一个地方发送到另一个地方。 | |||
除了从Ardour得到音频信号或者把获取的信号交付到Ardour意外,路由还在Ardour它自己本身里扮演着一个重要的角色。在Ardour中使用路由的例子包括:路由从音轨到主总线或者到其它总线、创建“sends发送”、路由从总线到主总线的输出,等等。(关于音轨和总线的阐释请参阅'''创建一个音轨'''章节)。所有的路由,不论Ardour内部和外部都是由JACK来处理。 | |||
== | ==在Ardour内的路由== | ||
在新会话的高级选项对话框里创建一个新会话时(参阅'''开启一个会话'''章节),输入的标准路由、以及Ardour里的音轨和总线就被确定下来了。默认情况下,路由如下: | |||
*音频设备输入路由到音轨输入。 | |||
*来自音轨和总线的所有输出路由到主总线输入。 | |||
*主总线输出路由到音频设备输出。 | |||
注意:在创建新的总线时,没有任何东西被路由到新总线的输入。 | |||
这个路由设置使会话只包含音轨具有其意义,但要使用任何总线(除了主总线)或者要取得带有创意的在Ardour内部音频信号的路径,我们就需要有能力改变路由。 | |||
Audio Connection Manager音频连接管理器窗口(也称为patchbay接线板)是建立连接到Ardour混音器、从Ardour混音器来连接、在Ardour混音器内部连接的主要方式。您可以使用快捷键“''Alt''”+“''N''”,或通过菜单''Window窗口>Audio Connections音频连接''来打开这个窗口。 | |||
http://brunoruviaro.github.io/ardour4-tutorial/images/Ardour4_Audio_Connection_Manager_Menu.png | http://brunoruviaro.github.io/ardour4-tutorial/images/Ardour4_Audio_Connection_Manager_Menu.png | ||
接线板带有两组端口:一组是来源,另一组是目标。来源和目标都是用标签页来分类。可用的来源垂直显示在左边,底部的水平显示的是目标。 | |||
在下面的截图里,请注意左上角被选中的的“''Hardware硬件''”标签页(这是一个源),在底部被选中的目标“''Ardour Tracks音轨''”。这意味着您所看到的矩阵显示的连接是:从可用的硬件声音来源(例如,一个麦克风),进入到已存在的Ardour音轨。 | |||
http://brunoruviaro.github.io/ardour4-tutorial/images/Ardour4_Audio_Connection_Manager_1.png | http://brunoruviaro.github.io/ardour4-tutorial/images/Ardour4_Audio_Connection_Manager_1.png | ||
绿色小圆点代表一个连接。上面的截图告诉我们,从“''system:capture_1系统:捕获_1''”输入的声音(您的声卡的第一个输入源,或者您的笔记本内置麦克风)进入到名叫“''Audio 1音频1''”的Ardour音轨,而且从“''system:capture_1系统:捕获_1''”和“''system:capture_2系统:捕获_2''”输入的声音分别进入名叫“Audio 2音频2”的Ardour音轨的左右输入端。 | |||
注意:我们可以看到“''Audio 1音频1''”是单声道的音轨,因为它只有一个连接槽,而音轨“''Audio 2音频2''”是立体声的,因为它有两个连接槽(Left左和Right右)。 | |||
接下来的屏幕截图显示了来自Ardour音轨(被选中的垂直标签页)的信号路径进入到了Ardour总线(被选中的水平标签页)。正如前面提到的,所有Ardour音轨默认设置是让音轨的声音进入主总线。 | |||
http://brunoruviaro.github.io/ardour4-tutorial/images/Ardour4_Audio_Connection_Manager_2.png | http://brunoruviaro.github.io/ardour4-tutorial/images/Ardour4_Audio_Connection_Manager_2.png | ||
注意:还记得“''Audio 1音频1''”是单声道音轨吗?我们在前面的截图可以看到“''Audio 1音频1''”只有一个输入槽。但是现在在上面的截图你看到“''Audio 1音频1''”有两个输出(Left左和Right右)。这是正常的:我们通过音轨的输入端的数量来定义一个音轨是否单声道或立体声,而不是用输出端来定义。单声道音轨将保留有音频的一个单通道,但你仍然可以选择将声音放置在左边的扬声器或者右边的扬声器(或着它们之间的任何地方)。关于这方面更多的信息请参考'''声相'''章节。 | |||
最后,让我们看一下音频连接管理器里的一些标签页,以便了解来自主总线的声音如何转到实际硬件输出(您的扬声器或者耳机): | |||
http://brunoruviaro.github.io/ardour4-tutorial/images/Ardour4_Audio_Connection_Manager_3.png | http://brunoruviaro.github.io/ardour4-tutorial/images/Ardour4_Audio_Connection_Manager_3.png | ||
正如您所看到的,现在已选中的来源是 “''Ardour Busses总线''”标签页,已选中的目标是“''Hardware硬件''”标签页。这个会话碰巧只有一个总线,即默认的“''master out主输出''”。绿色小圆点表明,所有来自Master Bus主总线的声音都转到system playback系统回放1和2,也就是您的声卡的输出端。 | |||
== | ==如何连接和断开连接?== | ||
要连接,点击矩阵中所需要的方格,将会出现一个绿色小圆点表示已创建连接。 | |||
要取消连接,只需简单地点击一个现有的绿色小圆点,它就会消失。 | |||
== | ==路由到一条总线的实例== | ||
在下面的会话实例中,有两个吉他音轨和一条被称为Guitar Bus吉他总线的未使用的总线,全都是立体声。 | |||
http://brunoruviaro.github.io/ardour4-tutorial/images/Ardour4_Ardour_Connection_Manager_4.png | http://brunoruviaro.github.io/ardour4-tutorial/images/Ardour4_Ardour_Connection_Manager_4.png | ||
假设您要从两个吉他音轨发送输出到吉他总线,不是发送到主总线。这对于只有一个增益调节器的吉他来说,在音量控制方面很有用(在本例中即是吉他总线增益调节器)。然后吉他总线的输出,即是这两个吉他的总和,是直接转接到主总线。 | |||
这里展示的是如何编辑接线板以得到所需的路由。从来源(垂直标签页)选择“''Ardour Tracks音轨''”标签页,从目标(水平标签页)选择“''Ardour Busses总线''”。撤销在音轨和Master Bus主总线间已有的连接。然后创建从两个音轨到Guitar Bus吉他总线的连接。最后的结果是像这样的: | |||
http://brunoruviaro.github.io/ardour4-tutorial/images/Ardour4_Audio_Connection_Manager_5.png | http://brunoruviaro.github.io/ardour4-tutorial/images/Ardour4_Audio_Connection_Manager_5.png | ||
现在两个吉他音轨都路由到吉他总线,并且不再直接连接到主总线。然后我们确保吉他总线,反过来,路由到主总线(一条总线的输出路由可以像一个音轨一样被编辑),以便让我们仍然可以听到来自吉他音轨的声音。(注:这里省略了一张图,即从垂直的来源“''Ardour Busses总线''”里的“''Guitar Bus吉他总线''”连接到水平的目标“''Ardour Busses总线''”里的“''Master Bus主总线''”的路由。)现在我们可以通过改变的吉他总线的增益调节器,来同时控制两个吉他音轨的音量。更重要的是,我们现在可以添加插件到吉他总线,同时处理这两个吉他音轨里的声音。 | |||
== | ==接线板的音轨或总线详细视图== | ||
按下快捷键“''Alt''”+“''P''”打开Audio Connection Manager音频连接管理器(Patchbay接线板),这里为您显示的是Ardour里每一个单独来源和每一个单独目标的完整矩阵。有时这里显得太复杂了:例如,当您只是想快速改变一个单独的音轨输入或输出的路由的时候。Ardour允许您访问相关的次级接线板连接,您只需在混音器工具栏里直接点击音轨或总线的输入或输出按钮。 | |||
输入按钮位于工具栏的顶部,输出按钮位于工具栏的底部。点击它们的任何一个都将向您展开一个连接选项菜单。在下面的截图中,例如,您可以点击刚好在音轨名称“''Guitar-1''”下方的“''1/2''”按钮,就可以访问到这个菜单: | |||
http://brunoruviaro.github.io/ardour4-tutorial/images/Ardour4_Editor_Mixer_In_Out.png | http://brunoruviaro.github.io/ardour4-tutorial/images/Ardour4_Editor_Mixer_In_Out.png | ||
您可以从菜单中选择一个连接,或者选择“''Routing Grid路由网格''”以查看一个更简单的音频连接管理器版本,只带有选中的音轨或总线的输入或输出。 | |||
== | ==所有的Ardour连接都是JACK连接== | ||
这很重要,要意识到您在Ardour里创建的连接实际上都是JACK路由,即您可以看到的来自于其它应用程序的JACK路由,像Qjackctl Catia、或者JackPilot,根据您的操作系统相关的应用程序。下面是一个例子:Catia窗口(仅Linux系统)显示的是与上述例子同样的JACK连接: | |||
http://brunoruviaro.github.io/ardour4-tutorial/images/Ardour4_Catia_Example.png | http://brunoruviaro.github.io/ardour4-tutorial/images/Ardour4_Catia_Example.png | ||
| 第606行: | 第668行: | ||
[http://brunoruviaro.github.io/ardour4-tutorial/routing-between-applications/ (原文)] | [http://brunoruviaro.github.io/ardour4-tutorial/routing-between-applications/ (原文)] | ||
有时您可能需要把另一个程序的音频输出录制到Ardour里(例如,一个在Firefox火狐浏览器里播放的YouTube视频的声音,或者SuperCollider音频合成编程语言的输出或者PureData编程语言的输出)。本章节展示了如何完成这工作。 | |||
这个页面的例子创建于一部运行着Ubuntu Linux的电脑上。注意,如果您使用的是另一个操作系统,那么事情可能有些不同(特别是如果您使用的是Mac苹果电脑,在这种情况下,您使用的将会是JackPilot)。不过,一般原则上总是相同的。 | |||
== | ==从您的浏览器路由到Ardour== | ||
Web网页浏览器(Firefox火狐、Chromium谷歌,诸如此类)不是JACK-aware可识别的应用程序。幸运的是,诸如KXStudio和UbuntuStudio系统在应用常规系统的音频(就像PulseAudio脉冲音频)和JACK之间已经具备有桥接功能。本教程假设您使用的是一台带有这种已经能运行和工作的桥接的电脑。 | |||
从YouTube(或任何其它来自您的浏览器的声音)录制音频到Ardour里的整个步骤是: | |||
#在Ardour里创建一个立体音轨 | |||
#从音轨输入断开硬件来源 | |||
#连接PulseAudio Jack Sink脉冲音频JACK插槽到音轨输入 | |||
#开始录制到音轨 | |||
#开始播放YouTube视频 | |||
在这个例子里,创建一个带有一条新的立体声音轨的新会话,取名为“''Firefox火狐''”: | |||
http://brunoruviaro.github.io/ardour4-tutorial/images/Ardour4_YouTube_1.png | http://brunoruviaro.github.io/ardour4-tutorial/images/Ardour4_YouTube_1.png | ||
然后我们选择音轨,并点击编辑器混音器工具栏上的输入按钮。在上面的截图中,按钮就刚好在编辑器混音器工具栏里的音轨名称(“''Firefox火狐''”)的下方(在上面的示例中,它只显示一个“''-''”横线,这意思是目前还没有创建连接)。我们点击后就打开了只特别显示音轨输入的接线板窗口。 | |||
首先要做的就是,从那个音轨上断开任何麦克风输入(即“''system capture系统捕获''”)的连接,如果有就断开。断开连接后,这部分与“''Firefox火狐''”音轨相关的矩阵应该是像这个样子的(没有绿色小圆点): | |||
http://brunoruviaro.github.io/ardour4-tutorial/images/Ardour4_YouTube_2.png | http://brunoruviaro.github.io/ardour4-tutorial/images/Ardour4_YouTube_2.png | ||
下一步是改变这同一个窗口里的标签页。选择“''Other其它''”作为来源。在这里您将会找到其它运行着的、可以用来作为声音来源转发到Ardour的应用程序。在Linux计算机上使用的是用PulseAudio Jack bridge脉冲音频JACK桥接,您会看到“''PulseAudio Jack Sink脉冲音频JACK插槽''”作为来源。在“''front-left左前''”和“''front-right右前''”到“''Firefox火狐''”音轨的Left左和Right右输入之间,点击适当的空白方格以创建连接(绿色小圆点)。最终它应该看起来像这样: | |||
(注:使用UbuntuStudio的用户,需要在启动Adour之前,首先启动Qjackctl,也就是教程开头说过的那个JACK音频连接工具包,否则在接线板的来源里会找不到“''Other其它''”这个标签页,更找不到PulseAudio Jack Sink。非UbuntuStudio用户,即普通Ubuntu用户,则需要做相当多的设置,请参考 https://help.ubuntu.com/community/UbuntuStudioPreparation ) | |||
http://brunoruviaro.github.io/ardour4-tutorial/images/Ardour4_YouTube_3.png | http://brunoruviaro.github.io/ardour4-tutorial/images/Ardour4_YouTube_3.png | ||
现在您已经准备好了。简单地遵循与'''录制音频'''章节所阐述的相同的录制过程:启用录制(预备)音轨(在音轨上的小红点),预备Ardour录制(大红点按钮,它开始闪烁),然后按下播放按钮。返回到您的浏览器并开始播放YouTube视频。 | |||
(注:电脑里只有一块主板内置声卡的用户,可能会遇到“录制时没波形没声音”的情况,这是因为启动JACK后就占用了声卡,导致其它软件无法正常播放。毕竟“一卡不能二用”。因此,建议玩数字音乐的朋友,还是买一块外置的专业声卡才能应用得当。) | |||
http://brunoruviaro.github.io/ardour4-tutorial/images/Ardour4_YouTube_4.png | http://brunoruviaro.github.io/ardour4-tutorial/images/Ardour4_YouTube_4.png | ||
== | ==从JACK可识别的应用程序路由到Ardour== | ||
其它音乐软件,像SuperCollider、Hydrogen、以及PureData都是JACK可识别的。这意味着它们将会直接出现在Ardour音频连接管理器的来源和目标选项中。在上面的YouTube例子中,您不需要担心任何 PulseAudio / JACK 桥接。 | |||
这过程本质上是一样的:创建一个单声道或立体声音轨来录制音频,设置音轨的输入端接到所需的来源,并正常录制。 | |||
http://brunoruviaro.github.io/ardour4-tutorial/images/Ardour4_Hydrogen.png | http://brunoruviaro.github.io/ardour4-tutorial/images/Ardour4_Hydrogen.png | ||
上面的截图是来自于从Hydrogen录制一个drum pattern鼓声样本直接转发到一个名为“''from Hydrogen''”的Ardour音轨上。在右边的是Hydrogen窗口。打开在左边的Ardour接线板窗口表明:注意应用程序“''Hydrogen''”作为一个来源显示在“Other其它”标签页的下方。它是直接连接到音轨的输入端。还要注意SuperCollider (另一个jack可识别的应用程序)也是碰巧同时开放着的,尽管在截图中看不到它的窗口。SuperCollider提供了8个默认的声音输出,所有这些都在Ardour接线板中显示为潜在的可用来源。 | |||
=<center>— [[Ardour完全教程|返回主目录]] —</center>= | =<center>— [[Ardour完全教程|返回主目录]] —</center>= | ||
2016年3月7日 (一) 18:09的最新版本
启用JACK
Ardour 4.X版不再要求您在您的系统上安装有JACK(JACK音频连接工具包)。但是您可能想启用JACK以便让Ardour可以与其他Linux音频应用程序共享音频和MIDI。如果您想知道JACK究竟是什么,请参考这个页面: http://ardour.org/jack
如果您不打算在Ardour里使用JACK,您可以跳过这一节内容,否则请继续阅读。
简而言之,JACK是一个音频系统,用于在您的计算机上管理Ardour和您的电脑的声卡之间的联系,以及Ardour与其他启用了JACK音频程序之间的联系。Ardour过去一直是要求必须运行JACK,但自从4.0版本开始这变成可选项。
更多关于JACK的信息请参考 http://jackaudio.org/ 以及 http://jackosx.com/
在Ubuntu系统上,您可以使用Qjackctl或者Cadenc去启动和停止JACK,并且控制它的设置。如果您有一个配置恰当的KXStudio安装版,JACK也许已经运行在系统后台中了。如果没有,您可能必须手工启动它。
在苹果Mac系统上,您将需要使用JackPilot。这个页面也许对您有所帮助: http://en.flossmanuals.net/ardour/ch005_installing-jackosx/ (警告:页面具体内容可能已经过时了。我们始终希望能像本教程这样在包括一个更新页面。)
使用Cadence(Linux系统)
启动 Cadence。如果 JACK 已经运行,您将看到这样的一个窗口:
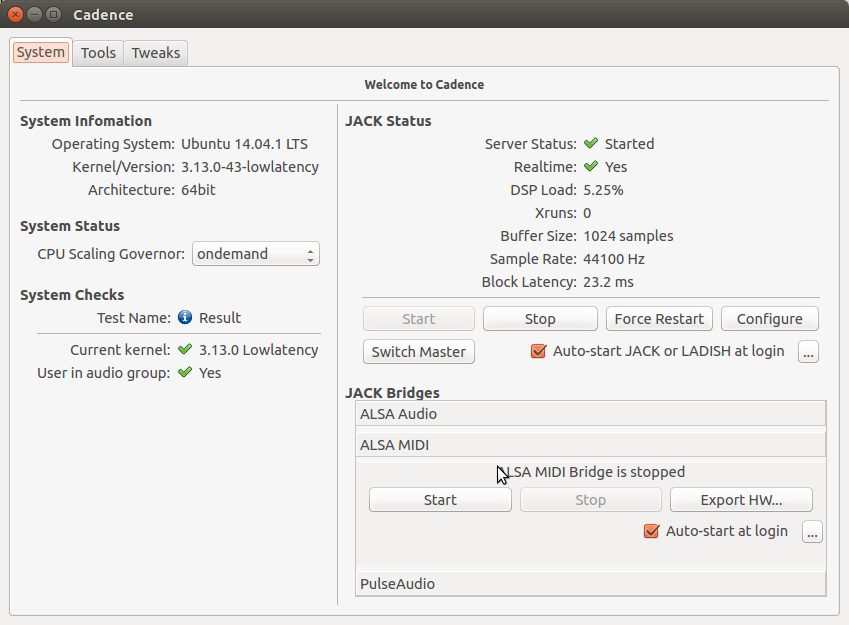
更多关于 Cadence 的信息请参考:
http://kxstudio.sourceforge.net/Documentation:Manual:cadence_introduction
使用Qjackctl(Linux系统)
如果使用Qjackctldi替代,看起来就会像这样:

如果您仍未运行,使用“设置Setup”按钮去配置JACK,然后点击“开始Start”去启动JACK。
使用JackPilot(苹果OS X系统)
请参考这个页面: http://en.flossmanuals.net/ardour/ch013_starting-jackosx/ (警告:页面具体内容可能已经过时了。放这个链接在此只是作为一个起点。我们始终希望能像本教程这样在包括一个更新页面。)
JACK设置
要了解更多的Jack配置信息,请参考: http://kxstudio.sourceforge.net/Documentation:Manual:jack_configuration (使用Cadence讲解,但基本信息同样适用于Qjackctl的设置窗口)。
启动Ardour
很简单,点击Ardour图标即可启动程序。
在Ubuntu系统,您可以使用在Dash分类菜单里找到该软件的启动器。按下“Super”超级键(即“Windows”窗口键),(或者按下“Super” + “A”键直接打开Dash应用分类)然后输入“Ardour”,然后你可以就找到并点击Ardour图标启动程序。如果Ardour是显示的第一个搜索结果,简单回车也可以启动它。
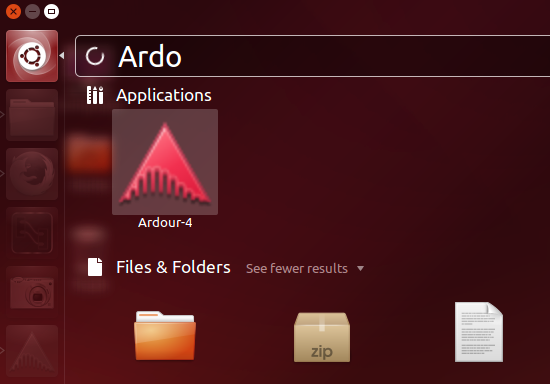
点击Ardour-4即可启动程序。
(注:在UbuntuStudio系统,您可以点击左上角任务栏主菜单,在"Audio Production音频制作"子菜单里就能找到Ardour。)
一旦您启动了Ardour,接下来就会出现会话设置Session Setup窗口。
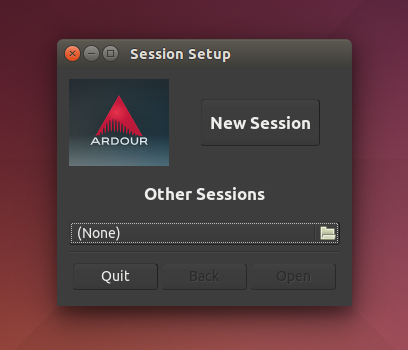
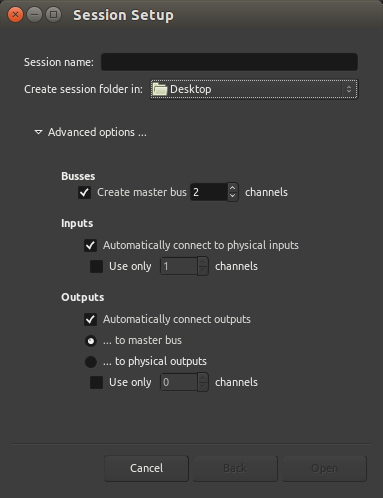
您可以点击New Session新会话按钮创建一个全新的会话,或者您使用下方的Other Sessions最近的会话选项,可以打开一个已经存在的回话。现在让我们创建一个新的会话,点击New Session新建会话按钮,会弹出一个窗口如下图所示。
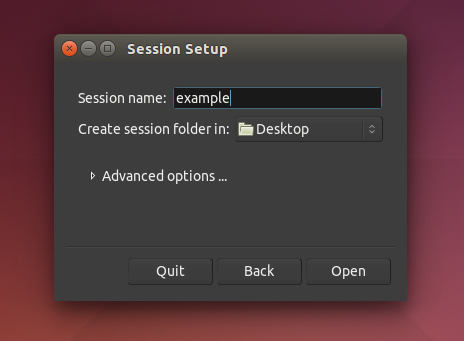
为您的新建工程输入一个名字,点击Open打开 。
- 提示:命名会话时,避免使用除字母和数字以外的任何字符(可以使用中文)。避免使用空格、带音标或重音的字母、!@#$%*()+、句号、逗号等。如果您喜欢,可以使用破折号或下划线。例如,以其命名为“My Great Session!”,不如命名为“My_Great_Session”,或者“MyGreatSession”,或者“my-great-session”。不要用“Açaí”这名字,可以改为“Acai”(没有带音标或重音的字母)等诸如此类。一旦您创建了您的Ardour会话,不要手动重命名属于这个会话的任何文件夹或文件。
开启一个会话
Ardour将对您在Sessions会话里的工作进行分组打包。一个会话是一组Tracks音轨,,最终可能会被混音成一个单声道、立体声或多声道声音文件。会话实质上就是工程,您所有的数据都被保存在这一个单独的会话文件夹中。
当您启动Ardour,您会看到一个提示窗问您是否启用一个新会话,或者打开一个已经存在的会话。当您创建一个新会话时,您必须为它起个名字。
- 提示:命名会话时,避免使用除字母和数字以外的任何字符(可以使用中文)。避免使用空格、带音标或重音的字母、!@#$%*()+、句号、逗号等。如果您喜欢,可以使用破折号或下划线。例如,以其命名为“My Great Session!”,不如命名为“My_Great_Session”,或者“MyGreatSession”,或者“my-great-session”。不要用“Açaí”这名字,可以改为“Acai”(没有带音标或重音的字母)等诸如此类。一旦您创建了您的Ardour会话,不要手动重命名属于这个会话的任何文件夹或文件。
您还需要为Ardour指定您想要把新会话文件夹存储在哪个目录下。
当您一切准备就绪,点击Open打开,Ardour将创建新会话,然后打开它。

高级选项
如果您单击小三角形打开高级选项Advanced Options‘’,您将可以通过以下选项对工程进行更细致的设置:
- 是否创建Master Bus主控总线(即:会话最终输出的音频)且包含有多少个channels声道。
- 是否自动把电脑音频接口(声卡)的输入连接到会话的音轨上,且需要使用几个声道。
- 是否自动连接到输出,是输出到主控总线或是输出到音频接口的输出,且需要使用几个声道。
如果您没有安装JACK到您的电脑里,或者它已经安装了但没有运行,在您的会话启动之前您将看到如下图所示的窗口:
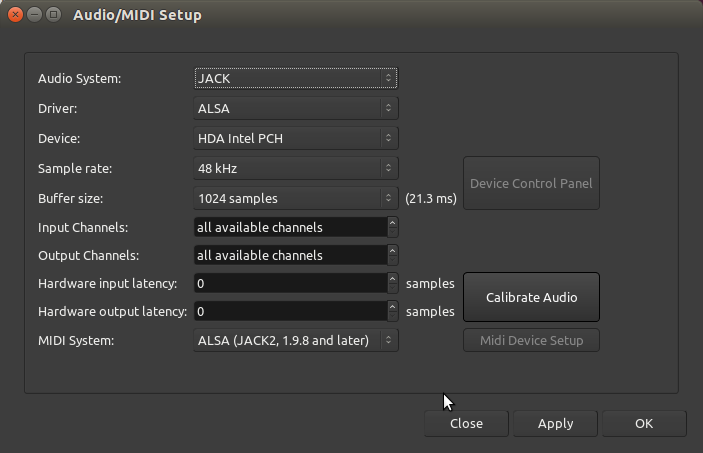
主要选项有:
Audio System音频系统 —— 您可以选择JACK(如果您已经安装有),或者选择您电脑里默认的音频系统(Linux系统是ALSA,苹果Mac系统是CoreAudio)。
Device驱动 —— 或者是您的内置声卡,或者是你也许安装有的一个外置声卡(诸如:一个USB接口的声卡)。
Sample Rate采样率 —— 48K或者44.1K是常用的选择。
(注:关于如何避免硬件延迟,选择UbuntuStudio系统有个好处就是,在开机启动菜单可以选择使用低延迟lowlatency的系统内核。)
如果您在启动Ardour之前就已经启动了JACK,你就不需要处理到这个窗口。
如果要在Audour已经启动后,再创建一个Ardour会话,选择菜单中的Session会话 > New新建。
界面概览
本节将为您概括介绍Ardour的基本界面。
我们将看一下Editor Window编辑器窗口和Mixer Window混音器窗口。在此列出的各项功能将会在后面的章节中介绍更多的细节信息。
编辑器窗口
当您创建一个新的会话之后,Ardour会打开一个空的新窗口即Editor Window编辑器窗口。在Ardour里,编辑器窗口是最重要的窗口,因为在此你不但能够控制程序,而且还能查看和编辑您已经导录制或导入的音频。
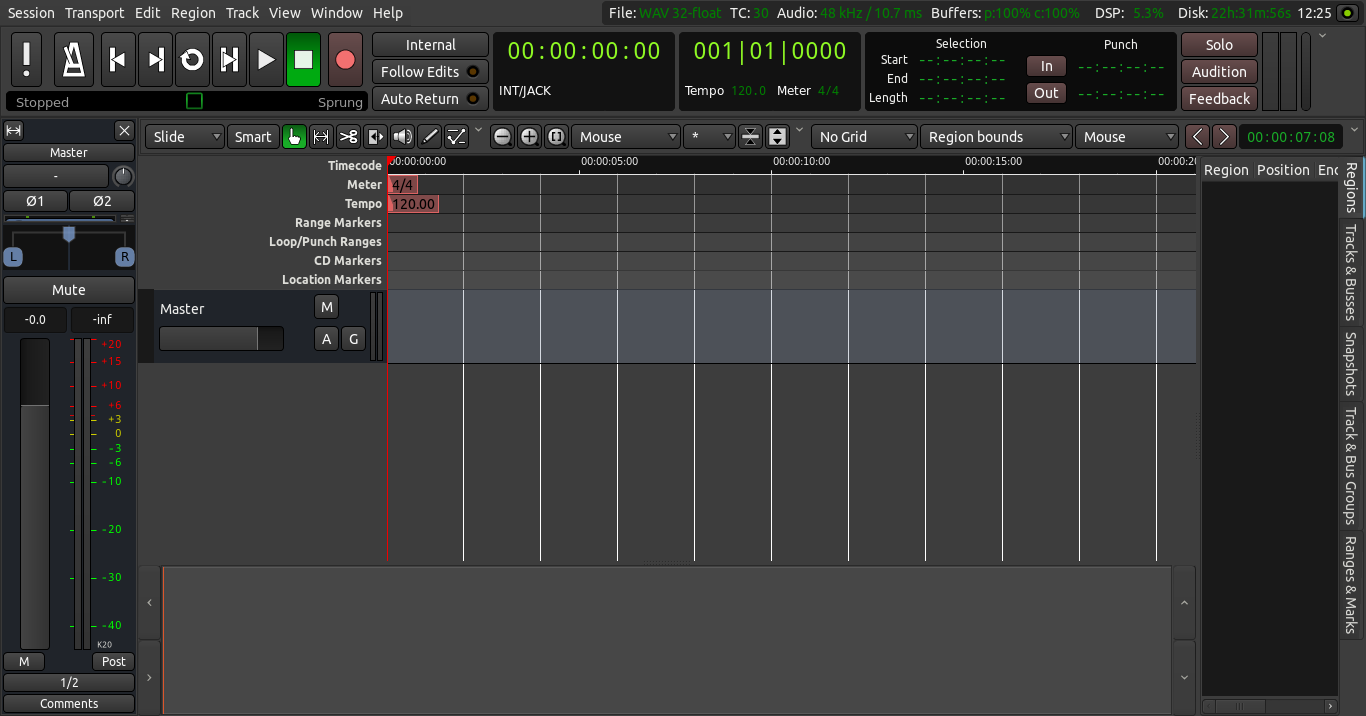
位于编辑器窗口顶部的,是几个主要功能区:Transport Menu播送工具栏,Clocks计时器,Edit Modes/Cursor Modes编辑模式/游标模式工具栏,Snap Mode吸附模式工具栏和Auxiliary Controls附加控制。下面的功能区是Main Canvas主版面,包括了在会话中使用的Tracks音轨和Busses总线。音轨的Mixer Strips混音器工具栏显示在左边,另一组用于概览的选项卡显示在右边,其中有:Regions区域,Tracks/Busses音轨/总线,Snapshots快照、Edit Groups编辑群组和Chunks模块。最底部的窗口是Summary摘要view视图,这是一个小型的时间线视图,可以在整段会话中快速导航。
我们将在这里简略介绍这些控件,而在后续章节将会专门详细地讲解它们。
播送工具栏

Transport Menu播送工具栏的控制包括以下按钮:
| 中文 | 快捷键 | 英文 |
| MIDI重置 | Ctrl+Alt+P | MIDI Panic |
| 启用/禁用音频识别声(节拍器) | 7 (大键盘数字键) | Enable/Disable audio click (metronome) |
| 跳转到会话起点 | Home/向左键 | Rewind(原文有误,不是倒放) |
| 跳转到会话终点 | End/向右键 | Fast forward(原文有误,不是快进) |
| 循环播放 | L | Loop playback |
| 播放片段/选区 | Play range/selection | |
| 从指针起播放 | 空格 | Play from playhead |
| 停止 | 空格 | Stop |
| 启用录音 | Shift+R | Record-enable |
| 推放/滑播(速度)控制 | (鼠标拖动绿色方块) | Jog/shuttle controls |
计时器

计时器位于播送控制的旁边。Ardour的计时器时可以显示4种不同的时间格式:时间码、小节:拍子、,分钟:秒、采样。右键点击计时器即可选择其中一种格式。您也可以关闭计时器。有两个播送计时器的原因是,它允许您以两个不同的时间单位查看指针的位置,而无需改变任何设置。
要了解关于计时器的更多细节,请参阅设置时间线章节。
编辑模式和游标模式

Edit Modes编辑模式和Cursor Mode游标模式控制定义主版幅的行为,以及指定不同功能的游标。在下拉菜单里有三种编辑模式:Slide滑动,Ripple波纹和Lock锁定。右边的Smart智能按钮是用于游标模式:
| 中文 | 快捷键 | 英文 |
| 智能模式 | Y | Smart Mode |
| 抓取模式 | G | Grab Mode |
| 范围模式 | R | Range Mode |
| 切割模式 | C | Cut Mode |
| 伸展模式 | T | Stretch Mode |
| 监听模式 | (鼠标点按着不放) | Audition Mode |
| 描绘模式 | D | Draw Mode |
| 内部编辑模式 | E | Internal Edit Mode |
它们中的大多数都是在区域常用操作这一章里详述。最后两个在使用自动化这一章里详述。
Smart Mode智能模式实际上是抓取模式和范围模式的组合。启用时,游标如果是在区域的上半部分时是“范围模式”,游标在下半部分时则是“抓取模式”。
(注:最右上角的向下箭头,点击它可以把工具栏提取出来成为一个单独的窗口,然后这个窗口可以移动放置在任意地方。同样,点击窗口里最右上角的向上箭头,或者点击窗口边框的X关闭按钮,可以把工具栏恢复到原位。)
吸附选项

吸附选项工具栏控制着Snap Options吸附选项、Grid Points网格点和Edit Point编辑点。请参见设置节拍、使用范围和区域常用操作章节以了解更多的细节。
缩放选项

在Cursor Modes游标模式和Snap Options吸附选项之间的是Zoom Options缩放选项。在这里您可以限定缩放操作的行为。您可以使用标准的Zoom In放大(推进)和Zoom Out缩小(拉远)按钮,加上第三个被称为Zoom to Session缩放到会话的按钮(对于快速概览您的整个会话十分有用:它根据屏幕可用空间缩放显示整个会话)。
| 中文 | 快捷键 | 英文 |
| 放大 | - | Zoom In |
| 缩小 | = | Zoom Out |
| 缩放到会话 | Shift+_ | Zoom to Session |
- 提示:使用快捷键 = (主键盘上的等于号)放大,使用快捷键 - (主键盘上的减号)缩小,使用快捷键 Shift +_ (主键盘上同时按着Shift键和减号键)缩放到会话。
接着的下拉菜单控制着Zoom Focus缩放焦点。它限定缩放操作的焦点。您可以尝试每一种不同的放大和缩小焦点。例如,选择指针(playhead播放头)将导致以指针所在的位置为中心进行缩放。选择鼠标将以您当前鼠标的位置作为参考进行缩放,诸如此类。
(注:该菜单的选项有——左、右、中、指针、鼠标、编辑点)
接着的下拉菜单和最后两个按钮控制着“垂直缩放”。它们允许您在垂直方向上延展和收缩所有的音轨及总线。使用下拉菜单选择一个您想在屏幕上显示的特定音轨数量(注:即屏幕最多能同时显示多少个音轨)。使用那两个按钮可以延展和收缩所有音轨(或者如果已经有了一个选区,则仅针对已选中的音轨)。
辅助控制
想了解主界面上其它按钮的更多信息,请参考Ardour手册 http://manual.ardour.org/ 。
主版面
主版面略低于上述的控制按钮行。它基本上包含了Rulers标尺、Tracks音轨和Busses总线显示的空间、以及底部的Summary摘要view视图。
在Ardour的编辑器窗口(整个窗口的右上角)的最顶端,您可以发现非常有用的信息,例如会话的采样率,可用的记录时间,以及DSP使用率。(注:Digital Signal Process数字信号处理器)
标尺
右键点击标尺名称,您将看到一个菜单,列出的是可供您显示的所有标尺类型。您可以取消勾选您不需要的标尺勾选,以节省屏幕空间。更多的相关操作信息可以参考设置时间线和设置节拍章节。
(注:菜单的选项有——分:秒、时间码、采样、小节&拍子、节拍、节奏、范围标记、循环/转切、CD标记、位置标记、视频时间线)

音轨和总线
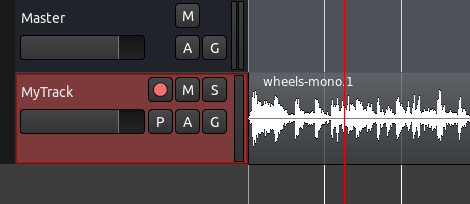
标尺的下方显示的是音轨和总线。如下图所示,您可以看到一个总线名叫“Master”,以及一条音轨名叫“MyTrack”。其中MyTrack音轨包括了一个区域,其所显示的一个音频文件被描绘成它的波形。更多关于音轨和总线的信息请参考创建一条音轨或总线章节。
编辑器混音器
编辑器混音器位于编辑窗口的左边。它显示的是当前选中的音轨或总线的Mixer Strip混音器工具栏信息。它控制着音量、插件以及与音轨和总线相对应的路由。您可以切换显示或隐藏编辑器混音器,只需点击菜单View视图 > Show Editor Mixer显示编辑器混音器 (快捷键 “Shift +E”)。混音器的更多信息请参考使用混音器章节。
(注:下图为选中音轨后的混音器工具栏显示状态)

区域、音轨/总线、快照、群组、范围、标记
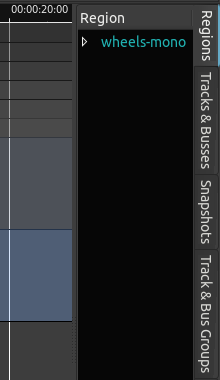
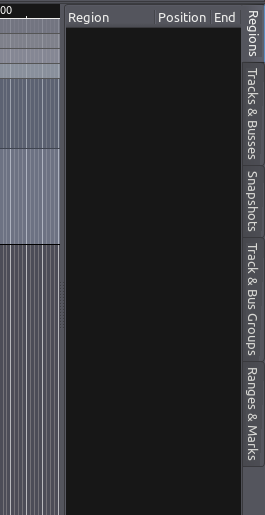
在Ardour的编辑器窗口的右边区域,根据所选中的标签页不同,可以有5个不同的功能:Regions区域、Tracks/Busses音轨/总线、Snapshots快照、Track & Bus Groups音轨和总线群组、以及Ranges & Marks范围&标记。默认是区域标签页被选中。因此编辑器窗口的这部分通常被称为Regions List区域列表。区域所代表的音频文件存储在银盘上,可以直接把它从区域列表里拖到主版面的音轨上。想了解更多区域的信息可参考区域常用操作章节。音轨标签页的功能请参考安排音轨章节,快照标签页的功能请参考保存一个快照章节。
混音器窗口控件
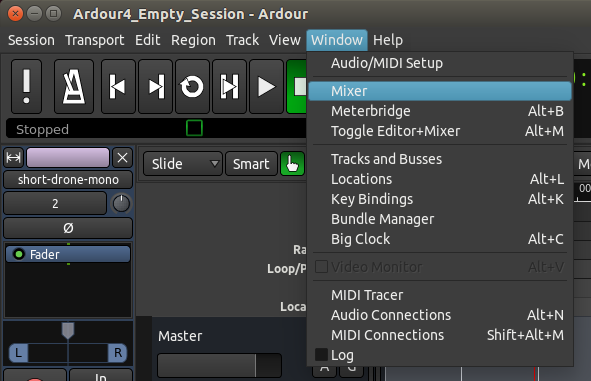
第二个窗口,Mixer Window混音器窗口,点击主菜单的 Window窗口 > Mixer混音器 即可显示。
混音器窗口的主要功能是显示所有的混音器工具栏,各个音轨并排显示,以便于参考。这个窗口主要应用于Mixing混音流程,它还提供了访问Plugins插件和其他Routing路由功能。若需要更的详细信息,请参阅理解路由、混音和使用插件章节。
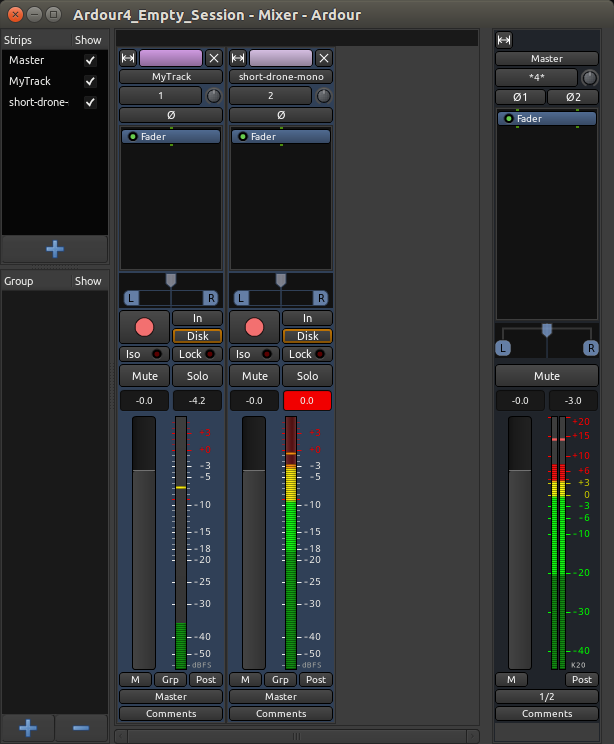
这个窗口的左上角还包含有一个可见混音器工具栏清单。这部分的复选框可以用来查看和隐藏不同音轨的混音器工具栏。最后,还有一个区域来管理Groups群组。
切换窗口
您可以使用组合键 Alt + M(苹果Mac系统 Control + M)来切换窗口置顶:编辑器或混合器。
分离和重新放置工具栏
编辑器窗口的大部分工具栏是可以从编辑器窗口脱离开来,只需点击右上角白色向下的小箭头即可。

分离出来的工具栏在屏幕上将成为一个单独的窗口,而如果要重新放会编辑器窗口的原处,只需点击右上角白色向上的小箭头即可。
设置时间线
因为不同的用户使用Ardour处理不同的工作,所在应用程序中,时间的衡量方式应当是可以变更的。
用户创建音频播放、纪录片、新闻报道或者环境音效可能希望使用Minutes分钟和Seconds秒,又例如,录制乐队或出品电子音乐将最有可能使用Bars小节和Beats拍子。视频出品则希望以一个视频帧每秒的Timecode时间码来操作,而那些希望极致精度的甚至可能希望使用Samples采样。所有这些方式都可以在Ardour中显示和使用,以此作为一种手段来组织您的区域和编辑。
主计时器和次计时器
Editor Window编辑器窗口顶部附近有两个计时器,以数字格式显示时间的格式:时间码,小节:拍子,分:秒和采样。右键点击这两个时钟的任意一个即可以更改它的格式。
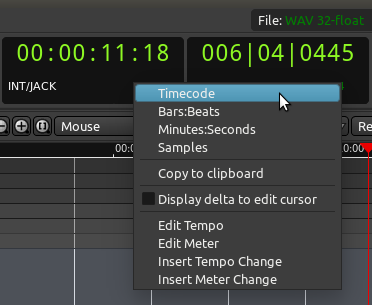
这些被称为播送计时器。左边是播送计时器,右边是次播送计时器。有两个播送计时器的优点是您能够以在两个不同的时间单位看到指针的位置,而无需改变任何设置。
在这两个计时器的右边,您还可以看到一组5个计时器,用于显示当前已选择的范围和切换范围。关于时钟显示更多的信息请参阅Ardour手册。
吸附模式
Snap Mode吸附模式工具栏位于计时器下方靠右的地方。它们控制Quantization量化时间网格的方式,即:“吸附”一个音频Region区域到您所选择的网格类型。

当选中了No Grid无网格,可以在音轨内自由移动区域。当选中了Grid网格,区域将会“吸附”到最近的Grid Point.网格点。当选中了Magnetic磁性吸附,可以自由移动区域,但当它们被移动到非常接近一个网格点时,将会“吸附”到网格点。
中间的Units单位菜单用于选择以什么来作为网格点,例如拍子、小节、标记、分钟、秒、各种SMPTE时间码,或者或区域的边缘。
时间线
Timeline时间线位于吸附模式工具栏下方,主版面的正上方。通过在时间线上右键单击,您可以设置复选框,勾选希望显示的不同类型的时间信息。

分/秒
要在时间线上查看分和秒,右键点击时间线,然后选择Min分:Sec秒。您将能够以秒或者分来设置网格。
小节/拍子
要在时间线上查看小节和拍子,右键点击时间线,然后选择Bars小节 & Beats拍子。您将能够以小节\拍子或者多拍的简写,例如3、4、8、16或32。
不但可以为整个Ardour回话设置一个Meter节拍和Tempo节奏,还可以在同一个会话中的不同地方改变它们。有关这方面的更多信息,请参阅Setting Up the Meter设置节拍章节。
时间码
要想以SMPTE视频时间码进行工作,首先您需要设置Timecode时间码fps(帧每秒)。可以在会话属性窗口(菜单栏 Session会话 > Properties属性,或者快捷键 Alt + O)找到时间码标签页。
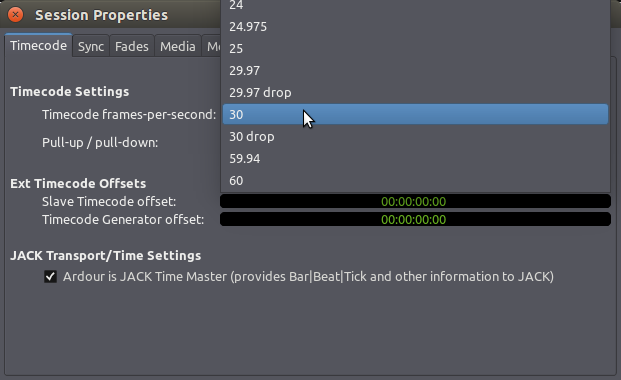
一旦您完成设置,请在时间线上右键点击,勾选Timecode时间码复选框,以确保您的时间码尺可见。你将能够以SMPTE Frames帧、SMPTE Seconds秒和SMPTE Minutes分设置网格。
创建一个音轨或一条总线
什么是音频轨道?
一个Audio Track音频轨道就是一个您可以从您的Region List区域列表拖动一个Region区域的地方,您还可以录制来自外部声源的声音。
一个区域代表一个音频剪辑片段。例如,您的声音文件或者声音文件的某一部分。在下图中,被标记为“Audio 1” 和 “Audio 2”的水平条状区域就是音轨。在音轨Audio 1 内包含有音频信息(命名为“某某声音”)的矩形被成为一个区域。

什么是总线?
一条Bus总线类似于音轨,除了它不包含属于它自己的区区域。您不能直接录制到一条总线,也不能拖拽区域到总线里。在上面的图片中,被标记为“master”的就是一条总线。通常每个会话都有一个Master Bus主总线。从您的会话导出的所有音频都将被发送到主总线。
如何使用音轨和总线?
音频处理Plugins插件和Automation自动化都可以应用于音轨和总线。
音频轨道可以被路由到总线。事实上,许多音轨可以同时被路由到一条总线。总线通常被用作是将任何信号处理一次同时应用到许多音轨的简便方法。您可能会发现它有用,例如,路由所有包含鼓声的音轨到一个单独的、您将命名为“drum bus鼓声总线”的总线。然后,如果你决定你所有的鼓声音轨太大声,您可以快速调整“drum bus鼓声总线”的电平,而不是调整汇聚到一起的每个单独的音轨。
总线的另一个用处是可以拥有一个共用的Reverberation混响插件,因此任何需要Reverb混响效果的音频轨道都可以被路由到一个单独的总线。
添加音轨和总线
在任何现有的音轨和总线下方的空白区域右键点击,或者,点击菜单 Track音轨 > Add Track/Bus添加音轨/Bus总线(快捷键 Ctrl + Shift + N)。将会出现以下窗口:
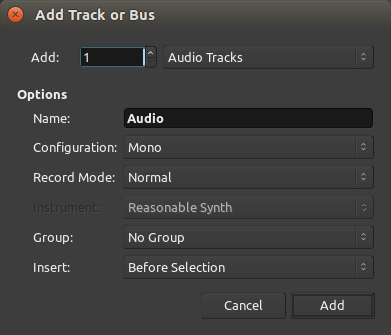
Add添加允许您指定要创建多少音轨(或总线)。
在菜单中选择Audio Tracks音频轨道或者Busses总线以确定您要创建的是音轨或者总线。您也能选择创建一条MIDI Track音乐设备数字接口音轨或者一条Audio+MIDI Track音频+音乐设备数字接口音轨。Ardour提供的这三种音轨类型是取决于他们所包含的数据类型,而区分这三种音轨模式则是取决于他们的录制方式。本教程将仅介绍音频轨道和总线(全部音轨类型的详细介绍请参阅Ardour手册)。
您可以为所创建的音轨或总线随意起一个Name名称。Configuration配置下拉菜单允许您指定您希望新的音轨或总线可以处理有多少声道。例如,如果您将使用一个单独的麦克风录制您的声音到这个音轨上,可选择Mono单声道。如果您计划从现有的歌曲导入一个片段并放置到这个音轨上,可选择Stereo立体声。此处的选择也会影响到哪些插件可以使用在这音轨上(单声道音轨不能使用立体声插件,反之亦然)。
Track Mode音轨模式菜单能让您选择Normal普通,Non Layered不分层和Tape磁带。正常模式为每次录制创建一个新区域,建议初学者使用。在其他模式下的更多信息,请查看Ardour手册。关于乐器和分组选项的附加信息也可以在手册的其它页面找到。
Group分组选项允许您把新的音轨添加到现有的分组,或者在创建新的音轨时也创建一个新组。如果您是一个初学者,您现在还不必担心分组。仅供未来参考,您可以在Ardour手册找到更多的信息。
最后一个选项(Insert插入)允许您选择把新的音轨或总线放置在什么地方:起始点、结束点、已选中部分之前或之后。
最后,点击Add添加按钮创建您刚刚配置好的音轨或总线。您会看到它们作为新的一行出现在Main Canvas主版面上。
导入音频
在Ardour里,音频的一部分被称为Regions区域。一个区域可以是整个声音文件或者是声音文件的一部分。在此您将学习到如何从您的电脑的硬盘导入音频文件,以便能在您的Ardour里使用它们。
要导入一个音频文件,首先在位于最右边的编辑器窗口的Region List区域列表上右键点击,如果您没有看到它,确保“View视图”菜单里已经勾选“Show Editor List显示编辑器列表”。一旦您看到编辑器列表,请注意这个地方显示的功能选项也会随着标签页的改变而改变。在您右键点击之前,确保区域标签页已经被选中。
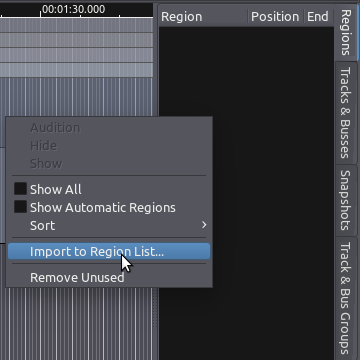
一旦您右键点击了,会出现一个菜单,其中有Import to Region List导入到区域列表这个选项,点击这个选项。
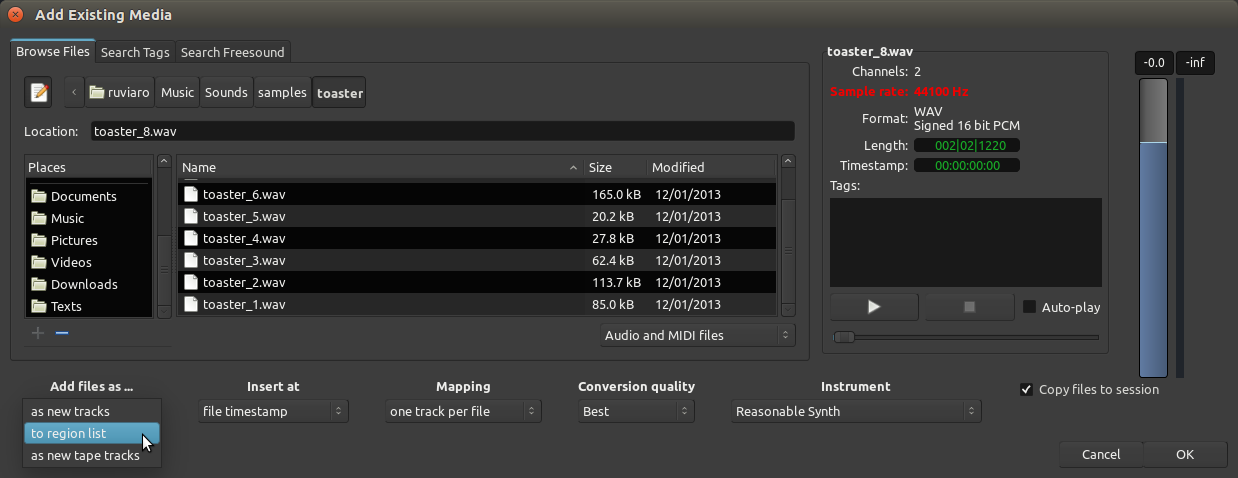
现在您将会看到Add existing media添加已存在的媒体对话框(注意:打开到这个窗口的快捷方式是“Ctrl”+“I”)。在这个对话框的左边,您会看到一个文件浏览器,让您可以从硬盘里搜索您要添加的声音文件(初学者最好是从一个通用的文件格式开始,诸如WAV或AIFF)。在左下角有一个菜单,指明这些文件将被如何添加。“Add files as new tracks添加文件作为新的音轨”将导入音频文件并把它们放在一个新创建的音轨上。“Add files to region list添加文件到区域列表”将简单地把音频文件导入到该区域列表,不创建任何新的音轨。现在选择则个选项,因为在此我们不想让Ardour创建任何音轨。
- 提示:如果您在硬盘里没有任何合适的音频文件来跟着这些步骤做,可以点击“Search Freesound搜索自由声音”标签页(或访问freesound.org),从那里您可以找到大量的、遵循Public Domain and Creative Commons–licensed公用领域和知识共享协议许可的、具有各种不同的采样率和格式的声音样例。
在Add existing media添加已存在的媒体对话框的右边,您可以看到有一处选项,允许您检查您所选择的文件的属性。在这里您将看到文件名,声道的数量,采样率,声音文件的格式和长度,以及您选择添加到文件的任何标签说明。
Play播放按钮允许您使用试听总线来预览文件。最后,这个对话框提供有一个选项,能让您选择复制(多个)文件到当前会话的文件夹(Copy Files to Session复制文件到会话)。这是安全的,但是它会占用更多的硬盘空间。如果你不勾选这个选项,Ardour将使用硬盘上当前位置的这个声音文件。在这种情况下,如果文件被移动到硬盘上的一个新的位置,您可能会遇到麻烦,因为在下次您打开这个会话时Ardour无法找到它。在此强烈建议您勾选离开这个复选框(“Copy Files to Session复制文件到会话复制文件到会话”)。
单击OK确定继续。您所选择的(多个)文件将会成排出现在您的区域列表中。
- 提示:如果您选择的文件的采样率不匹配当前会话的采样率,Ardour会以红色显示不匹配的采样率。如果您试图导入这个文件,Ardour也会警告您采样率不匹配,并且询问您是否确认您无论如何都要嵌入。如果您选择嵌入这个有问题的文件,它不会以它所录制的采样率来回放,而是以当前Ardour会话的采样率来回放。这将导致声音以错误的速度和切换方式来播放。
一旦您已经经成功地在该区域列表里嵌入了您的音频文件,您就会在屏幕上看到它。在下面的截图中,三个文件已经被导入:“toaster_8”、“short-drone-mono”、“wheels-mono”。在“toaster_8”后面的数字[2]表明它是一个立体声文件。
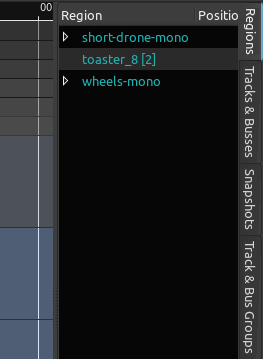
通过拖拽并放置区域到主版面,您可以把它插入到一个现有的音轨里。
- 提示:当该区域的名字是用蓝色突出显示时,如果您点击中间的文字,Ardour会认为您正在试图重命名该区域(名字将变成可编辑状态)。为了从列表中点击并拖动一个突出显示的区域,您需要把鼠标刚好指向并点击在名字之前或之后。
释放按着的鼠标完成拖放操作。该区域将被插入在您放开它的那个准确的时间点。
重要:您应当总是确保把立体声区域放置在立体声音轨上。如果您拖放一个立体声文件到一个单声道音频轨道上,那么只有左边声道会被使用。在下面的屏幕截图中,一个立体声文件具有非常独特的左声道和右声道,它被拖放到了立体声音轨和单声道音轨上。注意在单声道音轨上只有左边声道被显示出来(以及被回放)。

直接导入音频到一个音轨
如前所述,Add existing media添加已存在的媒体对话允许您直接导入音频到一个音轨。
选择Add files: as new tracks添加文件:作为新的音轨以自动创建一个新的音轨并将已选中的文件添加到它上面。将以声音文件的名称来命名音轨。
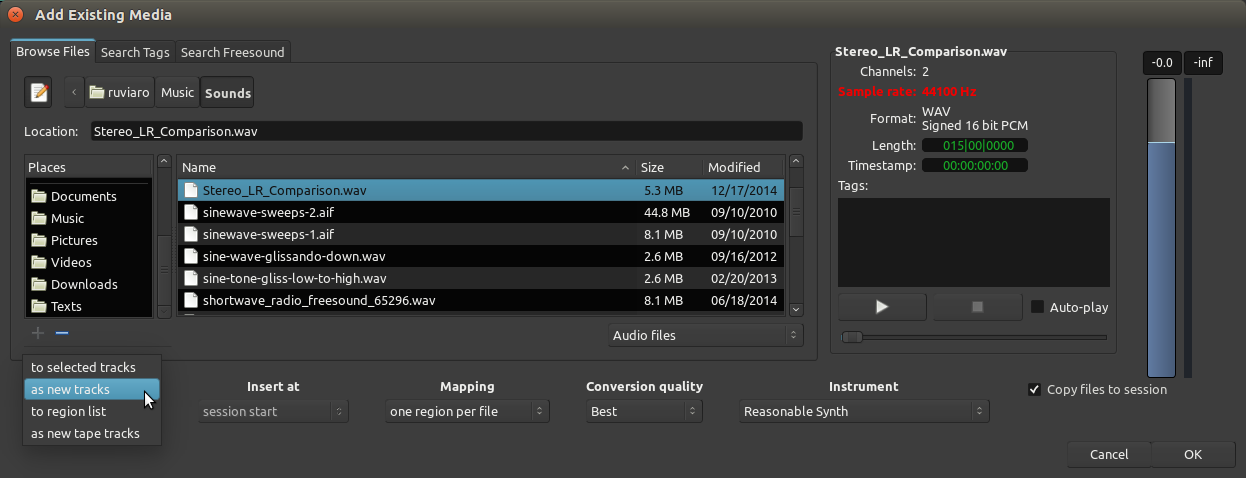
如果您之前已选中一个或更多个音轨,菜单将显示额外的选项Add files: to selected tracks添加文件:到已选中的音轨以添加声音文件到现有的已选中的音轨。
选择插入点
当使以上选项中的任意一个(“add as new track添加为新音轨”或“add to selected tracks添加到已选中的音轨”)时,您还应该指定在音轨里您要放置的新区域。在下面的截图中,我们选择“session start会话起点”。
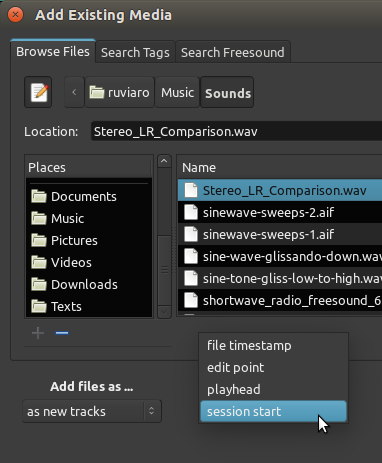
在会话中该区域出现在一个新的音轨里。新的音轨自动继承所导入的声音文件的名称。
声音文件也将出现在该区域列表中,以便它也可以插入到其它音轨(拖放即可)。
从音轨移除区域
要从一个音轨中移除一个区域,可以用鼠标选中它,并使用菜单中的Cut剪切功能,Ctrl键(或Apple苹果键)和X键,Delete删除键或fn和Backspace退格键的组合(例如,可用于没有一个适当的删除键的笔记本电脑键盘上)。
- 提示:经常保存您的工作!快捷键“Control”+“S”将是您的好伙伴,会经常用到它。
录制音频
除了导入音频,在您的Ardour会话里创建区域的另一种方法是录制新的音频。
这音频的来源可能是您的音频设备(声卡)上的接线或麦克风输入,或者它甚至可以是来自您的计算机上的、已通过JACK连接到Ardour的、其它应用程序的原始声音。更多细节请参阅Routing路由部分。
本节将向您展示如何从一个外部源(例如:一个麦克风)录制音频到Ardour里的一个音轨。
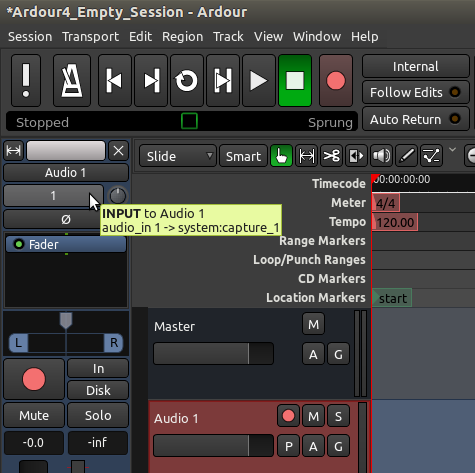
首先,您应该检查适当的输入已经被路由到您想录制到的音轨上。
- (在主版面)通过在略低于音轨名称和音量滑块的地方点击空白处选择音轨。
- 音轨变成突出显示。
- Editor Mixer编辑器混音器垂直栏目位于编辑器窗口的左侧,现在应该显示刚才选择的音轨(上图Audio 1音频1)。
- 在编辑器混合器中的音轨名称下方,您会发现一个按钮,允许您编辑路由。
- 右键点击那个按钮(会弹出一个新窗口)查看路由。(如果是左键点击则需要在菜单中选择Routing Grid路由网格)
- 提示:如果您没看到Editor Mixer编辑器混音器栏目,可以使用快捷键“Ctrl” + “E”让其显示出来。
在接下来的图中您可以看到,这个单声道音轨唯一的输入是从system capture_1系统捕获_1接收信号。这通常意味着您的声卡的第一个麦克风输入。
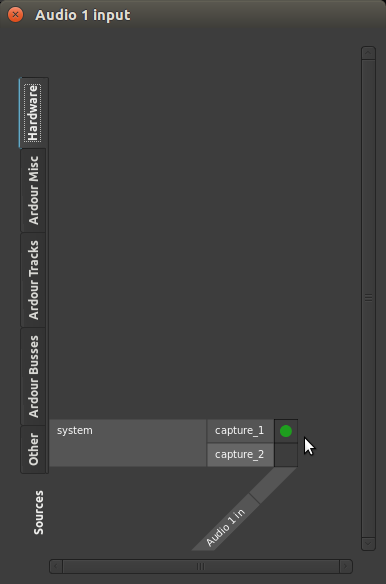
您可看到在左边垂直显示的标签是可用的来源。右下角的“Audio 1 in音频1输入”是目的地。绿点代表一个连接。
带有Ardour字样的标签页显示的是从Ardour里的其它来源生成的连接。Other其它标签页显示的是从其它软件来的音频可用连接而不是来自Ardour。Hardware硬件标签页显示的是硬件连接(例如,您的电脑内置的麦克风或者来自于您的声卡的输入端)。在所有情况下,这个路由矩阵直接与JACK沟通以在JACK系统它本身内改变路由。这方面在Understanding Routing理解路由章节有更详细的解释。
本章节的目的,只是简单确认system capture_1系统捕获_1(从Hardware硬件标签页)连接到Audio 1音频1音轨,这样我们可以做一个测试录音。如果您没有看到像上面截图中的一个绿点,手动点击矩阵进行连接即可。您现在可以关闭此窗口。
- 注意:上面的示例假设您录制一个Mono单声道声源到一条Mono单声道音轨。如果您想录制Stereo立体声,操作指南几乎是相同的,但是您应该创建一个Stereo立体声音轨。您应该会看到两个绿点,一个为capture_1捕获_1以及另一个为capture_2捕获_2。
预备音轨
“Arming the Track预备音轨”是简单地让音轨准备进行录制。一旦您确认正确的捕获输入被路由到音轨,您可以通过点击水平音轨栏目上的小红点图标来装备音轨(不是播送控制里的那个大红点图标)。
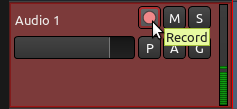
正确预备之后,小红点图标将持续突出显示,且您将能够通过查看在编辑器混合器或者水平音轨栏目上的Peak Meter峰值节拍看到传入的信号。
- 注意:除非您有告诉Ardour去做,否则,正在被录制的输入将通过Audition试听的输出被监控着(换句话说,被听到)。如果你不使用耳机来监控录音过程,你可能在这一点上会得到一些太大声的反馈!
预备Ardour并开始录制
现在您已经为录制预备了音轨,您必须通过点击播送工具栏的大红圆点按钮预备Ardour本身以录制。红色圆点按钮将闪烁,表明Ardour已经准备录制。要开始录制,点击播送工具栏的播放按钮,或者按下您的电脑键盘上的空格键。再次单击播放按钮(或按下空格键)将停止录制。
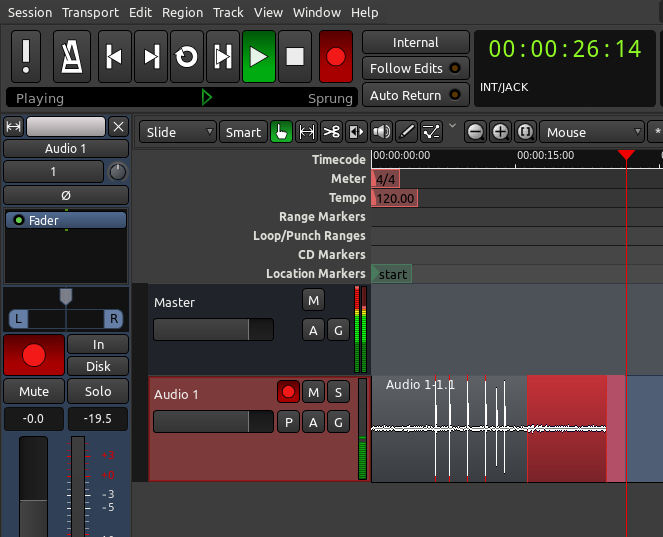
录制时,预备音轨将从输入捕获声音。在录制过程中,任何在其它音轨的已有的声音将会正常播放。这允许您随着其它您已经录制或嵌入到您的会话的区域和音轨来播放、歌唱或者说话。
录制时,您将能够看到导入的声音的电平(分贝振幅),录制的同时也能看到波形的峰值的显现。
避免截波
从下方截图中可看到,录制的音频太大声,并且产生了截波(换句话说,录制的信号超出了数字所能表达的范围之外)。导致信息的损失和声音的失真。在波形中,使用用红色来标记截波峰值。
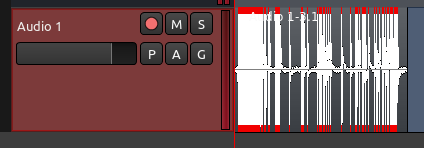
避免截波最好的和最容易的方法是,在输入的音频信号到达声卡之前,就对音量进行一些控制。例如,您可以移动麦克风远离将被录制的声音,或者使用混音器降低输入信号的音量。
当音频信号被录制在适当的范围内,您应该看到没有红色的峰值,以及电平计量应该显示一个负数的最大峰值(例如,一个最大的峰值到截波点之间有−3.0分贝是一个恰当的距离)。
在区域的最大峰值和截波点之间的分贝通常称为Headroom净空高度。通常录制时的做法是,在您的信号最大值和截波点之间,保持大约3到6分贝的净空高度,截波点本身被表示为0dB(零分贝)。换句话说,一个带有适当净空高度的音频区域,其拥有的最大峰值处在−6dB和−3dB之间。
区域列表
录制好的音频作为一个新的区域出现在录制的音轨上。像所有区域一样,这个新录制的区域显示在区域列表中,从那里您可以在需要的时候拖拽它到其它轨道。
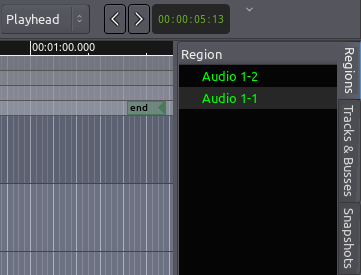
您刚才录制的区域将自动继承用来录制它的音轨的名字,不同的是会自动加上编号。在下面的截图中,“Audio 1-1音频1-1”和“Audio 1-2音频1-2”代表了在一个名为“Audio 1音频1”的音轨上的两次不同的记录。
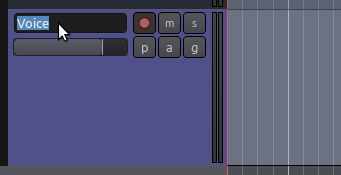
您可能希望以适当的名称为不同的音轨提前计划和组织您的录制会话。例如,仅用于录制vocals声乐的音轨可以命名为“Voice声音”。这种方式,录制后的声音文件将会被相应地命名,并且显示在区域列表中的不同的磁带将被标识为“Voice-1声音-1”,“Voice-2声音-2”,等等诸如此类,而不是默认的通用名称,如“Audio 1音频1”。
要重命名一条音轨,只需双击它的名称(在您为录制而预备的音轨的前面)然后就可以输入新的名称。
- 提示:记得我们提到经常保存您的工作是多么重要吗?现在按下“Ctrl”+“S”即可。要养成每隔几分钟就按下“Ctrl”+“S”的习惯。
理解路由
Routing路由一个音频信号就是把音频信号从一个地方发送到另一个地方。
除了从Ardour得到音频信号或者把获取的信号交付到Ardour意外,路由还在Ardour它自己本身里扮演着一个重要的角色。在Ardour中使用路由的例子包括:路由从音轨到主总线或者到其它总线、创建“sends发送”、路由从总线到主总线的输出,等等。(关于音轨和总线的阐释请参阅创建一个音轨章节)。所有的路由,不论Ardour内部和外部都是由JACK来处理。
在Ardour内的路由
在新会话的高级选项对话框里创建一个新会话时(参阅开启一个会话章节),输入的标准路由、以及Ardour里的音轨和总线就被确定下来了。默认情况下,路由如下:
- 音频设备输入路由到音轨输入。
- 来自音轨和总线的所有输出路由到主总线输入。
- 主总线输出路由到音频设备输出。
注意:在创建新的总线时,没有任何东西被路由到新总线的输入。
这个路由设置使会话只包含音轨具有其意义,但要使用任何总线(除了主总线)或者要取得带有创意的在Ardour内部音频信号的路径,我们就需要有能力改变路由。
Audio Connection Manager音频连接管理器窗口(也称为patchbay接线板)是建立连接到Ardour混音器、从Ardour混音器来连接、在Ardour混音器内部连接的主要方式。您可以使用快捷键“Alt”+“N”,或通过菜单Window窗口>Audio Connections音频连接来打开这个窗口。
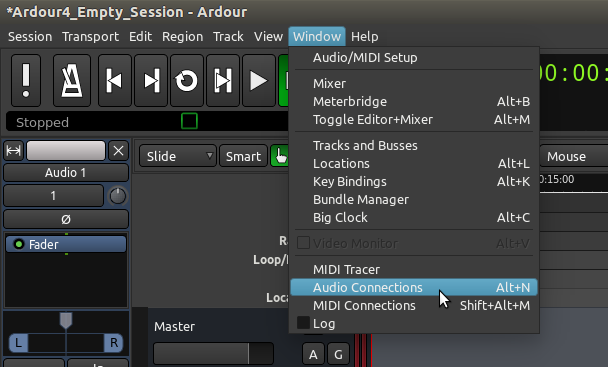
接线板带有两组端口:一组是来源,另一组是目标。来源和目标都是用标签页来分类。可用的来源垂直显示在左边,底部的水平显示的是目标。
在下面的截图里,请注意左上角被选中的的“Hardware硬件”标签页(这是一个源),在底部被选中的目标“Ardour Tracks音轨”。这意味着您所看到的矩阵显示的连接是:从可用的硬件声音来源(例如,一个麦克风),进入到已存在的Ardour音轨。
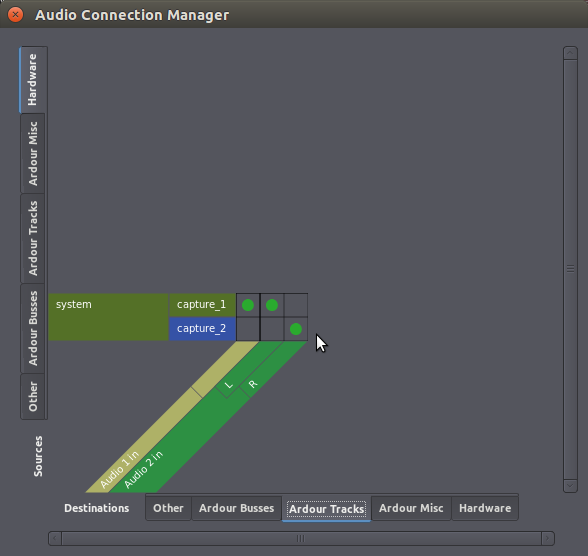
绿色小圆点代表一个连接。上面的截图告诉我们,从“system:capture_1系统:捕获_1”输入的声音(您的声卡的第一个输入源,或者您的笔记本内置麦克风)进入到名叫“Audio 1音频1”的Ardour音轨,而且从“system:capture_1系统:捕获_1”和“system:capture_2系统:捕获_2”输入的声音分别进入名叫“Audio 2音频2”的Ardour音轨的左右输入端。
注意:我们可以看到“Audio 1音频1”是单声道的音轨,因为它只有一个连接槽,而音轨“Audio 2音频2”是立体声的,因为它有两个连接槽(Left左和Right右)。
接下来的屏幕截图显示了来自Ardour音轨(被选中的垂直标签页)的信号路径进入到了Ardour总线(被选中的水平标签页)。正如前面提到的,所有Ardour音轨默认设置是让音轨的声音进入主总线。
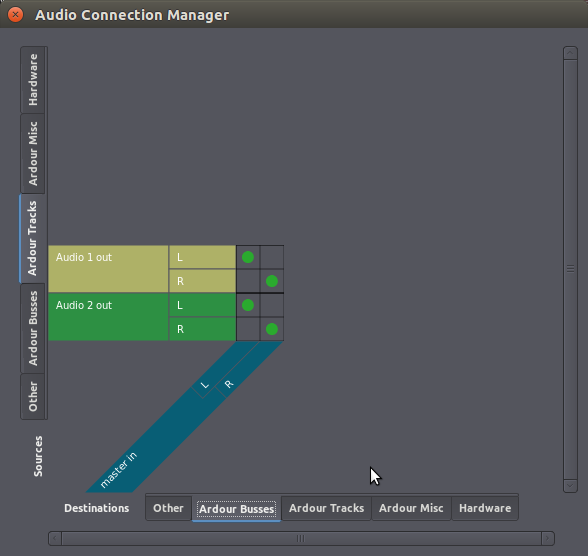
注意:还记得“Audio 1音频1”是单声道音轨吗?我们在前面的截图可以看到“Audio 1音频1”只有一个输入槽。但是现在在上面的截图你看到“Audio 1音频1”有两个输出(Left左和Right右)。这是正常的:我们通过音轨的输入端的数量来定义一个音轨是否单声道或立体声,而不是用输出端来定义。单声道音轨将保留有音频的一个单通道,但你仍然可以选择将声音放置在左边的扬声器或者右边的扬声器(或着它们之间的任何地方)。关于这方面更多的信息请参考声相章节。
最后,让我们看一下音频连接管理器里的一些标签页,以便了解来自主总线的声音如何转到实际硬件输出(您的扬声器或者耳机):
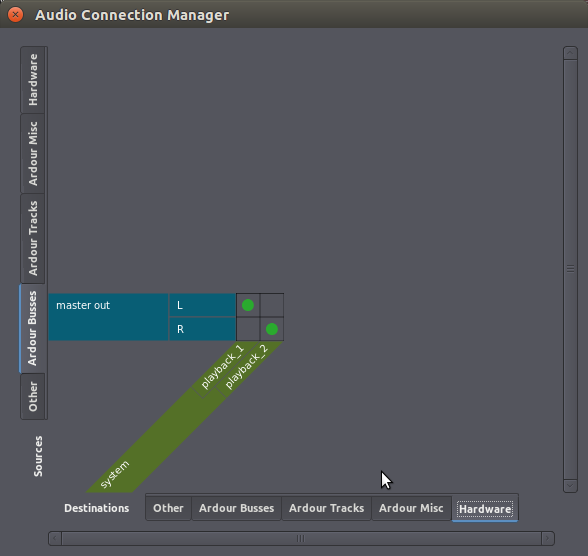
正如您所看到的,现在已选中的来源是 “Ardour Busses总线”标签页,已选中的目标是“Hardware硬件”标签页。这个会话碰巧只有一个总线,即默认的“master out主输出”。绿色小圆点表明,所有来自Master Bus主总线的声音都转到system playback系统回放1和2,也就是您的声卡的输出端。
如何连接和断开连接?
要连接,点击矩阵中所需要的方格,将会出现一个绿色小圆点表示已创建连接。
要取消连接,只需简单地点击一个现有的绿色小圆点,它就会消失。
路由到一条总线的实例
在下面的会话实例中,有两个吉他音轨和一条被称为Guitar Bus吉他总线的未使用的总线,全都是立体声。
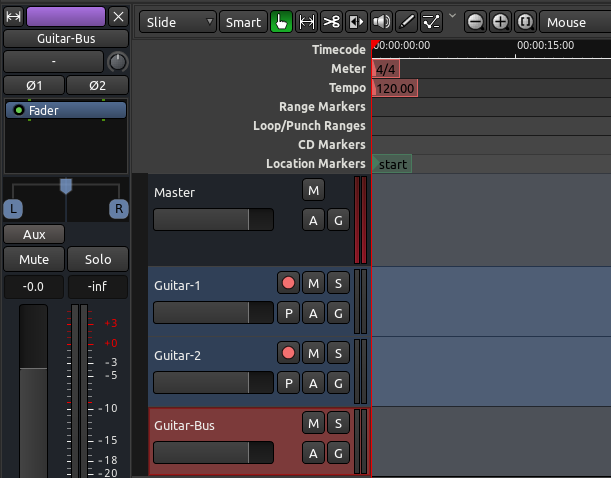
假设您要从两个吉他音轨发送输出到吉他总线,不是发送到主总线。这对于只有一个增益调节器的吉他来说,在音量控制方面很有用(在本例中即是吉他总线增益调节器)。然后吉他总线的输出,即是这两个吉他的总和,是直接转接到主总线。
这里展示的是如何编辑接线板以得到所需的路由。从来源(垂直标签页)选择“Ardour Tracks音轨”标签页,从目标(水平标签页)选择“Ardour Busses总线”。撤销在音轨和Master Bus主总线间已有的连接。然后创建从两个音轨到Guitar Bus吉他总线的连接。最后的结果是像这样的:
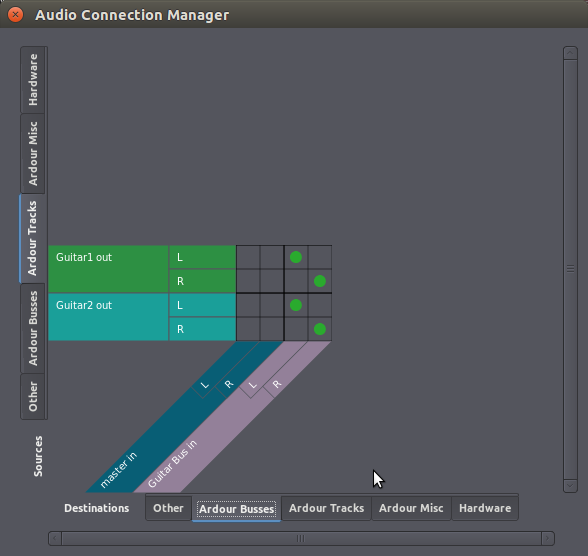
现在两个吉他音轨都路由到吉他总线,并且不再直接连接到主总线。然后我们确保吉他总线,反过来,路由到主总线(一条总线的输出路由可以像一个音轨一样被编辑),以便让我们仍然可以听到来自吉他音轨的声音。(注:这里省略了一张图,即从垂直的来源“Ardour Busses总线”里的“Guitar Bus吉他总线”连接到水平的目标“Ardour Busses总线”里的“Master Bus主总线”的路由。)现在我们可以通过改变的吉他总线的增益调节器,来同时控制两个吉他音轨的音量。更重要的是,我们现在可以添加插件到吉他总线,同时处理这两个吉他音轨里的声音。
接线板的音轨或总线详细视图
按下快捷键“Alt”+“P”打开Audio Connection Manager音频连接管理器(Patchbay接线板),这里为您显示的是Ardour里每一个单独来源和每一个单独目标的完整矩阵。有时这里显得太复杂了:例如,当您只是想快速改变一个单独的音轨输入或输出的路由的时候。Ardour允许您访问相关的次级接线板连接,您只需在混音器工具栏里直接点击音轨或总线的输入或输出按钮。
输入按钮位于工具栏的顶部,输出按钮位于工具栏的底部。点击它们的任何一个都将向您展开一个连接选项菜单。在下面的截图中,例如,您可以点击刚好在音轨名称“Guitar-1”下方的“1/2”按钮,就可以访问到这个菜单:
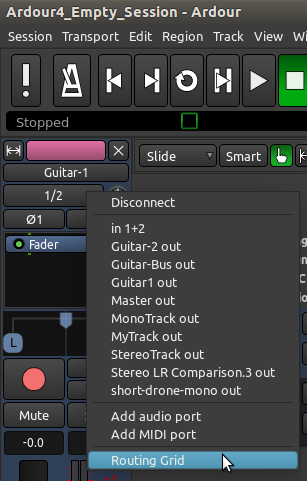
您可以从菜单中选择一个连接,或者选择“Routing Grid路由网格”以查看一个更简单的音频连接管理器版本,只带有选中的音轨或总线的输入或输出。
所有的Ardour连接都是JACK连接
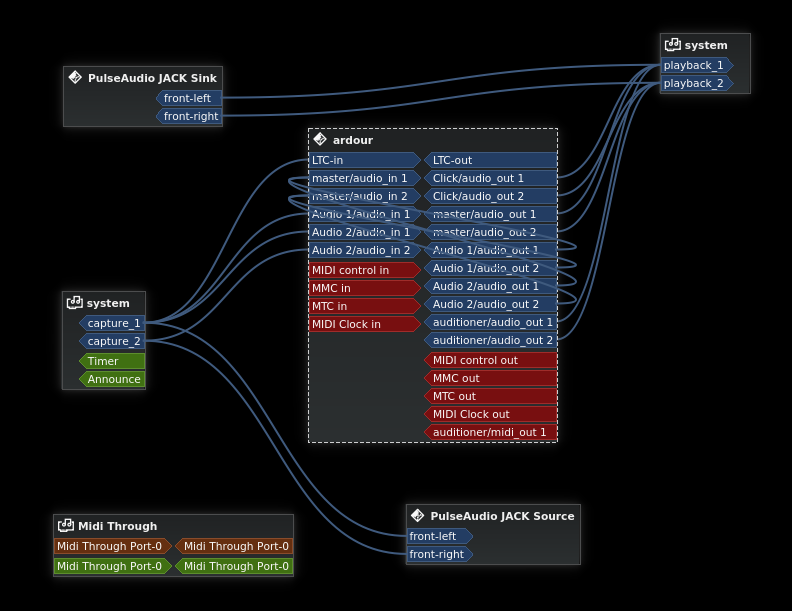
这很重要,要意识到您在Ardour里创建的连接实际上都是JACK路由,即您可以看到的来自于其它应用程序的JACK路由,像Qjackctl Catia、或者JackPilot,根据您的操作系统相关的应用程序。下面是一个例子:Catia窗口(仅Linux系统)显示的是与上述例子同样的JACK连接:
程序间路由
有时您可能需要把另一个程序的音频输出录制到Ardour里(例如,一个在Firefox火狐浏览器里播放的YouTube视频的声音,或者SuperCollider音频合成编程语言的输出或者PureData编程语言的输出)。本章节展示了如何完成这工作。
这个页面的例子创建于一部运行着Ubuntu Linux的电脑上。注意,如果您使用的是另一个操作系统,那么事情可能有些不同(特别是如果您使用的是Mac苹果电脑,在这种情况下,您使用的将会是JackPilot)。不过,一般原则上总是相同的。
从您的浏览器路由到Ardour
Web网页浏览器(Firefox火狐、Chromium谷歌,诸如此类)不是JACK-aware可识别的应用程序。幸运的是,诸如KXStudio和UbuntuStudio系统在应用常规系统的音频(就像PulseAudio脉冲音频)和JACK之间已经具备有桥接功能。本教程假设您使用的是一台带有这种已经能运行和工作的桥接的电脑。
从YouTube(或任何其它来自您的浏览器的声音)录制音频到Ardour里的整个步骤是:
- 在Ardour里创建一个立体音轨
- 从音轨输入断开硬件来源
- 连接PulseAudio Jack Sink脉冲音频JACK插槽到音轨输入
- 开始录制到音轨
- 开始播放YouTube视频
在这个例子里,创建一个带有一条新的立体声音轨的新会话,取名为“Firefox火狐”:
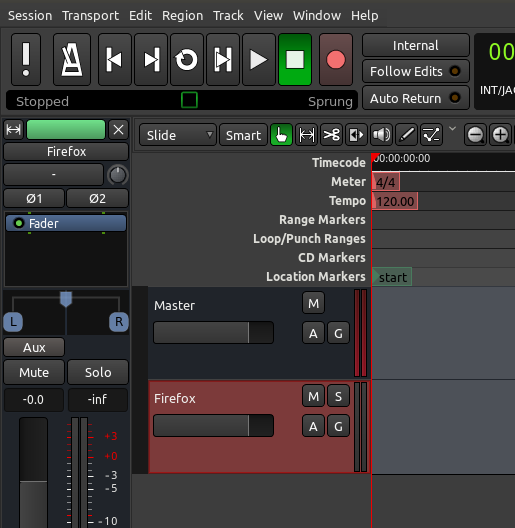
然后我们选择音轨,并点击编辑器混音器工具栏上的输入按钮。在上面的截图中,按钮就刚好在编辑器混音器工具栏里的音轨名称(“Firefox火狐”)的下方(在上面的示例中,它只显示一个“-”横线,这意思是目前还没有创建连接)。我们点击后就打开了只特别显示音轨输入的接线板窗口。
首先要做的就是,从那个音轨上断开任何麦克风输入(即“system capture系统捕获”)的连接,如果有就断开。断开连接后,这部分与“Firefox火狐”音轨相关的矩阵应该是像这个样子的(没有绿色小圆点):
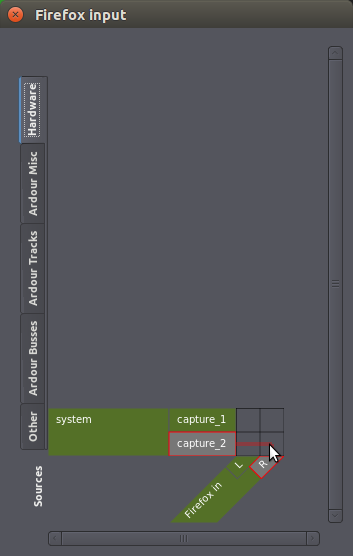
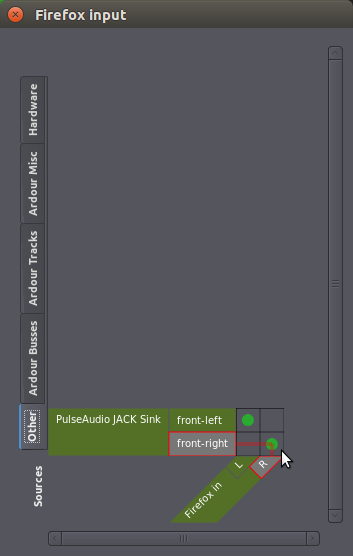
下一步是改变这同一个窗口里的标签页。选择“Other其它”作为来源。在这里您将会找到其它运行着的、可以用来作为声音来源转发到Ardour的应用程序。在Linux计算机上使用的是用PulseAudio Jack bridge脉冲音频JACK桥接,您会看到“PulseAudio Jack Sink脉冲音频JACK插槽”作为来源。在“front-left左前”和“front-right右前”到“Firefox火狐”音轨的Left左和Right右输入之间,点击适当的空白方格以创建连接(绿色小圆点)。最终它应该看起来像这样:
(注:使用UbuntuStudio的用户,需要在启动Adour之前,首先启动Qjackctl,也就是教程开头说过的那个JACK音频连接工具包,否则在接线板的来源里会找不到“Other其它”这个标签页,更找不到PulseAudio Jack Sink。非UbuntuStudio用户,即普通Ubuntu用户,则需要做相当多的设置,请参考 https://help.ubuntu.com/community/UbuntuStudioPreparation )
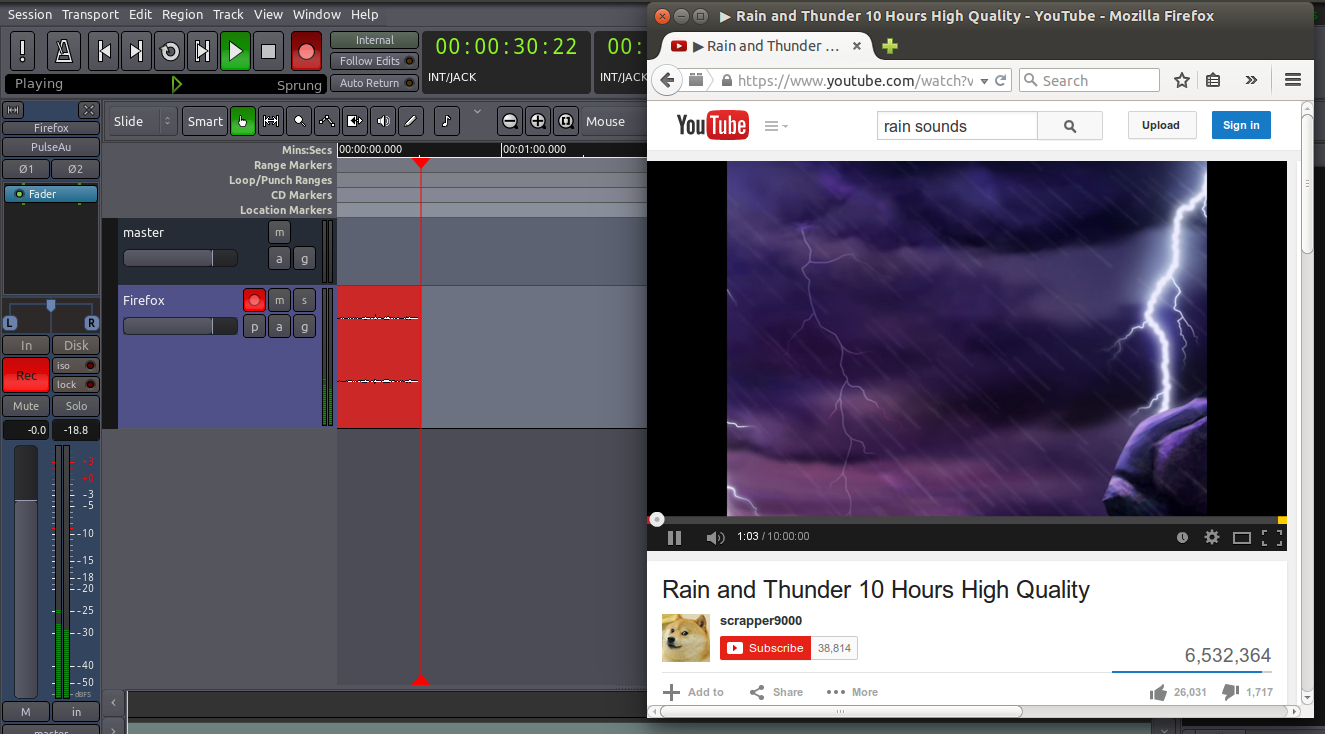
现在您已经准备好了。简单地遵循与录制音频章节所阐述的相同的录制过程:启用录制(预备)音轨(在音轨上的小红点),预备Ardour录制(大红点按钮,它开始闪烁),然后按下播放按钮。返回到您的浏览器并开始播放YouTube视频。
(注:电脑里只有一块主板内置声卡的用户,可能会遇到“录制时没波形没声音”的情况,这是因为启动JACK后就占用了声卡,导致其它软件无法正常播放。毕竟“一卡不能二用”。因此,建议玩数字音乐的朋友,还是买一块外置的专业声卡才能应用得当。)
从JACK可识别的应用程序路由到Ardour
其它音乐软件,像SuperCollider、Hydrogen、以及PureData都是JACK可识别的。这意味着它们将会直接出现在Ardour音频连接管理器的来源和目标选项中。在上面的YouTube例子中,您不需要担心任何 PulseAudio / JACK 桥接。
这过程本质上是一样的:创建一个单声道或立体声音轨来录制音频,设置音轨的输入端接到所需的来源,并正常录制。
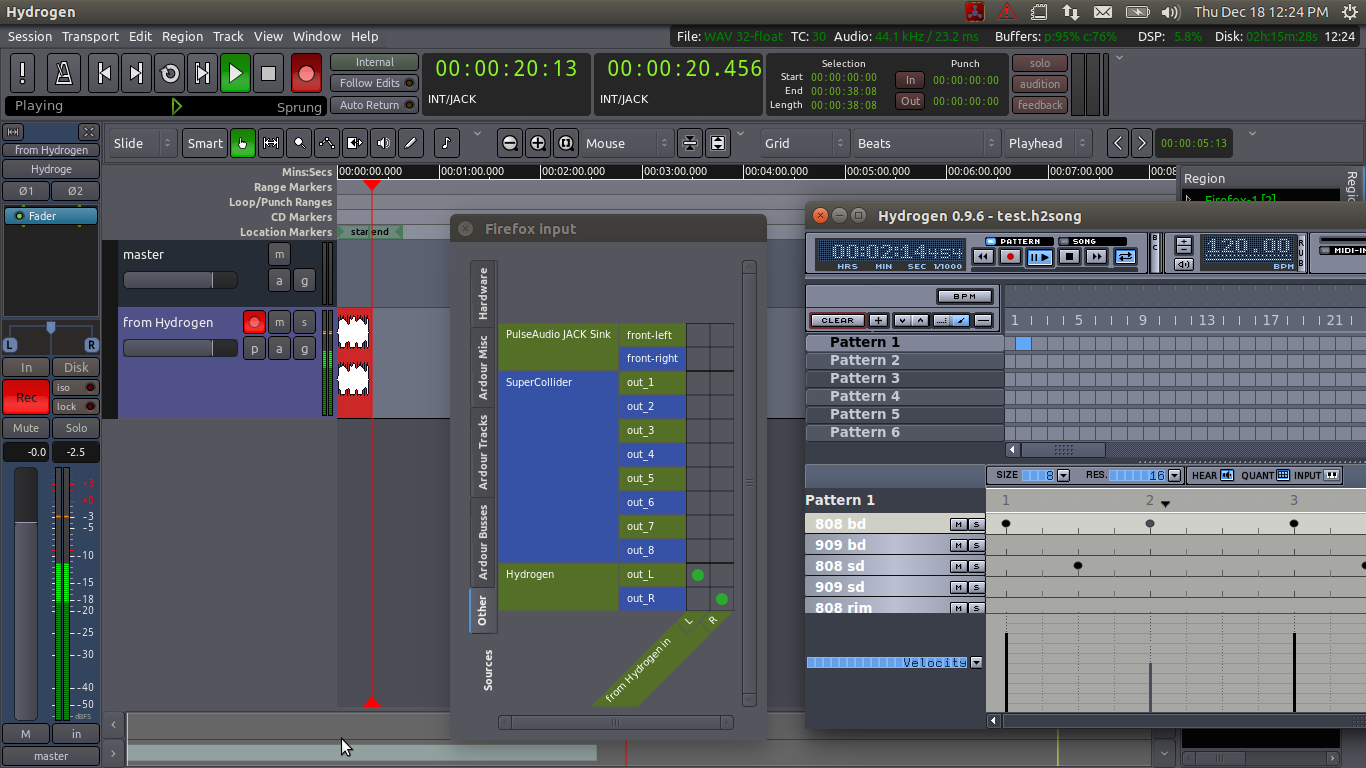
上面的截图是来自于从Hydrogen录制一个drum pattern鼓声样本直接转发到一个名为“from Hydrogen”的Ardour音轨上。在右边的是Hydrogen窗口。打开在左边的Ardour接线板窗口表明:注意应用程序“Hydrogen”作为一个来源显示在“Other其它”标签页的下方。它是直接连接到音轨的输入端。还要注意SuperCollider (另一个jack可识别的应用程序)也是碰巧同时开放着的,尽管在截图中看不到它的窗口。SuperCollider提供了8个默认的声音输出,所有这些都在Ardour接线板中显示为潜在的可用来源。