UbuntuHelp:Grub2
来自Ubuntu中文
| 点击翻译: |
English |
请不要直接编辑翻译本页,本页将定期与来源同步。 |
GRUB 2 is the default boot loader and manager for Ubuntu 9.10 (Karmic Koala) and many other operating systems. As the computer starts GRUB 2 either presents a menu and awaits user input or automatically transfers control to an operating system kernel. GRUB 2 is a descendant of GRUB (GRand Unified Bootloader). It has been completely rewritten to provide the user significantly increased flexibility and performance. GRUB 2 is Free Software. In this guide, GRUB 2 is version 1.96 or later. GRUB legacy (version 0.97) will be referred to as GRUB. To determine your version, use `grub-install -v`.
目录
- 1 Improvements
- 2 GRUB vs GRUB 2
- 3 Installation
- 4 File Structure
- 5 Configuring GRUB 2
- 6 Boot Display Behavior
- 7 Custom Menu Entries
- 8 Command Line and Rescue Mode
- 9 GRUB Errors
- 10 Splash Images and Theming
- 11 Reinstalling GRUB 2
- 12 Uninstalling GRUB 2
- 13 Selected Problems and Bugs
- 14 Miscellaneous
- 15 Links
Improvements
GRUB 2's major improvements over the original GRUB include:
- Scripting support including conditional statements and functions
- Dynamic module loading
- Rescue mode
- Custom Menus
- Themes
- Graphical boot menu support and improved splash capability
- Boot LiveCD ISO images directly from hard drive
- New configuration file structure
- Non-x86 platform support (such as PowerPC)
- Universal support for UUIDs (not just Ubuntu)
GRUB vs GRUB 2
GRUB 2's default menu will look familiar to GRUB users but there are a great number of differences beneath the surface.
- On a new install of Ubuntu 9.10 with no other installed operating system, GRUB 2 will boot directly to the login prompt or Desktop. No menu will be displayed.
- Hold down SHIFT to display the menu during boot (formerly ESC in GRUB legacy).
- No /boot/grub/menu.lst. It has been replaced by /boot/grub/grub.cfg.
- There is no "/find boot/grub/stage1" at the grub prompt. Stage 1.5 has been eliminated.
- The main menu file, /boot/grub/grub.cfg, is not meant to be edited, even by 'root'.
- grub.cfg is overwritten anytime there is a update, a kernel is added/removed, or the user runs `update-grub`
- The user can use a custom file, /etc/grub.d/40_custom, in which the user can place his own entries. This file will not be overwritten.
- The primary configuration file for changing menu display settings is /etc/default/grub.
- There are multiple files for configuring the menu - /etc/default/grub mentioned above, and all the files in the /etc/grub.d/ directory.
- Partition numbering has changed. The first partition is now 1 rather than 0. The first device is still 0, however (no change).
- Automated searches for other operating systems, such as Windows, whenever `update-grub` is executed.
- No changes made in the configuration files will take effect until the `update-grub` command is also run.
Installation
GRUB 2 is installed by default on new installations of Ubuntu 9.10 (Karmic Koala). Releases such as Ubuntu 9.04 Jaunty Jackalope which are upgraded to 9.10 will retain GRUB unless the user elects to upgrade to GRUB 2. Previous releases of Ubuntu can be upgraded to GRUB 2 if the user desires. You can check the current version installed on your system via Synaptic or from the command line. Open a Terminal (Applications > Accessories > Terminal) and enter the following:
grub-install -v
GRUB 2 should display a version number of 1.96 or later. Legacy GRUB is version 0.97.
Default Installation
GRUB 2 will be the default bootloader on LiveCD installations of Ubuntu 9.10, Karmic Koala.
- The GRUB 2 package is grub-pc. The grub-common package will also be installed.
- grub2 is a dummy transitional package. It can safely be removed and will not be shown as installed in Synaptic.
Upgrading to GRUB 2
Upgrading to GRUB 2 from GRUB (legacy) in Ubuntu 9.10 or earlier versions is relatively easy. Importantly, the upgrade offers a process to ensure GRUB 2 will work on your machine before the user commits to a full conversion. Note however that the developers made a decision to not use an automatic update to GRUB 2 as the default on upgrade installs. Users who upgrade to Ubuntu 9.10 may continue to use GRUB if desired.
- Before installing GRUB 2, refresh the repository indexes to ensure the system has the latest update list. This is normally accomplished via `sudo aptitude update` in a terminal or refreshing the lists in a GUI package manager such as Synaptic. Older GRUB packages may not contain updates which have fixed several bugs in the early versions of the installer.
- To upgrade to GRUB 2 install the grub-pc package. This package can be installed with Synaptic or running the command below. Once the installation begins, a simple script will guide the user through the rest of the installation:
sudo aptitude install grub-pc
| 1. At the first prompt, read the message, tab to select "OK", then press ~-ENTER-~. | |

| |
| 2. After selecting "OK" the next option allows the user to test GRUB 2 by adding an entry to their normal GRUB menu. Select "Yes" to place a Chainload option on the GRUB menu. When GRUB boots the next time, the user can select a normal GRUB entry or transfer control to GRUB 2 via the Chainload entry. | |
| 3. The next step(s) will import sections from GRUB's menu.lst to the "Linux command line" (shown) and possibly the "Linux default command line". These entries allow the user to enter any special commands such as quiet, splash, noapic and others of that nature. GRUB 2 should automatically import these settings. Normally the user should accept any existing entries and TAB to "OK". If necessary, entries can be added later. Refer to the Configuring GRUB 2 section for more detail. | |

| |
| 4. Once the system has installed GRUB 2, the user can reboot and will be greeted by an updated GRUB legacy menu. As shown, the user will see a "Chainload" option which will test the GRUB 2 installation. Selecting the Chainload option will transfer control to GRUB 2 and display a GRUB 2 menu. | |

| |
| 4a. Jaunty users may experience an "Unrecognized device string" Error 11 when making a selection. If so, press "e" until you see the line beginning with "grub edit> root". Change "root" to "uuid", ~-ENTER-~, then boot by pressing "b". More details on Error 11 are located in the Command|Line and Rescue Mode section. | |
| 5. Test the new entries and note the Grub 1.9X version number (highlight added). | |

| |
| 6. If the GRUB 2 menus function properly the user can upgrade to GRUB 2 at any time by running: |
sudo upgrade-from-grub-legacy
 |

|
During installation the user will be prompted to provide the device(s) on which to install GRUB 2. Use the UP/DOWN keys to highlight a device (sda, sdb, etc), then the SPACE key to select the device. Once at least one device is selected, use the TAB key to highlight OK and press ~-ENTER-~. Failure to select a drive will result in a GRUB Error 15 and failure of the installation. Upon successful installation of GRUB 2, a message will inform the user that some GRUB Legacy configuration files are still present and can be removed. The instructions provide the following command, which must be run as 'root': `rm -f /boot/grub/menu.lst*` Use caution when running the `rm` command as "root". Incorrectly entering this command could result in permanently deleting necessary system files.
File Structure
GRUB 2 incorporates a totally revised directory and file hierarchy. The menu.lst of GRUB legacy is no longer used. To find out where GRUB 2 is installed, the user can run the following commands: `sudo grub-probe -t device /boot/grub` for the device and `sudo grub-probe -t fs_uuid /boot/grub` for the UUID. The main directories and files used by GRUB 2 include:
/boot/grub/grub.cfg
This is the file most closely resembling GRUB's /boot/grub/menu.lst. This file contains the GRUB 2 menu information but unlike GRUB's menu.lst the grub.cfg file is not meant to be edited.
- Each section is clearly delineated with ~-"(### BEGIN)"-~ and references the file in the /etc/grub.d directory from which the information was generated.
- grub.cfg is updated by running the `update-grub` command as root. The `update-grub` command is a stub for `sudo grub-mkconfig -o /boot/grub/grub.cfg`. For standardization, the command `update-grub` will be employed, run as "root" with the `sudo`.
- The file is automatically updated with kernel installations/removals or other updates which would affect its output.
- By default, and whenever the `update-grub` command is executed, this file is made "read-only". This is in keeping with the intent that the file should not be edited manually.
The user will also see a multitude of *.mod files in the /boot/grub directory. These files relect the modular nature of GRUB 2 and are loaded as necessary by the GRUB 2 bootloader.
/etc/default/grub
- This configuration file contains information formerly contained in the upper section of GRUB Legacy's menu.lst and items contained on the end of the kernel line. The entries in this file can be edited by a user with administrator (root) privileges and are incorporated into grub.cfg when it is updated. Specific configuration settings are detailed in the Configuring GRUB 2 later in this section.
/etc/grub.d/ (directory)
- The files in this directory are read during execution of the `update-grub` command and their instructions are incorporated into /boot/grub/grub.cfg.
- The placement of the menu items in the grub.cfg menu is determined by the order in which the files in this directory are run. Files with a leading numeral are executed first, beginning with the lowest number. 10_linux is run before 20_memtest, which would run before 40_custom. If files with alphabetic names exist, they are run after the numerically-named files.
- Custom entries can be added to the 40_custom file or in a newly created file. Based on its name, 40_custom entries by default appear at the bottom of the menu. A custom file beginning with 06_ would appear at the top of the menu since its alphanumeric sorting would place it ahead of 10_ through 40_ files.
- Only executable files generate output to grub.cfg during execution of `update-grub`.
- The default files in this directory are:
- 00_header Sets initial appearance items such as the graphics mode, default selection, timeout, etc. These settings are normally imported from information from /etc/default/grub. Users normally do not need to make changes to this file.
- 05_debian_theme The settings in this file set splash image, text colors, selection highlighting and themes. In the absence of a splash image, this file sets a monochromatic theme for the initial menu display. How to set font renderings and splash images are discussed in detail in the Splash Images and Themes section.
- 10_hurd Locates Hurd kernels. Not currently used.
- 10_linux Locates kernels on the root device for the operating system currently in use. It takes this information and establishes the names displayed on the menu for these kernels.
- 20_memtest86+ Searches for /boot/memtest86+.bin and includes it as an option on the GRUB 2 boot menu. There is currently no line option to remove this entry from the menu. The display of memtest86+ can be inhibited by removing the executable bit from this file: `sudo chmod -x /etc/grub.d/20_memtest86+` and then running `sudo update-grub`.
- 30_os-prober This file with os-prober, which searches for Linux and other operating systems. Results are placed in grub.cfg based on the scripts in this file. The file is divided into 4 sections, representing the types of operating systems handled by the scripts: Windows, Linux, OSX, and Hurd. Variables in this file determine the format of the displayed names in /boot/grub/grub.cfg and on the GRUB 2 menu. Users familiar with basic scripting can alter these variables to change the format of the displayed menu entries. Alternatively, the user can insert an entry into /etc/default/grub which disables this script. (See below)
- 40_custom A template for adding custom menu entries which will be inserted into grub.cfg upon execution of the `update-grub2` command. The contents of this file, below the "exec tail -n +3 $0" line and the default comments, are imported directly into /boot/grub/grub.cfg without any changes.
- Files in these directories must be executable to be used by `update-grub`. Files which are not executable will be ignored. To make a file executable, run `sudo chmod +x filename`
Configuring GRUB 2
Configuration changes are normally made to /etc/default/grub and to the custom files located in /etc/grub.d. The /boot/grub/grub.cfg file should not be edited by the user; changes to this file are made by configuration scripts.
 Some of the most common changes, such as the default OS/kernel and menu timeout, can be changed from within a GUI app called !StartUp-Manager. See the community doc StartUpManager for information about how to install and use this application.
/etc/default/grub (file)
- The main configuration file for changing default settings. Upon installation, the following lines are available for alteration by the user:
- GRUB_DEFAULT - Sets the default menu entry. Entries may be numeric, a complete menuentry quotation, or "saved"
- ~-GRUB_DEFAULT=0-~ Sets the default menu entry by menu position. As in GRUB, the first "menuentry" in grub.cfg is 0, the second is 1, etc.
- ~-GRUB_DEFAULT="xxxx"-~ An exact menu entry, including the quotation symbols, may also be used. In this case, location in the menu will not matter. Example: ~-GRUB_DEFAULT="Ubuntu, Linux 2.6.31-9-generic"-~
- ~-GRUB_DEFAULT=saved-~
- The information in this section applies to GRUB 1.98 and later.
- Enables the "grub-reboot" and "grub-set-default" commands to set the default OS.
- The default OS will not be set by an interactive selection of an OS from the menu.
- grub-set-default Sets the default boot entry until changed.
- The format is `sudo grub-set-default X`, with X being the menuentry position (starting with 0 as the first entry) or the exact menu string. Examples: `sudo grub-set-default 3` or `sudo grub-set-default "Ubuntu, Linux 2.6.32-15-generic"`
- To obtain the existing menuentry choice number (starting from 0) or the menuentry "string", run `grep menuentry /boot/grub/grub.cfg`
- grub-reboot This command sets the default boot entry for the next boot only. The format of the command is the same as for `grub-set-default` (see above).
- GRUB_SAVEDEFAULT= If set to true this setting will automatically set the last selected OS from the menu as the default OS on the next boot.
- No commands need be run to set the default OS.
- Any time a menuentry is manually selected from the GRUB2 menu, it becomes the default OS.
- GRUB_HIDDEN_TIMEOUT=0
- This setting determines how long a screen without the GRUB 2 menu will be displayed. While the screen is blank, the user can press any key to display the menu.
- The default behavior is to hide the menu if only one operating system is present. If a user with only Ubuntu wishes to display the menu, place a # symbol at the start of this line to disable the hidden menu feature.
- For at least GRUB 1.97~beta - the version found in Karmic - whether or not the menu can include a timeout delay with a blank screen is dependent on whether GRUB 2 finds multiple operating systems.
Note to multiple-OS users: If GRUB 2's os-prober identifies additional operating systems while running the /etc/grub.d/30_os-prober script the hidden menu timeout feature is disabled by conditional statements. This also disables the ability to use the SHIFT key to display the menu during boot. Users with multiple operating systems wishing to hide the menu can find script edits on various forums which will allow them to add a hidden timeout feature to the boot sequence.
- ~-GRUB_HIDDEN_TIMEOUT=0-~ on single operating system computers.
- No menu is displayed. The system is immediately booted to the default OS.
- This is the default setting with only one identified operating system.
- To display the menu under this condition, place a # symbol at the start of the line and ensure the GRUB_TIMEOUT setting is a positive integer.
- If the value is set to 0, a keystatus check is performed to determine if the SHIFT key is depressed. If GRUB 2 determines the SHIFT key is depressed during the boot process, the menu will be displayed. This gives the user a method of interrupting an automatic boot which would normally not display the menu.
- ~-GRUB_HIDDEN_TIMEOUT=X-~
- X is a positive integer (e.g. 1, 5, 10, etc)
- The boot process will pause and display a blank screen or the designated splash image for X seconds. At the end of the time period, the system will boot. No menu will be displayed.
- While GRUB_HIDDEN_TIMEOUT is active, the menu can be displayed by pressing any key.
- ~-GRUB_HIDDEN_TIMEOUT= -~
- No value entered after the = sign
- The menu will be displayed for the number of seconds designated by GRUB_TIMEOUT.
- GRUB_HIDDEN_TIMEOUT_QUIET=true
- ~-true-~ No countdown is displayed. The screen will be blank.
- ~-false-~ A counter will display on a blank screen for the duration of the GRUB_HIDDEN_TIMEOUT value.
- GRUB_TIMEOUT=10
- This instruction defers to the ~-GRUB_HIDDEN_TIMEOUT-~ unless ~-GRUB_HIDDEN_TIMEOUT-~ is commented (#). If ~-GRUB_HIDDEN_TIMEOUT-~ is active, the ~-GRUB_TIMEOUT-~ only operates once, and if, the menu is displayed.
- Setting this value to -1 will cause the menu to display until the user makes a selection.
- The GRUB 2 menu is hidden by default unless another OS is detected by the system. If there is no other OS, this line may be commented out unless the user changes it. To display the menu on each boot, uncomment the line and use a value of 1 or higher.
- GRUB_DISTRIBUTOR=`lsb_release -i -s 2> /dev/null || echo Debian`
- Retrieves the descriptive name in the menu entry. (Ubuntu, Xubuntu, Debian, etc.)
- GRUB_CMDLINE_LINUX
- If it exists, this line imports any entries to the end of the 'linux' command line (GRUB legacy's "kernel" line) for both normal and recovery modes. This is similar to the "altoptions" line in menu.lst
- GRUB_CMDLINE_LINUX_DEFAULT="quiet splash"
- This line imports any entries to the end of the 'linux' line (GRUB legacy's "kernel" line). The entries are appended to the end of the normal mode only. This is similar to the "defoptions" line in menu.lst. For a black screen with boot processes displayed in text, remove "quiet splash". To see the grub splash image plus a condensed text output, use "splash". The entry "acpi=off", if required, would also be an option entered on this line.
- #GRUB_TERMINAL=console
- Uncomment to disable graphical terminal (grub-pc only)
- #GRUB_DISABLE_LINUX_UUID="true"
- Uncomment if you don't want GRUB to pass "root=UUID=xxx" parameter to Linux
- A bug currently requires true be placed within quotation marks for this option, when uncommented, to take effect. Quotation marks currently are not the default and the user must add them.
- #GRUB_GFXMODE=640x480
- You can remove the # symbol to make this line active. The entry sets the resolution of the graphical menu (the menu text size). It provides resolutions supported by the user's graphics card (e.g. 640x480, 800x600, 1280x1024, etc). The setting applies only to the boot menu display, not the resolution of the operating system that boots.
- Tip: Setting the same resolution in GRUB 2 and the operating system will decrease boot times slightly.
- Although not required, the user can also specify the color bitdepth by appending it to the resolution setting. An example would be 1280x1024x24 or 640x480x32.
- The user can also add multiple resolutions. If GRUB 2 cannot use the first entry, it will try the next setting. Settings are separated by a comma. Example: 1280x1024x16,800x600x24,640x480.
- If using a splash image, make sure the resolution setting and the splash image size are compatible.
- If using an entry that produces a "not found" message when running update-grub, try adding or changing the color bitdepth.
- Resolutions available to GRUB 2 can be displayed by typing `vbeinfo` in the GRUB 2 command line. The command line is accessed by typing "c" when the main GRUB 2 menu screen is displayed.
- If this line is commented (#) or the resolution is unavailable GRUB 2 uses the default setting determined by /etc/grub.d/00_header.
- For a guide to changing resolutions when using a splash image see the Splash Images and Theming section.
- GRUB_DISABLE_LINUX_RECOVERY=true
- Add or uncomment this line to prevent "Recovery" mode kernel options from appearing in the menu. If you want a "Recovery" option for only one kernel, make a special entry in /etc/grub/40_custom.
- GRUB_INIT_TUNE="480 440 1"
- When uncommented, plays a single beep just prior to the Grub 2 menu display.
- The format is tempo [pitch1 duration1] [pitch2 duration2] ...
- tempo is set once and applies to all duration settings.
- duration is the result of 60/tempo. A duration of 1 with a tempo of 60 would produce a 1 second beep. A duration of 1 with a tempo of 480 produces a .125 second beep.
- Caution: The menu is displayed after the tune is complete. Creating a long tune will delay the appearance of the menu.
- Online documentation is available by typing `info grub --index-search play` in a terminal. It mentions the ability to play a tune with the command `play file` if the tune is composed with little-endian numbers.
- Additional instructions which may be included:
- GRUB_DISABLE_OS_PROBER=true
- Enables/disables the os-prober check of other partitions for operating systems, including Windows, Linux, OSX and Hurd.
Boot Display Behavior
GRUB 2 loads before any operating system. Its modular components are loaded on an as-needed basis. Menu display behavior is generally determined by settings in /etc/default/grub. Review the "Configuring GRUB 2" section for specific entry and formatting guidance.
Initial Default
- GRUB 2 will boot straight into the default operating system if no other operating system is detected. No menu will be displayed. If another operating system is detected, the GRUB 2 menu will display.
Timed Display
- The menu is displayed for a predetermined number of seconds. The default entry is highlighted and other selections may be made by the user until the timeout expires. The default timeout is now 3 seconds. The timer continues until any key is pressed or the highlighted entry is selected by pressing ~-ENTER-~. If no user input is made GRUB 2 boots the default entry at the end of the timeout period.
- Once a key has been pressed the timeout is deactivated and the user must make a selection manually.
- The default entry is determined by the ~-DEFAULT=-~ setting in /etc/default/grub; the first "menuentry" is has a value of "0".
Hidden
- No menu entries are displayed. The splash screen, if configured, will be displayed.
- The user can interrupt the boot process and display the menu by holding down the SHIFT key until the menu displays.
- GRUB 2 searches for a depressed SHIFT key signal during boot. If the key is pressed or GRUB 2 cannot determine the status of the key, the menu is displayed.
- The time the screen remains blank but available for display is determined by a setting in /etc/default/grub.
- GRUB 2 can display a countdown timer to provide visual feedback on the time remaining until the default selection is chosen. The timeout setting is enabled in /etc/default/grub
- At the end of the timeout, the default entry determined by settings in /etc/default/grub will be selected.
Saved
- Saving an OS can be achieved by running `sudo grub-set-default` if DEFAULT=saved is set in /etc/default/grub. It may also be saved if SAVEDEFAULT=true is also set in /etc/default/grub. In this case, the default OS remains until a new OS is manually selected from the GRUB 2 menu or the `grub-set-default` command is executed.
Last Boot Failed or Boot into Recovery Mode
If the last boot failed or after a boot into Recovery Mode the menu will be displayed until the user makes a selection. The timeout setting in /etc/default/grub do not apply in this case. To change this behaviour, /etc/grub.d/00_header must be modified (if statement checking recordfail at the end of 00_header).
Custom Menu Entries
GRUB 2 allows users to create customized menu selections which will be automatically added to the main menu when `sudo update-grub` is executed. An empty 40_custom file is available in /etc/grub.d/ for use or to serve as an example to create other custom menus. Here are some considerations for custom menus:
- The name of the file determines the order of the selections in the menu. Numeric filenames are run first, followed by alphabetic filenames.
- 10_linux entries will appear before 30_os-prober entries, which will be placed before 40_custom entries, which will preceed my.custom.entries inputs.
- A user wishing for the custom menu entries to appear first on the main menu could name the directory 06_xxx so its listings are first in the menu.
- The file must be made executable: `sudo chmod +x /etc/grub.d/filename`.
- The contents of the file is added to grub.cfg without changes when the `update-grub` command is executed.
- Unlike grub.cfg, custom files can be edited at any time, are not read-only, and can be owned by the user if desired.
- Custom files are static. The contents will not be altered when new kernels are added or removed (unless the contents are affected by user-added scripts).
If the custom file places the menuentry listings at the top of grub.cfg, the user may wish to confirm the /etc/default/grub ~-DEFAULT=-~ setting after running `update-grub`. Make sure it still points to the desired menuentry listing. When counting, the first "menuentry" in /boot/grub/grub.cfg is 0.
Creating the Custom Menu
The user can either edit the default /etc/grub.d/40_custom file or create a new one. The easiest way to create the content of a custom menu is to copy a working entry from /boot/grub/grub.cfg. Once copied, the contents of 40_custom can be tailored to the user's desires.
- According to the default sample custom file (/etc/grub.d/40_custom) the first two lines of any custom file in /etc/grub.d should be:
| #!/bin/sh |
| exec tail -n +3 $0 |
- The user can copy existing menuentries from the /boot/grub/grub.cfg file or from a GRUB legacy file. If the user wishes to copy from a GRUB legacy menu.lst file:
- A backup copy of this file may be in the /boot/grub directory if the user upgraded from GRUB to GRUB 2.
- The following entries from the GRUB menu listing must be changed for them to work:
- title is changed to menuentry. The line must end with {
- root is changed to set root=
- kernel must be changed to linux
- Any partition designation (sda4, sdb6) must be changed, as GRUB and GRUB 2 count the partitions differently. The first partition for GRUB 2 is 1, not 0. Devices still start the count at 0.
- Look carefully at the format of any working GRUB 2 menulist entry to ensure the correct format is used.
- General menuentry Construction Rules:
- The first line must start with menuentry and end with ~+{+~
- The area between the quotation symbols is what will appear on the GRUB 2 menu. Edit as desired.
- The last line of the menuentry must be ~+}+~
- Do not leave empty spaces at the end of lines
- The set root= line should point to the GRUB 2 /boot location ( sdXY )
- The root reference in in the linux line should point to the system partition.
- If GRUB 2 cannot find the referenced kernel, try replacing the UUID with the device name (example: /dev/sda6 ).
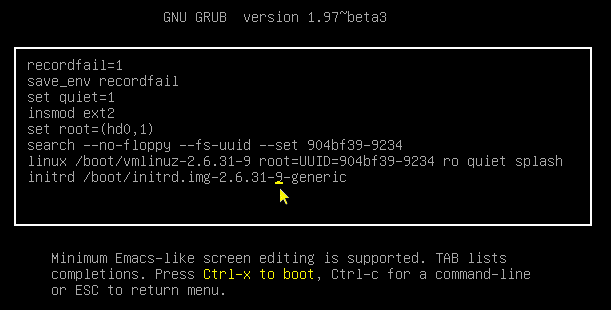
- A sample entry copied from the grub.cfg and altered by the user might look like this:
| menuentry "My Default Karmic" { |
| set root=(hd0,1) |
| search --no-floppy --fs-uuid --set cb201140-52f8-4449-9a95-749b27b58ce8 |
| linux /boot/vmlinuz-2.6.31-11-generic root=UUID=cb201140-52f8-4449-9a95-749b27b58ce8 ro quiet splash |
| initrd /boot/initrd.img-2.6.31-11-generic |
| } |
- A sample entry for a hard drive version of SystemRescueCD installed per the instructions on the web site (on sda8).
| menuentry "System Rescue CD" { |
| set root=(hd0,8) |
| linux /sysrcd/rescuecd subdir=sysrcd setkmap=us |
| initrd /sysrcd/initram.igz |
|}
- A sample entry for chainloading to another GRUB bootloader.
| menuentry "Grub 1 Bootloader" { |
| set root=(hd0,8) |
| chainloader +1 |
|}
Command Line and Rescue Mode
There are several ways for a user to attempt to resume a failed boot. If the menu is still available, menu settings can be viewed and altered by the user. Additionally, if GRUB 2 detects errors during boot and cannot pass control to the selected kernel because of a grub.cfg error or omission it will revert to the rescue mode. Both methods allow the user to recover to a usable system via a limited command line interface. If only the word "Grub" appears at the top of the screen without a prompt (access to the command line) or menu, refer to the Reinstalling|from LiveCD section.
| TROUBLESHOOTING: If you are in this section, you are probably having problems booting to your OS. The following sections detail methods to use the edit and command-line capabilities of GRUB 2 to attempt to boot the system. One of the improvements of GRUB 2 is the ability to search the contents of partitions from the command line. If the instructions in the following sections do not work, especially if accompanied by "not found" or "the kernel must be loaded first" messages, use the following commands to explore the partitions. For Ubuntu, the /boot directory should normally contain at least one "vmlinuz" kernel and an "initrd" .img file. The /boot/grub directory should normally contain "grub.cfg" and various ".mod" files. X is the drive, starting with 0. Y is the partition number, starting with 1. For a pure Ubuntu install on a single drive, the main drive/partition is often hd0,1. For dual-boot with Windows on a single drive, the normal location is often hd0,5. Use the ls command by itself to see which drives/partitions are known to GRUB 2. | |
| To explore the devices known to GRUB 2, press "c" from the GRUB 2 menu to enter the command line (if not already there): |
| ls | Display the drives/partitions known to GRUB 2. |
| ls (hdX,Y)/ | Display the contents of the / directory of the designated drive/partition. |
| ls (hdX,Y)/boot | Display the contents of the /boot directory. Example: ls (hd0,5)/boot |
| ls (hdX,Y)/boot/grub | Display the contents of the /boot/grub directory. Example: ls (hd0,5)/boot/grub |
Editing Menus During Boot
- If the menu is not normally displayed during boot, hold down the SHIFT key as the computer attempts to boot to display the GRUB 2 menu.
- With the menu displayed, press any key (except ~-ENTER-~) to halt the countdown timer and select the desired entry with the up/down arrow keys.
- Press the 'e' key to reveal the selection's settings.
- Use the keyboard to position the cursor. In this example, the cursor has been moved so the user can change or delete the numeral 9.
- Make a single or numerous changes to any or every line. Do not use ~-ENTER-~ to move between lines.
- Tab completion is available, which is especially useful in entering kernel and initrd entries.
- When complete, determine the next step:
- CTRL-x - boot with the changed settings (highlighted for emphasis)
- c - go to the command line to perform diagnostics, load modules, change settings, etc.
- ESC - Discard all changes and return to the main menu.
- The choices are listed at the bottom of the screen as a reminder.
Command Line Mode
From the main GRUB 2 menu display the user can elect to drop to a command line by typing 'c'.
Here are some useful tips and features for use with the GRUB 2 command line:
- Turning off the splash image may make viewing the terminal easier. Press "c" to go to the command line and then type: `set color_normal=white/blue` or the color combination you wish to use. "black" as the second entry retains the menu's transparency and should be avoided as a selection if the user wants to work with a solid background color.
- To prevent scrolling past the top of the screen, first run `set pager=1`, which acts like the terminal's "| more" command. This will allow one full screen of data, with line advancement continued by pressing the ~-ENTER-~ key.
- Type `help` to view a list of all the commands. Type `help x` to view help commands beginning with the letter "x". Tab completion and using the up arrow to repeat commands work the same as in a normal terminal.
- The TAB completion feature is very handy. At any point, pressing the TAB key may complete an entry, if the element is unique, or display available options. Typing a few additional characters and pressing TAB again may allow tab completion to finish the entry.
Some of the more useful commands include:
| Command | Result | |
| background_image | Load an existing background image. Use tab completion to help complete filename entries! `background_image=/usr/share/images/grub/` then tab to display a list of all images. Useful command when initially testing splash images. | |
| cat | Use to display the current file contents. `cat /boot/grub/grub.cfg , cat /etc/fstab` | |
| help | more" command, to prevent scrolling past the top of the screen. | |
| ls | Used alone, lists all devices known to GRUB 2, such as (hd0) (hd0,1), etc. View available partitions with `ls`. View /boot and /grub directory contents with `ls /boot, ls /boot/grub | |
| initrd | Load an initrd. | |
| linux | Load a linux kernel. | |
| loopback | Mount a file as a device. `loopback loop (hd0,2)/iso/my.iso | |
| lsmod | Display loaded modules | |
| reboot | Reboot the machine | |
| rescue | Enter the rescue mode | |
| set | Show environmental variables in place. Combined with others, set variables such as `set gfxmode=640x480`, `set color_normal=cyan/black` Use the latter command in command line mode to test various menu font colors. | |
| vbeinfo | Display available monitor resolutions. |
Using CLI to Boot
If the user has problems booting but the menu is available, the easiest method to boot the system is to edit the existing menu. Refer to Editing|Menus During Boot. If GRUB 2 fails to find a usable grub.cfg file it should revert to the grub-rescue mode. The command line prompt will display grub-rescue> and no menu will be displayed. From this command line the user can attempt to manually enter the instructions to boot to a usable system.
If the command line prompt is not already active press "c" to enter the Command Line mode. You will see the GRUB 2 prompt: ~-grub>-~ or ~-grub rescue>-~
If you wish to cancel and start over at any time, ~-ESC-~ will remove changes and return the user to the previous menu.
Use the following two commands to determine the device (drive) and partition of the system you wish to boot.
| set | When ~-set-~ is typed without additional entries the command displays the current GRUB 2 settings. | |
| ls | Run ~- ls-~ to see the devices recognized by GRUB 2. Example: (hd0) (hd0,1) (hd1,5) In this example sda, sda1, sdb5 are recognized. |
Express Boot to the Most Recent Kernel
| Command Summary *: | set root=(hdX,Y) |
| linux /boot/vmlinuz root=/dev/sdxY ro | |
| initrd /boot/initrd | |
| boot |
| Expanded Instructions *: |
| Press ~-ENTER-~ after completing each line. Some entries will not provide feedback. This is normal. |
| If a "file not found" or similar error message is displayed while running these commands, ensure you are using the correct X,Y values. The ls command can help determine the correct values. Once the X,Y values are confirmed run the following command: |
| set prefix=(hdX,Y)/boot/grub |
| 1*. set root=(hdX,Y) | Type with correct X,Y results from the ls command and press ~-ENTER-~. Remember GRUB 2 counts the first drive as 0, the first partition as 1. Example: If the Ubuntu system is on sda5, enter: set root=(hd0,5) |
| 2*. linux /vmlinuz root=/dev/sdxY ro | Example: linux /vmlinuz root=/dev/sda3 ro |
| * Wubi users see note. | |
| 3. initrd /initrd.img | Selects the latest initrd image. |
| 4. boot | Boot to the latest kernel on the selected partition. |
| * Wubi users only - substitute these commands in Steps 1 and 2: | |
| set root=(loop0) | |
| linux /vmlinuz root=/dev/sdxY loop=/ubuntu/disks/root.disk ro |
| These changes are not permanent. After successfully booting into the system the user should run `sudo update-grub` and inspect the GRUB 2 configuration file (/boot//grub/grub.cfg). For problems with booting the main linux kernel, ensure the search, linux, and initrd lines in the [[UbuntuHelp:## BEGIN /etc/grub.d/10_linux ###|## BEGIN /etc/grub.d/10_linux ###]] section of the file now correctly point to the correct locations. The user may need to reinstall GRUB 2 (`sudo grub-install /dev/sdX`). |
Boot a Specific Kernel Manually
If a GRUB 2 menu is not available for editing during the boot process the command line may still allow booting a specific kernel. If GRUB 2 is looking in the correct location a user may be able to enter all the necessary information on the command line in a single entry. This section will provide a step-by-step guide on how to enter this information. The line will look similar to the following when completed:
| Command Summary *: | set |
| linux /boot/vmlinuz- root=/dev/sdxY ro | |
| initrd /boot/initrd- | |
| boot |
| Expanded Instructions *: |
| Press ~-ENTER-~ only after completing each step ("1", "2", "3" and "4"). |
| Step 1*. Set the Root Partition |
| set root=(hdX,Y) |
| Use the correct X,Y results from the ls command and ~-ENTER-~. Remember GRUB 2 counts the first drive as 0, the first partition as 1. For example, if the Ubuntu system is on sda5, enter: set root=(hd0,5) |
| * For a Wubi install inside Windows, substitute the following command: |
| set root=(loop0) |
| Step 2*. Enter the "linux" line information |
| linux /boot/vmlinuz- root=/dev/sdxY ro |
| * For a Wubi install inside Windows, substitute the following command: |
| root=/dev/sdxY loop=/ubuntu/disks/root.disk |
| Afer typing linux /boot/, the user can TAB to display the available kernels. There is no space character after "/". If no kernels are visible, the address in the "Set Root" section may be incorrect. Enter the correct kernel by typing or using tab completion. |
| For the root=/dev/ section use the correct device such as "/dev/sda1", "/dev/sdb5", etc |
| Add any options, such as ro (read-only), at the end of the line (normally not required). |
| Once all the information on the line is correct it should look similar to the sample below. |
| linux /boot/vmlinuz-2.6.31-16-generic root=/dev/sda1 ro |
| When correctly typed and ~-ENTER-~, if the linux kernel is found, a line similar to the "Linux-bzImage" confirmation line highlighted below will appear. |

| If a "file not found" or similar error message occurs, either the device/partition/file does not exist or GRUB 2 is not looking at the correct drive, partition and/or directory. Determine the correct location using the ls command and then run the following command. Repeat Step 2. |
| set prefix=(hdX,Y)/boot/grub |
| Step 3. Enter the "initrd" line information |
| initrd /boot/initrd.img- |
| Afer typing initrd /boot/, the user can TAB to display the available initrd images. Do not leave a space after the "/". If no images are visible, the address in the "Set Root" section may be incorrect. Enter the correct image by typing or using tab completion. |
| Once all the information on the line is correct it should look similar to the sample below. Press ~-ENTER-~. Look for confirmation. |
| initrd /initrd-2.6.31-16-generic root=/dev/sda1 ro |
| When correctly typed and entered, if the initrd image is found, a line similar to the "Initrd"" confirmation line highlighted in the graphic above should appear. |
| Step 4. Boot |
| boot |
| Type the command and press ~-ENTER-~. |
Rescue Mode
The rescue mode is a major GRUB 2 enhancement. If GRUB 2 fails to find a useable grub.cfg and is unable to transfer control to a kernel it will drop to a grub-rescue> prompt. From this prompt the user can investigate problems, make changes, and retry the boot. The rescue mode provides fewer commands than the normal GRUB prompt line, but also provides these additional commands:
| Command | Result | |
| dump | Clears memory | |
| exit | Exit GRUB 2 | |
| normal | Return to the standard "grub>" mode if possible. |
The following commands can be used in the grub rescue mode:
| boot | cat | chainloader | dump | exit | kfreebsd |
| kfreebsd_loadenv | kfreebsd_module | help | initrd | insmod | linux |
| lsmod | multiboot | normal | rmmod | set | unset |
| While not all the following commands are necessary to boot to a linux kernel, running all the commands will provide a better chance of success by allowing the user to identify problems before the boot command is executed. |
If additional commands are needed, the user might try loading the normal GRUB 2 module with `insmod normal`. If successful, `help` and additional commands will be available.
| Command Summary *: |
| 1. ls |
| 2. set prefix=(hdX,Y)/boot/grub |
| 3*. set root=(hdX,Y) |
| 4. set |
| 5. ls /boot |
| 6. insmod /boot/grub/linux.mod |
| 7*. linux /vmlinuz root=/dev/sdxY ro |
| 8. initrd /initrd.img |
| 9. boot |
| * For Wubi installs (within Windows) only substitute these commands in Steps 3 and 7: |
| set root=(loop0) |
| linux /vmlinuz root=/dev/sdxY loop=/ubuntu/disks/root.disk ro |
| Expanded Instructions: |
| 1. ls This will display the known devices and partitions. From this information, the user must determine the device and partition on which the system is installed. |
| 2. set prefix=(hdX,Y)/boot/grub If incorrect, "no such disk" or "not found" errors will occur later. |
| 3. set root=(hdX,Y) In this command, X is the device/drive, starting with 0. Y is the partition, starting with 1. Example: (hd0,1) is sda1. (hd2,5) is sdc5. |
| 4. set Inspect the "prefix=" listing. It should match the root designation in Step 3, in the following format: prefix=(hdX,Y)/boot/grub. |
| 5. ls /boot/ Inspect the contents. The user should see varioius kernels, initrd images and the grub directory. If not, use the ~-ls-~ command to inspect the device and attempt to find these files and directories. If necessary, set another device as root. |
| 6. insmod /boot/grub/linux.mod Load (insert module) the linux module. Without this module loaded, the user will receive an "Unknown command linux" message when trying to load the kernel. |
| 7. linux /vmlinuz root=/dev/sdxY ro Load the linux kernel, substituting the correct designations for "X" and "Y" (example: sda1). The user will see a message showing the kernel has been loaded. (See graphic in the previous section above) |
| * Wubi users must use the alternate command presented earlier. |
| 8. initrd /initrd.img Load the initrd image. When pressing ~-ENTER-~ the user may or may not see a message in the terminal. (See highlighted graphic above) |
| 9. boot Attempt to boot using the information entered. |
| These changes are not permanent. After successfully booting into the system the user should run `sudo update-grub` and inspect the GRUB 2 configuration file (/boot//grub/grub.cfg). For problems with booting the main linux kernel, ensure the search, linux, and initrd lines in the [[UbuntuHelp:## BEGIN /etc/grub.d/10_linux ###|## BEGIN /etc/grub.d/10_linux ###]] section of the file now point to the correct locations. The user may need to reinstall GRUB 2 using `sudo grub-install /dev/sdX`. |
GRUB Errors
GRUB 2 does not report error numbers. If a number is associated with an error, it is a problem with the transition from GRUB legacy to GRUB 2.
Resolving an "Unrecognized Device String" (Error 11)
This error message is usually the result of a bad or malformed line within the menuentry. The most common cause is a GRUB 2 upgrade from Jaunty when the user attempts to use the Chainload feature.
- During a boot GRUB 2 displays the following message:

- Remembering there was a problem with the Jaunty chainload entries, the user presses a key to return to the main menu, then "e" until seeing "grub edit>". Edit the highlighted "Chainload into GRUB 2" entry or whichever entry the user attempted to boot.

- The user, who has a keen memory, remembers that "root" needs to be changed to "uuid". Using the arrow keys to position the cursor, the "root" entry is replaced with "uuid". When finished editing, the user presses ~-ENTER-~, then "b" to boot the revised selection. Note these are different commands than used in GRUB 2.
 If the user intends to keep the dual GRUB option, to correct the error open /boot/grub/menu.lst as root and change "root" to "uuid" in second line of the "Chainload into Grub 2" menu entry.

File Not Found (Error 15)
This error is the result of a GRUB 2 installation to /boot but a Master Boot Record ( MBR ) which still contains Grub legacy. This can happen if you don't select your drive when running `sudo update-from-grub-legacy`. Shortly after starting this command the user will be asked to select the device (sda, sdb, etc). Highlight the drive and press the space bar to select it when presented with this screen. Failure to select a drive will result in an Error 15. To recover from this error, GRUB 2 must be reinstalled. Go to Reinstalling|from the LiveCD for instructions.
Grub shows rescue prompt (and does not continue to boot)
You may have a buggy bios and the location of your /boot/* files is not under the 1024 cylinder boundary. Create a small partition on the beginning of the disk, mount it as /mnt/b, cp -av /boot/* /mnt/b; umount /mnt/b; mount /dev/small_partition /boot; grub-install /dev/<device>.
Splash Images and Theming
GRUB 2 Splash Images
GRUB 2's Splash Image capability is greatly enhanced over its predecessor. Configuring a boot splash image is a two step process: selecting the image to use and choosing the text colors to be displayed.
 |
Install the default GRUB 2 splash image package, install the grub2-splashimages package | |
| `sudo aptitude install grub2-splashimages` | ||
| Do not mistake this with the grub-splashimages package, which is not compatible with GRUB 2. | ||
| The default location for these downloaded images is /usr/share/images/grub. This location must be added to 05_debian_theme or the files copied elsewhere. (See below) | ||
| Users can create and use their own splash images. |
Set the splash image
The GRUB 2's splash images are controlled by /etc/grub.d/05_debian_theme. Open this file for editing as root.
The following guidance for setting the background image is for the current default Grub 2 installation on Karmic Koala, Ubuntu 9.10. In later versions of Grub 2 (1.97 and later), found in testing versions of Lucid Lynx 10.04, the line:
">for i in {/boot/grub,/usr/share/images/desktop-base}..."
has been replaced with a simplified line:
WALLPAPER="/usr/share/images/desktop-base/moreblue-orbit-grub.png"
With the newer version, simply find this line (approximately line 10 of /etc/grub.d/05_debian_image and replace "/usr/share..." with the correct path and filename of the file you wish to use as the GRUB2 background.
Find the following line and edit the highlighted area, replacing it with the path and name of the GRUB 2 splash image you wish to use:
| for i in {/boot/grub,/usr/share/images/desktop-base}/moreblue-orbit-grub.{png,tga} ; do |
There are several things to note about this entry:
- GRUB 2 by default will look for splash images in /boot/grub and /usr/share/images/desktop-base
- The grub2-splashimages package is not extracted to either of the above directories, but to /usr/share/images/grub
- The user must either:
- Change the directory location in the above line to point to the correct address, or
- Move the splash images to one of the directories referenced above.
- To add the grub directory, make the entry look like this, and change the filename to the desired splash image in /usr/share/images/grub directory.
| for i in {/boot/grub,/usr/share/images/desktop-base,/usr/share/images/grub}/moreblue-orbit-grub.{png,tga} ; do |
- The filename ends with a period (.) ( /moreblue-orbit-grub~+.+~ )
- Splash image selection:
- If the same filename exists in more than one directory, the filename in the earliest-designated directory will be used.
- If the filename exists as more than one type (multiple extensions), the file with the earliest-designated extension will be selected.
The user can make several changes to the above line to expand splash image flexibility:
- Add a user-owned directory in which GRUB 2 will search for available splash images.
- Add the ability use JPEG files as splash images. At this time, only 8-bit JPEG images will display correctly.
- Note that images need to be in RGB color format to be displayed, rather than indexed.
The following shows the addition of a user's own splash directory and added JPEG support:
| for i in {/boot/grub,/usr/share/images/grub,/home/drs/mysplash}/moreblue-orbit-grub.{png,tga,jpg,jpeg} ; do |
Once you have entered the path and filename into 05_debian_theme you can run `sudo update-grub` to add the information into grub.cfg. If adding the splash image was successful, the user will see "Found Debian image..." in the terminal as the command is executed. If this phrase is not seen, the image information was probably not entered.
These lines are contained in /etc/grub.d/05_debian_theme. The instructions do not apply to the "mono" theme settings near the top of the file.
- The color of non-selected menu entries is set by the line below. The first color is the text color; the second is the background color.
| set color_normal=black/black |
- The code below sets the color of selected entries. The first color is the highlighted text color; the second is the background color of the selected line. If /black is the second entry, the highlighted line will be transparent and only the text will change color.
| set color_highlight=magenta/black |
/black is the GRUB 2 default transparency color when listed second. Change only the first color (i.e. xxxxx/black) if using a splash image. If the second value in this line is changed to a color other than black the splash image will be hidden behind a solid color background.
- In the following graphic, the color_normal setting is white/black. The color_highlight setting is cyan/blue

- These colors are available in GRUB 2. "black" as a second entry is considered "transparent".
| black | blue | brown | cyan | dark-gray | green | light-cyan | light-blue |
| light-green | light-gray | light-magenta | light-red | magenta | red | white | yellow |
Save the file if any changes are made and then update GRUB 2: sudo update-grub
Testing Fonts and Splash Images
Rather than rebooting to test the color combinations, the user can see the changes by using GRUB 2's command line during the boot process.
- Select the splash image and initial font colors as described above, update GRUB 2's files with `sudo update-grub`, and reboot.
- When the GRUB 2 splash image/menu appears, press any key to stop the countdown timer.
- Press c to enter the GRUB 2 command line.
- Experiment with various color/highlight modes. Make changes by typing:
- `set color_normal=first-color/black` and/or `set color_highlight=first-color/second-color`
- Text colors are viewable immediately after the command is entered. You can use the "up" arrow to recall the last command and edit it to quicky test different color combinations.
- Once you are finished, press ESC to return to the menu.
- Repeat as desired.
- Remember the desired color combinations, boot normally and edit /etc/grub.d/05_debian_theme and make the changes permanent.

- Save the file, then update GRUB 2: `sudo update-grub`
Changing Resolutions w/ Splash Images
If the user wishes to change the resolution of the GRUB 2 screen while using a splash image follow these steps:
- Set the desired resolution in /etc/default/grub
- Change the value of ~-GRUB_GFXMODE=-~ (Example: ~-GRUB_GFXMODE=800x600-~)
- If unsure of what resolutions are available to GRUB 2 they can be displayed by typing `vbeinfo` in the GRUB 2 command line. The command line is accessed by typing "c" when the main GRUB 2 menu screen is displayed.
- Select an image of the same size and make the change in /etc/grub.d/05_debian_theme
- The image name is located in the line beginning with " for i in {/boot"
- If an image of the correct size is not used, the menu will not be positioned correctly.
- Use the image editor of your choice to create/resize an image to the correct size.
- The user may be able to view the image size via Properties in a file browser (check the Properties Image tab in Nautilus).
- Run update-grub as root to add the new settings to /boot/grub/grub.cfg
Creating User Splash Images
GRUB 2's splash image management makes it easy to use a wide variety of splash images.
Resolution Settings
The images in the grub2-splashimages package are primarily 640x480 images. GRUB 2 looks for a resolution setting in /etc/default/grub. If uncommented, the resolution is determined by this line:
| GRUB_GFXMODE=640x480 |
- If no setting is found in /etc/default/grub, GRUB 2 uses the resolution established in /etc/grub.d/00_header, which is set at 640x480.
Image Creation and Setup
In Ubuntu, refer to the System, Preferences, Display menu for available monitor resolutions, or run `vbeinfo` in the GRUB 2 command line to display available resolutions.
- Determine the resolution you will use for the GRUB 2 splash image.
- Create or resize any image to to the appropriate size.
- GRUB 2 currently supports .png, .tga, and 8-bit .jpg/.jpeg images.
- If using GIMP, naming the file with the applicable extension will save the file in the given format.
- Make the applicable changes in the GRUB 2 configuration files:
- /etc/default/grub: Uncomment the GRUB_GFXMODE=640x480 line and change the value if the resolution will be other than 640x480.
- /etc/grub.d/05_debian_theme: Enter the correct path and filename in the following line. Refer to the previous section for more information on how to edit this line.
| for i in {/boot/grub,/usr/share/images/desktop-base}/moreblue-orbit-grub.{png,tga} ; do |
- Run `sudo update-grub` to incorporate the changes into GRUB 2.
Themes
GRUB 2 Theming is still under development, as is integration with gfxmenu. Theme elements will include colors, fonts, progress indicators, menus, and labels. Both of these hold great promise but are not ready for release with Ubuntu 9.10. Check the Links section at the bottom of this page for references.
 |

|
Reinstalling GRUB 2
There may be times when a user needs to either move or reinstall a GRUB 2 installation. GRUB 2 needs to be reinstalled when a user is presented with a blank screen with only the word "GRUB", no prompt, and no ability to enter commands. This often happens when the MBR of the booting device is altered and GRUB 2 is removed, such as when Windows is installed after Ubuntu. Additionally, if a user cannot boot into an operating system at all, even using the rescue|mode mode, a complete reinstallation of GRUB 2 may be necessary.
Reinstalling from LiveCD
If you cannot boot from GRUB 2 review the section Boot Problems and Rescue Mode. If a reinstall becomes necessary follow these instructions. Two methods are presented; both require booting from a LiveCD (Ubuntu 9.10, Karmic Koala or later version). If the first method does not work, follow the second method, which is more complex and contains more options and instructions.
SIMPLEST - Copy GRUB 2 Files from the LiveCD
This is a quick and simple method of restoring a broken system's GRUB 2 files. The terminal is used for entering commands and the user must know the device name/partition of the installed system (sda1, sdb5, etc). The problem partition is located and mounted from the LiveCD. The files are then copied from the LiveCD libraries to the proper locations and MBR. It requires the least steps and fewer command line entries than the following methods.
- Boot to the LiveCD Desktop (Ubuntu 9.10 or later).
- Open a terminal by selecting Applications, Accessories, Terminal from the menu bar.
- Determine the partition with the Ubuntu installation. The fdisk option "-l" is a lowercase "L".
sudo fdisk -l
If the user isn't sure of the partition, look for one of the appropriate size or formatting. Running `sudo blkid` may provide more information to help locate the proper partition, especially if the partitions are labeled. The device/drive is designated by sdX, with X being the device designation. sda is the first device, sdb is the second, etc. For most users the MBR will be installed to sda, the first drive on their system. The partition is designated by the Y. The first partition is 1, the second is 2. Note the devices and partitions are counted differently.
- Mount the partition containing the Ubuntu installation.
sudo mount /dev/sd''xY'' /mnt
Example: sudo mount /dev/sda1 Note: If the user has a separate /boot partition, this must be mounted to /mnt/boot
- Run the `grub-install` command as described below. This will reinstall the GRUB 2 files on the mounted partition to the proper location and to the MBR of the designated device.
sudo grub-install --root-directory=/mnt/ /dev/sdX
Example: sudo grub-install --root-directory=/mnt/ /dev/sda
- Reboot
- Refresh the GRUB 2 menu with `sudo update-grub`
- If the user wishes to explore why the system failed, refer to Post-Restoration|Commands section below.
METHOD 2 - Copy GRUB 2 Files from the Installed Partition
This is a quick and simple method of restoring a broken system's GRUB 2 files. The problem partition is located and mounted from the LiveCD. The files are then copied from the broken system's /boot/grub directory to the proper locatations and MBR. It requires fewer steps and fewer command line entries than the following CHROOT method. For users with separate system partitions, such as a separate /boot partition, or other special circumstances, using the CHROOT method may provide better results.
- Boot to the LiveCD Desktop (Ubuntu 9.10 or later).
- Mount the partition with your Ubuntu installation.
- From the Places menu, select and click the partition containing your Ubuntu installation to mount it.

- If the partition isn't recognized, look for one of the appropriate size or label.
- Once mounted, the user should see Ubuntu system directories such as /boot
- Open a terminal by selecting Applications, Accessories, Terminal from the menu bar.
- Run the `grub-setup -d` command as described below. This will reinstall the GRUB 2 files on the mounted partition to the proper location and to the MBR of the designated device.
- Determine the mount point by referring to the location box in Places. Replace XXXX in the command with the UUID, or replace /media/XXXX with the correct location if the partition is not mounted in /media. The designation may be a UUID, or a label, if the user has created one (see note).
- If the location window is not in the format shown, click on the icon to the left to change the presentation.

- When ready to copy the UUID/location, by highlight it with the mouse. Paste it into the terminal by pressing the middle mouse button. If using the keyboard, use CTRL-SHIFT to copy the location and CTRL-SHIFT-V to paste it into the terminal.
- The device/drive is designated by sdX, with X being the device designation. sda is the first device, sdb is the second, etc. For most users the MBR should be installed to sda, the first drive on their system.
sudo grub-setup -d /media/XXXX/boot/grub /dev/sda
Example: sudo grub-setup -d /media/7848138a-41a0-4eba-8aed-d1b625ac8759/boot/grub /dev/sda
- If the user gets a "error: Cannot open /boot/grub/device.map" message, add the -m switch and path to the device.map to the command as follows:
sudo grub-setup -d /media/XXXXX/boot/grub -m /media/XXXXX/boot/grub/device.map /dev/sda
Example: sudo grub-setup -d /media/7848138a-41a0-4eba-8aed-d1b625ac8759/boot/grub -m /media/7848138a-41a0-4eba-8aed-d1b625ac8759/boot/grub/device.map /dev/sda
- Other switches are available for use with the `grub-setup` command. In a terminal, type `grub-setup --help` for a list of available options.
- You may find you get a repeated "error: Cannot open /boot/grub/device.map" message. If this happens try rebooting. The UUID method may actually work but throws an error message falsely. Using the label name does not seem to evoke the same repeated error message.
- Reboot
- Refresh the GRUB 2 menu with `sudo update-grub`
- If the user wishes to explore why the system failed, refer to Post-Restoration|Commands section below.
Ubuntu 9.10 introduced a new application which can easily assign labels to existing partitions. Access Disk Utility from the System, Administration menu.
METHOD 3 - CHROOT
This method of installation uses the chroot command to gain access to the broken system's files. Once the chroot command is issued, the LiveCD treats the broken system's / as its own. Commands run in a chroot environment will affect the broken systems filesystems and not those of the LiveCD.
- Boot to the LiveCD Desktop (Ubuntu 9.10 or later). Please note that the Live CD must be the same as the system you are fixing - either 32-bit or 64-bit (if not then the chroot will fail).
- Open a terminal - Applications, Accessories, Terminal.
- Determine your normal system partition - (the switch is a lowercase "L")
`sudo fdisk -l`
- If you aren't sure, run
`df -Th`. Look for the correct disk size and ext3 or ext4 format.
- Mount your normal system partition:
- Substitute the correct partition: sda1, sdb5, etc.
`sudo mount /dev/sdXX /mnt` # Example: `sudo mount /dev/sda1 /mnt`
- Only if you have a separate boot partition:
- sdYY is the /boot partition designation (for example sdb3)
- `sudo mount /dev/sdYY /mnt/boot`
- Mount the critical virtual filesystems:
`sudo mount --bind /dev /mnt/dev`<
> `sudo mount --bind /proc /mnt/proc`<
> `sudo mount --bind /sys /mnt/sys`- Chroot into your normal system device:
`sudo chroot /mnt`
- If there is no /boot/grub/grub.cfg or it's not correct, create one using
`update-grub`
- Reinstall GRUB 2:
- Substitute the correct device - sda, sdb, etc. Do not specify a partition number.
`grub-install /dev/sdX`
- Verify the install (use the correct device, for example sda. Do not specify a partition):
`sudo grub-install --recheck /dev/sdX`
- Exit chroot:
~-CTRL-D-~ on keyboard
- Unmount virtual filesystems:
`sudo umount /mnt/dev`<
> `sudo umount /mnt/proc`<
> `sudo umount /mnt/sys`- If you mounted a separate /boot partition:
`sudo umount /mnt/boot`
- Unmount the LiveCD's /usr directory:
`sudo umount /mnt/usr`
- Unmount last device:
`sudo umount /mnt`
- Reboot.
`sudo reboot`
Post-Restoration Commands
Once the user can boot to a working system, try to determine why the system failed to boot. The following commands may prove useful in locating and/or fixing the problem. To refresh the available devices and settings in /boot/grub/grub.cfg
- `sudo update-grub`
To look for the bootloader location.
- `grub-probe -t device /boot/grub`
To install GRUB 2 to the sdX partition's MBR (sda, sdb, etc.)
- `sudo grub-install /dev/sdX`
To recheck the installation. (sda, sdb, etc.)
- `sudo grub-install --recheck /dev/sdX`
Changing or Moving GRUB 2
The command to change the GRUB 2 installation device or boot files is `grub-install` run as root. This command allows the user to modify the installation by setting the ROOT directory, preload modules, run specific setup files and more. When executed, `grub-install` may run one or more other commands, such as `grub-probe`, `grub-mkimage`, and `grub-setup`. Here are some considerations when running `grub-install`:
- The `grub-install` command should be used rather than `grub-setup` under normal circumstances. `grub-setup` will be called by `grub-install` when needed.
- The command should specify a device and when executed will install the required GRUB files to the location called for in the options. (example: `sudo grub-install /dev/sda` )
- If the user attempts to run the command with a specific partition (example: `sudo grub-install /dev/sda6` ) a warning will be issued. Specifying a partition is not recommended due to the use of blocklists, which the developers consider unreliable. An option is provided on how to override this recommendation if the user still wishes to do so.
- The list of options available for `grub-install` can be displayed in a terminal with ~-grub-install --help-~.
- The man page for `grub-install` currently does not display the all the available options.
Uninstalling GRUB 2
Reverting to GRUB Legacy
If a user chooses to return to GRUB legacy (0.97), these steps will remove GRUB 2 and install GRUB. The command line produces a cleaner uninstall and reinstallation. While adding and removing the packages can be accomplished with Synaptic, certain steps must be accomplished in a terminal.
- Open a terminal: Applications, Accessories, Terminal.
- Optional: Make backup copies of the main GRUB 2 directories and files.
- `sudo cp /etc/default/grub /etc/default/grub.old`
- `sudo cp -R /etc/grub.d /etc/grub.d.old`
- `sudo cp -R /boot/grub /boot/grub.old`
- Remove GRUB 2
- `sudo aptitude purge grub2 grub-pc`
- The system will be unbootable until another bootloader is installed.
- Once the packages are removed, many files will still remain in '/boot/grub'
- Install GRUB 0.97
- `sudo aptitude install grub`
- With grub installed, the user must still create the menu.lst and stage1/stage2 files by running the following two commands.
- `sudo update-grub`
- Generates menu.lst
- Tab to "Yes" when prompted.
- `sudo grub-install /dev/sdX`
- Choose the correct device (sda, sdb, etc), normally the one on which Ubuntu is installed.
- Creates the stage1 and stage2 files in /boot/grub and writes to the MBR.
- Reboot
https://help.ubuntu.com/community/Grub2?action=AttachFile&do=get&target=important.pngIf the user receives an "Unrecognized device string Error 11" message on rebooting see the Resolving|an "Unrecognized Device String" (Error 11) section for instructions on how to edit the menu and make the system bootable.
Selected Problems and Bugs
External Drive Installs and grub-pc Updates
Launchpad Bug 496435 Installs of Ubuntu on external drives can cause problems as grub-install uses device names (e.g. sda, sdb) rather than UUIDs in certain circumstances. If connected to another machine when an update of grub-pc is made, the upgrade may be written to the incorrect device and make the computer unbootable. A workaround is posted on the bug link above.
External Drive Installs and MBR Selection
Launchpad Bug 414996 When installing Ubuntu to a USB drive, the potential exists for GRUB 2 to write to the hard drive's MBR or split the installation between the hard drive and the USB drive (rather than completely on the USB device). This can render the main drive unbootable. Workaround: During the final stages of the install there is an "Advanced" button which allows the user to select the install location. See the bug report for more details.
Miscellaneous
Booting from a serial console
If you want GRUB to operate over a serial line, you will need to uncomment GRUB_TERMINAL in /etc/default/grub and set it to serial (instead of the console default). The default serial console settings are to operate on the first serial port (ttyS0) at a 9600 bit/s transfer rate with 8 data bits, 1 stop bit and no parity. If you want to use another serial port or if your console uses different settings, you must add a GRUB_SERIAL_COMMAND line to specify additional parameters to the serial command. The serial command in GRUB2 uses the same syntax as its GRUB Legacy counterpart (documented here). For example, for a 4800 bit/s serial line with 7 data bits, 1 stop bit and even parity:
GRUB_SERIAL_COMMAND="serial --unit=0 --speed=4800 --word=7 --parity=even --stop=1"Links
External Links
- GNU GRUB
- GNU GRUB 2 Manual
- Illustrated Dual Boot HomePage
- Mac OS X (XNU) Support
- Mac OS X Boot Snow Leopard
- http://grub.gibibit.com/Theme_format (Themes)