“Ardour4 初学者教程 04 混音会话”的版本间的差异
来自Ubuntu中文
(→Panning) |
(→Processor Box) |
||
| 第36行: | 第36行: | ||
http://brunoruviaro.github.io/ardour4-tutorial/images/Ardour4_Mixer_Strip_2.png | http://brunoruviaro.github.io/ardour4-tutorial/images/Ardour4_Mixer_Strip_2.png | ||
| − | === | + | ===处理器框=== |
| − | + | 这部分底部的大片黑色区域是'''Processor Box处理器框'''(注:上面的那张图)。在这里您可以添加插件等,诸如此类的操作。处理器框将总是包含着一个蓝色的Fader淡化器处理器。这表明在处理器链条里已经安置了主要的声道淡化器——这就是淡化器在工具栏的下半部分所显示的。请参阅'''使用插件'''和'''使用发送'''章节里对这部分区域的详细讨论。 | |
| − | + | 混音器工具栏的下一部分包括有Panning平移,Record录制,Mute静音,以及Solo独奏,还有其它等等控制元件。 | |
http://brunoruviaro.github.io/ardour4-tutorial/images/Ardour4_Mixer_Strip_3.png | http://brunoruviaro.github.io/ardour4-tutorial/images/Ardour4_Mixer_Strip_3.png | ||
2016年2月8日 (一) 22:25的版本
目录
混音区域
Mixing混音是将多个音轨转化为一个让所有仪器都能清晰听到的Stereo Mix立体声混音的过程,。
混音工具
用来实现一个好的混音的主要工具有Levels电平,Panning平移,Equalization均衡(EQ)和Compression压缩。除了这些核心工具,众多的插件效果也可以用来优化声音,例如Reverb混响和Delay延迟。
混音器工具栏简介
Mixer Strip混音器工具栏是垂直排列的,包含有相关信号流的各种控制元件。在Ardour里的每个音轨和总线都拥有属于它自己的混音器工具栏。混音器工具栏也是我们在混合我们的音轨的过程中将要使用到的主要工具。在这一章节里,我们将对混音器工具栏做一个总体概述,并且对每一个部分进行阐述。我们还将列出包含有混音器工具栏各个方面特定信息的参考章节。
自上而下的混音器工具栏
混音器工具栏既以从Editor Window编辑器窗口也可以从Mixer Window混音器窗口访问到(快捷键“Alt”+“M”可以在两者之间切换)。混音器工具栏在任何一个窗口(不论是编辑器或者是混音器)上的操作都会互相镜像到另一个窗口:在混音器窗口里的一个混音器工具栏上执行的任何操作,将会被反映在编辑器窗口里相应的混音器工具栏中,反之亦然。在界面概述章节中对编辑器窗口和混音器窗口有更充分的讲解。
在Editor Window编辑器窗口中,您可以看到当前被选中的音轨的混音器工具栏位于窗口的左边。如果您没有看到它,按下“Ctrl”+“E”即可显示编辑器混音器工具栏。
概述
在这里我们看到的是整个混音器工具栏,正如它在编辑器窗口或混音器窗口里出现的那样。

常规模式和狭窄模式
混音器工具栏可以在常规宽度和一个为了节约空间而更狭窄的宽度之间切换。混合器工具栏的最顶端部分,如下图所示,使用左边的按钮即可切换常规模式和狭窄模式。右边的按钮则是用于彻底隐藏混音器工具栏。

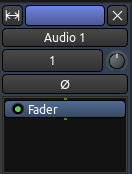
音轨名称和路由按钮
继续从上往下看,混音器工具栏的下一部分包含三个狭长的区域。这些区域的第一个显示的是音轨的名称(即下图所示的那个词“Audio 1”)。下一个区域,在下面这张图里命名为“1”的是一个按钮,允许访问输入路由。请参阅了解路由和录制音频章节可以了解关于输入路由的更多信息。最后一个狭长的区域控制的是phase reversing相位反转(在本教程我们不会深入讨论关于这个主题的细节)。
处理器框
这部分底部的大片黑色区域是Processor Box处理器框(注:上面的那张图)。在这里您可以添加插件等,诸如此类的操作。处理器框将总是包含着一个蓝色的Fader淡化器处理器。这表明在处理器链条里已经安置了主要的声道淡化器——这就是淡化器在工具栏的下半部分所显示的。请参阅使用插件和使用发送章节里对这部分区域的详细讨论。
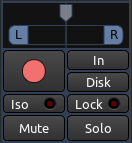
混音器工具栏的下一部分包括有Panning平移,Record录制,Mute静音,以及Solo独奏,还有其它等等控制元件。
平移
Panning平移与左右扬声器之间声音的位置协同工作。有关更多信息请参阅平移一章。
Solo
When a Track or Bus is on Solo, all the other Tracks or Busses which are not likewise on Solo will be inaudible through the Master Bus or the Audition. We can also find a miniaturized Solo Button in the Track Mixer. Note that soloing a bus will not silence any tracks and vice-versa.
When any Track or Bus is on Solo, the Solo Indicator in the Auxiliary Controls menu will flash red. Clicking the Solo Indicator while it is flashing will deactivate every Solo in the Session.

Mute
Any Track or Bus on Mute will be inaudible through the Master Bus or the Audition. The Track Mixer also contains a miniaturized Mute Button, in between the Record Arm Button and the Solo Button. Right-Clicking on the Mute Button gives you advanced options for the behavior of the mute button.
Arm Record
The Rec button arms the track for recording, as seen in the Recording Audio chapter.
Fader, Fade/Peak Meters
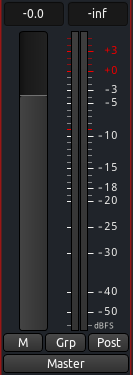
The most prominent control present in a Mixer Strip is the Fader, used to adjust the overall gain for the corresponding Track or Bus. The Peak Meter shows the Peak Value of the selected track, and is located directly to the right of the Fader. Each Peak Meter consists of one Bar Graph in the case of a Mono Track, and two Bar Graphs in case of a Stereo track. The small rectangular field above the meters shows the highest Peak Value that has been played on that track so far.
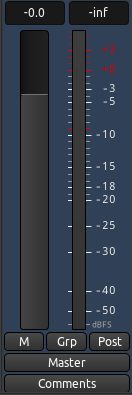
By clicking the right-hand button at the bottom of the Mixer Strip (it reads “post” in the image above), you will be able to select the Metering Point, for example the direct “in” from the sound card, the “pre” Fader signal, or the “post” fader signal.
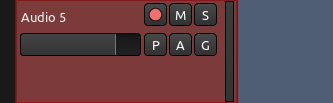
As you can see in the image below, there is a smaller version of the Mixer Strip in each Track, called the Track Mixer, which contains a horizontal Fader, a vertical Peak Meter as well as miniature buttons for Arm Record, Mute, and Solo. They all mirror those found in the Mixer Strip for that Track.
Please refer to the chapter on Mixing Levels for more detailed instruction about using the Fader and Peak Meters.
Routing
Finally, we reach the bottom of the Mixer Strip. Here we find the Output Routing Button, marked as “master” in the earlier screenshot, which is discussed in the Understanding Routing chapter.
混音音平
Levels are the volumes of each Track relative to the others.
If you can’t hear a bass line above the other instruments, the obvious choice would be to raise the bass line volume. Levels can be adjusted using the Fader in the Mixer Strip or in each Track, just below the Track name. The first step in Mixing is to listen to everything that has been recorded and adjust the levels of all Tracks so you can hear everything clearly, but in a manner that is appropriate for the song. For example, the vocal track is normally louder than the rhythm guitar because the voice is the focal point of the song.
Using the Fader
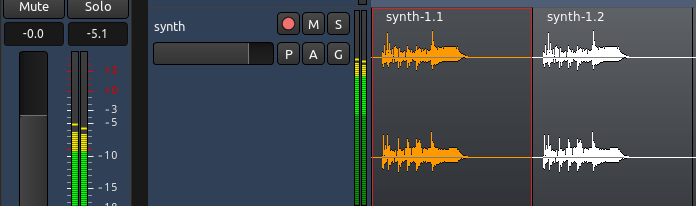
The Fader is the primary control of Levels for each Track. The exact value of the Track’s Levels are displayed in the small rectangular field above the Fader. You can change the Levels by either dragging the slider or typing in a new number directly into the rectangle with the number. By default the Fader is set to −0.0 dB, meaning that the Levels of the Track are not changed. In the screenshot below, the Fader for the track named “kick” is set to -0.0, and the Peak Meter indicates that the highest peak so far was -5.1.
Avoiding Clipping
One other important task in Mixing is to avoid Clipping. The Peak Value on the Mixer Strip turns red when the signal has peaked above 0.0dB. You can use this tool to monitor the highest Levels of your Track while Mixing.
In the screenshot below, the synth track has just clipped to +5.9. You can also see little red edges on the waveform itself, indicating the exact locations where the recorded sound clipped.
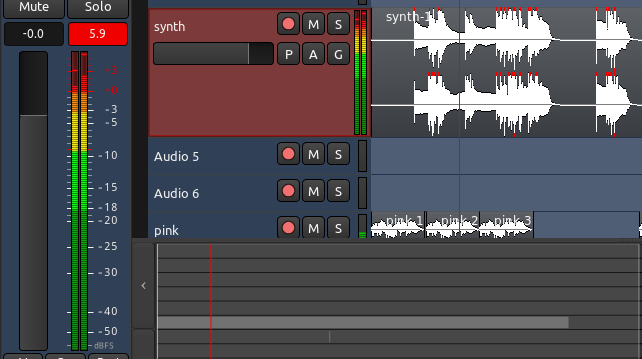
Click on the red number in the Peak Meter to reset it.
TIP: for the sake of the exercise, try to record your voice so that it clips. Hear how the playback is distorted.
You should make sure that anything that you send to your sound card or that you will eventually Export as a sound file (such as for CD mastering) never goes above 0.0dB to avoid actual Clipping.
If the clipping occurs in a very percussive sound and it is almost unnoticeable, you may be able to hide it by decreasing the gain (for example, Normalize the region to 0.0, or a lower number like -1.0). However, often the clipping results in audible distortion of the recorded sound. The best solution in this case is to just record again with lower levels.
平移
Panning helps to establish a Stereo Field, a relative space between the speakers in which to place your sounds and instruments.
Once you have established a good balance of levels on all the Tracks, you can begin to think about panning.
The Panning Interface
The Panning control in Ardour is located in the middle of the mixer strip.
A Mono Track will have a Mono Panner. It looks like this:

A Stereo Track will have a Stereo Panner, like this:

Mono Panner
The default Mono Panner distributes 1 input to 2 outputs. Its behaviour is controlled by a single parameter, the position. By default, the panner is centered. You can change the position by clicking and dragging directly on the Mono Panner. Right-click on the panner to access other options.
Stereo Panner
The default Stereo Panner distributes 2 inputs to 2 outputs. Its behaviour is controlled by two parameters, width and position. By default, the panner is centered at full width.
Click and drag either the Left or the Right button to change the width. For example, if you bring them closer together it will look like this:

With a narrower width, you can also drag the top handle to change the relative center position, like this:

If we make the Left and Right buttons to overlap completely (that is, width is reduced to zero), the handles turn into a single signal indicator marked “M” (for mono):

Panning Tricks
A more extensive discussion of panning philosophy and techniques is beyond the scope of this tutorial, but here are some general rules of thumb:
   Guitars tend to be Panned to the left and right.
   Vocals and bass tend to placed in the center. You want to create a balance so that one side is not louder then the other.
   Headphones may be helpful in determining how instruments should be panned, and whether the mix feels lopsided because one side is too loud.
Two other tools that are useful in creating a “spatial” or Stereo Field are Reverb and Delay. These effects can be used together with sends to create a drum send which would be further back in the mix with more Reverb, and a vocal send which might have a little more Delay but sound closer than the drums. Please see the chapter on Using Plugins and Using Sends for more information.
TIP: Always keep an eye on your Levels while Panning Tracks! Panning a Track to one channel increases the Level of that channel. This may change the balance of Levels you set up in the previous chapter, and in extreme cases can result in Clipping. When this happens, reduce the overall Levels of that Track and check again how it sits in the Mix.
使用插件
Plugins can be used to enhance or transform the sound of individual Tracks.
They can be applied directly to a single track, or to a group of Tracks using a Send. Later in this tutorial, we will discuss some Plugins specific to the Mixing process, such as Compressors, Limiters, Parametric Equalizers, Reverbs and others.
Processor Box
In Ardour terminology, a Processor is anything which gets plugged into a Mixer Strip, and treats the signal in some way. Ardour provides several built-in processors such as the Fader or Panners. Processors can also be plugins used for effects or as instruments, as well as sends or inserts which affect signal routing. The arrangement of processors is arbitrary, and there is no limit to how many there can be.
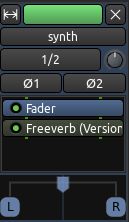
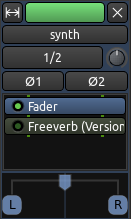
The main space shown in the screenshot above is the Processor Box. The blue box Fader is in fact a Processor that comes by default inside the Processor Box. It represents the Fader that you use to control the Track’s volume. All Processors are shown as coloured rectangles, with a small “LED” beside them that lights up when the processor is enabled. The colour of the processor depends on its location in the sequence; processors that are pre-fader are coloured in red, and post-fader processors are coloured green.
Adding a Plugin to a Track or a Bus
Plugins can be added by right-clicking in the Processor Box of the Track or Bus. A menu of options is presented. From the menu, new processors can be inserted.
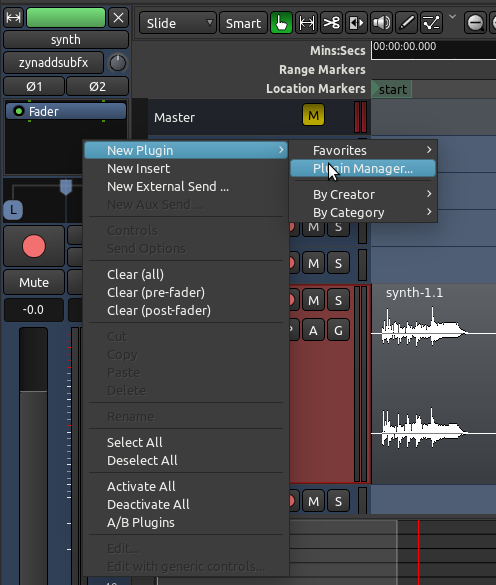
The Plugin Manager is a convenient way to browse and choose plugins:
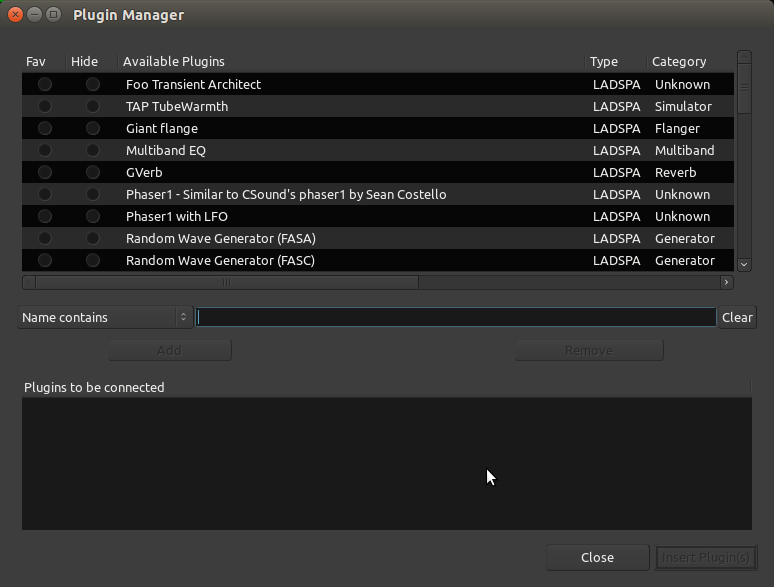
From the Plugin Manager, you can search them by Name, Type, or other search parameters available from the drop-down menu. For example, we will add the reverb plugin called “Freeverb”:
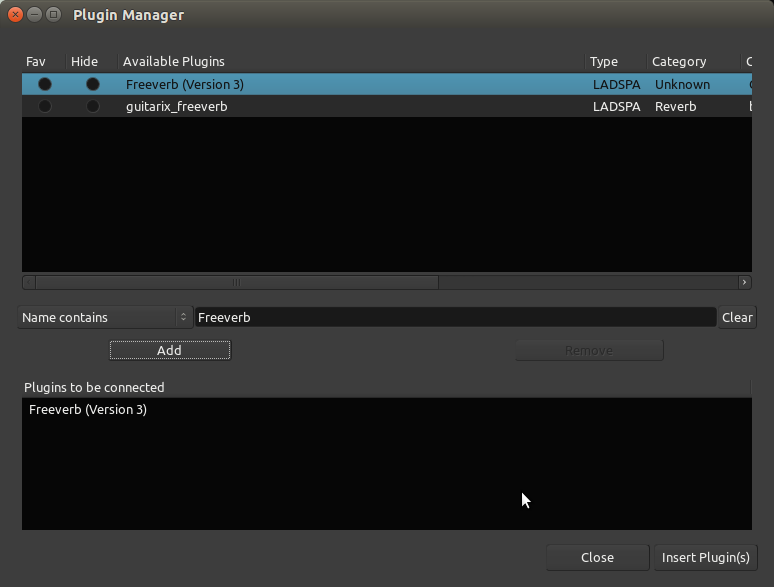
Once selected, click “Add” and the plugin will show up in the bottom list of “Plugins to be connected”. Then click “Insert Plugin(s)” and they will show up in the Processor Box.
Editing Plugin Parameters
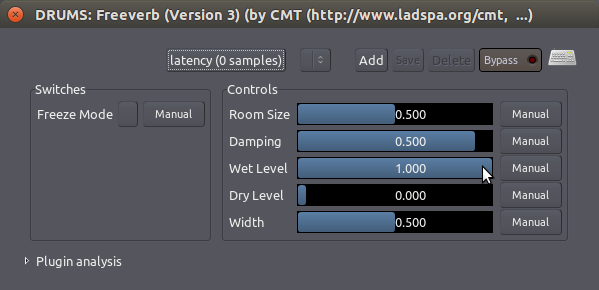
Double-click a Plugin to edit its parameters. In this example, we double click the “Freeverb” green box and get this window:
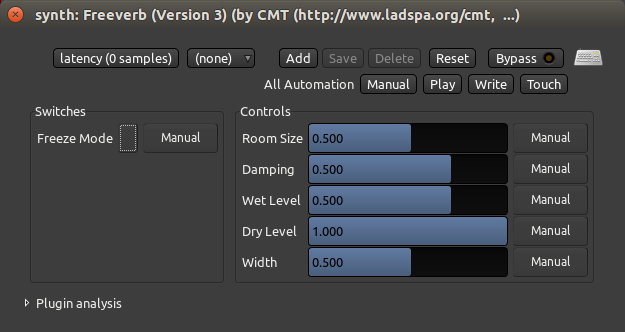
Here you can control reverb parameters such as Room Size, Damping, amount of Wet and Dry signal, and Width. The effect will apply to all sounds contained in the Track.
Bypassing Plugins
To bypass the Plugin, press the Bypass button in the Plugin settings window, or simply click the “LED” of the plugin in the Processor Box. This turns the Plugin off and allows the signal to pass by it unaffected. This is useful when you want to compare how a track sounds with and without the plugin.
Bypassed Plugins are shown greyed out and with the “LED” turned off.
Right-Clicking the Plugins will give a menu with several options, including Delete.
Pre-Fader vs Post-Fader
You have a choice whether you would like to add your Plugin before or after the Fader rectangle in the Processor Box. Pre-Fader Plugins are inserted in the signal path before the Fader, so that the Fader controls the level of the signal coming out of the Plugin. Post-Fader Plugins are inserted after the Fader: the Fader controls the level of the signal going into the Plugin. For some Plugins, Pre- or Post-fader placement does not matter. For others, the difference is subtle. For others still, inserting them in the right place is absolutely essential.
Plugin Formats
For those interested in learning more about plugin formats, here’s a quick overview:
LADSPA Plugins are the “native” Plugin format for Ardour. They were initially developed for Linux, but since have been ported to OS X as well.
LV2 is a simple but extensible successor of LADSPA, which can be used to display sound characteristics in a graphical manner. LV2 Plugins can be used on OS X and Linux.
AU Plugins are the “native” Plugin format for OS X. They will only work in Ardour if you have made a donation when you downloaded the program. See the Installing OS X chapter for details. AU Plugins will not work on Linux at all.
VST Plugins is a Plugin format common to Microsoft Windows. Some VST Plugins can be used on Linux, however they may not function correctly, or even cause Ardour to crash. Using these Plugins requires manually Compiling the Ardour application, a task which is outside the scope of this manual.
More information about using plugins with Ardour can be found here: http://manual.ardour.org/working-with-plugins/
使用发送端
A Send is just an extra output for a Track or Bus with its own separate Fader that can be used to route the signal to other points in Ardour.
Also known as Auxiliary Sends, they tap the signal at a specific point in the signal flow (pre-fader, post-fader, before or after EQs and other plugins, etc.) and send a copy of that signal somewhere else, without affecting the normal signal flow downwards to the channel fader.
In Ardour, you can easily add Sends to Tracks and Busses through the Mixer Strip. Sends are Processors, just like Plugins.
When is a Send useful?
In earlier chapters, we built a drum kit pattern with four separate tracks: kick, snare, hihat, and clap. Let’s say now you’d like to add a reverb to the drums. You could of course add a separate plugin for each individual track, and tweak their settings separately, but this method unnecessarily increases the amount of work. Every time you want to change a reverb setting across the board for all drums, you’d have to open all four reverb plugins and change them in the same way.
This is where Sends come in handy: you can use them to add a particular effect to a set of Tracks without creating multiple instances of the same Plugin.
Here’s the overview of how we will do this:
   Create a single Bus with the desired Plugin.
   Add a Send to each drum track to which you want to apply the effect.
   Route these Sends to the Bus.
Creating the Bus and adding a Plugin
Create a Bus (menu Track > Add Track or Bus), name it appropriately, and add a Plugin in the Pre-Fader Region (right-click just above the Fader blue rectangle in the Processor Box), as discussed in the chapter Using Plugins.
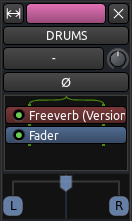
In this example, we have created a Mono Bus called “DRUMS”, and added the “Freeverb” Reverb LADSPA Plugin to the bus.
Bus inputs
The “-“ display in the Bus Input button indicates that nothing is routed to this bus yet. We will take care of this later.
Bus output
Before routing a send to this Bus, first make sure that the Bus outputs are Routed to the Master Bus, as shown below (button at bottom reads “master”).
Also, open the Plugin Window (double click on the Freeverb rectangle) and set the Plugin’s signal mix to 1.0 Wet Level and 0.0 Dry Level.
This ensures that the Bus carries all of the processed signal (the ‘Wet’ signal) from the Plugin, and none of the unprocessed signal (the ‘Dry’ signal) to the Master Bus. Remember, the unprocessed, ‘clean’ signals are still available from their original tracks, so there is no need to duplicate them in this Bus.
Creating and Routing Sends
Now we can create Sends in the other Tracks and route them to the Bus inputs.
Like Plugins, Sends are also created in the Processor Box. Go to each of your drum tracks, right-click in empty space of the Processor Box, and create a New Aux Send directed to the appropriate Bus (in our case, named DRUMS).
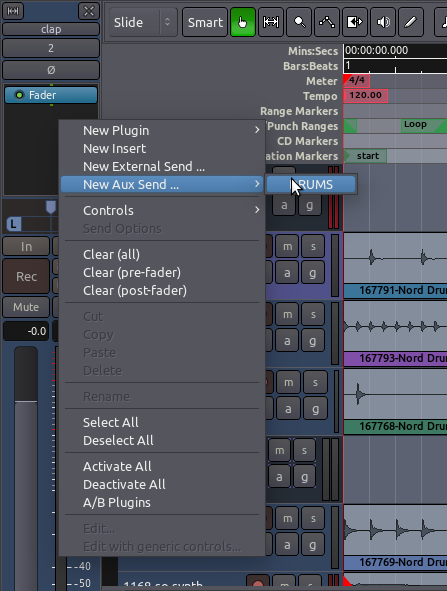
You should now see the Send displayed in the Processor Box:
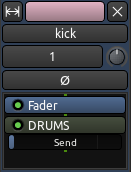
The little “Send” slider you see just below the green rectangle is the Send Fader, which controls how much sound will be sent from this Track to the Bus.
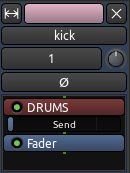
Post-Fader vs Pre-Fader Sends
Notice that the image above shows a Post-Fader Send (it sits “after” the Fader rectangle). In Post-Fader Sends, the Send Level is controlled first by both the Track/Bus Fader and second by the Send Fader.
In a Pre-Fader Send, on the other hand, the Send Level is controlled only by the Send Fader, independently of the Track/Bus Fader. A Pre-Fader Send would look like this:
You can drag the Send rectangle up and down the Processor box to make it Pre- or Post-Fader as needed.
TIP: The choice of Pre- or Post-Fader depending on the type of effect Plugin used and the desired result. For this exercise, either one will work.
A Send behaves just like any other Plugin in the Processor Box. You can deactivate it temporarily by clicking on the small “LED”, and you can right click on the rectangle to access other options, including “Delete”.
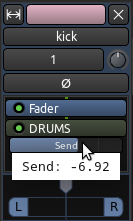
Send Fader
To control level of each Send, simply click and drag the Send Fader to increase or decrease its volume.
The DRUMS Bus is now receiving the sum of all tracks, and applying the effect to it. A single Plugin applied to the Bus controls the effect for the mix of all drum sounds routed there. This way, you have independent control over the “dry” sound of the original tracks, and the “wet” sound of coming out of the Bus.
Because Sends are very useful for this kind of work with effect Plugins, they are also commonly called “Effect Sends”.
动态
One of the problems you may encounter in a Mix is that the loud parts are too loud, and/or the quiet parts are too quiet.
This kind of problem cannot be easily solved using Faders to adjust the Levels alone. You may set the Levels so high that they clip, or you may add unwanted background noise by simply turning Levels up. These are all problems with what is called the Dynamic Range, i.e., the difference between the loudest and quietest parts of your Session. There are several types of tools for adjusting the Dynamic Range available as Plugins within Ardour, including Limiting, Compression and Gating.
Limiting
A Limiter is a tool that prevents the volume of a Track from going over a certain Level, usually the Peak Level (0dB) or something close to it. Many Limiters have the option to boost the Levels of the incoming signal before they are Limited, and in this way you can “close the gap” between the loudest and quietest parts of your Mix. A Limiter can be used on the Master Bus to prevent the overall Mix from Clipping. Limiters are almost always used Post-Fader.
The “Fast Lookahead Limiter” can be found among the Plugins. To set how much the Fast Lookahead Limiter limits, simply adjust the “Limit (dB)” slider. The Fast Lookahead Limiter literally “looks ahead” in the signal by a few milliseconds, and when it sees that the signal is about to go over the limit you have set, it automatically turns the Levels down.
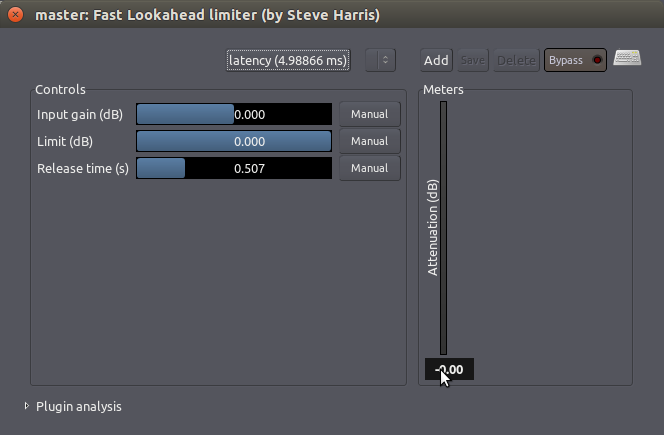
The “Input Gain (dB)” slider determines how much the Levels are increased before they reach the Limiter, and the “Attenuation (dB)” meter on the right-hand side shows how much the Levels are being reduced at any given moment. While the reduction in volume is nearly-instantaneous, the “Release time (s)” slider determines how long it takes the Limiter to return to 0 Decibels of Attenuation.
Note that the “harder” one drives the Limiter (by increasing the Input Gain and/or decreasing the maximum Peak Limit allowed), the more reduction the Limiter is forced to make, and the more likely it is that Artifacts of the processing will occur (such as Distortions or erratic changes in volume). On the Master Bus, it is generally best to avoid excessive Limiting.
Compression
A Compressor boosts the overall volume of a sound, but then “squeezes” it depending on how loud it is. This can make vocals sound more even or drums sound fuller and louder. The end effect is similar to how a Limiter can reduce the range between the quietest and the loudest sound, however the effect is more selective when using a Compressor.
The simplest Compressor has relatively few controls, such as the “Simple Compressor” Plugin shown below. Here, the “Threshold” sets the Level at which the Compressor will start to act, and the “Compression Ratio” controls how much the Compressor will “squeeze” the sound. The “Attack” and “Decay” parameters control how quickly the Compressor affects the sound.

A more complex Compressor, the “SC1 Compressor” Plugin, is show below.
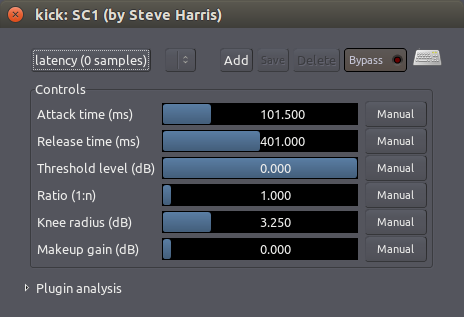
It has three main buttons:
“Threshold level (dB)” sets the level at which the Compressor will compress or squeeze the sound.
“Ratio (1:n)” controls how much it will squeeze when it reaches the threshold.
“Makeup gain (dB)” boosts the whole signal after the Compression occurs.
To soften out a vocal, for example, you could set a “Threshold level” of −10dB or so and a “Ratio” of 2.5, and then bring the volume back up with the “Makeup gain”.
The other three controls—”Attack time (ms)”, “Release time (ms)” and “Knee radius (dB)“—allow you to control the shape of the Compression.
For soft vocal Compression, you would want a semi-fast “Attack time” so that the Compressor catches the beginning of each word, a slower “Release time” to let the voice ring out, and a soft “Knee radius” to create a gentle form of compression that isn’t too noticeable.
If you want to make drums sound big, you might try a slow “Attack time” so that you don’t Compress the pop of the drum, a fast “Release time” so that the Compressor can catch the next hit of the drum, and a large “Ratio” to make the Dynamics between the beginning and end of the drum hit similar.
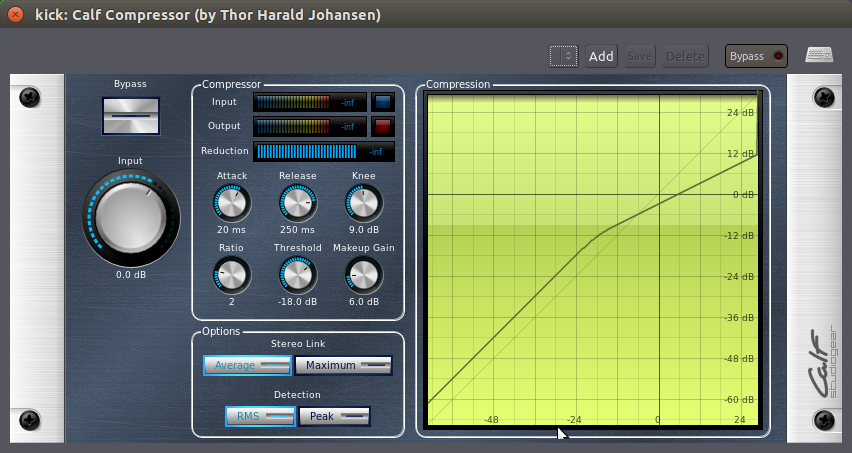
Below is a screenshot of a similar Compressor from the Calf Plugins Package:
Gating
The simplest kind of Gate allows a signal to pass through when it is over a certain Level, and blocks the signal when it is lower than that.
Gates are often used as a kind of noise reduction. For example, the Gate on a microphone channel might only open while the singer is singing, preventing other background noises from coming through as well when she is not singing. Gated drums are also a very well-known studio production trick to make them sound “sharper”.
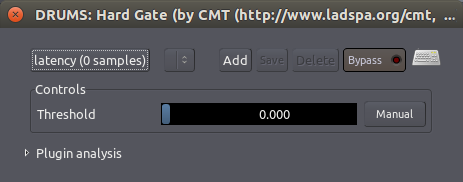
Here, the “Hard Gate” Plugin displays a single control parameter, the “Threshold” at which the Gate will open and let the signal through.
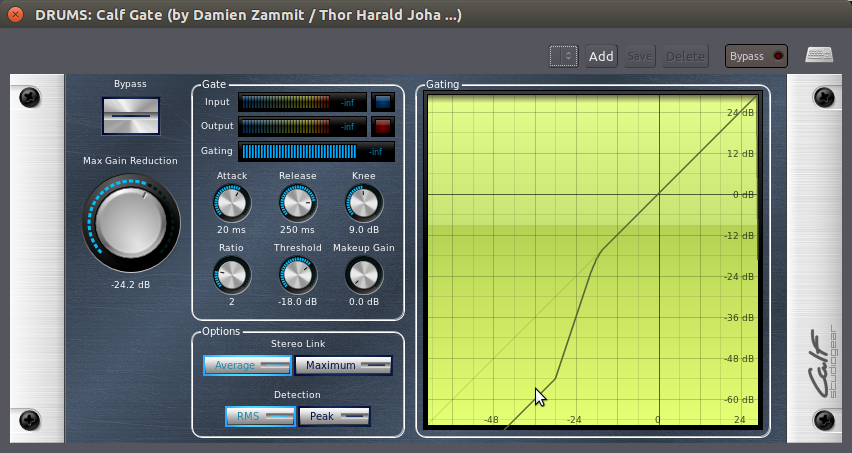
Other kinds of Gates, such as the Calf Gate Plugin, are more complex. They have independent control over how quickly the Gate opens (the “Attack”) and closes (the “Release”), as well as other parameters quite similar to those described for the SC Compressor above.
均衡
An Equalizer (or EQ) allows you to separately control the gain of different frequency ranges of a sound.
This can be useful not only to sculpt the timbre of an isolated sound (for example, to make it sound ‘sharper’ or ‘smoother’), but also to make sounds of various timbres to integrate better into the Mix.
Often, even after adjusting Levels and Panning, different tracks with similar frequency content (for example, a bass guitar and a kick drum) may be difficult to tell apart in the Mix. An Equalizer is a good tool to address this.
3-Band Equalizer
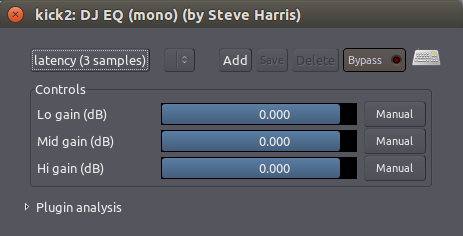
The simplest kind of Equalizer is the one familiar to us from analog mixers. It has three parameters, which adjust the Levels of three Bands, or frequency ranges: one for the Bass (low frequencies), one for the middle range frequencies and one for the Treble (high frequencies). The “DJ EQ” Plugin is just such an EQ.
Multi-Band (or Graphical) Equalizer
A more complex Multi-Band (or Graphical) Equalizer often has a lot more Bands. Each Band is centered on a frequency, and the Level of each Band can be independently adjusted. In some Multi-Band EQs, such as the “TAP Equalizer” Plugin shown below, the center frequency of each Band can be defined by the user. This allows you to either attenuate (or remove) an unwanted frequency, or to reinforce (boost) a desired one.
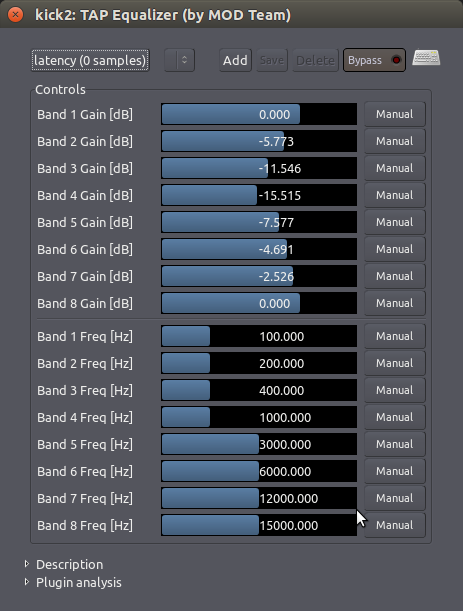
The overall “curve” of the Bands can also be used to determine the general tone of your Track or Mix. In the example above, the lower part of the mid-range frequencies have been “scooped out” a bit (note how Bands 1 and 8 are left untouched at 0 dB, while intermediary Bands 2 to 7 draw an attenuation curve, with Band 4 at -15 dB as the lowest point).
Parametric Equalizer
The Parametric Equalizer is the most versatile type of EQ used for Mixing because of its extensive control over all types of EQ parameters. In Ardour there is a Parametric Equalizer called the “Triple Band Parametric with Shelves”. There is also a similar one from the Calf Plugins package, as seen in the screenshot below:
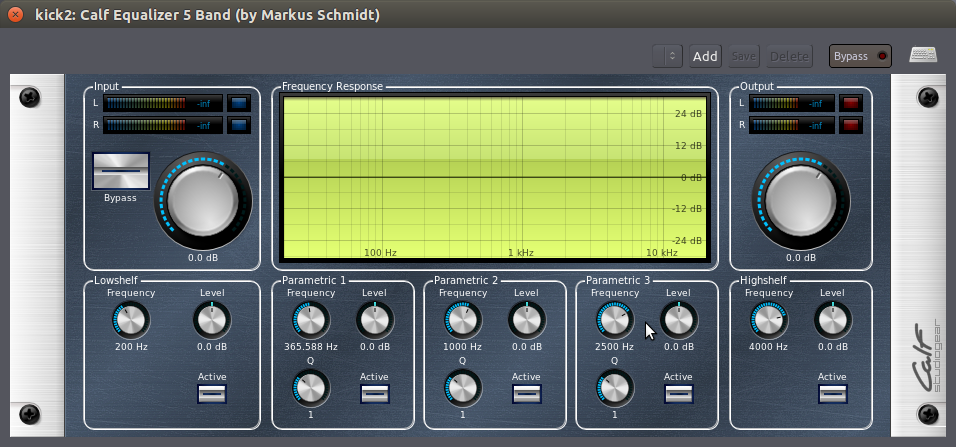
There are three options for each Frequency Band (boxes “Parametric 1”, “2”, and “3”). Each of the three Bands has a “Level (dB)” adjustment to cut or boost frequencies, a “Frequency (Hz)” adjustment to select center frequency, and a “Q” adjustment which determines how wide the range of frequencies to be affected will be.
High Shelf, Low Shelf
This plugin also contains a High Shelf and Low Shelf. A Shelf cuts or boosts everything above (High Shelf) or below (Low Shelf) a specific frequency. For example, a Low Shelf can be used to remove unwanted rumbling sounds, and a High Shelf can be used to reduce hiss. The “Frequency” control of a Shelf determines the cut-off frequency. For example, a Low Shelf with cut off frequency 200 Hz means that the equalizer will attenuate everything below that frequency. The amount of attenuation is controlled by the Level knob.
An Example of Using an Equalizer
In order to achieve a better separation of two instruments in the Mix through the use of EQ, you first need to find out where the two instruments overlap.
Here’s one approach. In the Calf Equalizer 5 Band Plugin shown above (or the Triple Band Parametric with Shelves), select an appropriate Band for one of the instruments. In the case of a bass guitar, it would be a low frequency band (start at, say, 100 Hz). Boost the “gain” to 10dB, change the “Q” (also called “bandwidth”) so that is a narrower range, and then scroll the “frequency” up and down slowly. You’ll hear a pitch move up and down. Then scroll it down slowly until you hear the frequency range where the two instruments overlap. Now simply reduce the “gain” to -5dB, and you will hopefully hear the instruments a bit clearer. Next, apply the same process to the other instrument.
There are many approaches to EQ. Hopefully this will provide one example of how to begin EQ’ing Tracks in your Mix. But most importantly, when it comes to EQ, it is better to use too little than too much, unless you’re consciously using extreme EQ as a compositional parameter.
使用自动化
Automation is a way of dynamically changing audio processing parameters over time.
Up to now, we have used fixed values for various parameters of our Tracks (for example, a Track Fader set to -3.0 dB; or a Mono Panner set to 100% Left; etc.) These fixed values would apply for the entire Track throughout the whole Session.
But what if you would like these values to change over time in a pre-determined way? For example, you may want to have the Gain of a Track to gradually decrease over twenty seconds. Or you may want to make a sound move from Left to Right over two seconds.
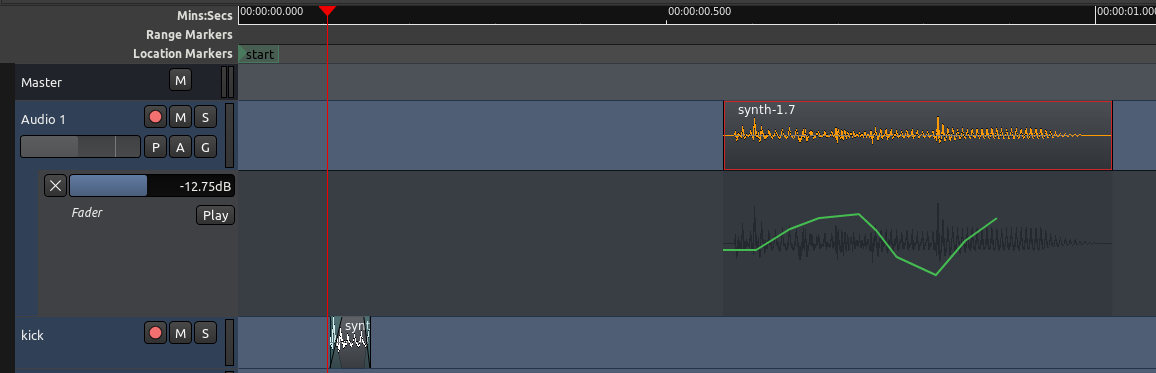
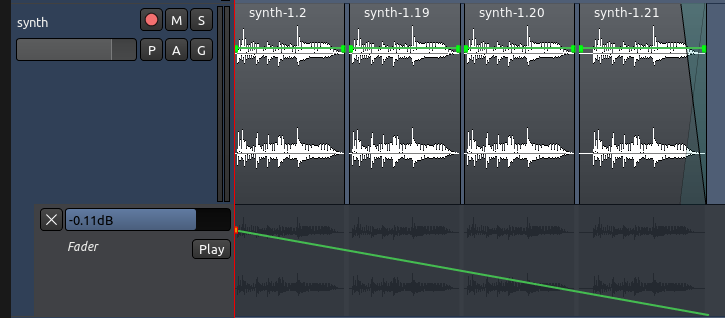
This is accomplished with Automation. The Fader, Panning, and any of the parameters of the Plugins used in that Track can be automated. An automated parameter is displayed underneath the parent track in its own Automation Track. Automation data is visually represented as an Automation Line, made up of a number of Automation Points. Here’s how a track with Automation looks like:
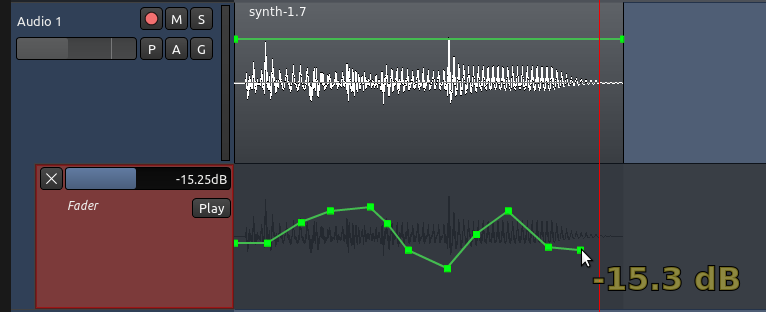
In the image above, the Automation Track called “Fader” is associated to the parent Track called “Audio 1”. The Automation Line controls Fader (volume) changes over time.
Creating a Fader Automation Line
Let’s create a simple Fader Automation. Click the “A” button of a chosen track. A menu will appear, where you can select the parameter you would like to Automate. Choose “Fader”.
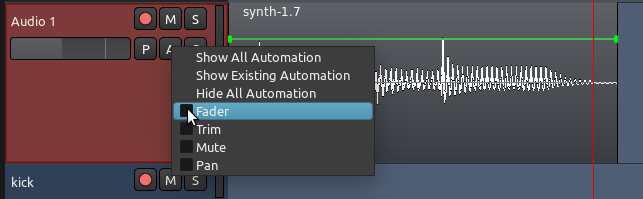
An Automation Track will then appear. Select the Draw Mode (shortcut “D”):

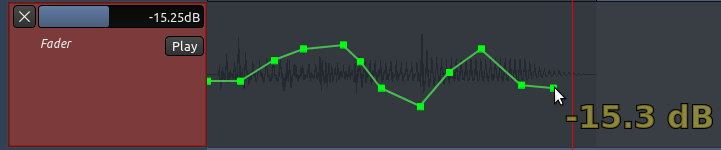
Now you can create Automation Points by clicking anywhere in the Automation Track. An Automation Line joins the Automation Points you add. The yellow number (-15.3 decibels in the image below) indicates the Gain level for the selected Automation Point.
Automation States
The Automation Curve will not play, however, until you set the Automation State to “Play”.
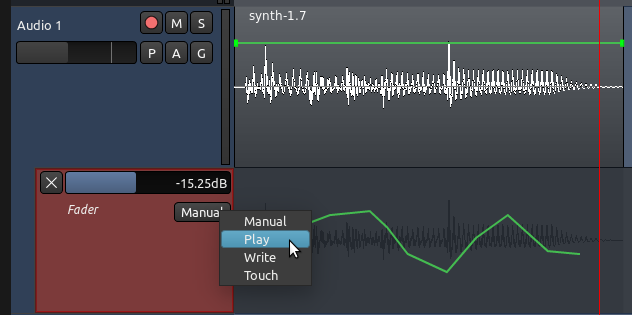
Manual: When set to “Manual”, the Track will ignore any Automation data. It will just play with whatever volume is the Fader is set to. In this mode, you are able to move the Track Fader by hand to set a new fixed level. That’s the default behavior of a Track when it’s first created.
Play: When set to “Play”, the Track will automatically change the Gain levels following the Automation Curve drawn in the Automation Track. You will no longer be able to move the Track Fader by hand. During playback, you will see the Track Fader moving up and down according to the curve.
Write mode will continuously record user changes to the Automated parameter as the Transport plays, creating an Automation Line. For instance, you may start playback and then make real-time changes in gain using the Fader of your Track. All the changes you make will be written (recorded) as an Automation Line, which then you can play back later by switching the Automation Mode back to Play
Touch mode is similar to Write mode. Unlike Write mode though, Touch mode won’t record over existing Automation data unless the parameter is being changed.
If these concepts are new to you, focus now on just the first two modes (Manual and Play), and practice creating automation by drawing Automation Curves by hand.
Creating a Plugin for Automation
You may add Automation to any Plugin which has already been added to a Track. In the example below, we have a “AM pitchshifter” Plugin added to a track.
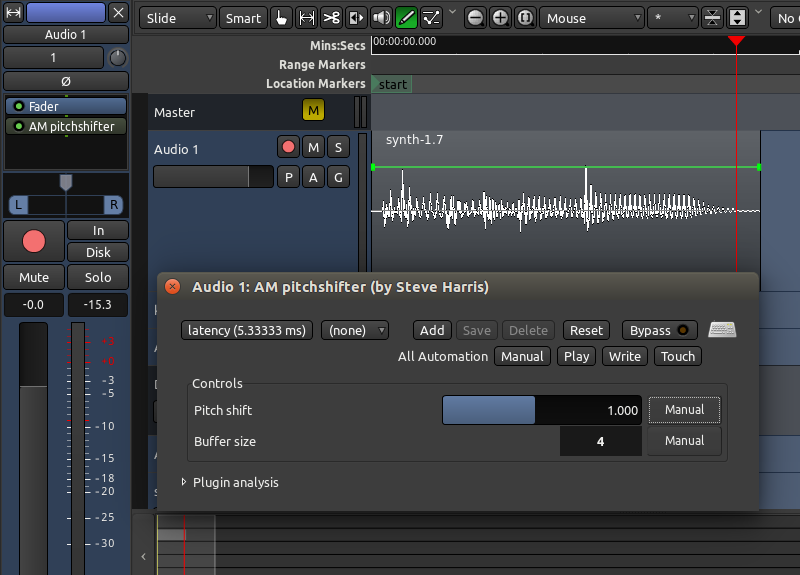
In order to select a Plugin parameter for Automation, click the button on the Track marked “a”. The menu will appear. Under “Processor Automation” you will find a listing of the Plugins you have added for that Track.
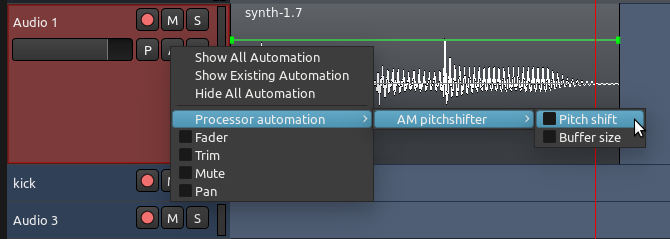
Within each listed Plugin, you may choose which parameter you want to Automate from a list. In the example, we chose the parameter “Pitch shift” of the Plugin “AM pitchshifter”. An Automation Track for that parameter appears. Note that as you open several Automation Tracks, they will appear one after the other below the main parent Track.
Draw an automation curve for that parameter. Don’t forget to set the Automation State to “Play”.
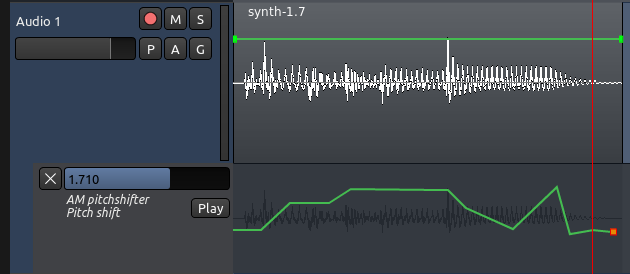
In the image above, the pitch shift of the sound is now changing over time, controlled by the curve.
TIP: You can hide an Automation Track by clicking on the “X” at the upper left corner of the Automation Track. Note that a hidden Automation Track continues to function even when it is not visible.
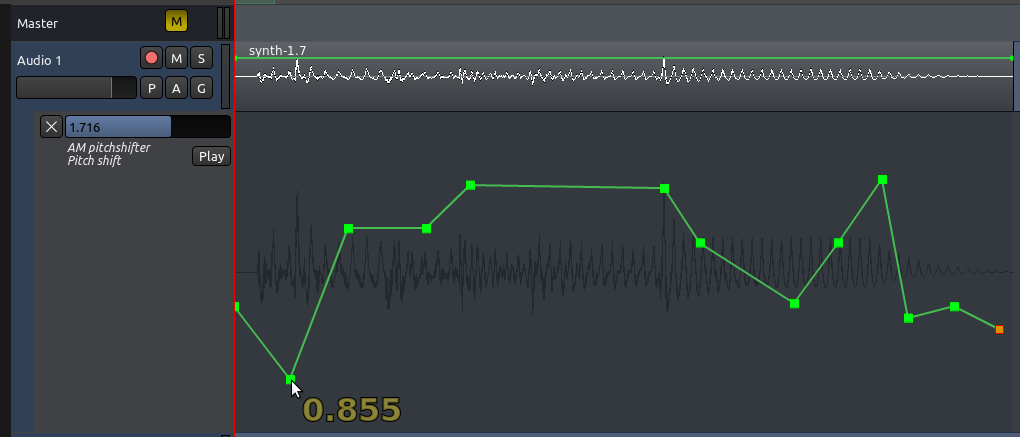
Adding Better Visual Resolution to Automation
You can achieve a greater amount of vertical precision by increasing the height of the Automation Track. Move your cursor near the lower edge of the Automation Track. The pointer turns into a vertical double arrow. Drag it down to increase the height of the Automation Track. Notice that the parent Track and the Automation Track heights are independent, so while working in your Automation Curves you might set them up like this:
TIP: Remember you can also Zoom In and Out to increase resolution in the horizontal axis.
Working with Automation Points
There are several ways ways of adjusting Automation Points, depending on the editing mode you are in:
An Automation Point can be dragged in any direction with the mouse (works in Grab, Draw, and Edit modes).
To remove an Automation Point, hold down the “Shift” key while Right-Clicking on it (works in Grab, Draw, and Edit modes).
“Control” + click + drag moves the current point in any direction, and also all subsequent points horizontally only (works in Grab, Draw, and Edit modes).
Edit Mode only: any segment of the Automation Line between Automation Points may be dragged vertically, affecting both end points at once, without affecting their horizontal position. Simply click somewhere on the line between two points, and drag up and down.
How to delete multiple Automation Points at once (Grab Mode and Edit Mode only): select multiple Automation Points by dragging a box starting on the track background around the points. Then the selected points may be deleted by hitting “Delete” (not “Backspace”). If you are on a Mac and do not have a true “Delete” key, try “Function” + “Backspace”).
After an Automation Curve ends, its value will stay at that level for all subsequent regions, whether or not you have drawn a continuation of the curve.
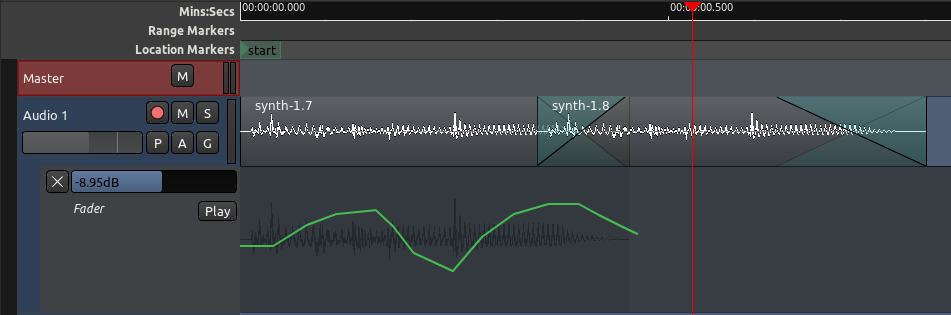
In the example above, the last point of the curve is at -23 decibels. That same level will be kept for the remainder of the Track, even though the line is not drawn until the end.
Moving Automation
Moving a Region to a new location will automatically move the Automation data that might be aligned with it, as we can see in the following screen shots.
Before moving:
After moving:
You can change this behaviour if you like. In other words, if you want automation curves to stay where they are even when you move Regions around, go to Edit > Preferences > Editor and uncheck “Move relevant automation when audio regions are moved.”
Region-specific Gain Automation
There is a way to create a gain automation directly bound to a Region. When you select Draw Mode, you should see a flat line on the top half of each Region rectangle:
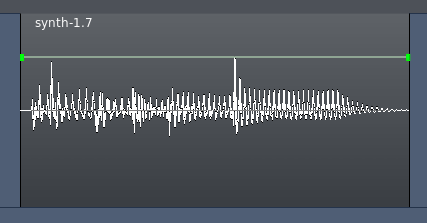
Click directly on that line to create Automation points. These will be drawn directly on the Region itself, unlike Fader Automation which is drawn or recorded in the Automation track. Region Gain Automation is separate from, and in addition to, Fader Automation.
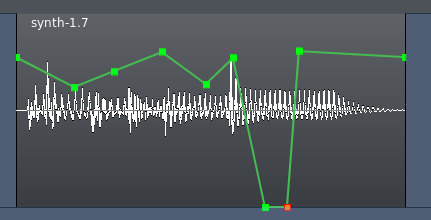
As with the Automation Tracks, a Gain Automation Point can be dragged in any direction with the mouse. To remove a Gain Automation Point, hold down the “Shift” key while Right-Clicking on it.
Deactivating and Removing Gain Automation
Gain Automation can be reset or deactivated from the Region context menu, which is reached by Right-Clicking on the Region.
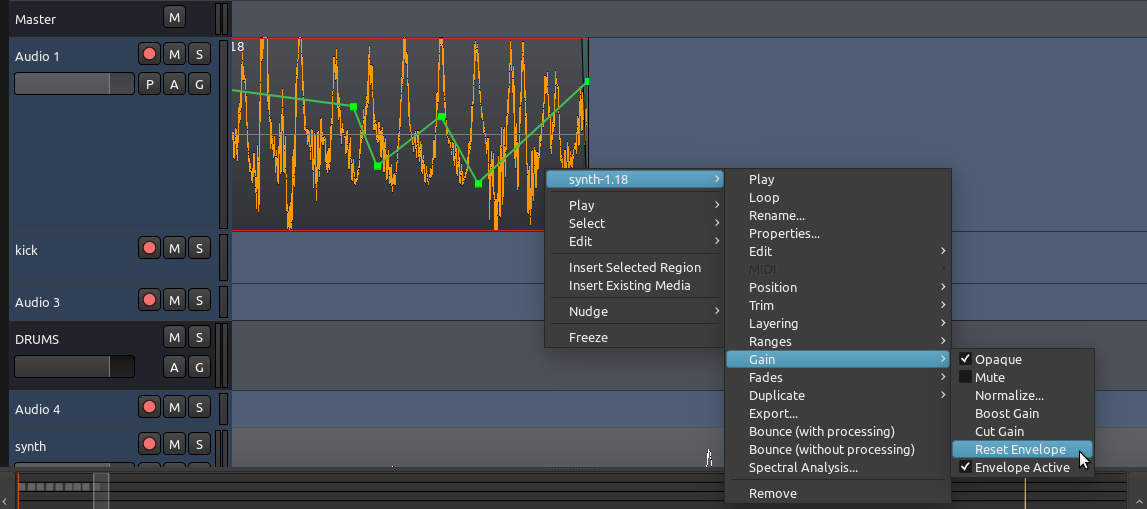
Here, the Gain Automation is referred to as the Envelope.
“Reset Envelope” removes the Gain Automation Points you have drawn in the Region.
“Envelope Active” toggles the Gain Automation Envelope on and off.
When should I use Region Gain Automation or Track Fader Automation?
As seen above, both are very similar. With practice you will notice situations in which one is more convenient than the other. Here are two examples:
If all you need to do is a little touch up (cut or boost gain) in a specific portion of a Region, and you are otherwise happy with the level for the Rest of the passage or entire track, use the Region-specific Automation.
If you have a more complex Track with crossfades over Regions, and/or need to shape a longer dynamic curve across several Regions on the same Track, use Fader Automation.
The screenshot above shows a simple gradual fade starting from the first Region in the track, and ending at the last Region. It’s very straightforward to do this with Fader Automation, but but it would be much harder to do it using region-specific automation.