Ardour4 初学者教程 02 开始入门
来自Ubuntu中文
目录
启用JACK
Ardour 4.X版不再要求您在您的系统上安装有JACK(JACK音频连接工具包)。但是您可能想启用JACK以便让Ardour可以与其他Linux音频应用程序共享音频和MIDI。如果您想知道JACK究竟是什么,请参考这个页面: http://ardour.org/jack
如果您不打算在Ardour里使用JACK,您可以跳过这一节内容,否则请继续阅读。
简而言之,JACK是一个音频系统,用于在您的计算机上管理Ardour和您的电脑的声卡之间的联系,以及Ardour与其他启用了JACK音频程序之间的联系。Ardour过去一直是要求必须运行JACK,但自从4.0版本开始这变成可选项。
更多关于JACK的信息请参考 http://jackaudio.org/ 以及 http://jackosx.com/
在Ubuntu系统上,您可以使用Qjackctl或者Cadenc去启动和停止JACK,并且控制它的设置。如果您有一个配置恰当的KXStudio安装版,JACK也许已经运行在系统后台中了。如果没有,您可能必须手工启动它。
在苹果Mac系统上,您将需要使用JackPilot。这个页面也许对您有所帮助: http://en.flossmanuals.net/ardour/ch005_installing-jackosx/ (警告:页面具体内容可能已经过时了。我们始终希望能像本教程这样在包括一个更新页面。)
使用Cadence(Linux系统)
Launch Cadence. If JACK is already running, you will see a window like this:
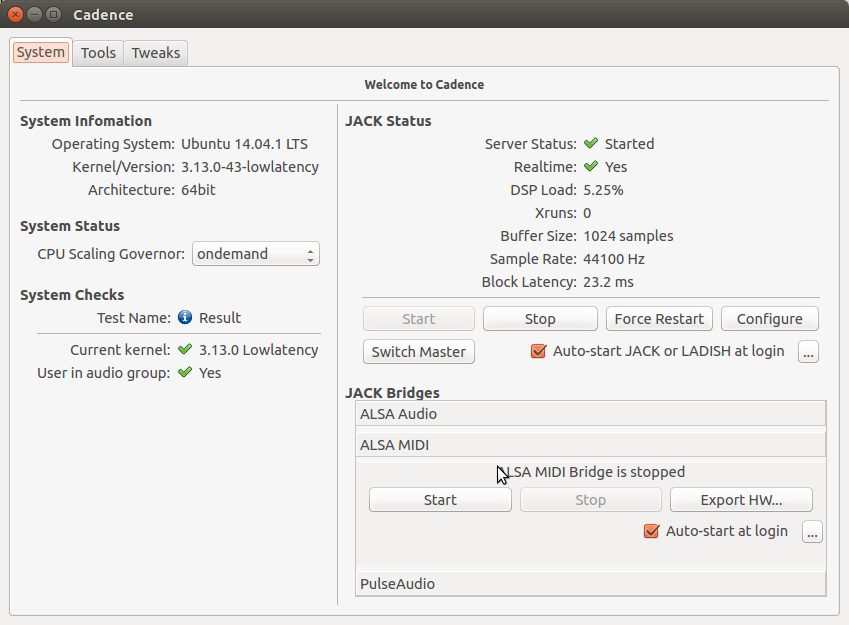
More info on Cadence: http://kxstudio.sourceforge.net/Documentation:Manual:cadence_introduction
使用Qjackctl(Linux系统)
如果使用Qjackctldi替代,看起来就会像这样:
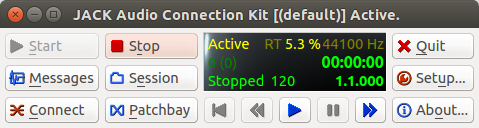
如果您仍未运行,使用“设置Setup”按钮去配置JACK,然后点击“开始Start”去启动JACK。
使用JackPilot(苹果OS X系统)
请参考这个页面: http://en.flossmanuals.net/ardour/ch013_starting-jackosx/ (警告:页面具体内容可能已经过时了。放这个链接在此只是作为一个起点。我们始终希望能像本教程这样在包括一个更新页面。)
JACK设置
要了解更多的Jack配置信息,请参考: http://kxstudio.sourceforge.net/Documentation:Manual:jack_configuration (使用Cadence讲解,但基本信息同样适用于Qjackctl的设置窗口)。
启动Ardour
很简单,点击Ardour图标即可启动程序。
在Ubuntu系统,您可以使用在Dash分类菜单里找到该软件的启动器。按下“Super”超级键(即“Windows”窗口键),(或者按下“Super” + “A”键直接打开Dash应用分类)然后输入“Ardour”,然后你可以就找到并点击Ardour图标启动程序。如果Ardour是显示的第一个搜索结果,简单回车也可以启动它。
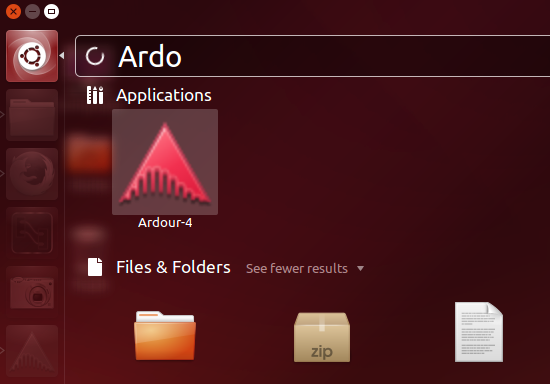
点击Ardour-4即可启动程序。
(注:在UbuntuStudio系统,您可以点击左上角任务栏主菜单,在"音频制作Audio Production"子菜单里就能找到Ardour。)
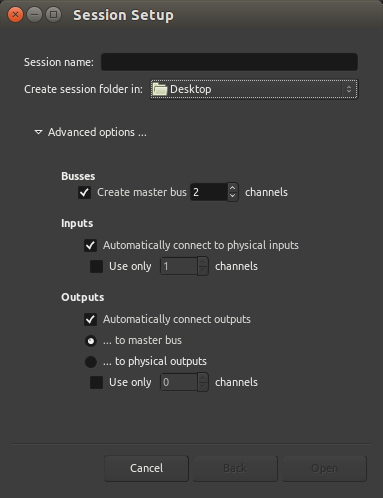
一旦您启动了Ardour,接下来就会出现会话设置Session Setup窗口。
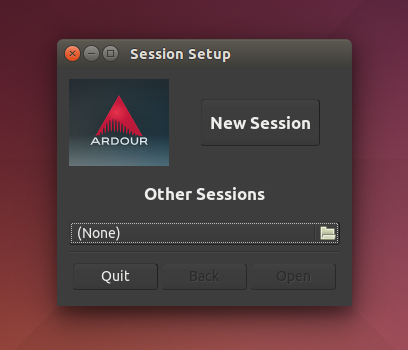
您可以点击新会话New Session按钮创建一个全新的会话,或者你使用下方的最近的会话Other Sessions选项,可以打开一个已经存在的回话。现在让我们创建一个新的会话,点击新建会话New Session按钮,会弹出一个窗口如下图所示。
为您的新建工程输入一个名字,点击打开Open 。

- 提示:命名会话时,避免使用除字母和数字以外的任何字符(可以使用中文)。避免使用空格、带音标或重音的字母、!@#$%*()+、句号、逗号等。如果您喜欢,可以使用破折号或下划线。例如,以其命名为“My Great Session!”,不如命名为“My_Great_Session”,或者“MyGreatSession”,或者“my-great-session”。不要用“Açaí”这名字,可以改为“Acai”(没有带音标或重音的字母)等诸如此类。一旦您创建了您的Ardour会话,不要手动重命名属于这个会话的任何文件夹或文件。
开启一个会话
Ardour将对您在会话Sessions里的工作进行分组打包。一个会话是一组音轨Tracks,,最终可能会被混合成一个单声道、立体声或多声道声音文件。会话实质上就是工程,您所有的数据都被保存在这一个单独的会话文件夹中。
当您启动Ardour,您会看到一个提示窗问您是否启用一个新会话,或者打开一个已经存在的会话。当您创建一个新会话时,您必须为它起个名字。
- 提示:命名会话时,避免使用除字母和数字以外的任何字符(可以使用中文)。避免使用空格、带音标或重音的字母、!@#$%*()+、句号、逗号等。如果您喜欢,可以使用破折号或下划线。例如,以其命名为“My Great Session!”,不如命名为“My_Great_Session”,或者“MyGreatSession”,或者“my-great-session”。不要用“Açaí”这名字,可以改为“Acai”(没有带音标或重音的字母)等诸如此类。一旦您创建了您的Ardour会话,不要手动重命名属于这个会话的任何文件夹或文件。
您还需要为Ardour指定您想要把新会话文件夹存储在哪个目录下。
当您一切准备就绪,点击打开Open,Ardour将创建新会话,然后打开它。
高级选项
如果您单击小三角形打开高级选项Advanced Options‘’,您将可以通过以下选项对工程进行更细致的设置:
- 是否创建主控总线Master Bus(即:会话最终输出的音频)且包含有多少个声道channels。
- 是否自动把电脑音频接口(声卡)的输入连接到会话的声轨上,且需要使用几个声道。
- 是否自动连接到输出,是输出到主控总线或是输出到音频接口的输出,且需要使用几个声道。
如果您没有安装JACK到您的电脑里,或者它已经安装了但没有运行,在您的会话启动之前您将看到如下图所示的窗口:
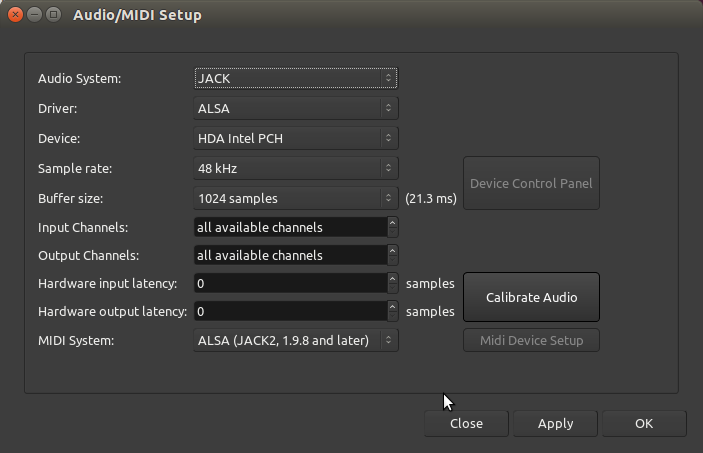
主要选项有:
音频系统Audio System —— 您可以选择JACK(如果您已经安装有),或者选择您电脑里默认的音频系统(Linux系统是ALSA,苹果Mac系统是CoreAudio)。
驱动Device —— 或者是您的内置声卡,或者是你也许安装有的一个外置声卡(诸如:一个USB接口的声卡)。
采样率Sample Rate —— 48K或者44.1K是常用的选择。
(注:关于如何避免硬件延迟,选择UbuntuStudio系统有个好处就是,在开机启动菜单可以选择使用低延迟lowlatency的系统内核。)
如果您在启动Ardour之前就已经启动了JACK,你就不需要处理到这个窗口。
如果要在Audour已经启动后,再创建一个Ardour会话,选择菜单中的会话Session > 新建New。
界面概览
本节将为您概括介绍Ardour的基本界面。
我们将看一下编辑器窗口Editor Window和混合器Mixer Window窗口。在此列出的各项功能将会在后面的章节中介绍更多的细节信息。
编辑器窗口
当您创建一个新的会话之后,Ardour会打开一个空的新窗口即编辑器窗口Editor Window。在Ardour里,编辑器窗口是最重要的窗口,因为在此你不但能够控制程序,而且还能查看和编辑您已经导录制或导入的音频。
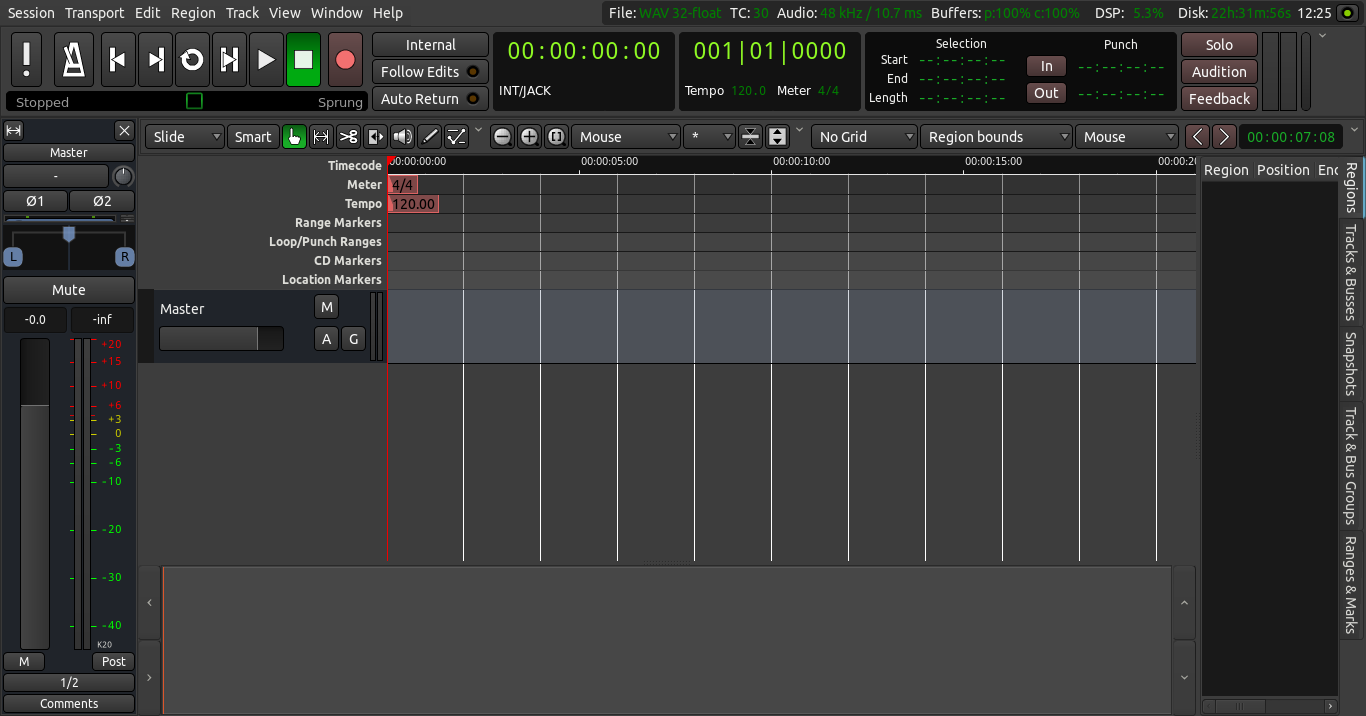
位于编辑器窗口顶部的,是几个主要区域:交通菜单,时钟,编辑模式/游标模式菜单,快速模式菜单和辅助控制。下面那个地区是主要的画布,它包含在会话中使用的跟踪和公交车。跟踪的混合带出现在左边,和一组选项卡允许的概述区域,跟踪/公交车、快照、编辑组织和块出现在右边。最底部的窗口是总结的观点,这是一个小型时间轴视图允许快速导航会话。我们将在这里简要介绍这些控件并覆盖更广泛的专门章节。
At the top of the Editor Window are several main areas: the Transport Menu, the Clocks, the Edit Modes/Cursor Modes menu, the Snap Mode menu and the Auxiliary Controls. Below that area is the Main Canvas, which contains the Tracks and Busses used in the Session. The Mixer Strips for the Tracks appear on the left, and a set of tabs allowing for an overview of the Regions, Tracks/Busses, Snapshots, Edit Groups and Chunks appear on the right. The very bottom of the window is the Summary view, which is a miniature timeline view allowing for quick navigation through the session.
We will introduce these controls briefly here and cover them more extensively in dedicated chapters later on.
Transport Menu
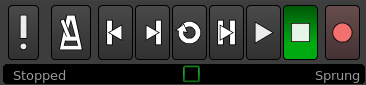
The Transport Menu controls include the following buttons:
   MIDI Panic
   Enable/Disable audio click (metronome)
   Rewind
   Fast forward
   Loop playback
   Play range/selection
   Play from playhead
   Stop
   Record-enable
   Jog/shuttle controls
Clocks

The main Clocks are located next to the transport controls. Clocks in Ardour can display time in 4 different formats: Time Code, Bars:Beats, Minutes:Seconds, and Samples. Right-click on the clock to select a format. You can also turn the clock off. The reason for having two transport clocks is that it allows you to see the playhead position in two different time units without having to change any settings.
Please see the Setting Up the Timeline chapter for more details on the Clocks.
Edit Modes and Cursor Modes

The Edit Modes and Cursor Modes controls define the behavior of the main canvas and the different functions the cursor can have. There are three Edit Modes in the drop-down menu: Slide, Ripple, and Lock. To the right of the Smart button are the Cursor Modes:
   Smart Mode (shortcut “Y”)
   Grab Mode (shortcut “G”)
   Range Mode (shortcut “R”)
   Cut Mode (shortcut “C”)
   Stretch Mode (shortcut “T”)
   Audition Mode
   Draw Mode (shortcut “D”)
   Internal Edit Mode (shortcut “E”)
Most of them are discussed in the Working With Regions chapter. The last two are discussed in the Using Automation chapter.
The Smart Mode is actually a combination of Grab Mode and Range Mode. When enabled, the mouse behaves as if it is in “Range Mode” in the upper half of a region, and in “Grab Mode” in the lower half.
Snap Options

The Snap Options menu controls the Grid, Grid Points and Edit Point. Please see the chapters on Setting Up the Meter, Using Ranges and Working With Regions for more details.
Zoom Options

In between Cursor Modes and Snap Options are the Zoom Options. Here you can define the behavior of zooming operations. You have standard Zoom In and Zoom Out buttons, plus a third called Zoom to Session (useful for having a quick overview of your entire session: it zooms it to fit the available space on the screen).
TIP: use the shortcuts = (the equal sign on your main keyboard) for Zoom In, and - (the dash key on your main keyboard) for Zoom Out.
The drop-down menu controls the Zoom Focus. It defines the focus point of zooming operations. Try zooming in and out with a different Zoom Focus each time. For example, choosing Playhead will cause zoom to behave in relation to the position of the Playhead. Mouse will take your current mouse position as the reference, and so on.
The following drop-down menu and the last two buttons control “vertical zoom.” They allow you to expand and shrink all tracks and busses vertically. Use the drop-down menu to choose a specific number of tracks you want to fit on the screen. Use the buttons to shrink or expand all tracks (or only selected tracks, if a selection is made).
Auxiliary Controls
For further information on other buttons and displays on the main interface, please refer to the Ardour Manual at http://manual.ardour.org/
Main Canvas
The main canvas is just below the top rows of controls described above. It basically comprises the Rulers, the space where Tracks and Busses are displayed, and a Summary view at the bottom.
At the very top of Ardour’s Editor Window (to the right) you will find useful information such as sample rate of the session, available recording time, and DSP use.
Rulers
Right-click on the names of rulers and you will see a menu with all the possible rulers at your disposition. You may uncheck rulers that you don’t need in order to save screen space. More information on these operations can be found in the Setting up the Timeline and Setting up the Meter chapters.

Tracks and Busses
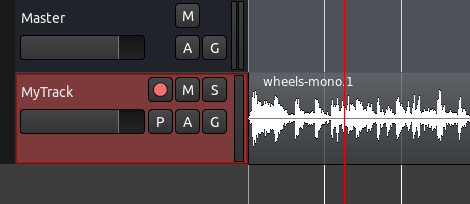
Just below the Rulers is where Tracks and Busses are displayed. In the example below, you can see one Bus called “Master” and one Track called “MyTrack”. MyTrack also contains one region, which represents an audio file with a drawing of its waveform. More information on Tracks and Busses can be found in the Creating a Track or Bus chapter.
Editor Mixer
The Editor Mixer is located at the left of the Edit Window. It displays the Mixer Strip of the currently selected Track or Bus. It controls the volume, Plugins and Routing for the Track or Bus to which it corresponds. You can toggle to view or hide the Editor Mixer by clicking on the menu View > Show Editor Mixer (shortcut “Shift” + “E”). This Mixer is covered in the Using the Mixer Strip chapter.

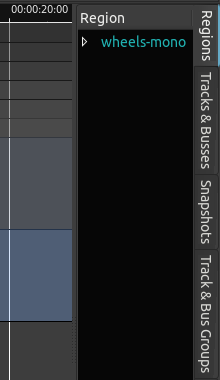
Regions, Tracks/Busses, Snapshots, Groups, Ranges, Marks
The space on the right of Ardour’s Editor Window can have 5 different functions, depending on which tab is currently selected: Regions, Tracks/Busses, Snapshots, Track & Bus Groups, and Ranges and Marks. Regions is the tab selected by default. This part of the Editor Window is commonly referred to as Regions List. Regions represent audio files stored on the hard drive which can be dragged from the Regions List directly onto a track in the main canvas. More information on Regions can be found in the Working With Regions chapter. The Tracks tab is covered in the Arranging Tracks chapter, and Snapshots are discussed in the Saving Snapshots chapter.
Mixer Window Controls
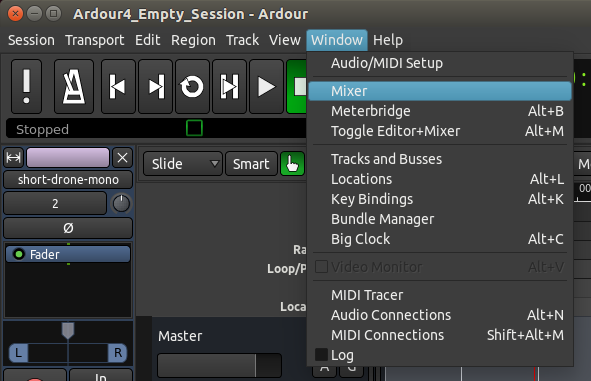
The second window, the Mixer Window, can be viewed by going to the main menu and clicking Window > Mixer.
The main function of the Mixer Window is to display all the Mixer Strips for the various Tracks side by side for easy reference. This window is mainly used during the Mixing process, and it also provides access Plugins and other Routing features. See the chapters on Understanding Routing, Mixing and Using Plugins for details.
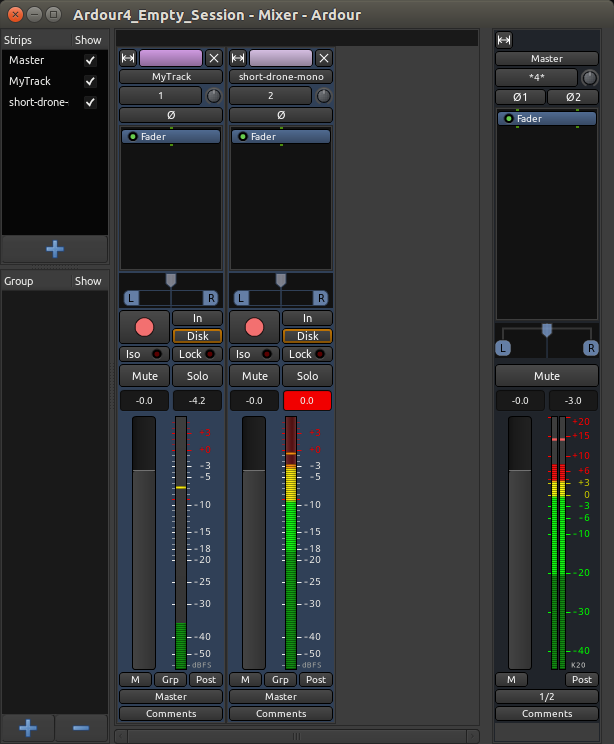
This window also contains a listing of the available Mixer Strips in the upper left hand corner. The check boxes in this area can be used to view and hide the Mixer Strips of the different Tracks. Finally, there is an area for managing Groups.
Switching Between Windows
You can use the key combination “Alt” + “M” (“Control”+ “M” on a Mac) in order to toggle which window is on top: Editor or Mixer.
Detaching and Reattaching Menus
Most of the major menus in the Editor Window can be detached from the Editor Window by clicking the white, downwards pointing arrow on the far right-hand side of that menu.
The detached menu will become a separate window on your screen, which can be reattached to the Editor Window by clicking the white, upwards-pointing arrow which now appears on the far right-hand side.