“Ardour4 初学者教程 02 开始入门”的版本间的差异
来自Ubuntu中文
(→Timecode) |
(→What is an Audio Track?) |
||
| 第394行: | 第394行: | ||
[http://brunoruviaro.github.io/ardour4-tutorial/creating-a-track-or-bus/ (原文)] | [http://brunoruviaro.github.io/ardour4-tutorial/creating-a-track-or-bus/ (原文)] | ||
| − | == | + | ==什么是音频轨道?== |
| − | + | 一个'''Audio Track音频轨道'''就是一个您可以从您的'''Region List区域列表'''拖动一个'''Region区域'''的地方,您还可以录制来自外部声源的声音。 | |
| − | + | 一个区域代表一个音频剪辑片段。例如,您的声音文件或者声音文件的某一部分。在下图中,被标记为“Audio 1” 和 “Audio 2”的水平条状区域就是音轨。在音轨Audio 1 内包含有音频信息(命名为“某某声音”)的矩形被成为一个区域。 | |
http://brunoruviaro.github.io/ardour4-tutorial/images/Ardour4_Tracks.png | http://brunoruviaro.github.io/ardour4-tutorial/images/Ardour4_Tracks.png | ||
2015年12月29日 (二) 17:14的版本
目录
启用JACK
Ardour 4.X版不再要求您在您的系统上安装有JACK(JACK音频连接工具包)。但是您可能想启用JACK以便让Ardour可以与其他Linux音频应用程序共享音频和MIDI。如果您想知道JACK究竟是什么,请参考这个页面: http://ardour.org/jack
如果您不打算在Ardour里使用JACK,您可以跳过这一节内容,否则请继续阅读。
简而言之,JACK是一个音频系统,用于在您的计算机上管理Ardour和您的电脑的声卡之间的联系,以及Ardour与其他启用了JACK音频程序之间的联系。Ardour过去一直是要求必须运行JACK,但自从4.0版本开始这变成可选项。
更多关于JACK的信息请参考 http://jackaudio.org/ 以及 http://jackosx.com/
在Ubuntu系统上,您可以使用Qjackctl或者Cadenc去启动和停止JACK,并且控制它的设置。如果您有一个配置恰当的KXStudio安装版,JACK也许已经运行在系统后台中了。如果没有,您可能必须手工启动它。
在苹果Mac系统上,您将需要使用JackPilot。这个页面也许对您有所帮助: http://en.flossmanuals.net/ardour/ch005_installing-jackosx/ (警告:页面具体内容可能已经过时了。我们始终希望能像本教程这样在包括一个更新页面。)
使用Cadence(Linux系统)
Launch Cadence. If JACK is already running, you will see a window like this:
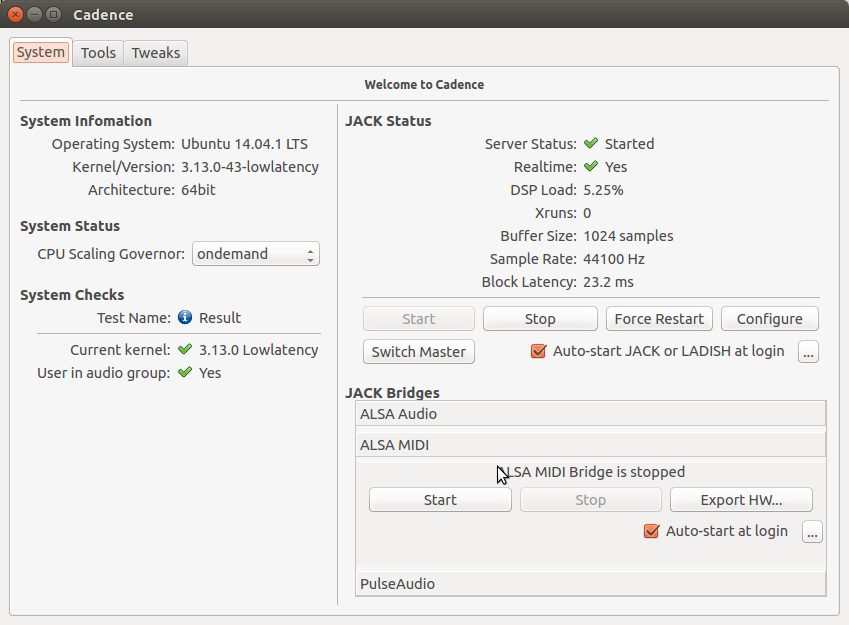
More info on Cadence: http://kxstudio.sourceforge.net/Documentation:Manual:cadence_introduction
使用Qjackctl(Linux系统)
如果使用Qjackctldi替代,看起来就会像这样:
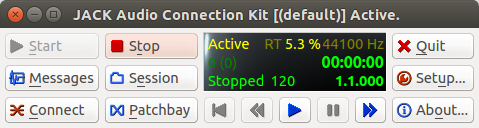
如果您仍未运行,使用“设置Setup”按钮去配置JACK,然后点击“开始Start”去启动JACK。
使用JackPilot(苹果OS X系统)
请参考这个页面: http://en.flossmanuals.net/ardour/ch013_starting-jackosx/ (警告:页面具体内容可能已经过时了。放这个链接在此只是作为一个起点。我们始终希望能像本教程这样在包括一个更新页面。)
JACK设置
要了解更多的Jack配置信息,请参考: http://kxstudio.sourceforge.net/Documentation:Manual:jack_configuration (使用Cadence讲解,但基本信息同样适用于Qjackctl的设置窗口)。
启动Ardour
很简单,点击Ardour图标即可启动程序。
在Ubuntu系统,您可以使用在Dash分类菜单里找到该软件的启动器。按下“Super”超级键(即“Windows”窗口键),(或者按下“Super” + “A”键直接打开Dash应用分类)然后输入“Ardour”,然后你可以就找到并点击Ardour图标启动程序。如果Ardour是显示的第一个搜索结果,简单回车也可以启动它。
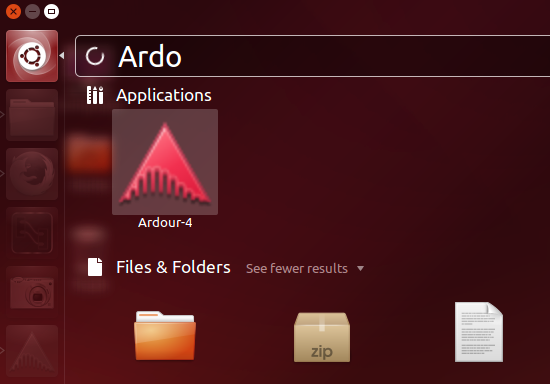
点击Ardour-4即可启动程序。
(注:在UbuntuStudio系统,您可以点击左上角任务栏主菜单,在"音频制作Audio Production"子菜单里就能找到Ardour。)
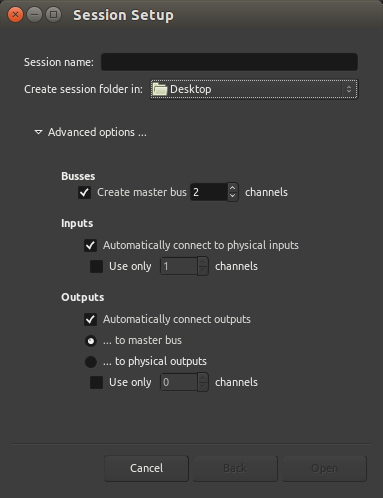
一旦您启动了Ardour,接下来就会出现会话设置Session Setup窗口。
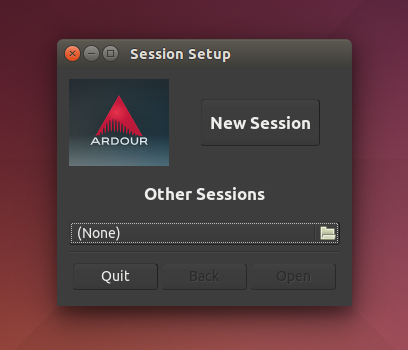
您可以点击新会话New Session按钮创建一个全新的会话,或者你使用下方的最近的会话Other Sessions选项,可以打开一个已经存在的回话。现在让我们创建一个新的会话,点击新建会话New Session按钮,会弹出一个窗口如下图所示。
为您的新建工程输入一个名字,点击打开Open 。

- 提示:命名会话时,避免使用除字母和数字以外的任何字符(可以使用中文)。避免使用空格、带音标或重音的字母、!@#$%*()+、句号、逗号等。如果您喜欢,可以使用破折号或下划线。例如,以其命名为“My Great Session!”,不如命名为“My_Great_Session”,或者“MyGreatSession”,或者“my-great-session”。不要用“Açaí”这名字,可以改为“Acai”(没有带音标或重音的字母)等诸如此类。一旦您创建了您的Ardour会话,不要手动重命名属于这个会话的任何文件夹或文件。
开启一个会话
Ardour将对您在会话Sessions里的工作进行分组打包。一个会话是一组音轨Tracks,,最终可能会被混音成一个单声道、立体声或多声道声音文件。会话实质上就是工程,您所有的数据都被保存在这一个单独的会话文件夹中。
当您启动Ardour,您会看到一个提示窗问您是否启用一个新会话,或者打开一个已经存在的会话。当您创建一个新会话时,您必须为它起个名字。
- 提示:命名会话时,避免使用除字母和数字以外的任何字符(可以使用中文)。避免使用空格、带音标或重音的字母、!@#$%*()+、句号、逗号等。如果您喜欢,可以使用破折号或下划线。例如,以其命名为“My Great Session!”,不如命名为“My_Great_Session”,或者“MyGreatSession”,或者“my-great-session”。不要用“Açaí”这名字,可以改为“Acai”(没有带音标或重音的字母)等诸如此类。一旦您创建了您的Ardour会话,不要手动重命名属于这个会话的任何文件夹或文件。
您还需要为Ardour指定您想要把新会话文件夹存储在哪个目录下。
当您一切准备就绪,点击打开Open,Ardour将创建新会话,然后打开它。
高级选项
如果您单击小三角形打开高级选项Advanced Options‘’,您将可以通过以下选项对工程进行更细致的设置:
- 是否创建主控总线Master Bus(即:会话最终输出的音频)且包含有多少个声道channels。
- 是否自动把电脑音频接口(声卡)的输入连接到会话的声轨上,且需要使用几个声道。
- 是否自动连接到输出,是输出到主控总线或是输出到音频接口的输出,且需要使用几个声道。
如果您没有安装JACK到您的电脑里,或者它已经安装了但没有运行,在您的会话启动之前您将看到如下图所示的窗口:
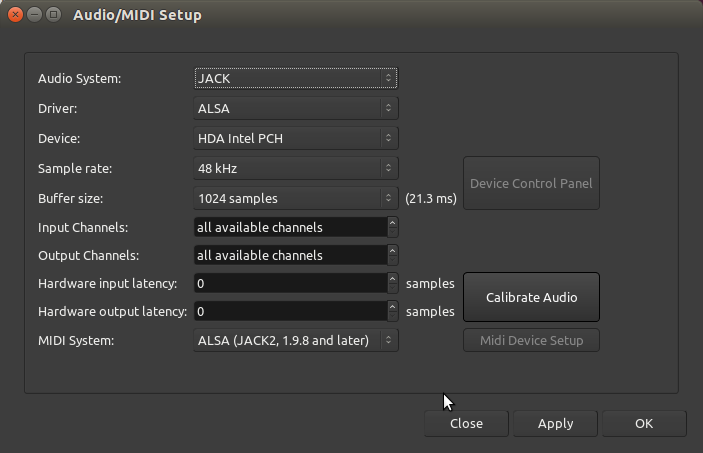
主要选项有:
音频系统Audio System —— 您可以选择JACK(如果您已经安装有),或者选择您电脑里默认的音频系统(Linux系统是ALSA,苹果Mac系统是CoreAudio)。
驱动Device —— 或者是您的内置声卡,或者是你也许安装有的一个外置声卡(诸如:一个USB接口的声卡)。
采样率Sample Rate —— 48K或者44.1K是常用的选择。
(注:关于如何避免硬件延迟,选择UbuntuStudio系统有个好处就是,在开机启动菜单可以选择使用低延迟lowlatency的系统内核。)
如果您在启动Ardour之前就已经启动了JACK,你就不需要处理到这个窗口。
如果要在Audour已经启动后,再创建一个Ardour会话,选择菜单中的会话Session > 新建New。
界面概览
本节将为您概括介绍Ardour的基本界面。
我们将看一下编辑器窗口Editor Window和混音器Mixer Window窗口。在此列出的各项功能将会在后面的章节中介绍更多的细节信息。
编辑器窗口
当您创建一个新的会话之后,Ardour会打开一个空的新窗口即编辑器窗口Editor Window。在Ardour里,编辑器窗口是最重要的窗口,因为在此你不但能够控制程序,而且还能查看和编辑您已经导录制或导入的音频。
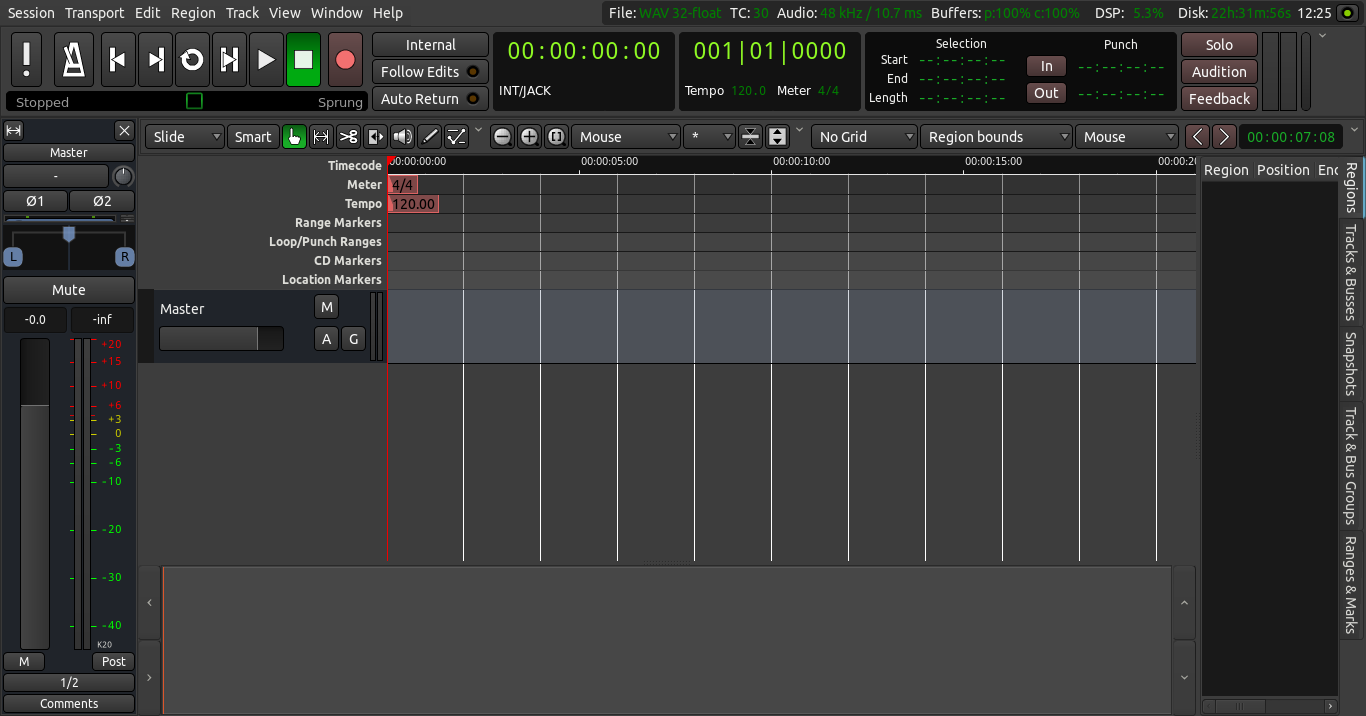
位于编辑器窗口顶部的,是几个主要功能区:播送菜单Transport Menu,时钟Clocks,编辑模式/游标模式Edit Modes/Cursor Modes菜单,吸附模式Snap Mode菜单和附加控制Auxiliary Controls。下的共能区是主版面Main Canvas,包括了在会话中使用的音轨Tracks和总线Busses。音轨的混音栏Mixer Strips显示在左边,另一组用于概览的选项卡显示在右边,其中有:区域Regions,音轨/总线Tracks/Busses,快照Snapshots、编辑群组Edit Groups和模块Chunks。最底部的窗口是摘要Summary视图view,这是一个小型的时间线视图,可以在整段会话中快速导航。
我们将在这里简略介绍这些控件,而在后续章节将会专门详细地讲解它们。
播送菜单
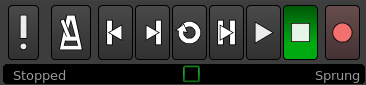
播送菜单Transport Menu的控制包括以下按钮:
| 中文 | 快捷键 | 英文 |
| MIDI重置 | Ctrl+Alt+P | MIDI Panic |
| 启用/禁用音频识别声(节拍器) | 7 (大键盘数字键) | Enable/Disable audio click (metronome) |
| 跳转到会话起点 | Home/向左键 | Rewind(原文有误,不是倒放) |
| 跳转到会话终点 | End/向右键 | Fast forward(原文有误,不是快进) |
| 循环播放 | L | Loop playback |
| 播放片段/选区 | Play range/selection | |
| 从指针起播放 | 空格 | Play from playhead |
| 停止 | 空格 | Stop |
| 启用录音 | Shift+R | Record-enable |
| 推放/滑播(速度)控制 | (鼠标拖动绿色方块) | Jog/shuttle controls |
计时器

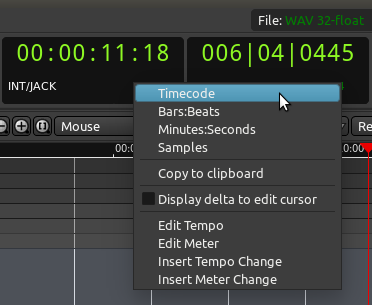
计时器位于播送控制的旁边。Ardour的计时器时可以显示4种不同的时间格式:时间码、小节:拍子、,分钟:秒、采样。右键点击计时器即可选择其中一种格式。您也可以关闭计时器。有两个播送计时器的原因是,它允许您以两个不同的时间单位查看指针的位置,而无需改变任何设置。
要了解关于计时器的更多细节,请参阅设置时间线章节。
编辑模式和游标模式

编辑模式Edit Modes和游标模式Cursor Mode控制定义主版幅的行为,以及指定不同功能的游标。在下拉菜单里有三种编辑模式:滑行Slide,波纹Ripple和锁定Lock。右边的智能Smart按钮是用于游标模式:
| 中文 | 快捷键 | 英文 |
| 智能模式 | Y | Smart Mode |
| 抓取模式 | G | Grab Mode |
| 范围模式 | R | Range Mode |
| 切割模式 | C | Cut Mode |
| 伸展模式 | T | Stretch Mode |
| 监听模式 | (鼠标点按着不放) | Audition Mode |
| 描绘模式 | D | Draw Mode |
| 内部编辑模式 | E | Internal Edit Mode |
它们中的大多数都是在区域常用操作这一章里详述。最后两个在使用自动化这一章里详述。
智能模式Smart Mode实际上是抓取模式和选区模式的组合。启用时,游标如果是在区域的上半部分时是“选区模式”,游标在下半部分时则是“抓取模式”。
(注:最右上角的向下箭头,点击它可以把工具栏提取出来成为一个单独的窗口,然后这个窗口可以移动放置在任意地方。同样,点击窗口里最右上角的向上箭头,或者点击窗口边框的X关闭按钮,可以把工具栏恢复到原位。)
吸附选项

吸附选项菜单控制着网格Snap Options、网格点Grid Points和编辑点Edit Point。请参见设置节拍Setting Up the Meter、使用范围Using Ranges和区域常用操作Working With Regions章节以了解更多的细节。
缩放选项

在游标模式Cursor Modes和吸附选项Snap Options之间的是缩放选项Zoom Options。在这里您可以限定缩放操作的行为。您可以使用标准的放大Zoom In(推进)和缩小Zoom Out(拉远)按钮,加上第三个被称为缩放到会话Zoom to Session的按钮(对于快速概览您的整个会话十分有用:它根据屏幕可用空间缩放显示整个会话)。
| 中文 | 快捷键 | 英文 |
| 放大 | - | Zoom In |
| 缩小 | = | Zoom Out |
| 缩放到会话 | Shift+_ | Zoom to Session |
- 提示:使用快捷键 = (主键盘上的等于号)放大,使用快捷键 - (主键盘上的减号)缩小,使用快捷键 Shift +_ (主键盘上同时按着Shift键和减号键)缩放到会话。
接着的下拉菜单控制着缩放焦点Zoom Focus。它限定缩放操作的焦点。您可以尝试每一种不同的放大和缩小焦点。例如,选择指针(播放头)将导致以指针所在的位置为中心进行缩放。选择鼠标将以您当前鼠标的位置作为参考进行缩放,诸如此类。
(注:该菜单的选项有——左、右、中、指针、鼠标、编辑点)
接着的下拉菜单和最后两个按钮控制着“垂直缩放”。它们允许您在垂直方向上延展和收缩所有的音轨及总线。使用下拉菜单选择一个您想在屏幕上显示的特定音轨数量(注:即屏幕最多能同时显示多少个音轨)。使用那两个按钮可以延展和收缩所有音轨(或者如果已经有了一个选区,则仅针对已选中的音轨)。
辅助控制
想了解主界面上其它按钮的更多信息,请参考Ardour手册 http://manual.ardour.org/ 。
主版面
主版面略低于上述的控制按钮行。它基本上包含了标尺Rulers、音轨Tracks和总线Busses显示的空间、以及底部的摘要Summary视图view。
在Ardour的编辑器窗口(整个窗口的右上角)的最顶端,您可以发现非常有用的信息,例如会话的采样率,可用的记录时间,以及DSP使用率。(注:数字信号处理器Digital Signal Process)
标尺
右键点击标尺名称,您将看到一个菜单,列出的是可供您显示的所有标尺类型。您可以取消勾选您不需要的标尺勾选,以节省屏幕空间。更多的相关操作信息可以参考设置时间线Setting up the Timeline和设置节拍Setting up the Meter章节。
(注:菜单的选项有——分:秒、时间码、采样、小节&拍子、节拍、节奏、范围标记、循环/转切、CD标记、位置标记、视频时间线)

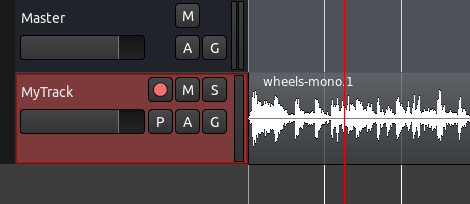
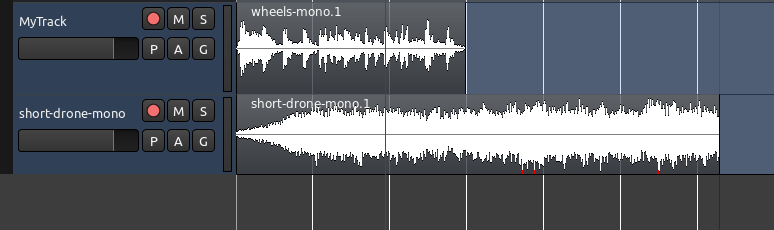
音轨和总线
标尺的下方显示的是音轨和总线。如下图所示,您可以看到一个总线名叫“Master”,以及一条音轨名叫“MyTrack”。其中MyTrack音轨包括了一个区域,其所显示的一个音频文件被描绘成它的波形。更多关于音轨和总线的信息请参考创建一条音轨或总线Creating a Track or Bus章节。
编辑器混音栏
编辑器混音栏位于编辑窗口的左边。它显示的是当前选中的音轨或总线的混音栏Mixer Strip信息。它控制着音量、插件以及与音轨和总线相对应的路由。您可以切换显示或隐藏编辑器混音栏,只需点击菜单视图View > 显示编辑器混音栏Show Editor Mixer (快捷键 “Shift +E”)。混音栏的更多信息请参考使用混音栏Using the Mixer Strip章节。
(注:下图为选中音轨后的混音栏显示状态)

区域、音轨/总线、快照、群组、范围、标记
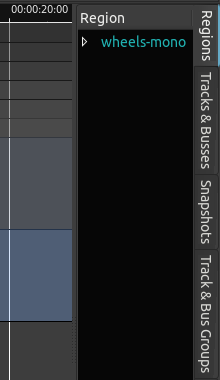
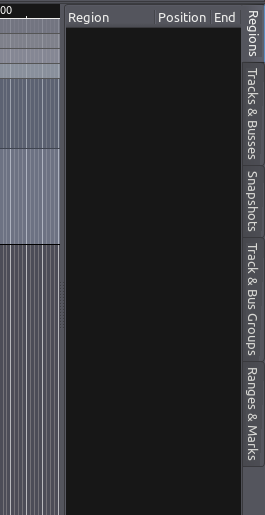
在Ardour的编辑器窗口的右边区域,根据所选中的标签页不同,可以有5个不同的功能:区域Regions、音轨/总线Tracks/Busses、快照Snapshots、音轨和总线群组Track & Bus Groups、以及范围和标记Ranges & Marks。默认是区域标签页被选中。因此编辑器窗口的这部分通常被称为区域列表Regions List。区域所代表的音频文件存储在银盘上,可以直接把它从区域列表里拖到主版面的音轨上。想了解更多区域的信息可参考区域常用操作Working With Regions章节。音轨标签页的功能请参考安排音轨Arranging Tracks章节,快照标签页的功能请参考保存一个快照Saving a Snapshots章节。
混音器窗口控件
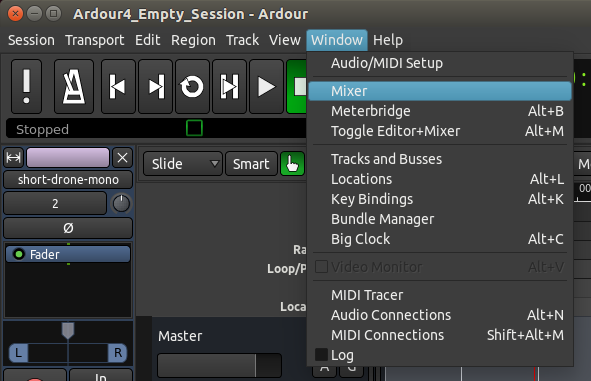
第二个窗口,Mixer Window 混音器窗口,点击主菜单的 Window 窗口 > Mixer 混音器 即可显示。
混音器窗口的主要功能是显示所有的混音栏,各个音轨并排显示,以便于参考。这个窗口主要应用于Mixing混音流程,它还提供了访问Plugins插件和其他Routing路由功能。若需要更的详细信息,请参阅理解路由、混音和使用插件章节。
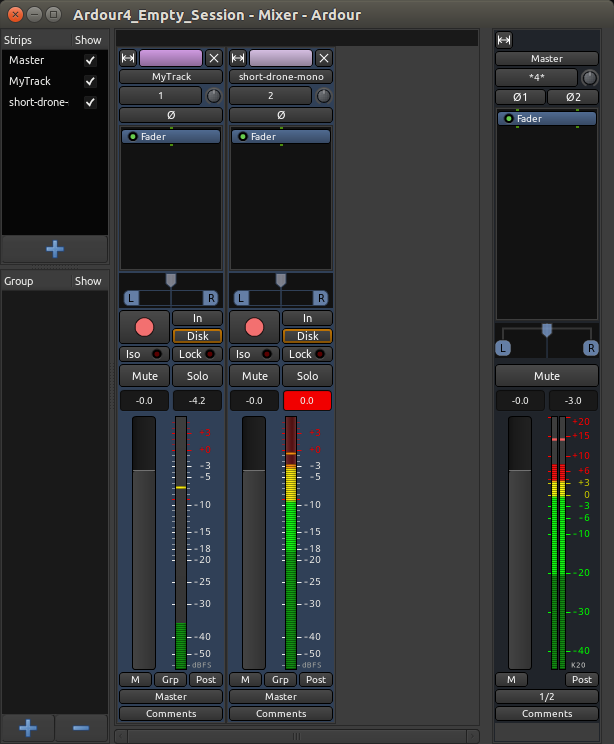
这个窗口的左上角还包含有一个可见混音栏清单。这部分的复选框可以用来查看和隐藏不同音轨的混音栏。最后,还有一个区域来管理Groups群组。
切换窗口
您可以使用组合键 Alt + M(苹果Mac系统 Control + M)来切换窗口置顶:编辑器或混合器。
分离和重新放置工具栏
编辑器窗口的大部分工具栏是可以从编辑器窗口脱离开来,只需点击右上角白色向下的小箭头即可。
分离出来的工具栏在屏幕上将成为一个单独的窗口,而如果要重新放会编辑器窗口的原处,只需点击右上角白色向上的小箭头即可。
设置时间线
因为不同的用户使用Ardour处理不同的工作,所在应用程序中,时间的衡量方式应当是可以变更的。
用户创建音频播放、纪录片、新闻报道或者环境音效可能希望使用Minutes分钟和Seconds秒,又例如,录制乐队或出品电子音乐将最有可能使用Bars小节和Beats拍子。视频出品则希望以一个视频帧每秒的Timecode时间码来操作,而那些希望极致精度的甚至可能希望使用Samples采样。所有这些方式都可以在Ardour中显示和使用,以此作为一种手段来组织您的区域和编辑。
主计时器和次计时器
Editor Window编辑器窗口顶部附近有两个计时器,以数字格式显示时间的格式:时间码,小节:拍子,分:秒和采样。右键点击这两个时钟的任意一个即可以更改它的格式。
这些被称为播送计时器。左边是播送计时器,右边是次播送计时器。有两个播送计时器的优点是您能够以在两个不同的时间单位看到指针的位置,而无需改变任何设置。
在这两个计时器的右边,您还可以看到一组5个计时器,用于显示当前已选择的范围和切换范围。关于时钟显示更多的信息请参阅Ardour手册。
吸附模式
Snap Mode吸附模式工具栏位于计时器下方靠右的地方。它们控制Quantization量化时间网格的方式,即:“吸附”一个音频Region区域到您所选择的网格类型。
当选中了No Grid无网格,可以在音轨内自由移动区域。当选中了Grid网格,区域将会“吸附”到最近的Grid Point.网格点。当选中了Magnetic磁性吸附,可以自由移动区域,但当它们被移动到非常接近一个网格点时,将会“吸附”到网格点。
中间的Units单位菜单用于选择以什么来作为网格点,例如拍子、小节、标记、分钟、秒、各种SMPTE时间码,或者或区域的边缘。
时间线
Timeline时间线位于吸附模式工具栏下方,主版面的正上方。通过在时间线上右键单击,您可以设置复选框,勾选希望显示的不同类型的时间信息。
分/秒
要在时间线上查看分和秒,右键点击时间线,然后选择Min分:Sec秒。您将能够以秒或者分来设置网格。
小节/拍子
要在时间线上查看小节和拍子,右键点击时间线,然后选择Bars小节 & Beats拍子。您将能够以小节\拍子或者多拍的简写,例如3、4、8、16或32。
不但可以为整个Ardour回话设置一个Meter节拍和Tempo节奏,还可以在同一个会话中的不同地方改变它们。有关这方面的更多信息,请参阅Setting Up the Meter设置节拍章节。
时间码
要想以SMPTE视频时间码进行工作,首先您需要设置Timecode时间码fps(帧每秒)。可以在会话属性窗口(菜单栏 Session会话 > Properties属性,或者快捷键 Alt + O)找到时间码标签页。
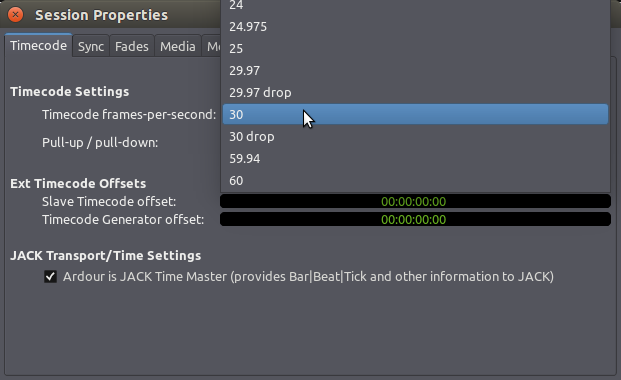
一旦您完成设置,请在时间线上右键点击,勾选Timecode时间码复选框,以确保您的时间码尺可见。你将能够以SMPTE Frames帧、SMPTE Seconds秒和SMPTE Minutes分设置网格。
创建一个音轨或一条总线
什么是音频轨道?
一个Audio Track音频轨道就是一个您可以从您的Region List区域列表拖动一个Region区域的地方,您还可以录制来自外部声源的声音。
一个区域代表一个音频剪辑片段。例如,您的声音文件或者声音文件的某一部分。在下图中,被标记为“Audio 1” 和 “Audio 2”的水平条状区域就是音轨。在音轨Audio 1 内包含有音频信息(命名为“某某声音”)的矩形被成为一个区域。
What is a Bus?
A Bus is similar to a track except that it does not contain its own regions. You cannot record directly into a bus or drag regions into it. In the image above, the area marked “master” is a Bus. Usually every session has a Master Bus. All the audio to be Exported from your Session will be sent to the Master Bus.
How are Tracks and Busses Used?
Audio-processing Plugins and Automation can be applied to both Tracks and Busses.
Audio tracks can be routed to Busses. In fact, many Tracks can be simultaneously routed to one Bus. Busses are traditionally used as a convenient way to apply any kind of signal processing to many Tracks at once. For instance, you might find it useful to route all Tracks that contain drum sounds to a single Bus that you would call ‘drum bus’. Then, if you decide that all your drum Tracks are too loud, you can quickly adjust the level of the ‘drum bus’ rather than adjusting each separate Track that feeds into it.
Another use of a Bus would be to have a common Reverberation Plugin, so that any audio Track which requires the Reverb effect could be routed to a single Bus.
Adding Tracks and Busses
Right-Click in the empty area beneath any existing Tracks and Busses. Alternatively, click on the menu Track > Add Track/Bus (shortcut “Ctrl” + “Shift” + “N”). The following window will appear:
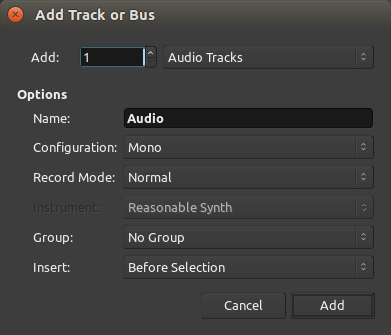
Add lets you specify how many Tracks (or Busses) you would to like to create.
Choose Audio Tracks or Busses to specify whether you want to create Tracks or Busses. You can also choose to create a MIDI Track or an Audio+MIDI Track. Ardour offers three track types depending on the type of data they contain, and differentiates between three track modes, depending on their recording behaviour. This tutorial will only cover Audio Tracks and Busses (see the Ardour Manual for details on all track types)
You can optionally give a Name to the Track or Bus being created. The Configuration drop-down menu allows you to specify how many channels of audio you’d like the new Track or Bus to handle. For example, if you will be recording your voice on this track using a single microphone, choose Mono. If you plan to import a clip from an existing song and place it on this Track, choose Stereo. The choice made here will also affect which Plugins you can use on the track (Mono tracks cannot use Stereo Plugins and vice versa).
The menu Track Mode gives you a choice between Normal, Non Layered, and Tape. Normal Mode creates a new Region for each Recording Take, and is suggested for beginners. For information on the other modes, check the Ardour Manual. Additional information on the Instrument and Group options can be found on this other page of the Manual.
The Group option lets you add the new track to an existing Group, or create a new Group as you create the new track. If you are a beginner, you don’t have to worry about Groups just now. For future reference, you can find more info on groups on the Ardour Manual.
The last option (Insert) lets you choose where you want the new track or bus to be placed: first, last, before or after the selection.
Finally, click the Add button to create the Tracks or Busses you have just configured. You will see them appear as new rows in the Main Canvas.
导入音频
Sections of audio are known as Regions in Ardour. A Region can be an entire sound file or a portion of it. Here you will learn how to import audio files from the hard drive of your computer so they can be used in your Ardour session.
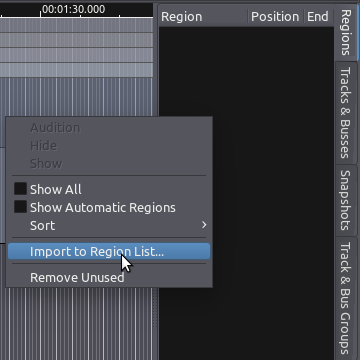
To import an audio file, first Right-Click on the Region List, located at the far right of the editor window. If you don’t see it, make sure “Show Editor List” is checked under the “View” menu. Once you see the Editor List, please note there are other tabs which change the function of this area. Before you Right-Click, make sure the Regions tab is selected.
Once you have Right-Clicked, a menu will appear with the option to Import to Region List. Click this option.
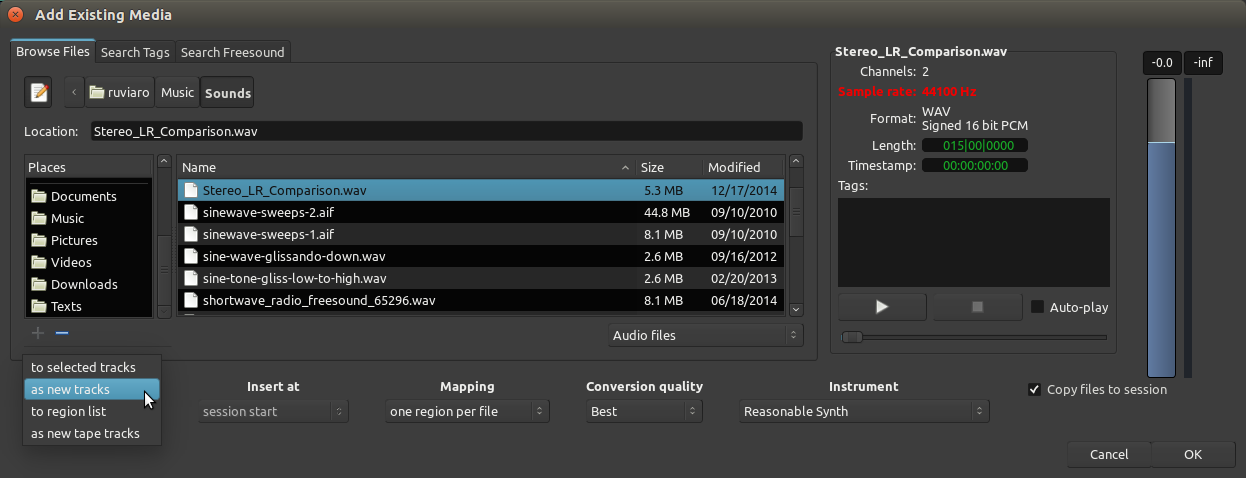
You will now see the Add existing media dialog (note: a shortcut to get to this window is “Ctrl” + “I”). On the left side of this dialog you will see a file browser which allows you to search your hard drive for appropriate sound files to add (preferably, start with a common file format, such as WAV or AIFF). At the lower left corner there is a menu which indicates how these files will be added. “Add files as new tracks” will import audio files and place them on a newly created track. “Add files to region list” will simply import audio files into the Region List, without creating any new tracks. Choose this option now, as we don’t want Ardour to create any tracks at this point.
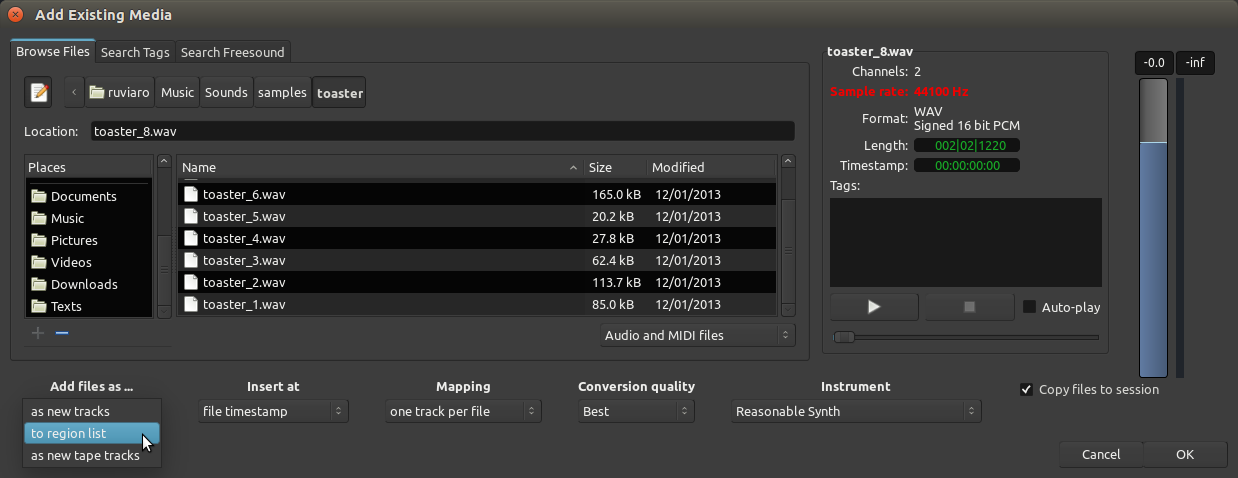
TIP: if you do not have any suitable audio files on your hard drive to follow these steps, click on the “Search Freesound” tab (or visit freesound.org), from where you can find a large collection of Public Domain and Creative Commons–licensed samples in a variety of Sample Rates and Formats.
On the right side of the Add existing media dialog you will see a section allowing you to inspect the properties of the file you selected. Here you will see the name, number of channels, sample rate, format and length of the sound file, along with any tags you have chosen to add to the file.
The Play button allows you to preview the file, using the Audition bus. Finally, this dialog gives you the option of copying the file(s) into the folder of the current session (Copy Files to Session). This is safer, but it uses more disk space. If you leave this option unchecked, Ardour will use the sound file from its current location on the hard drive. In this case, if the file is moved to a new location on the hard drive, you may run into trouble, because Ardour won’t be able to find it the next time you open this session. It is highly recommend that you leave this box checked (“Copy files to session”).
Click OK to proceed. The file(s) you have selected will appear listed in your Region List.
TIP: if the sample rate of the file you have chosen does not match the sample rate of the current session, Ardour colours the mismatched sample rate in red. If you try to import the file, Ardour will also warn you of the mismatched rate and ask you to confirm if you want to embed it anyway. If you do choose to embed the file in question, it will not play back at the sample rate it was recorded with, but rather at the sample rate of the current Ardour session. This will cause the sound to play at the wrong speed and pitch.
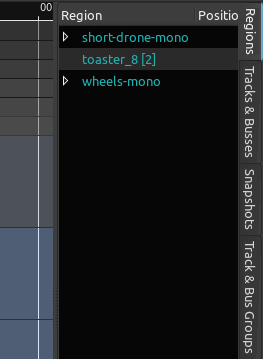
Once you have successfully embedded your audio file in the Region List, you will see it on the screen. In the screenshot below, three files were imported: “toaster_8”, “short-drone-mono”, and “wheels-mono”. The number [2] right after “toaster_8” indicates it is a stereo file.
By dragging and dropping the Region onto the Main Canvas, you can insert it in an existing track.
TIP: if you click in the middle of the word when the region name is highlighted in blue, Ardour thinks you are trying to rename the Region (the name will become editable). In order to click and drag a highlighted region from the list, you need to point and click right before or after the name.
Release the mouse-click to complete the drag-and-drop operation. The Region will be inserted at the exact time point where you dropped it.
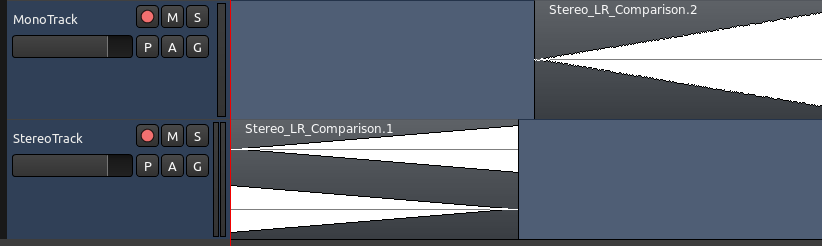
Important: always make sure you are placing Stereo Regions on Stereo Tracks. If you drag a Stereo file onto a Mono Audio Track, only the left channel will used. In the screenshot below, a stereo file with very distinct left and right channels was dragged onto a Stereo Track and a Mono Track. Notice that in the Mono Track only the left channel is displayed (and played back).
Importing Audio Directly to a Track
As mentioned earlier, the Add existing media dialogue also allows you to import audio files directly onto tracks.
Choose Add files: as new tracks in order to automatically create a new track and add the selected file to it. The track will be named after the sound file name.
If you have previously selected on or more tracks, the menu will display the additional option Add files: to selected tracks in order to add a sound file into the already existing selected track.
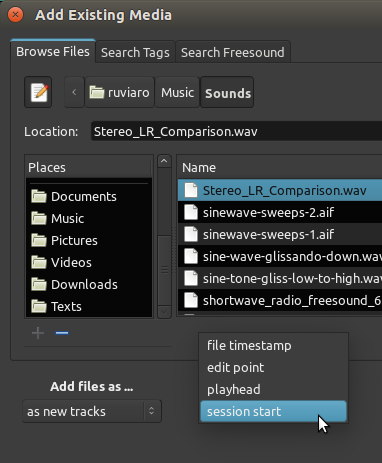
Choose Insert Point
When using either one of the options above (“add as new track” or “add to selected tracks”), you should also specify where in the track you want the new Region to be placed. In the screenshot below, we are choosing “session start”.
The Region appears in a new track in the session. The new track automatically receives the name of the imported sound file.
The sound file will also appear in the Region List so that it can be inserted into other tracks as well (drag and drop).
Remove Regions from Tracks
To remove a region from a track, one can select it with the mouse and use the Cut function from the menu, the Control (or Apple) key and the X key, the Delete key or the key combination of fn and Backspace (which is used, for example, on a laptop keyboard that does not have a proper Delete key).
TIP: Save your work often! The shortcut “Control” + “S” is your friend. Use it a lot, all the time.
录制音频
Besides Importing Audio, another way to create Regions in your Ardour session is to record new audio.
The source of this audio could be the line or microphone inputs of your audio interface, or it could even be sound originating from other applications on your computer which have been connected to Ardour via JACK. Please see the section on Routing for more details.
This section will show you how to record audio from an external source (for example, a microphone) onto a track in Ardour.
First, you should check that the proper inputs have been routed to the track you wish to record to.
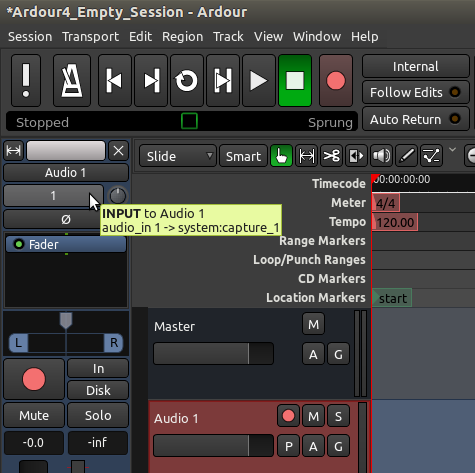
   Select the track by clicking on the empty space just below its name and volume slider.
   The Track becomes highlighted.
   The vertical strip Editor Mixer located on the left side of the Editor window should now show the Track you just selected (Audio 1 in the image above).
   Just below the Track name in the Editor Mixer you will find a button that allows you to edit the Routing.
   Click on that button to investigate the Routing.
TIP: If you don’t see the Editor Mixer strip, use the shortcut “Ctrl” + “E” to make it appear.
In the next image you can see that the only input of this Mono Track is receiving signal from system capture_1. This normally means the first microphone input of your soundcard.
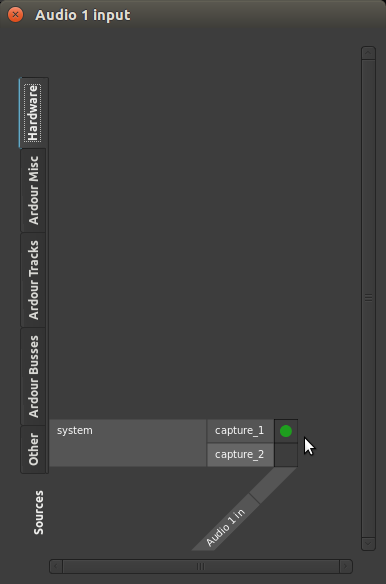
The tabs that you see displayed vertically on the left are available sources. “Audio 1 in” on the bottom right is the destination. The green dot represents a connection.
The Ardour tabs show the connections that can be made from other sources within Ardour. The Other tab displays audio connections available from software other than Ardour. The Hardware tab shows hardware connections (for example, the built-in microphone of your computer or the inputs from your sound card). In all cases, this Routing matrix communicates directly with JACK to change the Routing in the JACK system itself. This will be explained in more detail in the Understanding Routing chapter.
For the purpose of this chapter, simply make sure that system capture_1 (from Hardware tab) is connected to the Audio 1 track so that we can do a test recording. If you don’t see a green dot as in the screenshot above, click on the matrix to make the connection manually. You can now close this window.
Note: the example above assumes you are recording a Mono sound source onto a Mono Track. If you want to record in Stereo, the instructions are pretty much the same, but you should create a Stereo Track. You should then see two green dots, one for capture_1 and another for capture_2.
Arming the Track
“Arming the Track” is simply to get it ready for recording. Once you have checked that the proper capture inputs have been routed to the Track, you can arm the Track to record by clicking on the small red icon on the horizontal track strip (not the big one in the Transport controls).
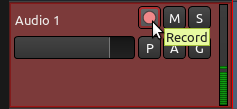
When properly armed, the small red icon will remain highlighted, and you will be able to see the incoming signal by looking at the Peak Meter on the Editor Mixer or on the horizontal Track strip.
Note: unless you have told Ardour to do otherwise, the input being recorded will be monitored (in other words, heard) via the Audition output. If you are not using headphones to monitor the recording process, you may get some loud feedback at this point!
Arm Ardour and Start Recording
Now that you have armed the Track to record, you must arm Ardour itself to record by clicking on the big red button in the Transport menu. The button will blink in red, indicating that Ardour is ready to record. To start recording, click on the Play button in the Transport menu, or press the space bar of your computer keyboard. Clicking the Play button again (or pressing the space bar) will stop recording.
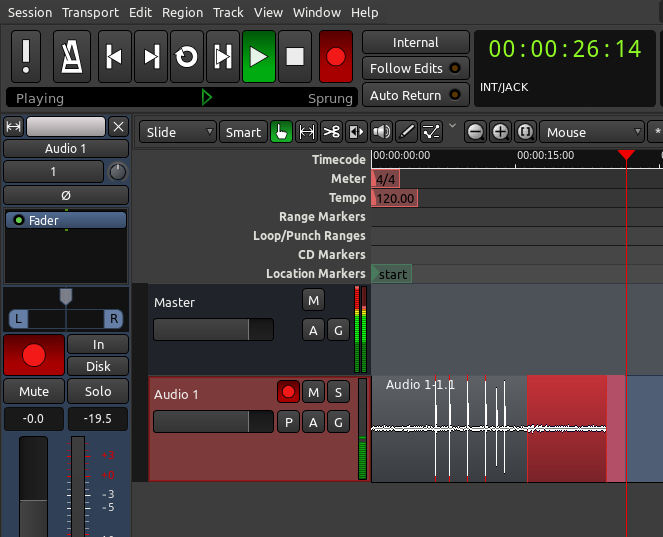
While recording, the armed Track will capture the sounds from the input. Any existing sound on other tracks will play normally during the recording. This allows you to play, sing or speak along with other Regions and Tracks you have already recorded or embedded in your Session.
While recording, you will be able to see the Levels (the amplitude in Decibels) of the incoming sound, as well as see the Peaks of the Waveform appearing as it is recorded.
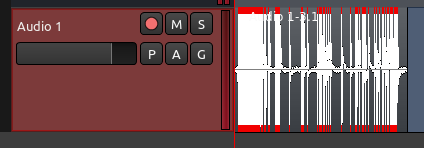
Avoid Clipping
The audio in the screenshot below was recorded too loud and produced Clipping (in other words, the signal recorded was outside the bounds of what could be represented digitally), which results in a loss of information and audible distortion. The clipped peaks in the waveform are marked in red.
The best and easiest way to avoid Clipping is have some control over the volume of the incoming audio signal before it gets to the sound card. For example, you can can move the microphone further away from the sound being recorded or use a mixer to reduce the volume of the incoming signal.
When the audio signal has been recorded within proper limits, you should see no red Peaks, and the level meter should show a negative number as maximum peak (for example, a maximum peak of around −3.0 Decibels allows for a comfortable distance from the Clipping Point.)
The range of decibels between the region’s maximum Peak and the Clipping Point is commonly referred to as Headroom. It is common recording practice to keep approximately three to six Decibels of Headroom between the maximum of your signal and the Clipping Point, with the Clipping Point itself being represented as 0dB (zero Decibels). In other words, an audio region with a comfortable amount of Headroom would have its maximum Peaks between −6dB and −3dB.
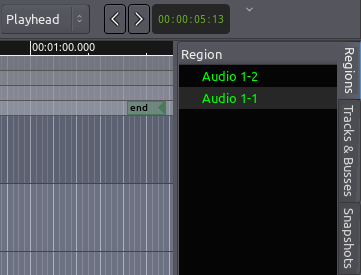
Region List
Recorded audio appears as a new Region in the recording Track. Like all Regions, this newly recorded one will be available in the Region List, from where you can drag-and-drop it into other Tracks if needed.
The Region you just recorded will automatically receive the name of the Track where it was recorded, with different takes being automatically numbered. In the screenshot below, “Audio 1-1” and “Audio 1-2” represent two different recordings made on a track named “Audio 1”.
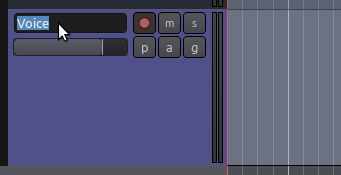
You might want to plan ahead and organize your recording Session by giving appropriate names to different tracks. For example, a Track used only for recording vocals can be named “Voice”. This way, recorded sound files will be named accordingly, and different takes will appear in the Regions List identified as “Voice-1”, “Voice-2”, etc, rather than the default generic names, such as “Audio 1”.
To rename a Track, just double-click on its name (before you arm the track to record) and type in the new name.
TIP: Did we mention how important it is to save your work often? Hit “Control” + “S” right now. Get in the habit of hitting “Control” + “S” every few minutes.
理解路由
Routing an audio signal is sending it from somewhere to somewhere else.
In addition to getting audio signals to and from Ardour, routing plays an important part inside Ardour itself. Examples of using routing inside Ardour include routing audio from Tracks to the Master Bus or to other Busses, creating ‘sends’, routing the outputs from Busses to the Master Bus, etc. (see chapter on Creating a Track for an explanation of Tracks and Busses). All routing, both internal and external to Ardour, is handled by JACK.
Routing in Ardour
The standard routing of inputs, tracks and busses in Ardour is determined when a new Session is created in the Advanced Options of the New Session dialog box (see Starting a Session chapter). By default, the routing is as follows:
   The audio device inputs are routed to the Track inputs.
   All outputs from Tracks and Busses are routed to the master bus inputs.
   The Master Bus outputs are routed to the audio device outputs.
Note that when a new Bus is created, nothing is routed to its input.
This routing setup makes sense for sessions containing only Tracks, but to make use of any Busses (other than the Master Bus) or to get creative with the paths of the audio signals inside Ardour, we need to be able to change the routing.
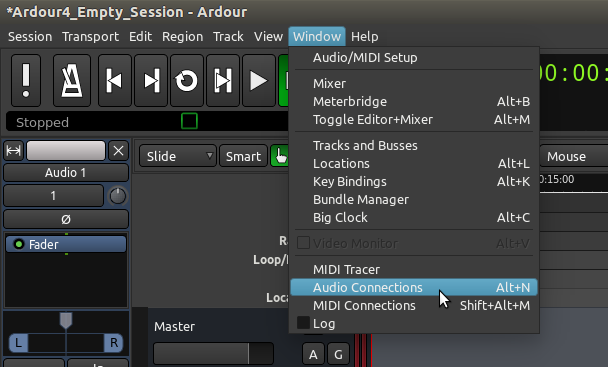
The Audio Connection Manager window (also known as the patchbay) is the main way to make connections to, from ,and within Ardour’s mixer. You can open this window with the shortcut “Alt” + “N”, or through the menu Window > Audio Connections.
The patchbay presents two groups of ports; one set of sources, and one of destinations. Sources and destinations are organized by tabs. The available sources are displayed vertically on the left side, and the destinations are displayed horizontally at the bottom.
In the screenshot below, notice that the “Hardware” tab is selected on the top left (that’s a source), and the “Ardour Tracks” is selected as a destination in the bottom. This means that the matrix you see displays connections from available hardware sound sources (for example, a microphone), into existing Ardour tracks.
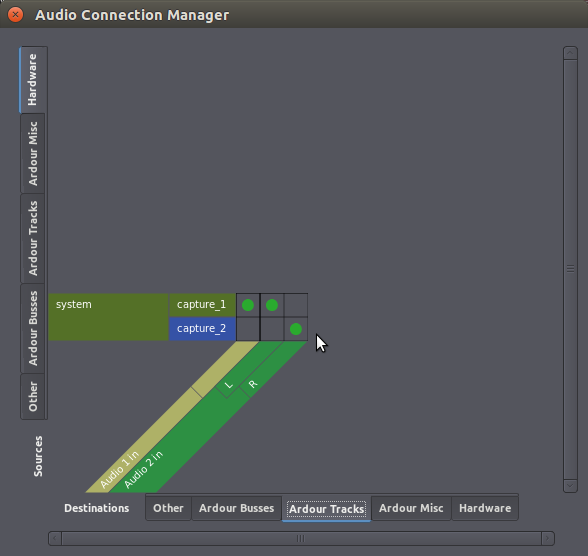
The green dots represent a connection. The screenshot above tells us that incoming sounds from “system: capture_1” (the first input source of your soundcard, or the built-in microphone of your laptop) are going into Ardour track named “Audio 1”, and also that incoming sounds from “system: capture_1” and “system: capture_2” are respectively going into the Left and Right inputs of Ardour track named “Audio 2.”
Notice we can see that “Audio 1” is a Mono track because it only has one connection slot, while track “Audio 2” is Stereo since it has two slots (Left and Right).
The next screenshot shows the signal path from Ardour Tracks (selected vertical tab) into Ardour Busses (selected horizontal tab). As mentioned earlier, the default setting for all Ardour Tracks is that their sound goes to the Master Bus.
Note: remember that “Audio 1” is a Mono track? We saw it in the earlier screenshot that “Audio 1” only has one input slot. But now on the screenshot above you see that “Audio 1” has two outputs (Left and Right). This is normal: we define whether a track is Mono or Stereo by its number of inputs, not outputs. Mono tracks will hold a single channel of audio, but you can still choose to place the sound on the left or the right speaker (or anywhere in between). More on this in the chapter Panning.
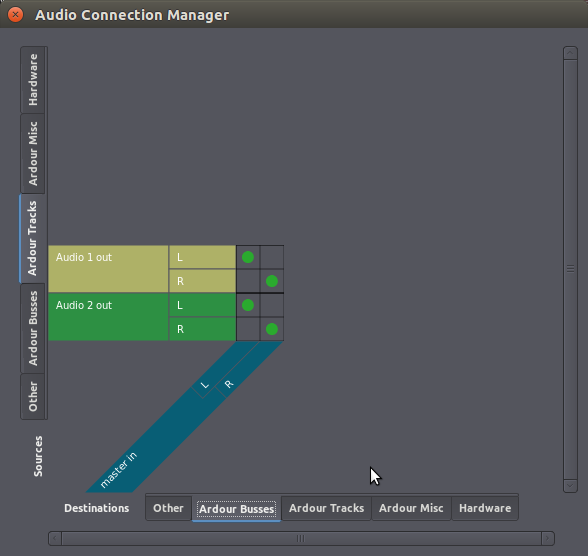
Finally, let’s explore a couple more tabs in the Audio Connection Manager to see the sound going from the Master Bus to the actual hardware outputs (your loudspeakers or headphones):

As you can see, the selected source tab is now “Ardour Busses”, and the destination tab is “Hardware”. This session happens to have only one bus, the default “master out”. The green dots show that all sounds coming out of the Master Bus are going to system playback 1 and 2, which are the outputs of your soundcard.
How to connect and disconnect?
To make a connection, click on the desired empty square in the matrix; a green dot will appear to indicate the connection is made.
To undo a connection, simply click on an existing green dot and it will disappear.
Practical example of routing to a bus
In the following example session, there are two guitar Tracks and one unused Bus called Guitar Bus, all Stereo.
Suppose you want to send the output from the two guitar Tracks to the Guitar Bus instead of the Master Bus. This can be useful to control the volume of both guitars with just one Fader (in this case the Guitar Bus fader). Then the output of the Guitar Bus, which is the sum of the two guitars, goes directly to the Master Bus.
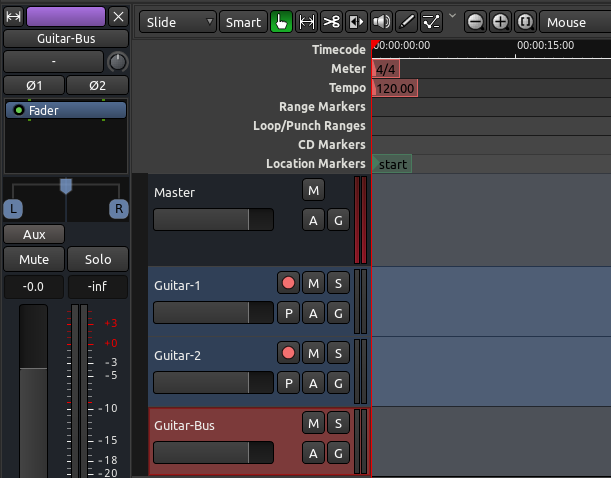
Here is how to edit the patchbay to get the desired routing. Select “Ardour Tracks” tab from Sources (vertical tabs), and “Ardour Busses” from destinations (horizontal bottom tabs). Undo existing connections from both Tracks to Master. Then create connections from both Tracks to Guitar Bus. The final result would look like this:

Now both guitar tracks are routed to the Guitar Bus, and no longer directly connected to the Master Bus. We then make sure that the Guitar Bus is, by its turn, routed to the Master Bus (the output routing of a Bus is edited in the same way as for a Track), so that we can still hear the sound from both guitar Tracks. Now we can control the volume of both guitar Tracks together by changing the Fader of the Guitar Bus. What’s more, we can now add Plugins to the Guitar Bus to process the sound of both guitar Tracks together.
Track- or Bus-specific views of the Patchbay
The Audio Connection Manager (Patchbay) that you open with “Alt” + “P” shows you the complete matrix of every single source and every single destination available in Ardour. Sometimes this is too much: you just want to quickly change the routing of a single track input or output, for example. Ardour allows you to access a relevant subset of Patchbay connections when you click directly on the Inputs or Outputs button of a Track or Bus in the Mixer Strip.
The Inputs button is at the top, and the Outputs button is on the bottom of the strip. Clicking on either one will show you a menu of connection options. In the screenshot below, for example, you would click on the “1/2” button right under the track name “Guitar-1” in order to access this menu:
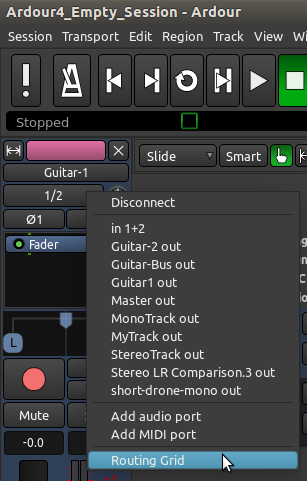
You may select a connection right there from the menu, or choose “Routing Grid” to see a simpler version of the Audio Connection Manager with only the Inputs or Outputs of the selected Track or Bus.
All Ardour connections are JACK connections
It is important to realize that any routings that you make or disconnect from within Ardour are in fact JACK routings, which you can see from other applications like Qjackctl, Catia, or JackPilot, depending on your Operational System. Below is an example of a Catia window (Linux only) displaying the same JACK connections discussed above:

程序间路由
Sometimes you may need to record the audio output of another program into Ardour (for example, the sound of a YouTube video playing in Firefox, or the output of SuperCollider or PureData). This chapter shows how to accomplish that.
The examples on this page were created on a computer running Ubuntu Linux. Beware that things may work differently if you are on another OS (in particular if you are using a Mac, in which case you will be using JackPilot). The general principles are always the same, though.
From your browser to Ardour
Web browsers (Firefox, Chromium, etc) are not JACK-aware applications. Luckily, systems such as KXStudio and UbuntuStudio come with a bridge application between regular system audio (like PulseAudio) and JACK. This tutorial assumes you are using a computer with this bridge already running and working.
The overall steps to record audio from YouTube (or any other sound coming from your browser) into Ardour are:
   Create a Stereo Track in Ardour
   Disconnect Hardware sources from Track inputs
   Connect PulseAudio Jack Sink to Track inputs
   Start recording into the Track
   Start playing the YouTube video
For this example, a new session was created with a new Stereo Track named “Firefox”:
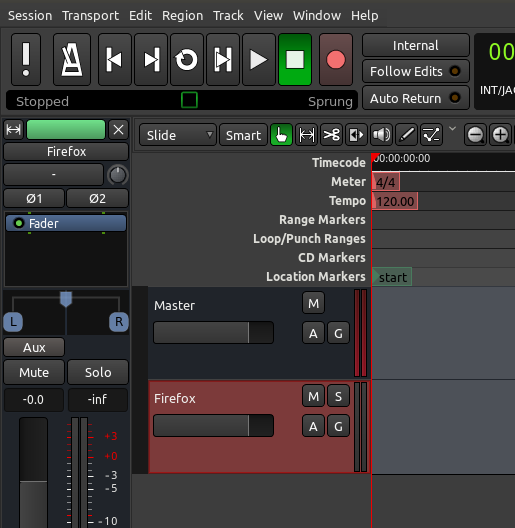
Then we select the Track and click on the Inputs button on the Editor Mixer strip. In the screenshot above, it’s the button just below the track name (“Firefox”) in the Editor Mixer strip (it shows only a “-“ (dash)in the example above, meaning that there are no connections made yet). We are presented with the Patchbay window specific to that Track’s inputs.
First thing to do is to disconnect any microphone inputs from that track (“system capture”), if any. After disconnecting, this part of matrix for the “Firefox” Track should look like this (no green dots):
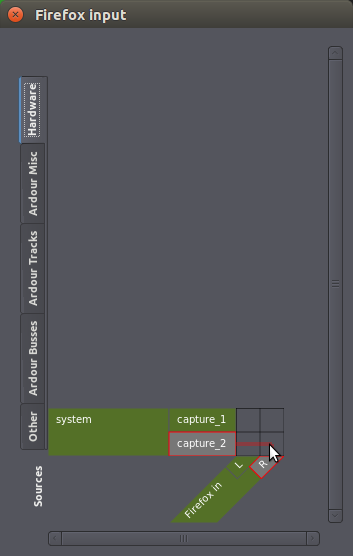
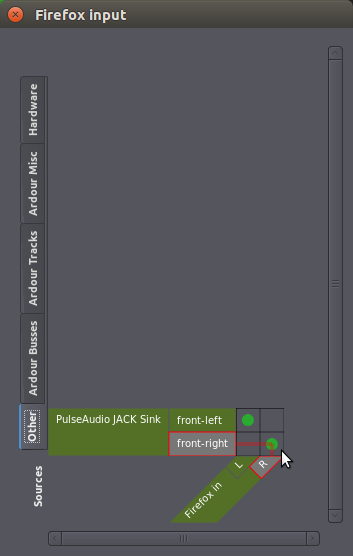
Next step is to change tabs in this same window. Choose “Other” as the source. This is where you will find other running applications that can be sound sources to Ardour. On a Linux computer with PulseAudio Jack bridge, you will see “PulseAudio JACK Sink” as a source. Click on the appropriate empty squares to create connections (green dots) between “front-left” and “front-right” to the Left and Right inputs of the “Firefox” Track. It should eventually look like this:
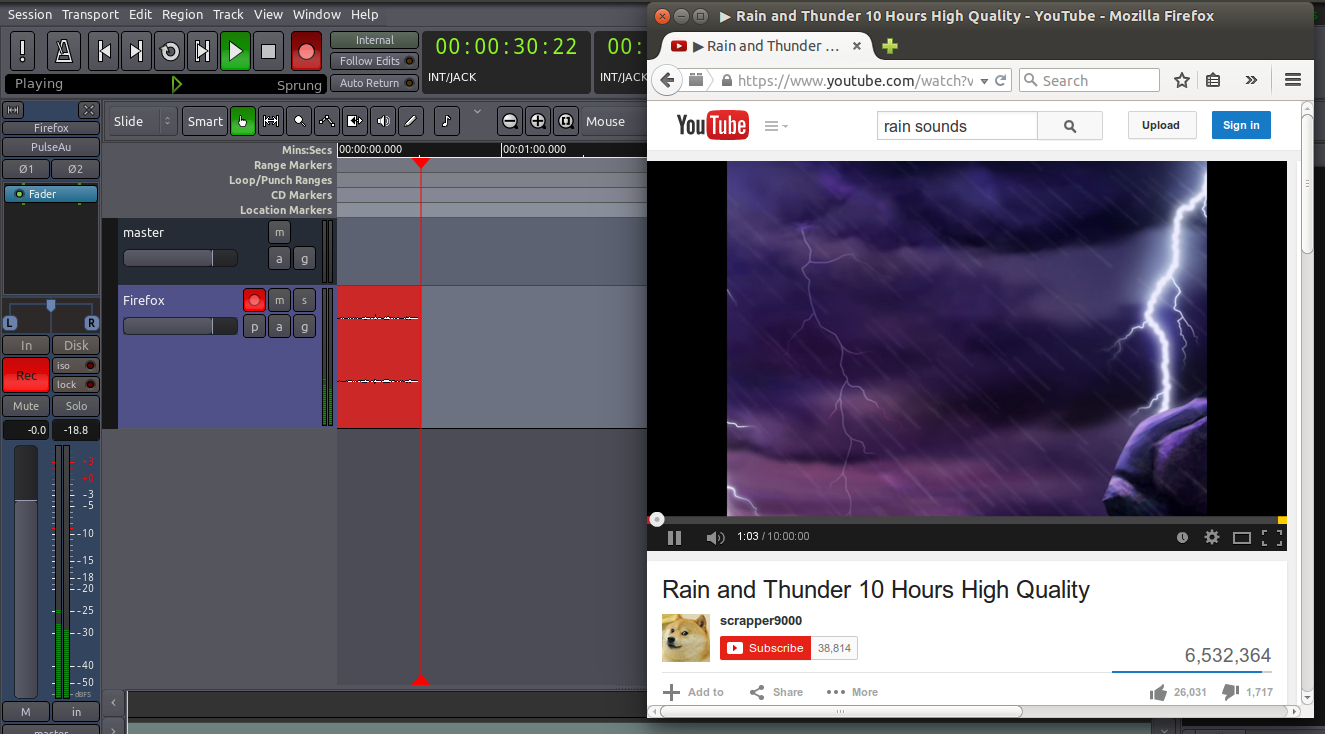
Now you are ready to go. Simply follow the same recording procedures explained in the Recording Audio chapter: record-enable (arm) the Track (small red circle on the track), arm Ardour to record (big red button; it starts blinking), then hit the Play button. Go back to your browser and start playing the YouTube video.
From JACK-aware applications to Ardour
Other music software like SuperCollider, Hydrogen, and PureData are JACK-aware. This means they will show up directly as source and destination options in Ardour’s Audio Connection Manager. You don’t need to worry about any PulseAudio / Jack bridge as in the YouTube example above.
The procedure is essentially the same: create a Mono or Stereo Track to record the audio, set that Track’s inputs to the desired source, and record as usual.
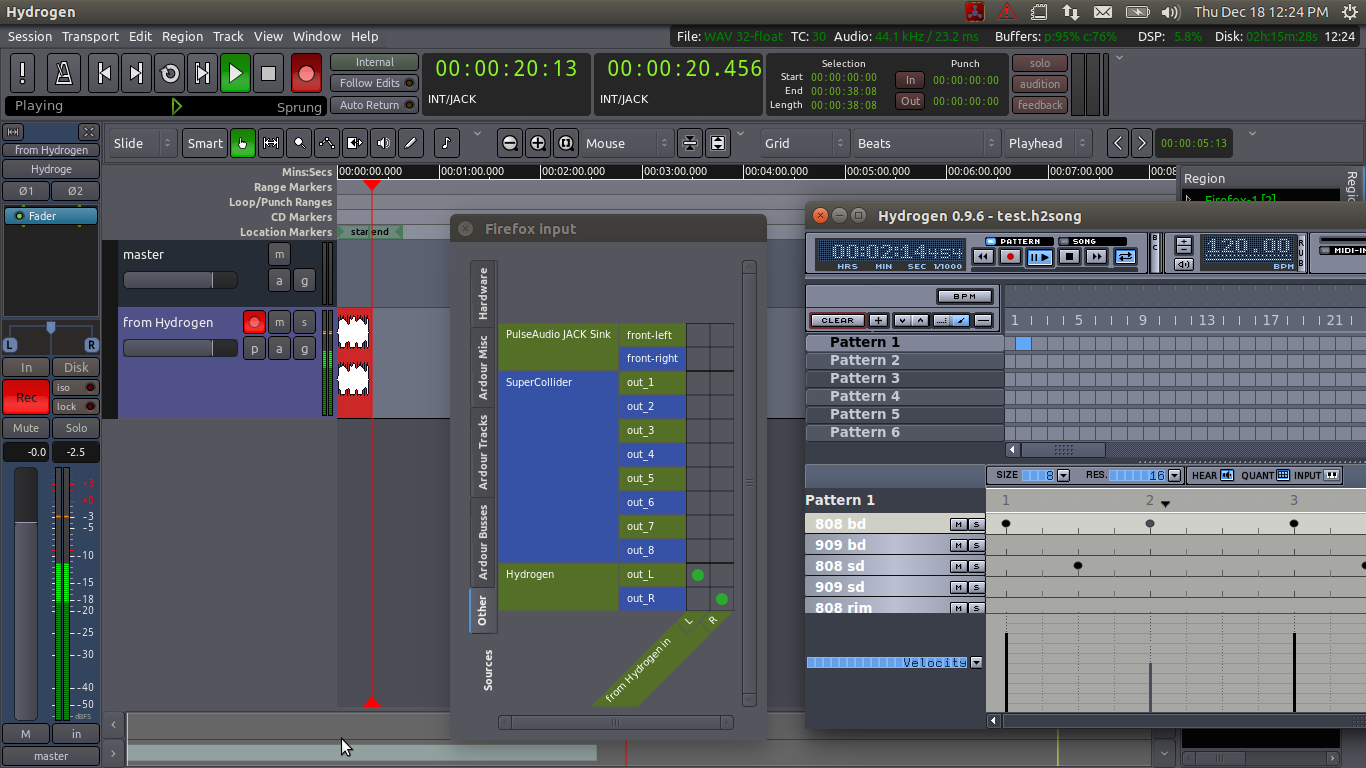
The screenshot above was taken while recording a drum pattern from Hydrogen directly into an Ardour track named “from Hydrogen”. Hydrogen’s window is on the right. Ardour’s Patchbay window was left open for demonstration: notice that the application “Hydrogen” shows up as a source under the “Other” tab. It is connected directly to the inputs of the track. Also notice that SuperCollider (another jack-aware application) happened to be open at the same time, though its window is not visible in this screenshot. SuperCollider provides 8 default sound outputs, all of which show up as potential sources in Ardour’s Patchbay.